Table of Contents
Advertisement
Read all instructions BEFORE assembly and USE of product.
Lire toutes les directives AVANT de monter
CONSERVER CES INSTRUCTIONS POUR UTILISATION FUTURE.
Read all instructions carefully before use
Il est recommandé de lire avec soin toutes
ces directives avant d'utiliser ce produit et de
les conserver pour éventuellement s'y référer.
KEEP INSRUCTIONS FOR FUTURE USE.
et d'UTILISER ce produit.
Playard User Guide
and keep them for future reference.
Mode d'emploi du parc
www.GBchildusa.com
lufta
Advertisement
Table of Contents

Related Manuals for GB LUFTA

Summary of Contents for GB LUFTA
- Page 1 KEEP INSRUCTIONS FOR FUTURE USE. Lire toutes les directives AVANT de monter et d’UTILISER ce produit. CONSERVER CES INSTRUCTIONS POUR UTILISATION FUTURE. lufta Playard User Guide Read all instructions carefully before use and keep them for future reference. Mode d’emploi du parc Il est recommandé...
-
Page 2: Table Of Contents
Index This product complies with the requirements of the Playpens Regulations (Canada). WARNINGS ..................4-5 PARTS LIST ..................9 SETTING UP PLAY YARD ............10-12 SETTING UP THE MATTRESS ..........13-16 PLACING MATTRESS INSIDE PLAY YARD ......17 FOLDING PLAY YARD..............18-19 FOLDING THE MATTRESS ............. - Page 3 Index Ce produit est conforme aux exigences du Règlement sur les parcs pour enfant (Canada). MISES EN GARDE ................6-8 LISTE DES PIÈCES ................9 MONTAGE DU PARC ..............10-12 MONTAGE DU MATELAS ............13-16 INSTALLATION DU MATELAS À L’INTÉRIEUR DU PARC .17 PLIAGE DU PARC ................
-
Page 4: Warnings
WARNING MISE EN GARDE Failure to follow these warnings and the instructions could result in serious injury or death. ADVERTENCIA PLEASE FOLLOW ALL STRINGS CAN CAUSE STRANGULATION! Never INSTRUCTIONS AND KEEP USER GUIDE FOR FUTURE place items with a string USE. -
Page 5: Warnings
SUFFOCATION or Check before assembly entanglement. Never use a and periodically during play yard sheet unless it is use. Contact GB at designed specifically for your 1-844-543-2020 for play yard and fits securely replacement parts. on all four corners of the Never substitute parts. -
Page 6: Mises En Garde
WARNING MISE EN GARDE ADVERTENCIA Ne pas se conformer à toutes ces mises en garde et direc- tives peut causer des blessures graves ou même la mort. PRIÈRE DE SUIVRE LORSQUE L’ENFANT EST TOUTES CES DIRECTIVES CAPABLE de se lever seul, ET DE CONSERVER CE retirer les coussins de MODE D’EMPLOI POUR... - Page 7 Bien vérifier avant de monter et régulièrement NE JAMAIS UTILISER de pendant l’usage. matelas d’eau avec ce Communiquer avec GB au produit. 1-844-543-2020 pour L’ENFANT PEUT SE obtenir des pièces de RETROUVER coincé et rechange. Ne pas substituer mourir lorsque des filets de pièces de rechange.
-
Page 8: Mises En Garde
ADVERTENCIA Ne pas se conformer à toutes ces mises en garde et direc- tives peut causer des blessures graves ou même la mort. GB NE RECOMMANDE PAS NE PAS modifier le produit de repeindre ce produit. ou ajouter d’accessoires qui Toutefois, s’il est nécessaire... -
Page 9: Parts List
Parts List Liste des pièces Please check that you have all the parts shown before assembling product. If you are missing any parts, please contact Customer Service at 1-844-543-2020. Tools required : Philips screwdriver Prière de s’assurer d’avoir toutes les pièces illustrées ci-dessous avant de procéder au montage de ce produit. -
Page 10: Montage Du Parc
Setting up the Play yard Montage du parc CLICK! CLICK! CLIC! CLIC! DO NOT push the center of the play yard down yet. The center of play yard MUST stay up in order to latch the side rails into the open position. Pull up the short side rails as shown. - Page 11 Setting up the Play yard (cont.) Montage du parc (suite...) CLICK! CLIC! CLICK! CLIC! Pull up the long side rails as shown until they click into position. CHECK TO MAKE SURE that all 4 top rails are locked into position before continuing.
-
Page 12: Setting Up Play Yard
Setting up Play yard (cont.) Montage du parc (suite...) Hold one end of the unit up and push CENTER of the play yard DOWN. Maintenir une extrémité du parc en haut et ABAISSER le CENTRE du parc. MAKE SURE the center of the play yard is completely FLAT. -
Page 13: Setting Up The Mattress
Setting up the Mattress Montage du matelas WARNING MISE EN GARDE To avoid serious injury or damage to product: ADVERTENCIA • NEVER use mattress without the tension bar installed. • NEVER use the mattress inside the playard when the toddler cot feet are installed. •... - Page 14 Setting up the Mattress (cont.) Montage du matelas (suite...) Red button Bouton rouge Red mount Support rouge CLICK! CLIC! Insert the tension bar with the red button into the side of the mattress tube with the red plastic mount so that it clicks into place. Insérer la barre de tension portant le bouton rouge dans le côté...
- Page 15 Setting up the Mattress (cont.) Montage du matelas (suite...) Insert the other side of the tension bar into the hole in frame so that it clicks into place. CLICK! CLIC! PULL ON the tension bar TO CHECK TO MAKE SURE that both sides of the tension bar are securely installed in the holes on either side of...
- Page 16 Setting up the Mattress (cont.) Montage du matelas (suite...) Straighten the tension bar and slide the cover over the threads of the tension bar. Redresser la barre de tension et glisser la housse par-des- sus le filetage de la barre de tension.
-
Page 17: Placing Mattress Inside Play Yard
Placing Mattress inside Play yard Installation du matelas à l’intérieur du parc Once mattress is set up. Place mattress inside the bottom of the playard. Une fois le matelas monté, le placer au fond du parc. MAKE SURE to put the four corners of the mattress into the holes in the bottom of the playard. -
Page 18: Folding Play Yard
Folding Play yard Pliage du parc To fold play yard, unfasten the 4 straps from the under- side of play yard and remove the mattress pad as shown. Pour replier le parc, détacher les 4 courroies à partir du dessous du parc et retirer le matelas, tel qu’illustré. - Page 19 Folding Play yard ( cont.) Pliage du parc (suite…) Squeeze the button on the underside of the top rail of the play yard as shown and lift top rail up to unlock. Repeat on the other 3 top rails. Comprimer le bouton situé sous une traverse supérieure du parc, tel qu’illustré, et soulever la traverse supérieure pour la...
-
Page 20: Folding The Mattress
Folding the Mattress Pliage du matelas Unscrew the tension bar to release the tension from the mattress. Dévisser la barre de tension afin de relâcher la tension du matelas. Separate the two pieces. Séparer les deux pièces. Rotate the tubes out. Faire pivoter les tubes vers l’extérieur. -
Page 21: Folding The Mattress
Folding the Mattress (cont.) Pliage du matelas (suite…) Push in the long sides of the mattress where the tension bar is attached. Pousser vers l’intérieur les côtés longs du matelas, où la barre de tension est fixée. Rotate the tension bar away from you then push the short sides of the mattress tubes in as shown. -
Page 22: Attaching Bassinet
IF A SHEET IS USED with the pad, use only the one provided by GB or one specifically designed to fit the dimension of the bassinet mattress. STRINGS CAN CAUSE STRANGULATION! Never place items with a string around a child’s neck such as hood... - Page 23 WARNING MISE EN GARDE Failure to follow these warnings and the instructions could result in serious injury or death. ADVERTENCIA The bassinet MUST be completely assembled, including the 8 clips tension bar and the mattress pad before using. Always follow the instructions in the owner’s manual to set up the playard and bassinet.
-
Page 24: Installation Du Couffin
à moins d’avis contraire d’un médecin. POUR UTILISER UN DRAP avec le matelas, n’utiliser que ceux fournis par GB ou un modèle spécialement conçu pour convenir aux dimensions du matelas du couffin. LES CORDONS PEUVENT CAUSER LA STRANGULATION! Ne jamais mettre d’objets munis d’un cordon autour du cou... - Page 25 WARNING MISE EN GARDE ADVERTENCIA Ne pas se conformer à toutes ces mises en garde et direc- tives peut causer des blessures graves ou même la mort. LORSQUE le couffin est utilisé pour le sommeil, toujours fournir la supervision nécessaire pour garantir la sécurité continue de l’enfant.
- Page 26 Attaching Bassinet (cont.) Installation du couffin (suite) Before installing, remove the mattress pad from the bottom of play yard, place bassinet inside the play yard and attach 8 clips to the top rail. CHECK to make sure all 8 clips are securely attached to the top rails.
- Page 27 Wrap bassinet over sides of playard. Entourer la bordure du parc avec le tissu du couffin. Place mattress pad inside bassinet. MAKE SURE all four corner posts are inserted into the holes in the corners of the playard. Déposer le matelas dans le couffin.
-
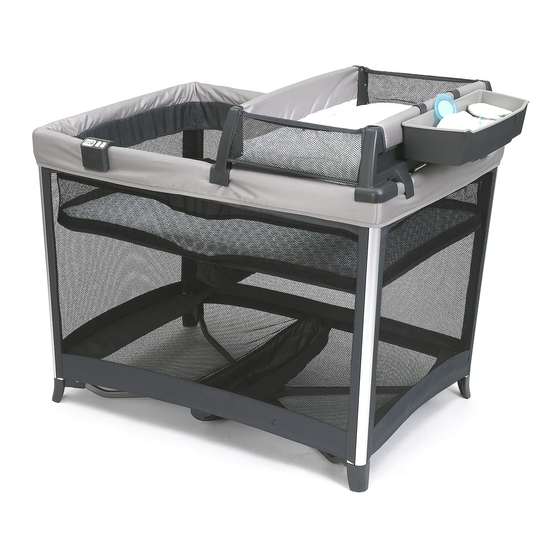
Page 28: Changing Table
Changing Table WARNING MISE EN GARDE Failure to follow these warnings and the instructions could result in serious injury or death. ADVERTENCIA FALL HAZARD − To prevent death or serious injury, always keep child within arm’s reach. • Never leave child unattended. •... - Page 29 Table à langer WARNING MISE EN GARDE ADVERTENCIA Ne pas se conformer à toutes ces mises en garde et direc- tives peut causer des blessures graves ou même la mort. DANGER DE CHUTE : Afin de prévenir les blessures graves ou mortelles, toujours garder l’enfant à...
- Page 30 Changing Table (cont.) Table à langer (suite...) NEVER use changing table NE JAMAIS utiliser la table à anywhere but fastened to the langer autrement qu’attachée play yard top rails exactly as aux traverses supérieures du shown in these instructions. parc, exactement de la manière illustrée dans ces directives.
- Page 31 TO REMOVE, pull the 4 plastic tabs of changing table away from the rails and lift unit off play yard frame. POUR RETIRER, tirer sur les 4 languettes de plastique de la table à langer pour les éloigner des traverses et soulever pour la détacher du cadre du parc.
-
Page 32: Parent Organizer
Parent Organizer Range-tout pour adultes WARNING Always keep objects out of child reach. Remove parent organizer when child is ADVERTENCIA able to pull himself up in the play yard. Weight limit is 7 lbs (3 kg) in WARNING each compartment. MISE EN GARDE Toujours garder les objets hors de portée de... -
Page 33: Sound Module
Sound Module Module sonore WARNING Always remove module from play WARNING yard when child can pull to a standing position. ADVERTENCIA MISE EN GARDE Toujours retirer le module du parc lorsque l’enfant est capable de ADVERTENCIA se mettre debout. Open door with Philips screwdriver and insert 3-AA (LR6-1.5V) batteries. - Page 34 Using the Module Utilisation du module TEMPERATURE - The display screen will show the temperature of the room all the time. When module is off or there is no music, module will show temp. To change from Fahrenheit to Celsius, press the + and - sign at the same time for 5 seconds.
- Page 35 SOUND button -The Module has 5 sounds: To turn the module ON. Press the SOUND button for 5 seconds. To turn the module OFF. Press the SOUND button for 5 seconds. 1 - Nature 3 - Lullaby 1 2 - Water 4 - Lullaby 2 5 - Lullaby 3 When music is on LCD light will be on.
-
Page 36: Battery Information
BATTERY INFORMATION WARNING MISE EN GARDE Failure to follow these warnings and the instructions could result in serious injury or death. ADVERTENCIA • Keep these instructions for future use. • DO NOT mix old and new batteries. • DO NOT mix alkaline, standard (carbon zinc), or rechargeable (nickel cadmium) batteries. -
Page 37: Renseignements Sur Les Piles
RENSEIGNEMENTS SUR LES PILES WARNING MISE EN GARDE ADVERTENCIA Ne pas se conformer à toutes ces mises en garde et direc- tives peut causer des blessures graves ou même la mort. • Conserver ce mode d’emploi pour consultation future. • NE PAS utiliser conjointement des piles usagées et des piles neuves. -
Page 38: Fcc Information
FCC INFORMATION This device complies with part 15 of the FCC Rules. Operation is subject to the following two conditions (1) this device may not cause harmful interference, and (2) this device must accept any interference received, including interference that may cause undesired operation. -
Page 39: Renseignements De La Fcc
RENSEIGNEMENTS DE LA FCC Cet appareil est conforme aux normes du chapitre 15 du règle- ment de la FCC. Le fonctionnement est soumis aux deux con- ditions suivantes : (1) cet appareil ne risque pas de causer des interférences nuisibles et (2) cet appareil doit accepter toutes les interférences reçues, incluant les interférences qui peuvent causer un fonctionnement inadéquat. -
Page 40: Toddler Cot
Toddler Cot Couchette pour bambin WARNING MISE EN GARDE To avoid serious injury or damage to product: ADVERTENCIA • NEVER use mattress without the tension bar installed. • NEVER use the mattress inside the playard when the toddler cot feet are installed. •... - Page 41 Toddler cot is intended to be used for a child up to 30lbs (14kg). La couchette pour bambin est destinée aux enfants jusqu’à 14 kg (30 lb). Insert the four toddler corner feet into the holes until they click into place as shown. The tabs should face towards Languette the inside of the mattress.
-
Page 42: Toddler Cot
Toddler Cot (cont.) Couchette pour bambin (suite...) Turn cot over and place on hard, level surface. Toddler cot is ready to use. Retourner la couchette et la poser sur une surface dure et de niveau. La couchette pour bambin est prête à utiliser. -
Page 43: Accessory Sheet
Accessory Sheet Drap accessoire WARNING Prevent possible strangulation or entanglement. NEVER use playard WARNING ADVERTENCIA sheet unless it fits securely on playard mattress. MISE EN GARDE Afin de prévenir les ris- ques de strangulation ou ADVERTENCIA d’enchevêtrement : NE JAMAIS utiliser un drap de parc à moins qu’il ne s’ajuste étroitement, de façon sécuritaire, sur le matelas. -
Page 44: To Store Play Yard
To Store Play Yard Rangement du parc Place unit and all parts inside the carry bag and fasten zipper. Placer le parc et toutes les pièces à l’intérieur du sac de transport et fermer la glissière. -
Page 45: Notes
Notes... -
Page 46: Care And Cleaning
Care and Cleaning FOR WASHING INSTRUCTIONS, REFER TO YOUR CARE TAG NEVER BLEACH. your play yard. TO CLEAN PLAY YARD, use household soap and warm water. NEVER USE BLEACH. TO CLEAN CARRY BAG, machine wash in cold water on delicate NO BLEACH. -
Page 47: Entretien Et Nettoyage
Entretien et nettoyage POUR NETTOYER LE PARC, CONSULTER LES DIRECTIVES SUR L’ÉTIQUETTE D’ENTRETIEN du parc. NE JAMAIS utiliser de JAVELLISANT. POUR NETTOYER LE PARC, utiliser un savon ménager et de l’eau tiède. NE JAMAIS UTILISER DE JAVELLISANT. POUR NETTOYER LE SAC DE TRANSPORT, laver à la machine à l’eau froide au cycle délicat;... -
Page 48: Replacement Parts And Warranty Information
Replacement Parts and Warranty Information Pièces de rechange et renseignements sur la garantie For customer service, warranty information or replacement parts, please call us at 1-844-543-2020 or visit us online at www.GBchildusa.com Pour communiquer avec le service à la clientèle ou encore obtenir des renseignements sur la garantie ou des pièces, composer le 1-844-543-2020 ou consulter notre site Web au...