Table of Contents
Advertisement
Available languages
Available languages
Advertisement
Chapters
Table of Contents

Related Manuals for Primos 63063M


Summary of Contents for Primos 63063M
- Page 1 Instruction Manual Model #: 63063M 3-16...
- Page 2 TABLE OF CONTENTS PAGE # ENGLISH 3-22 FrANçAIS 23-42 ESPAñOL 43-62 DEuTSCH 63-82 ITALIANO 83-102...
-
Page 3: English
- DO NOT OPEN CASE HOUSING. UNINSULATED, ‘DANGEROUS VOLTAGE’ WITHIN PRODUCTS ENCLOSURE. DO NOT REMOVE HOUSING COVER. THERE ARE NO USER - SERVICEABLE PARTS INSIDE, REFER SERVICING TO PRIMOS® CUSTOMER SERVICE. • Only use batteries as specified in this user manual and install according to correct polarization. - Page 4 Feel free to contact Primos® Customer Service Team with any comments, questions, problems or return requests. In Europe, call + 33 1 41 44 94 80 or e-mail contact@bushnell.eu In the United States, contact Primos Customer Service via phone: (601) 879-9323 or email: service@ primos.com...
-
Page 5: Table Of Contents
Page Index Introduction Parts & Controls Guide Battery and SD Card Installation Date & Time Imprint Feature 11-13 Power On Set Up 14-15 Viewing the Photos Glossary Technical Specifications Troubleshooting/FAQ 18-20 Warranty... -
Page 6: Important Note
Congratulations on your purchase of one of the best Game Cameras on the market! Primos is very proud of this camera and we are sure you will be pleased with yours as well. We appreciate your business and want to earn your trust. -
Page 7: Introduction
INTRODUCTION Congratulations on your purchase of a Primos BULLET PROOF 2 Game Camera. This camera, with its weatherproof, rugged construction, is designed to record animal activity in the outdoors. Your BULLET PROOF 2 Game Camera features a compact, portable size and an extra long battery life. -
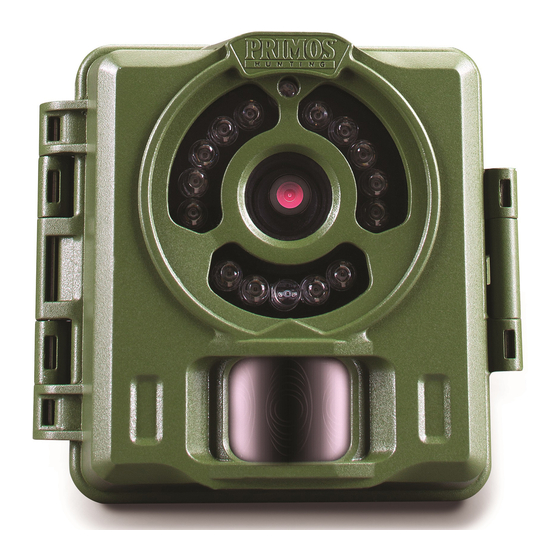
Page 8: Parts & Controls Guide
Parts and Controls Guide PIR/Battery Indicator LED Light Infrared LED Array Camera Lens Latch Light Sensor PIR Motion Sensor Front of Camera PIR/Battery Indicator LED: • Lights when PIR sensor is triggered during first 10 sec after power on. • Lights when capturing photo or video during first 3 minutes after power on. -
Page 9: Parts & Controls Guide
Parts and Controls Guide Operating Status Indicator LED Light Interior View (Unlatched) Battery Compartment (note orientation for correct polarity) Side View Power/Mode Switch SD Card Slot Operating Status Indicator LED: • Lights when Timetool software has finished saving to SD card (see pg. 11). •... -
Page 10: Battery Installation
BATTERY INSTALLATION To maximize battery life, you should install a set of 4 AA lithium (for longest life) or alkaline batteries. NOTE: Always set the power switch to the OFF position when installing or removing batteries. Please make sure the batteries are inserted correctly, as indicated inside the battery compartment. -
Page 11: Date & Time Imprint Feature
SD card, as described below. If no text file with date/time is found on the card when the camera is turned on, only “Primos” will be imprinted on the photos. -
Page 12: Date & Time Imprint Feature
computer’s clock. If this is not the correct date and time, click “Edit” and make changes as needed. Click the “... ” button above Cancel and select the SD card location (drive letter). Or, if you know the drive letter for the SD card (e.g. “D:\”), change the “A”... -
Page 13: Power On
Eject the SD card (right click, select “Eject (name of card)_”, and wait for the card icon to disappear from your Mac desktop). Make sure the Primos cam’s power switch is off. Insert the SD card into the camera’s card slot, then switch on the camera. Test the date imprint by waving a hand in front of the camera a few times during a minute or two. -
Page 14: Set Up"
DO NOT switch off the camera while this is on, or the video file may become damaged and unplayable. To capture photos/videos of activity in the area you choose to locate your Primos BULLET PROOF 2 Game Camera, follow the steps listed next in “SET UP”: SET UP 1. -
Page 15: Viewing The Photos
3. Test the Coverage Area One of the BULLET PROOF 2 Game Camera’s most useful features is the ability to test the coverage area. • After mounting the camera, open the front housing and slide the Power switch to the “PIC” position. •... -
Page 16: Glossary
3. The SD card or card reader should appear on your desktop or list of connected “drives”. Double click it to view or download the photo files (.jpg) and/or video files (.avi) on the SD card. Note: while it may be possible to view the files on many digital cameras, it is not recommended. -
Page 17: Technical Specifications
TECHNICAL SPECIFICATIONS Model Number 63063M Image Sensor Type 1/2.7 Inch CMOS Sensor Resolution 2 million pixels Effective Focal Length 7.6 mm Lens Aperture f/2.5 IR Filter Automatic IR Filter PIR Sensor Trigger Speed <1.0 second Number of IR LED 14 LEDs... -
Page 18: Troubleshooting/Faq
Make sure that you are using a good quality name brand SD card in your camera. Primos recommends SanDisk® brand SD Cards up to 32GB. Our experience indicates that poor quality SD cards can sometimes reduce your BULLET PROOF 2 Game Camera’s battery life. - Page 19 If this is seen on a consistent basis, then the sensor may need servicing. Please contact Primos customer service. 6. Video file won’t play a. If the camera was powered off during a video recording (green...
-
Page 20: Setup
Troubleshooting / FAQ Photos Do Not Capture Subject of Interest Try to set your camera up in an area where there is not a heat source in the camera’s line of sight. In some cases, setting the camera near water will make the camera take images with no subject in them. -
Page 21: Warranty
TWO YEAR LIMITED WARRANTY Your Primos® electronic product is warranted to be free of defects in materials and workmanship for two years after the date of purchase. In the event of a defect under this warranty, we will, at our option, repair or replace the product, provided that you return the product postage prepaid. -
Page 22: Fcc Compliance Statement
· Consult the dealer or an experienced radio/TV technician for help. The device does not contain any user-serviceable parts. Repairs should only be made by an Authorized Primos repair center. Unauthorized repairs or modifications could result in permanent damage to the equipment, and will void your warranty and your authority to operate this device under Part 15 regulations. -
Page 23: Français
COMPOSANTS QUALIFIÉS « TENSION DANGEREUSE » NON ISOLÉS. NE RETIREZ PAS LE CAPOT DU BOÎTIER. AUCUN DES COMPOSANTS INTÉRIEURS NE PEUT ÊTRE ENTRETENU PAR L’UTILISATEUR. POUR TOUT ENTRETIEN, VEUILLEZ VOUS RÉFÉRER AU SERVICE CLIENTS DE PRIMOS®. • Utilisez uniquement les piles comme indiqué dans le présent manuel et respectez la polarité. - Page 24 • Ne pas exposer à des chaleurs extrêmes. Ne pas laisser l’appareil ou les piles exposés à la lumière directe du soleil à l’intérieur d’un véhicule ou de tout autre espace confiné durant une longue période. • Utilisez les accessoires uniquement comme cela est recommandé dans le présent manuel ATTENTION ENTRETIEN ET PRÉCAUTIONS •...
-
Page 25: Fiche Technique
QUESTIONS ? Merci de prendre contact avec le service clients de Primos® pour tout commentaire ou problème et toute question ou demande de retour. Appelez au + 33 1 41 44 94 80 (EU) ou +1 (601) 879 9323 (USA) ou écrivez un courriel à contact@bushnell-europe.com (EU) ou service@primos.com (USA). -
Page 26: Informations Importantes
Veuillez consulter les informations ci-dessous et les instructions de ce manuel pour garantir une utilisation optimale de ce produit. Si votre piège-photographique Primos BULLET PROOF 2 ne semble pas fonctionner correctement, ou si vous avez des problèmes de qualité avec les photos/vidéos, veuillez consulter la section Dépannage/FAQ aux... -
Page 27: Introduction
INTRODUCTION Félicitations ! Vous venez d’acquérir une piège-photographique haut de gamme Primos BULLET PROOF 2. Cet appareil, avec son design robuste résistant aux intempéries, est conçu pour filmer les mouvements des animaux dans la nature. De taille compacte et facile à transporter, la caméra BULLET PROOF 2 possède également une très longue durée... -
Page 28: Guide Des Différents Composants Et Commandes
Guide des différents composants et commandes LED du Capteur / de l’indicateur de piles Faisceau infrarouge à LED Objectif Verrou Détecteur de lumière Détecteur infrarouge passif (PIR) de mouvement Face avant de la caméra LED du Capteur / de l’indicateur de piles : •... - Page 29 Guide des différents composants et commandes LED de l’état de fonctionnement Vue de l’intérieur (ouvert) Compartiment des piles (notez bien l’orientation pour une polarité correcte) Commutateur Marche / Configuration Side View Emplacement de carte SD LED de l’état de fonctionnement : •...
-
Page 30: Installation Des Piles Et De La Carte Sd
INSTALLATION DES PILES Pour une autonomie maximale, il est conseillé d’installer 4 piles AA lithium (la plus longue durée de vie) ou alcalines. REMARQUE : Le bouton d’alimentation doit toujours être en position OFF lorsque vous insérez ou retirez les piles. Assurez-vous que les piles sont correctement insérées, tel qu’indiqué... -
Page 31: Horodatage
SD, comme indiqué ci-après. Si aucun fichier texte comportant les données de date et heure n’est trouvé sur la carte lors de la mise en route de l’appareil, les photos comporteront uniquement la mention « Primos ». Configuration requise : •... - Page 32 connecté par USB. Affichez le contenu de la carte SD -effectuez un double clic pour ouvrir le fichier « timetool.exe ». Remarque : Si la fenêtre Timetool ne s’affiche pas après avoir inséré la carte, allez dans le menu Démarrer, puis Ordinateur, et effectuez un double clic sur «...
- Page 33 », et attendez que l’icône de la carte disparaisse du bureau de votre Mac). Assurez-vous que le bouton d’alimentation de la caméra Primos est en position « Off ». Insérez la carte SD dans le lecteur de carte...
- Page 34 (Film) si vous souhaitez enregistrer de la vidéo. Les LED du capteur et des indicateurs de piles et d’état de fonctionnement (LED sous le logo Primos) vous avertissent en cas de problèmes avec la carte SD ou les piles. • Si la LED de l’état de fonctionnement (p. 29) clignote, un problème de carte SD a été...
-
Page 35: Mise En Marche
INSTALLATION 1. Installation de la caméra Il est recommandé d’installer la caméra à une hauteur minimale comprise entre 90 cm et 1,20 m (3 ou 4 pieds). Il est préférable d’éviter d’orienter la caméra vers l’est ou l’ouest car le lever et le coucher du soleil pourraient la déclencher et produire des photos surexposées. - Page 36 zone de couverture. • Réglez la position de la caméra selon les besoins et faites des essais jusqu’à ce que la zone voulue soit couverte. • Au bout de trois minutes, l’indicateur du capteur ne s’allume pas même lorsque vous êtes dans la zone de couverture (afin d’éviter que l’appareil ne soit repéré...
-
Page 37: Glossaire
Remarque : Il est possible de visionner les fichiers sur la plupart des caméras numériques, mais cela n’est pas recommandé. Si vous insérez la carte SD dans une caméra numérique, nous vous recommandons d’effectuer un formatage de la carte au moyen d’un ordinateur avant de la réinsérer dans la piège-photographique. - Page 38 CARACTÉRISTIQUES TECHNIQUES Numéro de modèle 63063M Type de capteur photographique Type CMOS, 12,7 mm (½ pouce) Résolution du capteur 2 millions de pixels Distance focale effective 7,6 mm (3 pouces) Ouverture de diaphragme f/2,5 Filtre infrarouge Filtre infrarouge automatique Détecteur PIR Vitesse de déclenchement...
-
Page 39: Dépannage/Faq
Pour une autonomie maximale, Primos recommande d’utiliser 4 piles AA lithium Energizer® avec le piège-photographique BULLET PROOF Utilisez une marque de carte SD reconnue avec votre appareil. Primos recommande les cartes SD SanDisk® d’une capacité maximale de 32 Go. L’utilisation de cartes SD de mauvaise qualité peut parfois réduire la durée de vie des piles de votre piège-photographique BULLET... - Page 40 Certaines conditions de luminosité peuvent affecter les performances du capteur et produire des photos aux couleurs altérées. b. Si ce problème se produit régulièrement, il peut être nécessaire de faire réparer le capteur. Veuillez contacter le service clients de Primos.
- Page 41 Dépannage / FAQ 6. Impossible de lire le fichier vidéo a. Si la caméra a été éteinte durant un enregistrement (LED verte allumée), le fichier a peut-être été corrompu. Les photos prises ne contiennent pas le sujet ciblé Essayez d’installer votre appareil dans un endroit où il n’y a pas de source de chaleur dans l’axe de l’appareil.
- Page 42 Centre de Réparation agréé par Primos ou Bushnell. Tout retour effectué dans le cadre de la présente garantie doit être accompagné des éléments ci-dessous :...
- Page 43 Traitement des déchets d’équipements électriques et électroniques (En vigueur dans l’Union européenne et autres pays européens ayant des systèmes de collecte des déchets séparés) Cet équipement contient des composants électriques et/ou électroniques et par conséquent ne doit pas être éliminé en fin de vie avec les autres déchets ménagers.
-
Page 44: Español
LA CAJA. NO HAY PIEZAS EN EL INTERIOR EN LAS QUE EL USUARIO PUEDA EFECTUAR SERVICIO. RECURRA AL SERVICIO DE ATENCIÓN AL CLIENTE DE PRIMOS® PARA EFECTUAR SERVICIO. • Use únicamente las pilas que se especifican en este manual del usuario e instálelas con la polarización correcta. - Page 45 • No exponga a calor extremo. No deje el producto y/o las pilas expuestas a la luz solar directa dentro de un vehículo, u otro entorno confinado durante un período prolongado. • Use únicamente accesorios como se recomienda en este manual. PRECAUCIÓN CUIDADO Y PRECAUCIÓN •...
- Page 46 ¿PREGUNTAS? Comuníquese con el Equipo de Atención al Cliente de Primos® por cualquier comentario, pregunta, problema o solicitud de devolución. Llame al + 33 1 41 44 94 80 (EU) o 1 (601) 879-9323 (USA) o envíe un mensaje de correo electrónico a contact@bushnell-europe.com (EU) o service@primos (USA).com.
- Page 47 NOTA IMPORTANTE ¡Enhorabuena por su compra de una de las mejores cámaras para animales de caza del mercado! En Primos estamos muy orgullosos de esta cámara y estamos seguros de que usted también quedará complacido con la suya. Agradecemos su compra y queremos ganarnos su confianza. Consulte las notas siguientes y las instrucciones de este manual para asegurarse de quedar plenamente satisfecho con este producto.
-
Page 48: Introducción
INTRODUCCIÓN Enhorabuena por su compra de una cámara para animales de caza BULLET PROOF 2 de Primos. Esta cámara, con su construcción robusta resistente a la intemperie, está diseñada para registrar actividad animal en exteriores. Su cámara para animales de caza BULLET PROOF 2 presenta un tamaño compacto y portátil y una vida útil de las pilas extraprolongada. -
Page 49: Guía De Piezas Y Controles
Guía de piezas y controles Luz de LED indicador de PIR/Pilas Matriz de LED infrarrojos Lente de la cámara Pestillo Sensor de luz Sensor de movimiento Parte delantera de la cámara LED indicador de PIR/Pilas: • Se ilumina cuando se dispara el sensor de PIR durante los primeros 10 segundos después del encendido. - Page 50 Guía de piezas y controles Luz de LED indica- dor de Estado de funcionamiento Vista interior (sin el pestillo colocado) Compartimiento de pilas (tome nota del sentido para la po- laridad correcta) Interruptor de encendido/modo Side View Ranura para tarjeta SD LED indicador de Estado de funcionamiento: •...
-
Page 51: Instalación De Las Pilas Y La Tarjeta Sd
INSTALACIÓN DE LAS PILAS Para maximizar la vida útil de las pilas, debe instalar un juego de 4 pilas AA de litio (para vida útil más prolongada) o alcalinas. NOTA: Siempre ajuste el interruptor de encendido en posición OFF al instalar o retirar pilas. -
Page 52: Función De Impresión De Fecha Y Hora
SD, como se describe abajo. Si no se encuentra ningún archivo de texto con fecha/hora en la tarjeta cuando se enciende la cámara, solo se imprimirá “Primos” en las fotografías. Requisitos: •... -
Page 53: Para Usuarios De Mac
si no emerge la ventana Timetool después de insertar la tarjeta, vaya a Inicio > Ordenador y haga doble clic en “Almacenamiento extraíble” para visualizar el contenido de la tarjeta SD. Haga clic en “Actualizar” en la ventana Timetool para llenar automáticamente la fecha y hora del reloj de su ordenador. - Page 54 Mac). Asegúrese de que el interruptor de encendido de la cámara Primos esté en OFF. Inserte la tarjeta SD en la ranura para tarjeta de la cámara, después encienda la cámara. Pruebe la impresión de la fecha agitando una mano enfrente de la cámara varias...
-
Page 55: Encendido
MOV (película) si prefiere capturar vídeos. Las luces indicadoras de PIR/Pila y Estado de funcionamiento (LED debajo del logotipo de Primos) advertirán de los problemas con la tarjeta SD o las pilas. • Si destella el LED indicador de Estado de funcionamiento (pág. 50), hay un problema con la tarjeta SD. -
Page 56: Configuración
CONFIGURACIÓN 1. Monte la cámara Recomendamos que monte la cámara a unos 3 ft o 4 ft (0,9 m o 1,2 m) del suelo. Es mejor evitar montar la cámara mirando al Este u Oeste dado que la salida y puesta del sol puede producir falsos disparos y sobrexponer las imágenes. -
Page 57: Para Ver De Las Fotografías
• Después de tres minutos, el indicador de PIR no brillará cuando esté en la zona de cobertura (para evitar ser visto por animales o posibles ladrones). La cámara ahora está “descansando” y esperando que el sensor de PIR dispare la captura de una imagen. •... -
Page 58: Glosario
digital, recomendamos que efectúe un formato completo de la tarjeta usando un ordenador antes de volver a insertar la tarjeta en la cámara para animales de caza. GLOSARIO PIR (Sensor infrarrojo pasivo): Detecta el movimiento como un detector de movimiento para seguridad típico. Requiere energía infrarroja (calor) además de movimiento para disparar el sensor para ayudar a limitar la detección a sujetos vivos (en lugar de hojas, etc.). -
Page 59: Especificaciones Técnicas
ESPECIFICACIONES TÉCNICAS Número de modelo 63063M Tipo de sensor de imagen CMOS de 1/2,7 in Resolución del sensor 2 millones de píxeles Distancia focal efectiva 7,6 mm Apertura de la lente f/2,5 Filtro IR Filtro IR automático Sensor PIR Sí... -
Page 60: Resolución De Problemas/Preguntas Frecuentes
Compruebe para asegurarse que ha usado pilas AA alcalinas o de litio nuevas. Primos recomienda usar 4 pilas AA Energizer® de litio en esta cámara para animales de caza BULLET PROOF 2 para obtener máxima vida útil de las pilas. - Page 61 Bajo ciertas condiciones de iluminación, el sensor puede confundirse y producir imágenes de color deficiente. b. Si esto se ve frecuentemente, entonces el sensor puede necesitar servicio. Por favor, comuníquese con el Servicio de Atención al cliente de Primos.
- Page 62 Resolución de problemas/Preguntas frecuentes 6. El archivo de vídeo no se reproduce a. Si la cámara se apagó durante la grabación de un vídeo (LED verde encendido), el archivo puede haberse corrompido. Las fotografías no capturan sujetos de interés Intente montar su cámara en una zona donde no haya fuentes de calor en la línea de visión de la cámara.
-
Page 63: Garantía
Esta garantía no cubre daños causados por el mal uso, el manejo inapropiado, la instalación, o el mantenimiento llevado a cabo por alguien diferente de un Servicio Autorizado de Primos o Bushnell. - Page 64 Eliminación de equipos eléctricos y electrónicos (Aplicable en la UE y otros países europeos con sistemas de recogida separada) Este equipo contiene elementos eléctricos o electrónicos y por tanto no debe eliminarse con los residuos domésticos normales. En cambio, debe eliminarse en los correspondientes puntos de recogida para reciclaje previstos por las comunidades.
-
Page 65: Deutsch
NICHT DIE GEHÄUSEABDECKUNG. IM GEHÄUSE BEFINDEN SICH KEINE TEILE, DIE DER BENUTZER SELBST REPARIEREN KANN. WENDEN SIE SICH IM REPARATURFALL AN DEN KUNDENDIENST VON PRIMOS®. • Verwenden Sie nur die in dieser Betriebsanleitung angegebenen Batterien, und setzen Sie sie richtig herum ein. Bei Nichteinhaltung können die Batterien auslaufen oder explodieren, das... - Page 66 Produkt beschädigen, sich in Brand setzen oder Personen verletzen. Berühren Sie beschädigte oder ausgelaufene Batterien nicht. • Setzen Sie das Produkt keiner übermäßigen Wärme/Hitze aus. Setzen Sie das Produkt und/ oder die Batterien nicht über einen längeren Zeitraum dem direkten Sonnenlicht aus, beispielsweise in einem Fahrzeug oder einem anderen geschlossen Raum.
-
Page 67: Garantie
Falls Sie Anregungen, Fragen, Probleme oder Rücksendeanfragen haben, wenden Sie sich an das Kundendienstteam von Primos®. Rufen Sie die Nummer 0221 995568 0 (Deutschland), + 33 1 41 44 94 80 (EU) an, oder senden Sie eine E-Mail an contact@bushnell-europe.com (EU) oder service@primos.com (USA). Seitenindex Einleitung Leitfaden für Teile und Steuerelemente... - Page 68 WICHTIGER HINWEIS Herzlichen Glückwunsch! Sie haben eine der besten Wildkameras erworben, die es derzeit auf dem Markt gibt. Primos ist sehr stolz auf diese Kamera, und wir sind sicher, dass sie auch Ihnen gefällt. Wir schätzen Ihr Tun und möchten Ihr Vertrauen gewinnen. Bitte lesen Sie die Hinweise weiter unten und die Anweisungen in dieser Anleitung, um sicherzugehen, dass Sie rundherum zufrieden mit dem Produkt sind.
-
Page 69: Einleitung
EINLEITUNG Herzlichen Glückwunsch zu Ihrem Kauf einer BULLET PROOF 2 Wildkamera von Primos. Diese Kamera mit dem witterungsgeschützten, robusten Design wurde für die Aufnahme der Aktivitäten von Wildtieren in der freien Natur konzipiert. Ihre BULLET PROOF 2 Wildkamera ist kompakt gebaut, tragbar und bietet eine extra lange Batterielebensdauer. -
Page 70: Leitfaden Für Teile Und Steuerelemente
Anleitung für Teile und Bedienelemente PIR/Batterie-Anzeige-LED Infrarot- LED- Anordnung Kamera objektiv Verschluss Licht- sensor PIR-Bewe- gungssensor Vorderseite der Kamera PIR/Batterie-Anzeige-LED: • Leuchtet auf, wenn der PIR-Sensor während der ersten 10 Sekunden nach dem Einschalten ausgelöst wird. • Leuchtet auf, wenn während der ersten 3 Minuten nach dem Einschalten Fotos oder Videos aufgenommen werden. - Page 71 Anleitung für Teile und Bedienelemente Betriebsstatus -Anzeige-LED Innenansicht (entsperrt) Batteriefach (achten Sie auf die Ausrichtung für die korrekte Polarität) Ein-/Aus-/Modus- Schalter Side View SD-Karteneinschub Betriebsstatus-Anzeige-LED: • Leuchtet auf, wenn der Speichervorgang der Timetool- Software auf der SD-Karte abgeschlossen ist (siehe Seite 73). •...
-
Page 72: Installation Von Batterie Und Sd-Karte
EINSETZEN DER BATTERIEN Um die Lebensdauer der Batterien zu maximieren, sollten Sie einen Satz von vier AA-Lithium-Batterien (am langlebigsten) oder Alkali-Batterien einsetzen. HINWEIS: Stellen Sie den Einschaltknopf immer auf OFF, wenn Sie Batterien einlegen oder entnehmen. Vergewissern Sie sich, dass die Batterie richtig herum eingelegt sind, wie es auf der Innenseite des Batteriefachs angegeben ist. -
Page 73: Zeitstempelfunktion
Datumsangaben in einer Textdatei, die Sie erstellen und auf der SD-Karte speichern können, wie es unten beschrieben ist. Wird beim Einschalten der Kamera keine Textdatei mit Datum/Uhrzeit auf der SD-Karte gefunden, wird nur „Primos“ auf die Fotos gedruckt. Anforderungen: •... - Page 74 Computers oder in einen angeschlossenen kompatiblen USB- Kartenleser. Der Inhalt der SD-Karte wird angezeigt. Führen Sie auf “timetool.exe” einen Doppelklick aus, um die Datei zu öffnen. Hinweis: Wird das „Timetool“-Fenster nach dem Einlegen der Karte nicht angezeigt, wechseln Sie zu „Start > Computer“ und führen einen Doppelklick auf “Wechselmedien”...
- Page 75 Maustaste, wählen „[Name der Karte] auswerfen“, und warten Sie, bis das Kartensymbol von Ihrem Mac-Desktop verschwindet. Achten Sie darauf, dass der Einschaltknopf der Primos Kamera ausgeschaltet ist. Legen Sie die SD-Karte in den Kamera- Steckplatz ein, und schalten Sie dann die Kamera ein. Prüfen Sie...
-
Page 76: Einschalten
Position „MOV“ (Film), wenn Sie Videos aufnehmen möchten. Die PIR/ Batterie-Anzeige-LED und die Betriebsstatus-Anzeigeleuchte (LED unter dem Primos-Logo) warnt vor Problemen mit der SD-Karte oder Batterie. • Wenn die Betriebsstatus-Anzeige-LED (Seite 71) aufblinkt, liegt ein Problem mit der SD-Karte vor. Prüfen Sie die Karte (vergewissern... -
Page 77: Setup
Sie die Primos BULLET PROOF 2 Kamera, und führen Sie die unter „SETUP“ aufgeführten Schritte aus: SET UP 1. Anbringen der Kamera Es wird empfohlen, die Kamera etwa 90 cm bis 1,20 m über dem Boden anzubringen. Die Kamera sollte möglichst nicht nach Osten oder Westen ausgerichtet werden, da das Aufgehen/Untergehen der Sonne zu falschen Auslösemomenten und überbelichteten Bildern führen könnte. -
Page 78: Anzeigen Von Fotos
• Nachdem Sie die Kamera angebracht haben, öffnen Sie das vordere Gehäuse und schieben den Einschaltknopf in die „ON“-Stellung. • Die rote Anzeige-LED des PIR-Sensors oberhalb des Objektivs leuchtet für circa drei Sekunden, wenn Sie den PIR-Sensor auslösen, indem Sie in den Abdeckungsbereich treten. •... -
Page 79: Glossar
in der Liste der verbundenen „Laufwerke“ angezeigt werden. Doppelklicken Sie darauf, um die Fotodateien (.jpg) und/ oder Videodateien (.avi) auf der SD-Karte anzuzeigen oder herunterzuladen. Hinweis: Es ist möglich, die Dateien auf verschiedenen Digitalkameras anzuzeigen. Dies wird jedoch nicht empfohlen. Wenn Sie die SD-Karte in eine Digitalkamera einlegen, empfehlen wir, die Karte vor dem Einlegen in eine Wildkamera mit einem Computer vollständig zu formatieren. -
Page 80: Technische Spezifikationen
TECHNISCHE SPEZIFIKATIONEN Modell-Nr. 63063M Bildsensortyp 1/2,7 Zoll CMOS Sensorauflösung 2 MP Effektive Brennweite 7,6 mm Blende 1:2,5 IR-Filter Automatischer IR-Filter PIR-Sensor Auslösegeschwindigkeit <1 Sekunde Anzahl IR-LEDs 14 LEDs Max. Nachtsicht-Leuchtweite 13,72 m Speicher SD-Karte bis 32 GB Speicherkapazität PIR-Anzeige Ja, rote LED oberhalb des Objektivs Bildauflösung (Fotos) -
Page 81: Fehlerbehebung/Häufig Gestellte Fragen
„PIC“ oder „MOV“ und nicht auf „OFF“ steht. Stellen Sie sicher, dass Sie eine SD-Karte von guter Markenqualität in die Kamera eingelegt haben. Primos empfiehlt SD-Karten von SanDisk® bis zu 32 GB. Wenn der Schreibschutzschieber auf der SD-Karte verriegelt ist, kann die Kamera keine Aufnahmen machen. - Page 82 Sonne oder eine andere Lichtquelle ausgerichtet ist. 5. Roter, grüner oder blauer Farbstich Unter bestimmten Bedingungen kann der Sensor getäuscht werden, und es entstehen Farbbilder geringer Qualität. b. Tritt dieses Problem dauerhaft auf, sollten Sie den Sensor warten lassen. Wenden Sie sich an den Primos Kundendienst.
- Page 83 Fehlerbehebung / Häufig gestellte Fragen 6. Videodatei wird nicht abgespielt a. Wenn die Kamera bei einer Videoaufzeichnung ausgeschaltet wurde (grüne LED ein), ist die Datei möglicherweise beschädigt. Die Fotos erfassen nicht die interessanten Motive Bringen Sie Ihre Kamera in einem Bereich an, in dem sich im Sichtfeld der Kamera keine Wärmequellen befinden.
- Page 84 BESCHRÄNKTE ZWEI-JAHRES GARANTIE Wir garantieren für zwei Jahre ab Erwerbsdatum, dass Ihr Bushnell ® -Produkt frei von Material- und Verarbeitungsfehlern ist. Bei allen Schäden unter dieser Garantie behalten wir uns nach eigenem Ermessen vor, das Produkt entweder zu reparieren oder zu ersetzen, vorausgesetzt, dass Sie das Produkt frei Haus an uns senden.
- Page 85 Anweisungen: Falls Sie von der Garantie abgedeckten Service benötigen, wenden Sie sich an den Primos® Kundendienst (service@primos.com oder 0221 995568 0)). Gehen Sie wie folgt vor: Entnehmen Sie SD-Karte und Batterien aus dem Produkt, und verpacken Sie es sicher in einem Karton.
-
Page 86: Italiano
NON RIMUOVERE IL COPERCHIO DELL’ALLOGGIAMENTO. ALL’INTERNO NON SONO PRESENTI PARTI RIPARABILI DALL’UTENTE; PER LA MANUTENZIONE, FARE RIFERIMENTO ALL’ASSISTENZA CLIENTI PRIMOS®. • Utilizzare esclusivamente le batterie specificate nel manuale per l’utente, installandole con la corretta polarità. Il mancato rispetto delle istruzioni potrebbe causare perdite dalle batterie,... - Page 87 l’ e splosione delle batterie, danni al prodotto, incendi o lesioni personali. Non maneggiare le batterie danneggiate o con perdite. • Non esporre a calore estremo. Non lasciare il prodotto e/o le batterie esposti alla luce diretta del sole all’interno di un veicolo o in un altro ambiente di dimensioni ridotte per un periodo prolungato.
- Page 88 DOMANDE? Contattare il team dell’assistenza clienti Primos® per eventuali commenti, domande, problemi o richieste di reso. Telefonare al numero + 33 1 41 44 94 80 (EU) o +1 (601) 879-9323 (USA) o inviare un’ e -mail all’indirizzo contact@bushnell-europe.com (EU) o service@primos.com (USA).
- Page 89 Congratulazioni per l’acquisto di una delle migliori fotocamere da caccia sul mercato! Noi di Primos siamo molto orgogliosi di questa fotocamera e siamo certi che anche voi la apprezzerete. Primos apprezza le attività svolte dagli utenti, di cui desidera guadagnare la fiducia. Fare riferimento alle note sottostanti e alle istruzioni contenute nel presente manuale per garantire l’uso soddisfacente del prodotto.
-
Page 90: Introduzione
INTRODUZIONE Congratulazioni per l’acquisto della fotocamera da caccia Primos BULLET PROOF 2. Questa fotocamera, resistente alle intemperie e caratterizzata da una struttura robusta, è realizzata per registrare l’attività degli animali all’aperto. La fotocamera da caccia BULLET PROOF 2 è portatile, grazie alle dimensioni compatte, e vanta una durata davvero estrema della batteria. -
Page 91: Guida Ai Componenti E Ai Comandi
Guida ai componenti e ai comandi LED indicatore luminoso della batteria/PIR Serie di LED infrarossi Obiettivo della foto- camera Gancio Sensore luminoso Sensore di movimento Parte anteriore della fotocamera LED indicatore luminoso della batteria/PIR: • Si accende quando il sensore PIR viene attivato durante i primi 10 s successivi all’accensione. -
Page 92: Side View
Guida ai componenti e ai comandi LED indicatore lumi- noso dello stato di funzionamento Vista all’interno (senza gancio) Vano batterie (notare l’orientamento per la corretta polarità) Interruttore di alimentazione/ modalità Side View Slot per schede SD LED indicatore dello stato di funzion- amento: •... -
Page 93: Installazione Della Batteria E Della Scheda Sd
INSTALLAZIONE BATTERIA Per ottimizzare la durata della batteria, inserire un set di 4 batterie al litio o alcaline AA (per la durata massima). NOTA: impostare sempre l’interruttore su OFF prima di installare o rimuovere le batterie. Verificare che le batterie siano inserite correttamente, come indicato all’interno del vano batterie. -
Page 94: Funzione Di Indicazione Di Data E Ora
In base ai dati iniziali relativi a data e ora in un file di testo è possibile generare e salvare i file sulla scheda SD, come descritto di seguito. Se sulla scheda non viene trovato alcun file di testo con data/ora mentre la fotocamera è accesa, sulle foto sarà indicato solo “Primos”. Requisiti: •... - Page 95 facendo doppio clic sul file “timetool.exe”. Nota: se la finestra di Timetool non viene visualizzata dopo aver inserito la scheda, andare su Start > Computer e fare doppio clic su “Archivi rimovibili” per visualizzare il contenuto della scheda SD. Fare clic su “Update” (Aggiorna) nella finestra di Timetool per inserire automaticamente la data e l’ora dell’orologio del computer.
- Page 96 Mac). Accertarsi che l’interruttore di alimentazione della fotocamera Primos sia spento. Inserire la scheda SD nell’apposito slot della fotocamera, quindi accenderla. Testare l’indicazione della data passando una mano davanti alla fotocamera un paio di volte nel corso di un minuto o due.
-
Page 97: Accensione
MOV (filmato) per acquisire video. Le spie PIR/batteria e dello lo stato di funzionamento (LED sotto il logo Primos) indicano eventuali problemi con la scheda SD o la batteria. • Se il LED indicatore dello stato di funzionamento (pag. 92) lampeggia, è... - Page 98 fotocamera, per non ostruire l’obiettivo della fotocamera o il sensore PIR. Per montare la fotocamera in posizione, far passare la cinghia nelle apposite fessure situate sulla parte posteriore dell’alloggiamento. Avvolgere la cinghia intorno alla superficie di montaggio. Fissare la cinghia e stringere la fibbia per fissare la fotocamera. Verificare che il gancio della fotocamera sia saldamente bloccato in posizione per garantire un’adeguata resistenza alle intemperie.
-
Page 99: Visualizzazione Delle Foto
Angolo di copertura PIR = 42 gradi Angolo di ripresa dell’obiettivo = 40 gradi 4. Protezione della fotocamera È possibile utilizzare un lucchetto standard nel foro della fotocamera per proteggerla ed evitare furti. VISUALIZZAZIONE DI FOTO/VIDEO Trascorso un po’ di tempo dal funzionamento della fotocamera, sicuramente si desidera rivedere le foto scattate. -
Page 100: Glossario
GLOSSARIO PIR (Passive Infrared Sensor = Sensore infrarosso passivo): rileva il movimento come un comune dispositivo di sicurezza per il rilevamento dei movimenti. Il sensore viene azionato dalle radiazioni infrarosse (calore) e dal movimento, in modo da rilevare solo i soggetti viventi in movimento (anziché... -
Page 101: Specifiche Tecniche
SPECIFICHE TECNICHE Numero di modello 63063M Tipo sensore immagini CMOS 1/2,7 poll. Risoluzione sensore 2 milioni di pixel Lunghezza focale effettiva 7,6 mm Apertura dell'obiettivo f/2,5 Filtro IR Filtro IR automatico Sensore PIR Sì Velocità scatto <1,0 secondi Numero di LED IR... -
Page 102: Risoluzione Problemi/Domande Frequenti
Verificare se sono state usate batterie nuove alcaline o al litio. Primos consiglia l’utilizzo di 4 batterie AA Energizer® al litio con la fotocamera da caccia BULLET PROOF 2 per ottenere una durata massima della batteria. - Page 103 5. Colorazione rossa, verde o blu In determinate condizioni di illuminazione, il sensore può confondersi e acquisire immagini con scarsa colorazione. Se questo problema si verifica spesso, il sensore potrebbe necessitare di manutenzione. Contattare l’assistenza clienti Primos.
- Page 104 Risoluzione problemi/Domande frequenti 6. Il file video non viene riprodotto a. Se la fotocamera è stata spenta durante una registrazione video (LED verde acceso), il file potrebbe essere danneggiato. Le foto non acquisiscono il soggetto di interesse. Provare a installare la fotocamera in un’area dove non esistono fonti di calore nella linea visiva della fotocamera.
-
Page 105: Garanzia
GARANZIA LIMITATA DI DUE ANNI Questo prodotto Bushnell ® è garantito esente da difetti del materiale e di fabbricazione per due anni a decorrere dalla data di acquisto. In caso di difetto durante il periodo di garanzia, a nostra discrezione ripareremo o sostituiremo il prodotto purché sia restituito franco destinatario. - Page 106 Smaltimento di apparecchiature elettriche ed elettroniche (Vigente presso i Paesi UE e altri Paesi europei con sistemi di raccolta differenziata dei rifiuti) Il presente apparecchio componenti elettriche e/o elettroniche e non può pertanto essere smaltito come rifiuto domestico ordinario. Al contrario, dovrebbe essere smaltito presso punti di raccolta destinati al riciclaggio, in base alle istruzioni delle amministrazioni locali.
- Page 108 For further questions or additional information please contact: Primos Customer Service (601) 879-9323 service@primos.com ©2016 Vista Outdoor Inc.
Need help?
Do you have a question about the 63063M and is the answer not in the manual?
Questions and answers