Table of Contents
Advertisement
Quick Links
Advertisement
Table of Contents

Related Manuals for Scan Coin SC 8220


Summary of Contents for Scan Coin SC 8220
- Page 1 SC 8220 Currency Counter User’s Guide © SCAN COIN AB 2016...
-
Page 2: Table Of Contents
Machine Part Terminology ....6 Setting Up SC 8220 ......16 Control Panel Overview . - Page 3 Counting Speed......19 Switching Between External LED and LCD Display....31 Sorting Mode Setting .
-
Page 4: General Information
General Information Environmental Compliance Note SCAN COIN AB reserves the right to revise and improve its If the equipment contains batteries or accumulators, dispose of products as it sees fit. This publication describes this product at the these separately according to local requirements. -
Page 5: Responsibility
Responsibility WARNING Risk of electric shock The supplier of the equipment accepts no responsibility for injury The machine is of metal construction and must therefore always be earthed to the supply. Ensure that both the plug on or damage to personnel or equipment, if the equipment is altered in the supply lead and the supply source are earthed. -
Page 6: Installation
Follow the Safety Precautions. interference (EMI) or vibration is placed close to the machine. The machine must be installed by an authorised SCAN COIN representative. Positional References Note The machine must be protected by a fuse or a circuit breaker in the Unless stated otherwise, positions and directions such as left, right, electrical circuit. -
Page 7: Machine Label
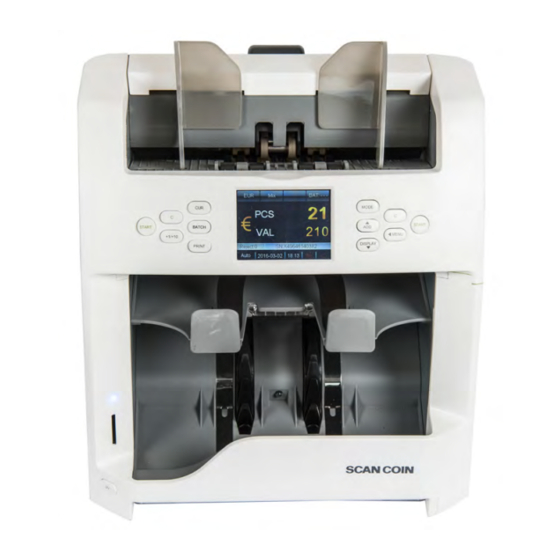
Machine Label The label below is an example of the information available on the The SC 8220 is a compact desktop currency sorter, light to carry and easy machine. to operate. By touching the icons on the screen or the operator buttons beside the screen you can select how to perform the counting and sorting of banknotes. -
Page 8: Unpacking
Print cable Please check whether the appearance of the machine is in good condition and whether all of the accessories are available. Inside the package there shall be the following. SC 8220 USB cable Quick guide Dust cover Cleaning brush... -
Page 9: Machine Part Terminology
Machine Part Terminology 1 Adjusting screw 2 Power switch 3 Side carrying grip 4 Power connection (with fuse) 1 Hopper 7 UV switch 2 3.2” Color TFT LCD 8 Note guide 5 Port for network touch screen 6 Port for printer 9 Control panel 3 Red indicator for reject 10 Banknote receiving wheel... -
Page 10: Control Panel Overview
Control Panel Overview Button Description DISPLAY Press to view the count result. Also served as navigation key DOWN Press to enter/step back in MENU navigation. MENU Button Description Press to start counting. START Also served as selection confirmation in MENU Press to clear the number of counted banknotes. -
Page 11: Display Overview
Operation Display Overview WARNING Risk of jamming! "Safety Precautions" on page 2 Follow the Getting started a) Connect the power cable to the machine and the power outlet. b) Press the Power Switch button to I to switch on. 1 Currency selection 8 SD card icon 2 Sorting mode 9 Date and time... -
Page 12: Switching Off
Switching Off Selecting Currency a) Confirm that all counting results are saved. Selecting a preset currency b) Switch off the machine by setting the main switch to off ( Inserting Banknotes Avoid counting wet, dirty or spoiled banknotes. a) Check for foreign matter mixed with the banknotes for example paper chips, rubber bands, clips and dust. -
Page 13: Quick Currency Selection
Quick Currency Selection Automatic recognition mode (AUTO) Press and hold CUR. The machine recognizes the currency according to the first note, provided that the currency is ON in the AUTO CUR Selection – All the available currencies are listed on the display. menu. -
Page 14: Multi-Currency Mode (Mult)
Multi-currency mode (MULT) Count Mode (COUNT) The device counts the number of piece with no limitation of The machine can process three currencies simultaneously. currency. Note User can turn on/off/adjust the detection setting under COUNT For further setting, please refer "Multi-Currency Configuration "... -
Page 15: Batch Counting
Batch Counting d) Increase the batch value by 1 by pressing +1/+10. How to count a preset number of banknotes: Press and hold +1/+10 to increase by 10. a) Press BATCH or +1/+10 to select banknote batch value by When counting, the machine stops once the counted banknotes pieces or by preset values. -
Page 16: Cancelling The Batch Function
ADD Mode Cancelling the Batch Function a) When switch to "---", the batch preset value is disabled. In ADD mode, all counting results are accumulated. b) Press BATCH to cancel the batch function. a) Press ADD to switch between ADD mode on/off. When ADD mode is turned on, “ADD”... -
Page 17: Sorting Modes
Sorting Modes Mode Description Face(S) Face Sorting Count banknotes based on the How to count banknotes with different sorting functions. Mode with denomination and the face of the Denomination a) Press MODE to select the desired Sorting Mode. first detected genuine note. Different Detection face, denomination, or suspicious The selected Sorting Modes are shown sequentially next to the... -
Page 18: Counting Information
Counting Information Mode Description F&O(S) Face and Count banknotes based on the When banknote processing is done, press DISPLAY to see the Orientation denomination, the face, and the ori- detailed information of the accepted banknotes. Sorting Mode entation of the first detected genuine with Denomi- note. -
Page 19: Print Function
Setting Up SC 8220 Print Function Printing the counting result using an external printer Verifying and Adjusting Basic Settings a) Connect the supplied print cable on the back of the a) Enter the User Menu machine. – Press the Power Switch button. After a short boot-up and self- b) Connect the printer to the test, machine enters the main menu. -
Page 20: Count Mode Setting
Count Mode Setting Note 0 means detection off. Highlight the “1 COUNT mode setting” item. 8 means the highest sensitivity value. To discriminate banknote, please adjust from the higher sensitivity value like 6 to 8. Thickness setting is for double detection sensitivity. Chain setting is for chain detection and recommended to be 1 that means activated. -
Page 21: Serial Number Recognition
Serial Number Recognition Reject Reset a) Highlight the “2 Serial Number” item. a) Highlight the “3 Reject Reset ” item. b) Press START to confirm. b) Press START to confirm the selection. c) Use the navigation keys to switch between Auto or Standard mode. -
Page 22: Automatic / Manual Counting Start Mode
Automatic / Manual Counting Start Mode Counting Speed a) Highlight the “4 Auto/Manual” item. a) Highlight the “5 Speed” item. b) Press START to confirm. b) Press START to confirm. c) Switch between Automatic and Manual Counting start Mode. c) Use navigation keys to select desired Counting Speed. d) Press START to save the setting. -
Page 23: Sorting Mode Setting
Sorting Mode Setting Orientation Sorting Mode a) Highlight the “6 Mode Setting”. a) Highlight the “2 Orient Mode” item. b) Press START to confirm. b) Press START to confirm. c) Select mode for Orientation Sorting by using navigation keys, Face Sorting Mode and press START to confirm. -
Page 24: Face And Orientation Sorting Mode
Face and Orientation Sorting Mode Version Sorting Mode a) Highlight the “3 F&O Mode” item. a) Highlight the “4 Version Mode” item. b) Press START to confirm. b) Press START to confirm. c) Select mode for Version Sorting by using navigation keys, and Select mode for mode for Face and Orientation Sorting by using press START to confirm. -
Page 25: Viewing Version Information Of Machine
Viewing Version Information of Machine Setting Import a) Highlight the “8 Version” item. a) Insert an SD card into the SD card slot. The SD card should have setting.txt created from Setting Export. b) Press START to confirm. b) Highlight the “10 Setting Import” item. c) Press START to confirm. -
Page 26: Network Setting
Network Setting d) Enter desired value by using the touch screen. a) Highlight the “12 Network Setting” item. e) Press START or OK to save. b) Press START to confirm. Restart the machine. c) Select the desired item by using navigation keys, and press START to confirm. -
Page 27: Basic Device Settings
Highlight the “2 Protocol” item. b) Press START to confirm. b) Press START to confirm. c) User can choose SCAN COIN protocol (A) or the protocol Reject Pocket Capacity Settings specific for SC 8220 CashNetwork software (B) by using the navigation keys. -
Page 28: Automatic Recognition Currency Selection
Automatic Recognition Currency Selection Quick Currency Selection a) Highlight the “3 AUTO CUR Selection” item, and then a) Highlight the “4 Quick CUR Selection” item. confirm with. b) Press START to confirm. b) Press START to confirm. c) Use ADD and DISPLAY to highlight the currency. c) Use ADD and DISPLAY to highlight the desired currency. -
Page 29: Multi-Currency Configuration
Multi-Currency Configuration External UV Settings a) Highlight the “5 MULT CUR Selection” item. External UV can be activated by pressing the dedicated UV switch, b) Press START to confirm. or activated automatically when there is a rejected banknote. c) Use ADD and DISPLAY to highlight the desired currency. a) Highlight the “6 EXT UV“... -
Page 30: Sound Settings
Sound Settings Automatic turn off Time for the External UV a) Highlight the “7 Beep Setup” item. a) Highlight the “2 EXT UV auto off“ item. b) Press START to confirm. b) Press START to confirm. Turning on/off Key Beep Settings c) Use the navigation keys to set the automatic turn off time. -
Page 31: Setting Up Date And Time
Setting Up Date and Time Turning off Alarm Settings a) Highlight the “8 Date & Time” item. a) Highlight the “2 Alarm Beep” item. b) Press START to confirm. c) Use navigation keys to toggle between Alarm Beep Normal and Mute. b) Press START to confirm. -
Page 32: Changing User Interface Language
Changing User Interface Language Changing Date and Time Settings a) Highlight the “9 Language“ item. a) Highlight the “2 Date Setup or “3 Time Setup” items. b) Press START to confirm. c) Use navigation keys to highlight the desired value to modify. b) Press START to confirm. -
Page 33: Activating Sleep Mode
Activating Sleep Mode Calibrating Touch Screen a) Highlight the “10 Sleep Time“ item. a) Highlight the “11 Touch Calibration“ item. b) Press START to confirm. b) Press START to confirm. c) Use the navigation keys to set the sleep time, then press START to confirm. -
Page 34: Turning On/Off Cctalk
Turning ON/OFF ccTalk Switching Between External LED and LCD Display To turn on/off ccTalk protocol for the PC software using ccTalk a) Highlight the “13 External Display“ item. protocol by connecting to the serial port. b) Press START to confirm. a) Highlight the “12 cc Talk“... -
Page 35: Setting Display Contrast
Setting Display Contrast Setting Display Backlight a) Highlight the “14 LCD Contrast” item. a) Highlight the “15 LCD Backlight” item. b) Press START to confirm. b) Press START to confirm. c) Change the Display Contrast by using the navigation keys. c) Change the Display Contrast by using the navigation keys. -
Page 36: Print Settings
Print Settings Print Title Settings a) Highlight the “17 Print Title” item. Printer Baud Rate Settings b) Press START to confirm. The current print title is shown. a) Highlight the “16 Print Setting” item. c) Press START one more time to enter the interface for entering. b) Press START to confirm. -
Page 37: Maintenance
Maintenance Print Paper Settings a) Highlight the “18 Print paper” item. Accessing Note Path b) Press START to confirm. Upper note path c) Check the paper width of the connected printer. – 57.5mm: 2-inch paper – 79.5mm: 3-inch paper d) Use navigation keys to select the paper width of the connected printer. -
Page 38: Cleaning
Cleaning Clean the machine daily to prevent from accumulation of dirt, Lower note path since this may cause too many banknotes to be rejected. Use an air brush to blow away dirt from the sensors. Caution! Only use cleaning materials and tools which do not scratch. Clean the outside of the machine with a soft cotton towel. -
Page 39: Exchanging Fuse
Adjusting Feeding Gap Exchanging Fuse The position of the adjusting screw on the top cover has already WARNING been set to the best position at the factory. If banknote feeding is Follow the safety precautions. Risk of electric shock. unsmooth or banknote counting is inaccurate, it can be necessary to adjust the adjusting screw to optimize the banknote transport. -
Page 40: Software Update
Software Update Update SC 8220 using an SD card. Follow strictly the instructions below to update your machine in the correct way. a) Turn on the machine. b) Put the UPDATE folder in the root directory of an SD card. -
Page 41: Error Message
Error Message Self-test error message Error message Solutions Feeding Fault Remove the banknote, clean the feeding sensor. Receiving Fault Remove the banknote, clean the receiving sensor. Rejector Faults Remove the banknote, clean the rejector sensor. UV Fault Remove the banknote, clean the UV sensor. FL Fault Remove the banknote, clean the sensor. - Page 42 Error message Solutions Brake Fault 1. It’s possible the speed of the machine is abnormal. Please do the motor speed calibration. 2. If the error persists after calibration, maybe there is something wrong with motor control board, please replace the motor control board. 3.
-
Page 43: Detective Error Message
Detective error message Error message Solutions UV-Error Remove the banknotes, clean the sensor. FL-Error If the error persists, please do the UV calibration. MG-Error Clean the magnetic sensor. MG1-Error Lower the sensitivity level MG2-Error MG3-Error IR-Error Please do the Counting IR calibration. Lower the sensitivity level. - Page 44 Error message Solutions Width Please do the width calibration first. Then perform the counting IR sensor calibration. Length Image#1 Please do the CIS calibration. Image#2 Scan the miscounting data for analysis. Image#3 Old Ver Remove the banknote. Judge SN-Error SN Invalid SN Repeat Face Diff Orient Diff...
- Page 45 Error message Solutions Stacker Full The stacker is full. Remove the banknotes from the stacker. Reject Full The reject pocket is full. Remove the banknotes from the reject pocket. Cover Open Close the top cover. 1. Some foreign substance falls inside the machine or notes are blocked, open the back cover to remove them.
-
Page 46: Technical Data
Technical Data Counterfeit detection: ... IR, MG, DUAL CIS, MT, UV Counting speed: ....800 / 900 / 1100 notes/min Hopper Capacity: .
Need help?
Do you have a question about the SC 8220 and is the answer not in the manual?
Questions and answers