Advertisement
Table of Contents
- 1 Table of Contents
- 2 The Spinning Studio Console
- 3 Unpack the Box
- 4 Console Features
- 5 Console Setup
- 6 Cadence Sensor Installation
- 7 Pairing with Your Heart Rate Belt
- 8 Customize Console Settings
- 9 Attach the Console to the Bike
- 10 Console Care
- 11 Frequently Asked Questions
- 12 Certifications
- 13 Warranty Information and Customer Support
- Download this manual
Advertisement
Table of Contents

Summary of Contents for Spinning Studio Console
- Page 1 SPINNING ® STUDIO CONSOLE OWNER’S MANUAL...
- Page 3 The Spinner Family of Marks—Spin®, Spinner®, Spinning®, Spin Fitness®, and the Spinning logo ® are registered trademarks owned by Mad Dogg Athletics, Inc., a California corporation. ANT, ANT+ and the ANT+ logo are trademarks of Dynastream® Innovations Inc., a subsidiary of Garmin®...
- Page 4 Important Safety Information Important Save these instructions for future reference. Read all documentation provided with your bike, including assembly, maintenance, and getting started, before using this bike. Note This product is intended for commercial use. WARNING To prevent injury, the console must be attached securely to the base unit following all assembly and installation instructions.
- Page 5 • Consider carefully the requirements of the Americans with Disabilities Act (ADA), US Code 28 CFR (see Section 305). ASTM standards are voluntary and may not reflect current industry standards. The actual area for access, passage around, and emergency dismount is the responsibility of the facility. The facility should consider the total space requirements for training on each unit, voluntary and industry standards, and any local, state, and federal regulations.
- Page 6 Owner and User Instructions Before beginning any fitness program, you should obtain a thorough medical exam from your physician, particularly if you have high blood pressure, high cholesterol, or heart disease; have a family history of any of the preceding conditions;...
- Page 7 • You must gradually slow your pedal strokes to slow the bike. To stop immediately, firmly press down the resistance knob. Do not dismount the bike until the pedals and flywheel have come to complete stop and there is resistance on the flywheel. Failure to follow these safety instructions can result in serious personal injury.
- Page 8 Regulatory Information Hazardous Materials and Proper Disposal The batteries within self-powered equipment contain materials considered hazardous to the environment. Federal law requires proper disposal. Product Recycling and Disposal This equipment must be recycled or discarded according to applicable local and national regulations. Product labels, in accordance with European Directive 2002/96/EC concerning waste electrical and electronic equipment (WEEE), determine the framework for the return and recycling of used equipment as applicable...
-
Page 9: Table Of Contents
Contents The Spinning® Studio Console Unpack the Box Console Features Console Setup Cadence Sensor Installation Pairing with your Heart Rate Belt Customize Console Settings Attach the Console to the Bike Console Care Frequently Asked Questions Certifications Warranty Information and Customer Support... -
Page 10: The Spinning Studio Console
® Thank you for purchasing the Spinning® Studio Console. Heart rate training is an essential aspect of the Spinning program and this console will help you monitor your heart rate, cadence, time, distance and calories burned on every ride. This manual explains the key features of this console, as well as the steps for installing the console onto your Spinner®... -
Page 11: Unpack The Box
SPIN N IN G® ST U DIO CO N SO L E OWN ER S M AN UAL Unpack the Box The console box contains components for mounting the console on different bike models. Most current bikes use the flat mount bracket (2). Each console ships with the following parts: Console 2. -
Page 12: Console Features
Console Features Console Features • ANT+ interoperable 2.4Ghz wireless technology • Low power consumption for long battery life • Code memory during battery displacement and replacement • Large three line display: Cadence, Heart rate and Training data • Bright LED backlight •... -
Page 13: Console Setup
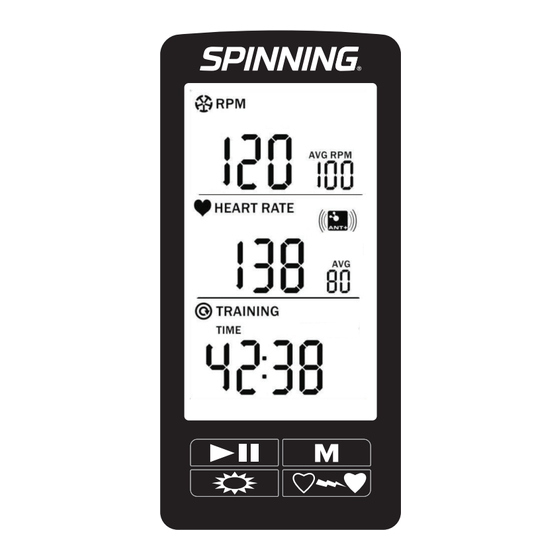
SPIN N IN G® ST U DIO CO N SO L E OWN ER S M AN UAL Console Setup The Spinning® Studio Console features a large, clear display and simple four-button layout. cadence heart rate Start/Pause/Resume time Mode distance... -
Page 14: Cadence Sensor Installation
Cadence Sensor Installation The Spinning® Studio Console tracks your cadence (measured in RPM) and distance. To track this information, you must attach the cadence sensor to the Spinner® bike. To mount the magnet on a Precor Spinning bike: Using a clean cloth, wipe the inside of the crank arm and magnet pocket (Figure 2) to remove dust or dirt. - Page 15 SPIN N IN G® ST U DIO CO N SO L E OWN ER S M AN UAL Press the cadence sensor into the foam holder (Figure 4). 4. Press a strip of double stick adhesive to the back of the cadence sensor and foam Figure 4 holder to cover the battery...
-
Page 16: Pairing With Your Heart Rate Belt
Pairing with your Heart Rate Belt ANT+ compatible heart rate belts work with this console, and pairing to an ANT+ belt prevents any heart rate “crosstalk”. Analog 5.3 KHz heart rate belts such as Polar® Wearlink also pair with the this console. - Page 17 SPIN N IN G® ST U DIO CO N SO L E OWN ER S M AN UAL 4. When pairing is successful: ANT+ products: A four digit code displays on the screen. For other 5.3 KHz heart rate belts: Four zeros display on the screen.
-
Page 18: Customize Console Settings
Customize Console Settings Use these settings to customize the console display or, if necessary, to re-pair the cadence sensor with the console. Important To enter the settings mode, you must press and hold Mode as you install the third battery into the console. The keys on the console are used as labeled by users, but function differently when setting up the console. - Page 19 SPIN N IN G® ST U DIO CO N SO L E OWN ER S M AN UAL Press Mode again to display the code entry screen. 4. Hold Start/Pause/Resume until the first number or letter at the bottom of the screen begins flashing.
- Page 20 To change the units of measure: On the console, press Heart Rate Pairing to display the units of measure (Figure 9). Press Mode to select unit of measure. (Km or Miles). The back light adjustment Mile screen now displays. Figure 9 Backlight Time Adjustment Increasing the amount of time the backlight stays on will diminish battery life.
-
Page 21: Attach The Console To The Bike
SPIN N IN G® ST U DIO CO N SO L E OWN ER S M AN UAL Attach the Console to the Bike Before attaching your Spinning® Studio Console to your Spinner® bike, make sure that the console is pairing properly with your cadence sensor and heart rate transmitter. -
Page 22: Console Care
Console Care Precor strongly recommends performing regular maintenance to ensure the console performs accurately. Important It is the duty of the owner to maintain equipment in accordance with the instructions in this material and any accompanying material. Always purchase replacement parts and hardware from Precor. If you use parts not approved by Precor, you could void the Precor Limited Warranty. -
Page 23: Frequently Asked Questions
SPIN N IN G® ST U DIO CO N SO L E OWN ER S M AN UAL Frequently Asked Questions Which heart rate belts work with the Spinning Studio Console? ® Any ANT+ compatible heart rate belt will work with this console, and pairing to an ANT+ belt will prevent any heart rate “crosstalk”. - Page 24 What if I am picking up another rider’s heart rate? If bikes and riders are close enough together while wearing analog heart rate belts, it is possible to have “crosstalk” wherein the heart rate signal from another rider displays on an adjacent console. Using ANT+ compatible belts prevents this problem, but if this problem persists, try moving the bikes further apart to prevent “crosstalk.”...
-
Page 25: Certifications
(1) this device may not cause harmful interference, and (2) this device must accept any interference received, including interference that may cause undesired operation. Changes or modifications not expressly approved by Spinning could void the ® user’s authority to operate the equipment. -
Page 26: Warranty Information And Customer Support
Warranty Information and Customer Support Warranty The Spinning® Studio Console has a one-year warranty on the console and sensor. This warranty excludes batteries and battery replacement. Customer Support If you have any questions about this console or any parts in need of replacement, please contact: Precor Customer Service &... - Page 27 SPIN N IN G® ST U DIO CO N SO L E OWN ER S M AN UAL Notes:...
- Page 28 Spinning® Studio Console P/N 304187-101 rev A December 2015...
Need help?
Do you have a question about the Studio Console and is the answer not in the manual?
Questions and answers