Gram K3 User Manual
Hide thumbs
Also See for K3:
- Operation manual (52 pages) ,
- Quick start manual (9 pages) ,
- Operation manual (52 pages)

Subscribe to Our Youtube Channel
Related Manuals for Gram K3


Summary of Contents for Gram K3
- Page 1 SERIE K3 / K3P / K3i / K3i Printer MK3 / MK3 Printer S3/ S5i / S7i / TCamel 2T USER MANUAL...
-
Page 2: Table Of Contents
INDEX Warning ________________________________________________________________________________ 3 Features _______________________________________________________________________________ 3 Options ________________________________________________________________________________ 4 Packaging ______________________________________________________________________________ 4 Features of the indicator __________________________________________________________________ 4 Load cell connection __________________________________________________________________ 4 User interface _______________________________________________________________________ 5 Serial communications ________________________________________________________________ 5 ... -
Page 3: Warning
ENGLISH WARNING Unplug the power supply before installing or disassembling. • Before using the device, check that the voltage printed on the features label matches the one of the electricity • network that will be used. If they do not match, do not plug the device into the electrical network. Before using the device, make sure that the power supply cord is not obstructed or trapped. -
Page 4: Options
2-line ticket footer printing with 4 selectable font sizes. • Memorization of item code to print 6 alphanumeric characters. • Batch number to be printed on the ticket. • Printing in Spanish, English, French and German. • Printing of the total on the ticket (selectable). •... -
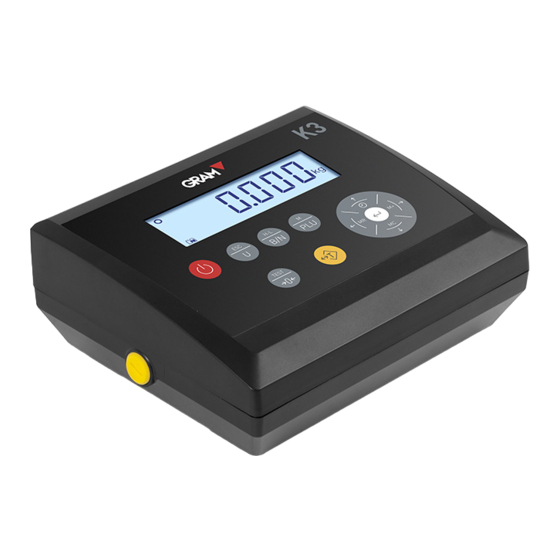
Page 5: User Interface
Service time 25/60 hours, depending on use. Operating conditions and m echanical data Operating temperature range +5ºC/+35ºC Size (mm) 220 x 180 x 83 Weight (kg) 1.5 (including battery) Assembly Countertop Optional: Tilting wall/column mount Watertightness IP-65 (K3); IP-67 (K3i) 5 ... -
Page 6: Relay Card
Relay card Maximum voltage 24 VDC/24 VAC Maximum intensity 10 A Relay life 100000 operations at nominal load Therm al printer (K3iP and M K3P) Printer life 6000000 printed lines Resolution 8 points/mm Printing speed 30 mm/sec Type of paper Thermal paper roll (57mm wide, 30 mm ø) Printing width... -
Page 7: Connections
Zero button. It sets the scale to zero, correcting possible deviations. The platform must always be empty to perform this function. By pressing this button for over a second, it shows the display test, capacity, division and software version. Tare button. Pressing this button once will subtract the weight of any container or box located on the platform, until the container or box is removed and the tare button is pressed again. -
Page 8: Platform 1 Connection
Platform 1 connection. Multipin mobile connector. Male chassis socket P700 (7-pin). Load Cell A Load Cell B PIN 1 SIG - Blue White PIN 2 SIG + Brown Green PIN 3 SHIELD Shield Shield PIN 4 EXC - Black Black PIN 5 SENSE - Blue... -
Page 9: Assembly
ASSEMBLY Place the platform on a flat surface without any objects that might interfere in the weighing process. Unblock the platform by removing or loosening the blocking screws, as indicated in the instructions of the attached unblocking guide. Insert the cell cable through the column until it comes out of the column's top opening. Place the column (optional) inside the column support and adjust the screws to block it and fix it. -
Page 10: Device Reset
DEVICE RESET If the platform is empty and the display is not showing a value of zero, press to reset it. USING THE TARE Fixed tare Place a container on the platform. The indicator will show its weight. After pressing the button, the scale will now show the “0”... - Page 11 circle must be on), press the button. The weight value will now be added (when the printer is plugged in it will print the header as well as the first weight value, if this option is set up). To add the weight of another object, the previous one must be removed. Make sure the display has returned to zero and the stability symbol is on.
-
Page 12: Internal Test
Internal test This function turns on all the icons on the display to check their status. After this, it shows the capacity, the resolution and the device software version. To perform this test, from the main screen (weighing mode), press the button for two seconds. -
Page 13: Advanced Functions And Set Up
ADVANCED FUNCTIONS AND SET UP To access the functions set up menu, press the button briefly. The message “ n ItEN ” will appear. This indicates that you have entered the functions set up menu. It has 18 different options that include several functions and settings of the indicator.To scroll through the menu, submenu and data editing, follow these ... - Page 14 instructions: To scroll forward through the menu, press To scroll backwards through the menu, press To increase the value of a specific digit or option, use the button. To decrease the value of a specific digit or option, use the button.
-
Page 15: Manual Function
Manual function This function is used to memorise a product code. It must have a maximum of 6 alphanumeric characters. There is a maximum of a 100 item codes that can be memorised. button. The display will show the “ n ItEN ” message. Press the Press the button. -
Page 16: Scanner Function
When in regular weighing mode, we can now upload the code of any of the 100 memorised items. Press the button and then immediately press . Now (following the procedure above) we can choose the code of the required item and it will stay programmed. When we have, a printer connected to the data output, and the printing parameters are correctly set up, we will get a ticket with the product code that we have at the time. -
Page 17: Memorising Weight Limits And Response Mode
Hi/lo W eight control – PluPro Weight limit function helps to indicate if a weight is within a particular range, transmitting a visual signal through the colours on the display and the bottom bars of the display with the option of also sending out a sound signal through the indicator. - Page 18 entered by using cursors to increase or decrease the position until you find the desired one, and to scroll to the left or the right. Press to confirm. 5. Now it will show ‘ HI ’ for a moment and then it will immediately show ‘ 000000 ’ where the maximum limit must be entered by using the same method as in the previous step.
-
Page 19: Activating The Limit (+/-) Function
Activating the Limit (+/-) function 1. Keep the button pressed until it shows “ Hi-Lo X”, where ‘X’ indicates what mode the function is in. These can be: 0 . Disabled. 1 . Limits with sound and light indication. 2 . Limits with light indication and automatic tare. 2. -
Page 20: Sampling
Piece-counting function – CluPro This mode is used to count pieces of a similar weight. After carrying out a sample weighing, the indicator will memorise the individual weight of the pieces. Then it will display the total number of pieces placed on the platform. Sampling To carry out the sample weighing, the scales must show the 0 value and the platform must be empty. -
Page 21: Individual Weight Memory (Piece-Counting)
button several times until the display shows the symbol. Individual weight memory (Piece-counting) There are 100 memory slots to save the different types of pieces for the piece-counting function. To save a specific piece, we must enter the functions menu by pressing Press the button three times and the message “... - Page 22 Now, this piece is saved in the selected memory slot. To save any other piece, follow the same process. Once a piece has been saved in the memory, if you wish to use one type or another, access “ CLuPro ” and select the desired memory slot.
-
Page 23: Using The Tare Memory
4. To modify it and enter the tare's weight value, use the cursors select the required number. 5. To move to a digit on the right, press . To modify it use the cursors. If you need to modify a digit on the left, press until the digit flashes. - Page 24 Auto Hold function – hoLd To access the functions menu, press and the display will show " n ItEN ". Press until the display shows " hoLd ". Press and the display will show " hoLd X", where 'X' is the selected option.
-
Page 25: Activating This Function
Activating this function To use this option, the Auto tare, function must be enabled as follows: 1. Press the button. The display will show the message “ n ItEN ” . Press several times, until the display shows “ ”. Aut-t 2. - Page 26 Fltr 2 - For not so stable environments (average response) Fltr 3 - For stable environments (not very quick) Fltr 4 - For less stable environments (slow) Fltr 5 - For quite unstable environments (very slow) To change it, press Confirm by pressing To exit the menu and return to the weighing mode, press Activating the display's light...
- Page 27 When pressing any key on the indicator it will emit a sound. This sound can be enabled/disabled as follows: Press and then until the display shows “ ” bEEp Press to confirm. Use the button to select the digit on the right according to the following options: 0 .
- Page 28 To change it, press . Then confirm by pressing To exit, press the button. RS-232 Data output configuration – uArt 28 ...
- Page 29 The device has a standard data output and an optional one. To access the configuration settings of these data outputs, press and then press until you see the “ uArT ” message. Press to confirm. You will see the following options for data transmission speed: br 001 –...
- Page 30 The message “ PC2P X” will appear (‘X’ is the number of the port for “USB K3”; 0 = deactivated, 1 = Connected to Port 1, 2 = Connected to Port 2). The message “ SNod X” will appear, where ‘X’...
- Page 31 NET W EIGHT(POIDS NET) if ( s tatus A ND 0 2h ) = 0 2h Net = t rue else ...
- Page 32 Printing form at – pRNfRN 32 ...
- Page 33 The printer data output can be set up with 5 different printing formats, according to the following versions: 33 ...
- Page 34 -‐ -‐ -‐ -‐ -‐ -‐ -‐ -‐ -‐ -‐ -‐ -‐ -‐ -‐ -‐ -‐ -‐ -‐ -‐ -‐ -‐ -‐ -‐ -‐ -‐ -‐ Weight no.: #00010 Format 1...
- Page 35 , 1 = when the scales are stable). By using choose the required option and confirm with The message “ dot X” will appear. By modifying ‘X’ we can choose the transmission format to “USB K3” sends a . (0 = comma (“,”)
- Page 36 The message “ hEAd X” will appear (‘X’ is the number where the printing of the header and footer of the ticket are chosen. 0 = Does not print ticket header or footer, 1 = Prints ticket header and footer). By using choose the required option and confirm with If you do not want to print the header and, therefore, you have selected "...
- Page 37 Note: The simple width font sizes (options 1 and 2) will print 32 characters. The double width font sizes (options 3 and 4) will only print 16 characters, even when more have been entered. To centre the characters, white spaces must be left if necessary. By using choose the required option and confirm with If an option other than '0' has been selected, the line will appear with the default characters (it prints the...
-
Page 38: Printing Operation
Note: The first three lines will be printed as the ticket's header, before the rest of the data. Lines 4 and 5 will be printed as the ticket's footer at the bottom. The message “ Lin4 X” will appear (‘X’ is the number where the line 4 printing is selected 1 ; 0 = do not print, 1 = small font size, 2 = double height font size, 3 = double width font size, 4 = double height and width font size). - Page 39 Lastly, if you want to print a simple ticket, with any of the formats previously selected, you must use the button . The header and footer will be printed if enabled. Verification function of the ADC – iCount This utility shows the reading of the Analog/Digital converter (ADC), to verify the correct operation of the indicator in conjunction with the connected weighing cell or cells.
- Page 40 using to move to the left or right digit. Once the date has been set up, press the button to confirm. The word “ tiNE ” briefly appears on the display. Then, it shows 6 digits with the time (hh.mm.ss) which can be modified by using to increase or decrease the value of the digit that is flashing, and using to move to the left or right digit.
- Page 41 Press to return to weighing mode if you do not want to change any other value within the functions menu. Activate auxiliary units – unit This function can be used to enable or disable the lb, oz and PCS units. To enter this option, press the button and then repeatedly press until “...
- Page 42 Select a printer – PrnNod This feature allows you to configure the GRAM printer model connected to the unit. To enter this option, press the button and then repeatedly press until “ PrnNod ” is shown. Press to confirm. The display will show “ Prn X”, where ‘X’...
-
Page 43: Warranty
This unit’s warranty covers any factory and hardware defects. The warranty is valid for a period of 1 year from the date of delivery. Within the warranty period, GRAM PRECISION, SL, will be responsible for the repair cost of the scales. The warranty does not apply to damage incurred due to improper unit use or unit overload. - Page 44 006/14122016 Gram Precision S.L. Travesía Industrial, 11 · 08907 Hospitalet de Llobregat · Barcelona (Spain) Tel. +34 902 208 000 · +34 93 300 33 32 Fax +34 93 300 66 98 gram.es comercial www.gram-group.com ...
Need help?
Do you have a question about the K3 and is the answer not in the manual?
Questions and answers
Hi We have K3P with bult in printer . How do you set the time and date pls