Advertisement
Quick Links
Advertisement
Chapters

Related Manuals for Sony HDFV-C950W


Summary of Contents for Sony HDFV-C950W
- Page 1 HD ELECTRONIC VIEWFINDER HDVF-C950W 電気製品は、安全のための注意事項を守らないと、 火災や人身事故になることがあります。 このオペレーションマニュアルには、事故を防ぐための重要な注意事項と製品の取 り扱いかたを示してあります。このオペレーションマニュアルをよくお読みのう え、製品を安全にお使いください。お読みになったあとは、いつでも見られるとこ ろに必ず保管してください。 OPERATION MANUAL [Japanese/English] 1st Edition (Revised 2)
- Page 2 日本語 安全のために 電気製品は、安全のための注意事項を守らないと、火災や感電などにより死亡や 警告表示の意味 大けがなど人身事故につながることがあり、危険です。 事故を防ぐために次のことを必ずお守りください。 オペレーションマニュアルおよび 製品では、次のような表示をして 安全のための注意事項を守る います。表示の内容をよく理解し てから本文をお読みください。 3、4 ページの注意事項をよくお読みください。 定期点検をする 長期間安全に使用していただくために、定期点検を実施することをおすすめしま す。点検の内容や費用については、ソニーのサービス担当者または営業担当者に この表示の注意事項を守らないと、 ご相談ください。 火災や感電などにより死亡や大け がなど人身事故につながることが 故障したら使用を中止する あります。 ソニーのサービス担当者、または営業担当者にご連絡ください。 万一、異常が起きたら この表示の注意事項を守らないと、 ・ 異常な音、におい、煙が出たら 感電やその他の事故によりけがを ・ 落下させたら したり周辺の物品に損害を与えた りすることがあります。 a カメラの電源を切る。 b 接続ケーブルを抜く。 注意を促す記号 c ソニーのサービス担当者、または営業担当者に修理を依頼する。 炎が出たら 行為を禁止する記号...
-
Page 3: Table Of Contents
目次 警告 ................3 注意 ................4 概要 ..................4 使用上のご注意 ..............5 各部の名称と働き ............... 6 カメラに取り付ける............8 分解・改造しない 位置を調節する ..............9 外装を外したり、改造したりすると、感 高さ調節 ..............9 電の原因となります。 チルティング操作 ..........10 ビューファインダー内部の調整や設定お パンニング操作............10 よび点検を行う必要がある場合は、必ず 画面を調整する ..............11 サービストレーニングを受けた技術者に アクセサリーを取り付ける ..........12 ご依頼ください。... - Page 4 概要 HD エレクトロニックビューファインダー HDVF-C950W は、ソニーハイビジョンカラーカメラおよびカムコーダー 用の 9 型カラービューファインダーです。 本機には以下のような特長があります。 高速応答性 ビューファインダーの取り付 従来の液晶ビューファインダーに比べて応答性が格段に向 けは確実に行う 上し、動画表示に優れています。 ビューファインダーは確実に固定してく マルチスキャン ださい。正しく取り付けられていない と、落下してけがの原因となることがあ カメラからの制御信号により、60i のほかに 24PsF や 50i な ります。 どの各種フォーマットに対応します。 ビューファインダーを取り外 安定した画像 すときは、指示にしたがって LCD の採用により、画面の明るさに関係なく、ひずみのな 行う い安定した画像が得られます。 ビューファインダーの取り外しは、この 画像拡大機能 オペレーションマニュアルに記載されて いる方法で行ってください。正しく取り 画像の縦横を 2.4 倍に拡大して、フォーカスを容易に調整 外さないと、落下してけがの原因となる...
-
Page 5: 使用上のご注意
防滴構造 使用上のご注意 多少の雨にも耐えられる防滴構造により、戸外での撮影に も適しています。 屋内フードおよび屋外フードを取り付け可 • 本機の液晶パネルは非常に精密な技術で作られておりま 能 す。まれに黒い画素が現れたり、常時点灯(赤、青、緑 など)する画素が存在することがありますが、故障では 堅牢で操作性のよい屋内フード ( 付属 ) と、遮光性に優れて ありません(有効画素 99.99% 以上) 。これらの現象はカ いる屋外フード ( 別売り ) を取り付けることができます。 メラの映像出力には影響しません。 • 静止画を継続的に表示すると残像が現れることがありま す。長時間使用しないときは電源を切ってください。 • 低温でのご使用時には、動解像度と輝度が低下いたしま す。 • 画面の表面からほこりを取り除くときは、ブロアーをお 使いください。 • 画面をクリーニングするときは、シンナーなどの溶剤は いっさい使用しないでください。 使用上のご注意... -
Page 6: 各部の名称と働き
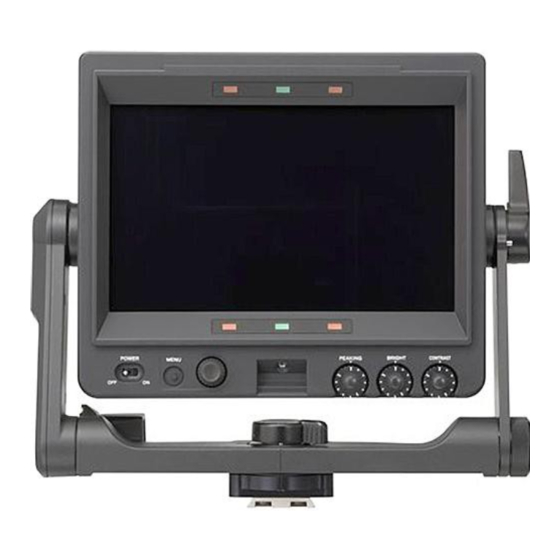
各部の名称と働き 1 POWER スイッチ 前面 2 レッド(R)タリーランプ 3 チルトロック / フリクション調節レバー 4 CONTRAST つまみ 5 BRIGHT つまみ 6 リフトロック解除ノブ 1 7 PEAKING つまみ 8 パンロック / フリクション調節レバー 9 グリーン(G)タリーランプ 0 マウントウェッジ qa MENU つまみ qs MENU スイッチ 後面 qd 外部タリーランプ qf ASSIGN. - Page 7 c チルトロック / フリクション調節レバー 3 秒以上押すと「VR LOCK」が表示され、つまみがロック チルティング操作のフリクションを希望の角度に調節し、 されます。もう一度 3 秒以上押すと「VR UNLOCK」が表 固定します。 示され、ロックが解除されます。 レバーをカメラのレンズ側に倒すと固定され、手前に倒す ◆ 操作方法については、「メニューを使う」 (13 ページ)をご覧く とフリクションを調節できます。 ださい。 d CONTRAST(コントラスト調節)つまみ m 外部タリーランプ 画面のコントラストを調節します。 (カメラの映像出力には カメラにレッドタリー信号が供給されると点灯(赤)しま 影響しません。 ) す。0 から 9 までのナンバープレート(付属)を取り付け て、カメラの番号を表示できます。 e BRIGHT(明るさ調節)つまみ 画面の明るさを調節します。 (カメラの映像出力には影響し n ASSIGN. 1/ASSIGN. 2(アサイナブル 1/2)スイッ ません。...
-
Page 8: カメラに取り付ける
カメラに取り付ける カメラに V ウェッジシューアタッチメント(付属)を取り 付け、アタッチメントに本機を取り付けます。 ご注意 • 本機をカメラに取り付け / 取り外しするときには、 かなら ず本機を標準位置にロックしてください。 • 本機をカメラから取り外すときは、三脚のチルトロック 接続ケーブル(付属)を使用して、本機のカメラ端子 を確実に行い、本機を確実に持って取り外してください。 とカメラの VF 端子とを接続する。 また、本機およびカメラの転倒・落下にご注意ください。 接続ケーブルは、下図のようにケーブルクランパーで ◆ カメラに取り付けた後本機の位置を変える方法については、 「位 固定する。 置を調節する」 (9 ページ)の手順をご覧ください。 4個のプラスチックキャップを外し、 Lレンチ (付属) と六 角穴付きボルト(4 × 12、4 本付属)を使って、V ウェッジシューアタッチメント(付属)をカメラの上 部に取り付ける。 カメラ端子 プラスチックキャップ ケーブルクランパー... -
Page 9: 位置を調節する
位置を調節する ン調節レバーをカメラのレンズ側に倒してロックしてくだ ご注意 さい。また、リフトロック解除ノブ 1 が LOCK 側に固定さ 本機をカメラに取り付けたままカメラを移動するときは、 れていることを確認してください。 本機を標準位置まで引き上げ、チルトロック / フリクショ 高さ調節 リフトロック解除ノブ 1 を RELEASE 側に止るまで回し 本機を確実に持ちながら、 リフトロック解除ノブ 2 を引 てロックを解除する。 き、本機を標準位置、中間位置 1、中間位置 2、また は、最低位置に移動する。 カチッと音がして固定されます。 リフトロック解除ノブ 2 リフトロック解除ノブ 1 最低位置 中間位置 2 標準位置 中間位置 1 リフトロック解除ノブ1 を LOCK側に回して確実に固定 ご注意... -
Page 10: チルティング操作
チルティング操作 パンニング操作 チルトロック / フリクション調節レバーを倒して、 フリ パンロック / フリクション調節レバーを RELEASE 側に クションを調節する。 回して、フリクションを調整する。 チルティング角度を調節する。 本機を持って、本機を希望の角度に調節する。 調節範囲:+90゜∼− 90゜(高さ調節の位置により異 なる) ◆ 詳しくは 9 ページの図をご覧ください。 パンロック/フリクション調節レバーを LOCK側に回し てロックする。 ご注意 チルトロック / フリクション調節レバーをカメラのレン 接続するカメラによっては、パンニング操作をしたときに ズ側に倒してロックする。 本機がカメラのハンドルに当たることがあります。カメラ のハンドルの位置が変えられない場合、本機のマウント ウェッジの位置を調整してください。 ◆ 詳しくは「マウントウェッジの位置を変えるには」 (11 ページ) をご覧ください。 位置を調節する... -
Page 11: 画面を調整する
マウントウェッジの位置を変えるには 画面を調整する 本機を確実に押さえながら、マウントウェッジのねじ を 7 本取りはずす。 ご注意 底面 操作の前に、メニューの「PRESET」が「OFF」に設定さ れていることを確認してください。 「PRESET」が「ON」に設定されていると、前面の PEAKING/BRIGHT/CONTRAST つまみの操作が無効に なります。 ◆ メニュー操作について詳しくは、 「メニューを使う」 (13 ペー ジ)をご覧ください。 マウントウェッジの位置をずらし、ねじを取り付ける。 底面 PEAKING つまみを回して、ピーキングを補正する。 輪郭をはっきりさせるには:時計方向に回す。 BRIGHT つまみを回して、画面の明るさを調節する。 明るくするには:時計方向に回す。 CONTRAST つまみを回して、画面のコントラストを 調節する。 コントラストを強くするには:時計方向に回す。 つまみの誤動作を避けるには MENU スイッチを 3 秒以上押すと、 「VR LOCK」が表示さ れ、 PEAKING/BRIGHT/CONTRAST つまみがロックされ て誤動作を防ぐことができます。もう一度... -
Page 12: アクセサリーを取り付ける
屋内フード アクセサリーを取り付け る フードの取り付け 屋内フード ( 付属 ) の取り付けかたを説明します。 屋外フード VFH-990 ( 別売り ) の取り付けかたも同じ操作 です。 フードは上方向に 30°向きを変えることができます。 溝に引っかけて、フードを取り付ける。 屋外フード ( 別売り ) 溝 コインネジ ネジを回して固定する。 屋外フードが動きにくいときや、逆に所定の位置に留まり にくいときは、コインネジで調節します。右に回すと動き が重くなり、左へ回すと軽くなります。 ナンバープレートの取り付け ナンバープレート ( 付属 ) の左右のつめを外部タリーランプ の溝に差し込みます。 外部タリーランプ ネジ ナンバープレート (付属) アクセサリーを取り付ける... -
Page 13: メニューを使う
• ページを選びなおすときは、MENU スイッチを押す メニューを使う と、ページ選択モードに戻ります。 • 設定項目に●マークが、設定値に ? マークがある場合 (設定値変更モード)は、MENU スイッチを押すと 項目選択モードに戻ります。もう一度 MENU スイッ 本機では、メニューを使って操作全般の設定を行います。 チを押すと、ページ選択モードになります。 項目を選ぶ。 メニューモードの基本操作 選択したページの設定項目に マークが表示されてい メニューモードに入る。 る状態(項目選択モード)で、MENU つまみを回し て、 マークを移動する。 MENU スイッチを押す。 時計方向に回すと、 マークが下へ移動し、反時計方 メニュー画面がビューファインダー画面に表示されま 向に回すと マークが上へ移動します。 す。 項目選択モード c マーク ビューファインダーの画面上にカメラからの映像やメ 設定したい項目に マークを合わせ、MENU つまみ ニューが表示されている状態でも、本機のメニューを表... -
Page 14: メニュー一覧
なります。 続けて設定を変更する。 速く回すと数値が速く変化し、ゆっくり回すと微調整 続けて他の設定項目を変更するには、手順 2 ∼ 5 を繰り ができます。 返す。 設定値を確定する。 メニューモードから抜ける。 MENU つまみを押す。 メニュー画面が消えるまで、MENU スイッチを繰り返 し押す。 設定値が確定され、項目選択モードへ移ります。 設定値を標準値に戻すには MENU つまみを押す前に、MENU スイッチを押すと、 標準設定に戻したい設定項目に マークを移動させ、 設定値は変更前の値に戻り、項目選択モードに戻りま MENU つまみを 2 秒以上押します。 す。 メニュー一覧 • 選択できない項目は、設定値に「−−−」と表示されま ご注意 す。 • 項目によっては、前のメニュー項目で「ON」が選択され ていないと選択できないものがあります。 ページ メニュー 項目... - Page 15 ページ メニュー 項目 設定値([ ] はお買い上 機能 げ時の設定) MAGNIFICATION MAGNIFICATION [OFF]/ON 通常表示(OFF)と拡大表示(ON)を切り換えます。 電源投入後は必ず通常表示(OFF)になります。 POSITION [CNT]/UP L/UP R/ 拡大表示時、拡大する部分を選択します。 LOW R/LOW L CNT:中央部分を 2.4 倍に拡大 UP L:左上部分を 2.4 倍に拡大 UP R:右上部分を 2.4 倍に拡大 LOW R:右下部分を 2.4 倍に拡大 LOW L:左下部分を 2.4 倍に拡大 AUTO RELEASE [AUTO]/MAN 拡大表示時、拡大表示から通常表示へ戻す方法を設定します。...
- Page 16 接続端子 仕様 カメラ端子丸型 20 ピン 付属品 一般 屋内フード(1) ナンバープレート(1) 電源 DC10.5 ∼ 17.0 V(カメラから供給) V ウェッジシューアタッチメント(1) 消費電力 18 W L レンチ(1) 使用温度 − 20゜C ∼+ 45゜C 六角穴付きボルト(4) 保存温度 − 20゜C ∼+ 60゜C 接続ケーブル(1) 質量 2.7 kg(フード含まず) オペレーションマニュアル(1) 外形寸法(単位:mm) 別売り品 屋外フード VFH-990 関連製品...
- Page 17 E4 (kontrollierter EMV-Bereich, z.B. Fernsehstudio). harmful interference in which case the user will be required to correct the interference at his own expense. For the customers in Europe The manufacturer of this product is Sony Corporation, 1- 7-1 Konan, Minato-ku, Tokyo, Japan.
- Page 18 Notes ............19 Location and Function of Parts ....20 Pour les clients en Europe Le fabricant de ce produit est Sony Corporation, 1-7-1 Attaching the viewfinder to the Camera 22 Konan, Minato-ku, Tokyo, Japon. Adjusting the Position ......23 Le représentant autorisé...
-
Page 19: Overview
The HDVF-C950W HD Electronic Viewfinder is a 9-inch Studio monitor hood, outdoor hood color viewfinder for use with a Sony high-definition color The viewfinder can be fitted with a strong, easy-to-use camera or high-definition camcorder. -
Page 20: Notes
Notes • The LCD panel of the viewfinder is a product of high- precision technology. In rare cases, there may be one or more dropout pixels or pixels (red, blue, green, etc.) which are always on. This is not a malfunction (99.99% or more effective pixels). -
Page 21: Location And Function Of Parts
Location and Function of Parts 1 POWER switch Front 2 Red (R) tally lamps 3 Tilt-lock/friction adjustment lever 4 CONTRAST control 5 BRIGHT control 6 Lift-lock release knob 1 7 PEAKING control 8 Pan-lock/friction adjustment lever 9 Green (G) tally lamps 0 Mounting wedge qa MENU control qs MENU switch... - Page 22 c Tilt-lock/friction adjustment lever Press again for 3 seconds or more to unlock the controls Adjusts the amount of friction in the tilting mechanism, (“VR UNLOCK” appears in the viewfinder). and locks the viewfinder at a desired angle. For details on menu operations, see “Using the Menu” on The angle is locked when the lever is pushed towards the page 28.
-
Page 23: Attaching The Viewfinder To The Camera
There is an audible click when the viewfinder snaps Attaching the Viewfinder into the attachment. to the Camera Attach the V-shaped shoe attachment (supplied) to the top of the camera, then attach the viewfinder to the V-shaped shoe attachment. Notes •... -
Page 24: Adjusting The Position
Adjusting the Position push the tilt-lock/friction adjustment lever towards the Note camera lens to lock the viewfinder. Also, check to be sure Before moving the camera with the viewfinder attached, that lift-lock release knob 1 is locked in the “LOCK” always pull the viewfinder up to the standard position and position. -
Page 25: Tilting
Tilting Panning Pull the tilt-lock/friction adjustment lever towards the Turn the pan-lock/friction adjustment lever towards back of the camera to set the desired tilt friction. “RELEASE” to set the desired panning friction. Adjust the tilt angle. Grasp the viewfinder and turn it to the desired position. -
Page 26: Adjusting The Screen
Changing the position of the mounting Adjusting the Screen wedge Grasp the viewfinder firmly and remove the 7 screws from the mounting wedge. Note Before operating the PEAKING/BRIGHT/CONTRAST Bottom of the controls, make sure that “PRESET” in the menu is set to viewfinder “OFF.”... -
Page 27: Attaching Accessories
Monitor hood Attaching Accessories Attaching Hoods This section describes how to attach the supplied monitor hood. The optional VFH-990 Outdoor Hood is attached in the same manner. Hook the hood onto the projection above the screen. The hood direction can be adjusted up by 30º. Outdoor hood (optional) Projection Screw... -
Page 28: Using The Menu
item select mode. Press the MENU switch again to Using the Menu return to page select mode. Select menu items. Many of the viewfinder’s functions can be set by a menu With the c mark is positioned to the left of a menu operation. -
Page 29: List Of Menu Items
Enter the setting. End menu operations. Press the MENU control. Press the MENU switch repeatedly until the menu page disappears from the display. The setting is entered and the menu returns to item select mode. Restoring a setting to its initial value Move the c mark to the menu item to be restored, and then If you press the MENU switch before pressing the press the MENU control for 2 seconds or more. - Page 30 Page Menu item Settings Description (default in [OFF] MAGNIFICATION MAGNIFICATION Selects the normal display (OFF) or magnified display (ON). “OFF” (normal display) is selected whenever the power is turned on. [CNT] Selects the section of the screen to be magnified. /UP L/UP R/ POSITION CNT: Magnifies the center of the screen by 2.4 times...
- Page 31 Page Menu item Settings Description (default in [ON] STATUS DISPLAY ASSIGN. 1 Specifies whether the status of the function stored to the OFF/ ASSIGN. 1 switch is displayed (ON) or not (OFF). [ON] ASSIGN. 2 Specifies whether the status of the function stored to the OFF/ ASSIGN.
-
Page 32: Specifications
× inches) (H/V, at Always verify that the unit is operating properly before the lower of the screen) use. SONY WILL NOT BE LIABLE FOR DAMAGES OF ANY KIND INCLUDING, BUT NOT LIMITED TO, COMPENSATION OR REIMBURSEMENT ON Performance ACCOUNT OF THE LOSS OF PRESENT OR... - Page 33 保守等) と異なる目的で本マニュアルを使用することを禁止 します。 The material contained in this manual consists of information that is the property of Sony Corporation and is intended solely for use by the purchasers of the equipment described in this manual. Sony Corporation expressly prohibits the duplication of any...
- Page 34 Sony Corporation Printed in Belgium 2008.02.08 HDVF-C950W (SY) © 2006 2-697-741-03(1)
Need help?
Do you have a question about the HDFV-C950W and is the answer not in the manual?
Questions and answers