Table of Contents
Advertisement
Advertisement
Table of Contents

Related Manuals for Viavito satori


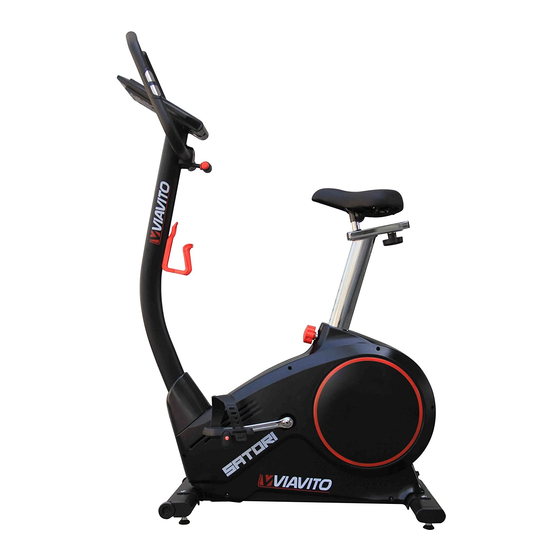
Summary of Contents for Viavito satori
- Page 1 Owner’s Manual. SATORI Exercise Bike. www.viavito.com Manual version 2.1...
-
Page 2: Table Of Contents
Congratulations Manual Contents. on purchasing your Safety Information 03/04 very own SATORI Machine Assembly 05/14 Exercise Bike. Contents Checklist Hardware Pack Assembly Diagram You have chosen a high-quality, safe and Assembly Instructions 08/14 innovative piece of exercise equipment as your training partner and we are certain... -
Page 3: Safety Information
06 Before beginning training, remove abnormal symptoms STOP all objects within a 2-metre radius EXERCISING IMMEDIATELY of the machine. AND CONSULT A PHYSICIAN 07 Use the machine only for its intended WITHOUT DELAY. purpose as described in the manual. www.viavito.com... - Page 4 Read all instructions before wear, e.g. bearings, connection points. using this exercise bike. 19 Examine the machine carefully before Viavito assumes no responsibility you use it, especially the components for personal injury or property, most susceptible to wear, e.g.
-
Page 5: Machine Assembly
Machine Assembly. Contents Checklist Make sure you have the following parts: B700 NO.N-8 Regular Washer φ 7(1) NO.N-9 Spring Washerφ 7(1) NO.N-7 Bushing φ 12*40MM (1) www.viavito.com... -
Page 6: Hardware Pack
NO. N-7 Bushing O 12x40MM (1) N-4 Box Spanner (1) N-5 Screwdriver/Wrench (1) NO. N-1 T-shape knob M8x65L (1) N-6 Allen Key (1) (MM) Please also view our Youtube Assembly Guide video, should you require extra assistance in setting up this product: https://youtu.be/yH8cPgfQuDM www.viavito.com... -
Page 7: Assembly Diagram
Assembly Diagram G-4R G-10 www.viavito.com... -
Page 8: Assembly Instructions
(G-9) using the two Allen main frame (G-9) using the two bolts (N-3). Allen bolts (N-3). M8x16L N-6 Allen Key Please also view our Youtube Assembly Guide video, should you require extra assistance in setting up this product: https://youtu.be/yH8cPgfQuDM www.viavito.com... - Page 9 Note: Screw the left pedal in counter-clockwise and the right pedal clockwise. Use the supplied wrench to screw in the two spindles completely. Do not force the pedal. If it’s not turning freely then unscrew it and re-seat it. Forcing the pedal on may damage the thread and prevent assembly. www.viavito.com...
- Page 10 N-5 Screwdriver/Wrench N-4 Box Spanner In addition, the slider can be adjusted on the horizontal plane by loosening the knob underneath the slider. Once the desired position has been set, re-tighten the knob to secure the slider. www.viavito.com...
- Page 11 Note: Do not fully tighten the bolts one at a time. Fix the 4 bolts in place finger tight, then once all 4 are fitted, fully tighten them using the supplied Allen key. 8x2T E-2M8x16L E-3 8x2T Ø Ø N-6 Allen Key www.viavito.com...
- Page 12 02 Pass the hand pulse wire (M-4) through the hole on the handlebar post as per www.viavito.com...
- Page 13 02 Remove the screws (H-3) from the post the hand pulse wire jack (M-4) to the and attach the bottle holder (G-25) to female hand pulse socket. Then attach the post (H-2) using those screws. the computer (A) to the computer G-25 G-10 www.viavito.com...
- Page 14 01 Connect the power supply (G-10) to the socket at the rear base of the bike and then plug it into the mains power. Please also view our Youtube Assembly Guide video, should you require extra assistance in setting up this product: https://youtu.be/yH8cPgfQuDM www.viavito.com...
-
Page 15: Console Instructions
Test heart rate recovery status. See Operation section point 4 RECOVERY on page 22 for more information In stop mode, press for body fat measurement. See Opera- BODY FAT tion section point 3.6 on page 21 for more information KM/ML SWITCH Select KM (°C) or ML (°F) mode www.viavito.com... -
Page 16: Display Functions
Celsius or in miles and Fahrenheit. There is a button on the back of the console to switch between the two. To do so, turn the power off, then select the desired setting using the switch, and then turn the power back on. www.viavito.com... -
Page 17: Operation
Fig. 1 Fig. 2 2. Settings 2.1. Setting the Date Set the year, month, date and clock by using the dial and pressing ENTER (figure 3). The screen will then enter user profile set-up mode (figure 4). Fig. 3 www.viavito.com... - Page 18 U1 Note: If the bike is unplugged from the is displayed on the screen use the dial to get mains, the user profiles will be deleted. www.viavito.com...
- Page 19 3. Selecting workout Press the ENTER button to confirm your (figure 12) and WATT programs (figure 13). selected workout. This bike offers manual, To select a workout, turn the dial when pre-set programs (figure 10), user program in the main menu and press the ENTER (figure 11), Heart Rate Control (H.R.C.) button to confirm the selection.
- Page 20 30~230. Use the dial to select one of the programs and press the ENTER button to set your exercise target. Press the START/STOP button to start the workout. To perform this program you must wear a compatible chest strap that pairs with Fig. 15 www.viavito.com...
- Page 21 (figure 17), the body fat advice Age, Height, and Weight information and symbol (figure 18), and BMI (figure 19), are holding both handgrips. The screen changing between them every 3 seconds. Fig. 16 Fig. 17 Fig. 18 Fig. 19 www.viavito.com...
- Page 22 (figure 22). All settings and as user profiles and programs. The exercise data will be stored until the machine has an auto-off function so it user starts exercising again. doesn’t need to be unplugged in order to power down. Fig. 22 www.viavito.com...
-
Page 23: Conditioning Guidelines
124-156 • Stimulate the mind 122-155 121-153 • Help maintain stable weight 119-151 • Control appetite 118-150 • Boost self-image 117-147 115-146 • Improve muscle tone and strength 114-144 • Improve flexibility • Lower blood pressure • Relieve insomnia www.viavito.com... -
Page 24: Beginners Guide To Exercise
• If you are sore or tired, give yourself the THR for your age. Always be aware of a few extra days to recover. how you feel when you exercise. If you feel dizzy or light-headed, stop immediately and rest. www.viavito.com... -
Page 25: Stretching Guide
• Stretch at least three times a week to perature, which greatly reduces the risk of maintain flexibility. injury. Stretching develops flexibility and reduces muscles soreness. Stretches should be held for 15 to 30 seconds. www.viavito.com... - Page 26 The purpose of cooling down is to return the body to its normal or near normal, resting state at the end of each exercise session. A proper cool-down slowly lowers your heart rate, allows blood to return to the heart and helps prevent muscle soreness caused by the build-up of lactic acid in the muscles. www.viavito.com...
-
Page 27: Customer Support
• Precise description of the issue or defect. IMPORTANT!! - Please retain your sales receipt. Viavito Customer Care may request proof of purchase to validate eligibility for warranty service. Warranty cover starts from the date shown on the proof of purchase. -
Page 28: Manufacturer's Warranty
Manufacturer's Warranty Viavito ltd warrants this product to be free Viavito is not responsible or liable for of defects of material and workmanship, direct, indirect, or consequential losses under normal use and conditions, for a arising out of or in connection with the use... -
Page 29: Technical Information
*E-4 – Occurs when FAT% is below 5 or exceeds 50 and BMI result is below 5 or exceeds 50. Space Required. Site area 500 990 1320 Dimensions provided are in Training area 650 1100 1320 millimetres (mm). Free area 1250 1700 2320 www.viavito.com... -
Page 30: Exploded Diagram
Exploded Diagram G-25 C-11 G-24 C-13 G-19 G-18 G-20 C-10 C-12 G-4R G-16 G-14 G-21 G-22 G-13 G-15 G-17 G-23 G-11 G-10 G-12 G-4L F-3 F-2 www.viavito.com... -
Page 31: Parts List
Flat Washer Bearing 6003RS C-10 Bearing 6300RS C-11 Flywheel Axle C-12 Flywheel C-13 Blushing Belt Tightener Set Screw Pully Wheel (incl. 2 bearings) Curve Washer Nylon Nut Screw Flat Washer Flat Washer Spring Belt Tightener Handlebar Screw Set Semi-Circle Washer www.viavito.com... - Page 32 Drive Belt G-18 Seat Post Sleeve G-19 Seat Post Locking Knob G-20 Lower Computer Cable G-21 Screw G-22 Sensor Wire G-23 Sensor Holder G-24 Handlebar Post Cover G-25 Bottle Holder Upper Computer Cable Handlebar Post Screw M5X20L Rear Stabiliser Set www.viavito.com...
- Page 33 Flat Washer End Cap Handlebar Set Foam Grip Hand Pulse Sensor End Cap Hand Pulse Sensor Wire Screw Handlebar Hardware kit T-Shape Knob Handlebar Bracket Cover Allen Bolt Box Spanner Screwdriver/Wrench Allen Key Bushing Flat Washer Spring Washer Servomotor Set www.viavito.com...
Need help?
Do you have a question about the satori and is the answer not in the manual?
Questions and answers