Table of Contents
Advertisement
Available languages
Available languages
MANUAL DE INSTRUCCIONES
INSTRUCCIONES PARA EL USO Y EL MANTENIMIENTO, LEA ESTE
MANUAL ANTES DE PONER EN MARCHA EL EQUIPO
INSTRUCTION MANUAL
INSTRUCTIONS FOR THE USE AND MAINTENANCE, READ THIS
MANUAL BEFORE STARTING THE EQUIPMENT
MANUEL D'INSTRUCTIONS
INSTRUCTIONS POUR L'UTILISATION ET LA MAINTENANCE, LISEZ
CE MANUEL AVANT DE METTRE L'APPAREIL EN MARCHE
BEDIENUNGSANLEITUNG
BEDIENUNGS- UND WARTUNGSANLEITUNG, LESEN SIE DIESE
ANLEITUNG VOR INBETRIEBNAHME DES GERÄTES
MANUAL DE INSTRUÇÕES
INSTRUÇÕES PARA O USO E MANUTENÇÃO, LEIA ESTE MANUAL
ANTES DE UTILIZAR O EQUIPAMENTO
MI03122-01 09/2015
ES
EN
FR
DE
PT
Advertisement
Table of Contents

Related Manuals for Solter aeroprocess 2000


Summary of Contents for Solter aeroprocess 2000
- Page 1 MANUAL DE INSTRUCCIONES INSTRUCCIONES PARA EL USO Y EL MANTENIMIENTO, LEA ESTE MANUAL ANTES DE PONER EN MARCHA EL EQUIPO INSTRUCTION MANUAL INSTRUCTIONS FOR THE USE AND MAINTENANCE, READ THIS MANUAL BEFORE STARTING THE EQUIPMENT MANUEL D’INSTRUCTIONS INSTRUCTIONS POUR L’UTILISATION ET LA MAINTENANCE, LISEZ CE MANUEL AVANT DE METTRE L’APPAREIL EN MARCHE BEDIENUNGSANLEITUNG BEDIENUNGS- UND WARTUNGSANLEITUNG, LESEN SIE DIESE...
-
Page 2: Table Of Contents
Descripción de los elementos del equipo Conexionado de la pinza de masa Conexionado de la antorcha Conexionado del gas Uso de generadores Puesta en servicio Aeroprocess 2000 Puesta en servicio Aeroprocess 3200 Puesta en servicio Aeroprocess 3220 Esquema panel frontal Operativa panel Simbología del display... -
Page 3: Introducción
Si a pesar de todo hay problemas de interfe- rencias, el operador deberá tomar medidas extras como mover la máquina de soldar, usar filtros, usar cables blindados... para asegurar la no interferencia con otros equipos. SOLTER SOLDADURA S.L. AEROPROCESS... -
Page 4: Descripciones Generales
La gama de equipos Solter Aeroprocess, logra un ajuste ágil gracias a la asistencia de configuración sinérgica de los parámetros de soldadura MIG-MAG. - Page 5 CARACTERÍSTICAS TÉCNICAS Aeroprocess 2000 Aeroprocess 3200 Aeroprocess 3220 Voltaje de entrada (U1) 230V +/- 15% 400V +/- 15% 400V +/- 15% Intensidad máxima de entrada (I1 máx) 22,2A 22,2A Voltaje de soldadura en vacío (U0) Potencia absorbida max. 9KVA 9KVA...
-
Page 6: Descripción De Los Elementos Del Equipo
(curva D), para prevenir falsos disparos. MANIPULACIÓN Y MONTAJE DEL EQUIPO Para la manipulación y transporte del equipo Aeroprocess 2000, utilice siempre las asas frontal y posterior. Para mover los equipos Aeroprocess 3200 e 3220, primero debe montar las ruedas delanteras y posteriores con los respectivos tonillos. -
Page 7: Conexionado De La Pinza De Masa
Asegúrese de que la antorcha que se va a utilizar es la adecuada según el material, el tipo de refri- geración, los niveles de corriente y el ciclo de trabajo que requiera cada aplicación. Solter dispone de distintas antor- chas para adaptarse a las necesidades de cada cliente. -
Page 8: Uso De Generadores
Conectar la máquina de soldar a un enchufe provisto de toma de tierra. Es obligatorio que la toma de corriente dis- ponga de la conexión de tierra. La tensión de la red debe encontrarse dentro de los márgenes establecidos por Solter Soldadura (230V ± 15V). Fuera de estas tensiones, la máquina puede funcionar incorrectamente. - Page 9 Tanto la electroválvula cómo el sensor de presión de gas de protección están ubicados en la unidad de potencia con el fin de ahorrar en el consumo de gas. ATENCIÓN Debe asegurarse que todos los conectores están conectados firmemente y que no puedan presentar pro- blemas de falsos contactos. SOLTER SOLDADURA S.L. AEROPROCESS...
-
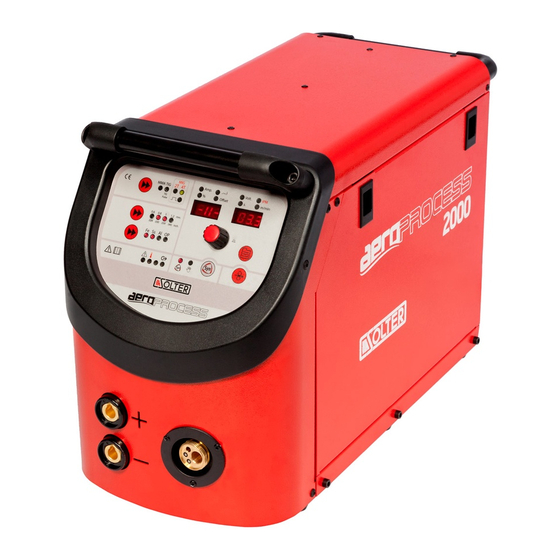
Page 10: Esquema Panel Frontal
17- Selector del Menú 7- Amperios 18- Pulsador de enhebrado manual 8- Velocidad (m/min) 19- Mando principal 9- Grosor a soldar 20- Selector sinérgico o manual 10- Altura del arco 21- Modo manual 11-Tiempo (0,1s) 22- Modo sinérgico SOLTER SOLDADURA S.L. AEROPROCESS... -
Page 11: Operativa Panel
Al pulsarlo, aparece en la pantalla la indicación inc y la velocidad de enhebrado (que podremos modifi- car con el selector E). H- Indicador de las anomalías o estados del equipo: En él aparecen varias indicaciones (alarmas, sobretemperatura o equipo trabajando). SOLTER SOLDADURA S.L. AEROPROCESS... -
Page 12: Simbología Del Display
Reset del contador de Función activada Función desactivada Confirmar Anular consumo de alambre Versión de software Versión de software Versión SYN en Versión de software de la interfaz usuario de la unidad potencia MIG-MAG SOLTER SOLDADURA S.L. AEROPROCESS... -
Page 13: Operativa Del Menú
El valor es acumulativo hasta un valor máximo de 600m en el que se resetea auto- máticamente. El dato de las horas de trabajo se visualiza en horas y minutos (hhhh.mm) y no puede ser reseteado. Este contador se incrementa con el tiempo de soldadura real. Ejemplo: 71h 30 minutos SOLTER SOLDADURA S.L. AEROPROCESS... -
Page 14: Operativa Soldadura Mig-Mag
Asegúrese de que ninguna parte sobresalga de la bobina de alambre. Uti- lice el adaptador SOLTER 56125 para bobinas de 150mm de diámetro. El extremo del alambre deberá limarse para que se deslice correctamente y no pueda quedarse bloqueado o estropear la guía. Ajuste el freno de manera que la bobina no continue girando cuando el motor se detenga. - Page 15 Colocaremos el rodete del alambre en el soporte previsto para éste, de manera que entre lo más recto posible en el sistema de arrastre (utilizar el adaptador SOLTER ref. 56125 para rodetes de 150mm). El freno debe ajustarse de manera que no gire suave, ya que podría ocasionar un enredo del alambre al parar de traccionar. El extremo del alambre deberá...
-
Page 16: Operativa Soldadura Mma
Conectar la pinza porta-electrodos y pinza de masa según indicaciones del electrodo que utilizemos (utilizar los bor- nes dinse (+ y -) del exterior del equipo). Seleccionar el modo MMA. Una vez está seleccionado el modo MMA, podremos ajustar el amperaje de soldadura deseado. SOLTER SOLDADURA S.L. AEROPROCESS... -
Page 17: Operativa Soldadura Tig
Para los modelos Aeroprocess 2000, 3200 y 3220, la ignición del arco para procesos TIG se realiza mediante con- tacto. Presione ligeramente el electrodo con la pieza a soldar (1), presione el pulsador de la antorcha y espere entre 1 y 2 segundos (comenzará... - Page 18 Ésto permite con un solo mando reducir o aumentar el ajuste de corriente de soldeo de todos los parámetros asociados a la intensidad nominal. SOLTER SOLDADURA S.L. AEROPROCESS...
- Page 19 Para montar el KIT ruedas (56206), primero debe retirar los 4 pies de nylon de la parte inferior de la unidad, montar las ruedas a los 2 soportes y atornillar éstos a la base de la devanadora. No vuelva a utilizar los pies de nylon para atornillar los soportes, utilice los tornillos metálicos suministrados con el kit. SOLTER SOLDADURA S.L. AEROPROCESS...
-
Page 20: Rodillos
Verificar si el material que utilizamos se corresponde con el que hemos El arco no es estable y el alambre seleccionado. choca con la pieza. Verificar que tenemos los consumibles y rodillos adecuados al material utilizado. SOLTER SOLDADURA S.L. AEROPROCESS... -
Page 21: Alarmas Y Anomalias
Error de la memoria in- Er 6 Memoria de datos no operativa, substituya el panel operador. terna Sobrecalentamiento Esperar que el equipo se enfríe. Er 10 Tensión de alimenta- Verificar la tensión de entrada del equipo ción incorrecta SOLTER SOLDADURA S.L. AEROPROCESS... -
Page 22: Instrucciones De Mantenimiento
5 minutos antes de realizar cualquier operación de mantenimiento. DESPIECES Aeropocess 2000 (A1) Aerofeed 5 (A1) Aeroprocess 3200 (A2) Aeroprocess 3220 (A3) ESQUEMAS ELÉCTRICOS AEROPROCESS 3200 (A4) AEROPROCESS 3220 (A5) AEROPROCESS 2000 (A6) AEROFEED 5 (A7) SOLTER SOLDADURA S.L. AEROPROCESS... - Page 23 Description of the items of equipment Connection of the earth clamp Connection of the torch Gas connection Use of electric generators Commissioning of Aeroprocess 2000 Commissioning of Aeroprocess 3200 Commissioning of Aeroprocess 3220 Front panel layout Operating the front panel...
- Page 24 RECYCLING In compliance with European Directive 2002/96/EC on waste electric and electronic equipment, this equipment must be deposited in your local recycling centre at the end of its useful life. SOLTER SOLDADURA S.L. AEROPROCESS...
- Page 25 It can be applied universally to any type of welding of various materials such as stainless steels, alloy steels, aluminium alloys or other copper or titanium alloys. The range of Solter Aeroprocess equipments allows rapid setting with the assistance of synergic configuration of MIG-MAG parameters.
- Page 26 TECHNICAL SPECIFICATIONS Aeroprocess 2000 Aeroprocess 3200 Aeroprocess 3220 Input voltage (U1) 230V +/- 15% 400V +/- 15% 400V +/- 15% Maximum input current (I1 máx) 22,2A 22,2A No-load voltage (U0) Max. absobed power 9KVA 9KVA 9KVA Fuse Mig-Mag regulation range...
- Page 27 HANDLING AND ASSEMBLY OF THE MACHINE To handle and move the Aeroprocess 2000 equipments, always use the front and rear handles. To handle and move the Aeroprocess 3200 and 3220 equipments, firstly you have to assemble the front and the rear wheels (using their respective screws).
-
Page 28: Gas Connection
You can use an air-cooled or water-cooled torch. Solter has different torches to suit the needs of each customer. See table below. TORCH REFRIGERATIÓN... - Page 29 Always start or stop the machine using the rear switch, NOT by plugging or unplugging it from the mains COMMISSIONING OF AEROPROCESS 2000 Connect the welding machine to a socket with earth wire (the plug must have an earth connection).
- Page 30 Do not connect the gas cylinder directly to the wire feeder, as it has no solenoid. The solenoid and the shielding gas pressure sensor are located in the power unit in order to save gas consumption. ATTENTION Ensure that all connectors are securely connected and that they may not present problems of false contacts. SOLTER SOLDADURA S.L. AEROPROCESS...
-
Page 31: Front Panel Layout
17- Menu selector 7- Amps visualization 18- Button of manual feeding 8- Speed in m/min. 19- Main selector 9- Welding thickness 20- Synergic or manual selector 10- Arc height 21- Manual mode 11-Time (0,1s) 22- Synergic mode SOLTER SOLDADURA S.L. AEROPROCESS... - Page 32 G- Button of manual feeding: Only available in MIG mode. It allows us to thread the wire into the torch to prepare the equipment. When pressed, the indication "inc" and the threading speed (which may change with the E selector) are displayed. H - Machine status indicator: This part displays several indications (alarms, overheating or machine operating) SOLTER SOLDADURA S.L. AEROPROCESS...
- Page 33 Program Consumed parameters program settings Functions wire Enabled Disabled Reset of the consu- Confirm Cancel function function med wire counter Firmware release Power unit MIG-MAG SYN Software version of the user interface firmware release database version SOLTER SOLDADURA S.L. AEROPROCESS...
- Page 34 If you don’t reset the value manually, this value will be reset automatically when it arri- ves to 600m. The operating time value is displayed in hours and minutes (hhhh.mm) and cannot be reset. The value on this time meter increases with the real welding time. Example: 71h 30 minutes SOLTER SOLDADURA S.L. AEROPROCESS...
- Page 35 Place the coil of wire in the support provided for this purpose, so that the coil rotates clockwise when in operation. Make sure that no part protrudes from the coil of wire. Use the SOLTER 56125 adapter for coils of 150mm diameter.
- Page 36 Wire threading Place the wire coil on the bracket provided for it and as straight as possible with the drive system (use the SOLTER adapter 56125 for coils of 150mm diameter). The brake must be adjusted so that the coil no turn soft as it could cause a wire tangle when the motor stops.
- Page 37 Connect the electrode holder clamp and earth clamp according to the instructions of the electrodes you are going to use (use the terminals (+ and -) on the front of the power unit). Select the MMA mode. Having selected the MMA mode, you can set the desired welding amperage. SOLTER SOLDADURA S.L. AEROPROCESS...
- Page 38 For TIG welding and TIG pulsed arc welding, you must use a TIG torch ref. 06131 connected to the euroconnector (only for aeroprocess 2000 and 3220) or the TIG adapter ref. 56210 (all models) for SR17 and SR26 TIG torches. In this case, the torch has to be connected directly to the external terminals.
- Page 39 If you use a torch with potentiometer control, you can vary the welding amperage setting (from the rated value set on the front panel to the minimum machine operating value). This allows you to reduce or increase the welding current setting of all parameters associated with the nominal current with a single control. SOLTER SOLDADURA S.L. AEROPROCESS...
- Page 40 To mount the wheels kit (56206), first remove the 4 nylon feet from the bottom of the unit. Attach the wheels to the 2 brackets and screw these to the base of the winder. Do not reuse the nylon feet to screw the brackets, use the metal screws provided with the kit. SOLTER SOLDADURA S.L. AEROPROCESS...
- Page 41 Check if the material used corresponds to the selected in the machine. The arc is not stable and the wire Verify that consumables and rollers are appropriate with the material in collides with the workpiece. use. SOLTER SOLDADURA S.L. AEROPROCESS...
- Page 42 Er 5 compatible working. Replace it. Er 6 Error in internal memory Non-operational data memory, replace the operator panel. Overheating Wait until the equipment regains a safe temperature. Er 10 Incorrect input voltage Verify the input voltage. SOLTER SOLDADURA S.L. AEROPROCESS...
- Page 43 Before accessing the interior of the machine, unplug it from the mains and wait at least 5 minutes before carrying out any maintenance operation. EXPLODED DRAWINGS Aeropocess 2000 (A1) Aerofeed 5 (A1) Aeroprocess 3200 (A2) Aeroprocess 3220 (A3) SCHEMATICS AEROPROCESS 3200 (A4) AEROPROCESS 3220 (A5) AEROPROCESS 2000 (A6) AEROFEED 5 (A7) SOLTER SOLDADURA S.L. AEROPROCESS...
- Page 44 AEROPROCESS 2000 69000271 AEROFEED 5 SOLTER SOLDADURA S.L. AEROPROCESS...
- Page 45 AEROPROCESS 3200 SOLTER SOLDADURA S.L. AEROPROCESS...
- Page 46 AEROPROCESS 3220 SOLTER SOLDADURA S.L. AEROPROCESS...
- Page 47 SOLTER SOLDADURA S.L. AEROPROCESS...
- Page 48 SOLTER SOLDADURA S.L. AEROPROCESS...
- Page 49 SOLTER SOLDADURA S.L. AEROPROCESS...
- Page 50 SOLTER SOLTER SOLDADURA S.L. SOLDADURA S.L. AEROPROCESS AEROPROCESS...
- Page 51 / On ne déclare que la machine type: / Se declara que el aparato tipo: / Die Maschine Typ: AEROPROCESS 2000, AEROPROCESS 3200, AEROPROCESS 3220 y AEROFEED 5 Serial Number: / Número de serie: / Nombre de sèrie: / Numéro de série : / Número de série: / Seriennummer:...
- Page 52 CERTIFICATE OF GUARANTEE SOLTER products are designed for industrial and professional applications. Both its construction and the strict testing and quality controls, guarantee products from 1 to 3 years depending on the type of product and territory where the product is purchased.
Need help?
Do you have a question about the aeroprocess 2000 and is the answer not in the manual?
Questions and answers