
Subscribe to Our Youtube Channel
Related Manuals for Transcell Technology TI-500 RF Series


Summary of Contents for Transcell Technology TI-500 RF Series
- Page 1 MODEL TI-500 RF Series User Manual Digital Weight Indicator Revision 1.3 July 9, 2012 (with wireless weighing capability)
-
Page 2: Table Of Contents
Table of Contents OVERVIEW ..........................3 Scope of TI-500 RF Series ....................3 BASIC OPERATION ........................4 Getting Started – Cabled Systems..................4 Getting Started – Wireless Systems ..................4 Operation – TI-500 RF and TI-500 RF SS ................4 Operation – TI-500 RFTM ....................4 Replacing the batteries – TI-500 RFTM ................5 Rechargeable battery information –... - Page 3 ©Transcell Technology, Inc. 2010-2012. All rights reserved. The information contained herein is the property of Transcell Technology and is supplied without liability for errors or omissions. No part may be reproduced or used except as authorized by contract or other written permission. The copy- right and the foregoing restriction on reproduction and use extend to all media in which the information may be embod- ied.
-
Page 4: Overview
OVERVIEW Scope of TI-500 RF Series Out of the box, the TI-500 RF series indicator operates as a basic, cabled digital weight indica- tor. The load cell(s) and/or j-box is connected to the indicator’s internal A/D convertor. This con- figuration is depicted in the following diagram: When sold with an external TI-500 RFTM (Radio Frequency Transceiver Module) and an op- tional wireless radio, your TI-500 RF series indicator is transformed from “wired”... -
Page 5: Basic Operation
BASIC OPERATION Getting Started – Cabled Systems 1. Press and hold the ON/PRINT key on the digital indicator unit for two seconds. After a brief initialization period, the scale will revert to a zero (“0”) weight display. Your scale is now ready for operation! Getting Started –... -
Page 6: Replacing The Batteries - Ti-500 Rftm
NOTE 1: TI-500 RFTM will shut down completely within two hours of a lost connection with the indicator. NOTE: 2: TI-500 RFTM will only enter sleep mode when the TI-500 RF indicator is OFF. When shipped from the factory, the TI-500 RF digital indicator is configured to automatically switch off after 5 minutes if not in use. -
Page 7: Rechargeable Battery Information - Ti-500 Rf Ss
Rechargeable battery information – TI-500 RF SS The TI-500 RF SS contains an internal lead-acid rechargeable battery. Before using the indica- tor for the first time, please charge the battery overnight. The indicator’s battery should operate for about 85 hours if left on continuously. The display unit is configured to power down after 5 minutes of inactivity but this parameter can be changed thru the A10 menu setting. -
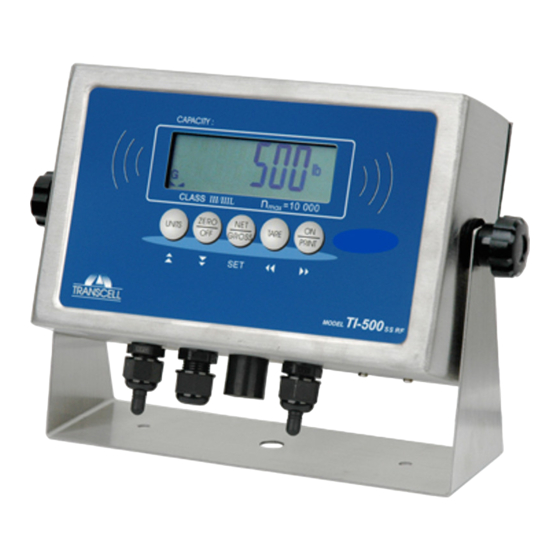
Page 8: Display & Keypad Details
DISPLAY & KEYPAD DETAILS This model utilizes a 6-digit LCD (Liquid Crystal Display) with adjustable LED backlight. The Ta- ble below summarizes the display annunciators. Symbol Display Displays when the scale is on Zero. 0 Indicates that the indicator is displaying net weight (Gross weight minus Tare weigh). Indicates that the indicator is displaying gross weight Indicates that a push-button tare weight has been established in the system Indicates that the indicator is in PEAK HOLD mode... - Page 9 The keypad is composed of a total of five (5) function keys. Keypad Functions Units This key toggles the indicator between lb and kg. Zero/Off This key sets the indicator to display zero weight provided the following conditions are met: 1.
-
Page 10: Advanced Operation
ADVANCED OPERATION Hold operation: This mode of operation is enabled by setting F30 to “5” in the Setup Menu (see separate install- er’s guide for more information). This mode captures the weight of an unstable load, e.g. live- stock, by freezing the weight on the display. Use the Motion Band setting (F5) and the Percent- age Hold setting (F12) to adjust this mode to your specific application. -
Page 11: Piece Counting
Piece Counting IMPORTANT NOTE: The piece counting function cannot be used in commercial (NTEP) appli- cations. This mode of operation is enabled by setting F30 to “3” in the Setup Menu (see separate install- er’s guide for more information). This mode is used to indicate the number of pieces of an item you have placed on the scale’s platform and is accessed by pressing the UNITS key. -
Page 12: Peak Hold Mode
Peak Hold Mode IMPORTANT NOTE: The peak hold function cannot be used in commercial (NTEP) appli- cations. This mode of operation is enabled by setting F30 to “5” in the Setup Menu and A11 to “3” in the User Menu (see separate installer’s guide for more information). This mode is used to indicate and hold the peak weight recorded during a specific process. -
Page 13: Printer
Printer If the weighing system has been equipped with a printer, then weighing and time & date data can be printed. Here is an example of a possible printout: ID.NO. 123456 DATE 01/28/11 TIME 10:23 AM GROSS 1067 lb TARE 67 lb 1000 lb 1000... -
Page 14: Set Point Control (Relay Option)
10. After entering the exact value, press the NET/GROSS key to save the value. The screen displays “dA_xx” where ‘xx’ is the current day of the month, e.g. “14”. One digit will be flash- ing. 11. Use the four directional keys to adjust the displayed value to the actual day value. Increase the flashing digit by pressing the UNITS key. - Page 15 Target weight signal In this application, relay 1 is activated as soon as the gross or net weight value exceeds the set- point 1 value. Conversely, relay 1 is de-activated as soon as the gross or net weight value drops below the set-point 1 value.
- Page 16 Filling: 1. Place an empty container onto the scale. 2. Press the TARE key. The display shows the net value and the pointers stp1 and stp2 are on. Relays 1 and 2 are closed. 3. As soon as set-point 1 is reached, pointer stp1 will turn off and relay 1 will be opened. 4.
- Page 17 3. The set-point value is activated and the display returns to the weighing mode. 1. Press the NET/GROSS key. The display shows the last entered value with the left digit blinking. The pointer for set-point 1 is on. 2. Use the four directional keys to adjust the displayed value to the actual set point. In- crease the flashing digit by pressing the UNITS key.
-
Page 18: Error Messages
ERROR MESSAGES Indicates that the weighing capacity of the scale has been exceeded. Indicates that the weight on the scale is negative. Press the Zero/Off key. TI-500 RFTM #1 not found; ensure that it is pow- ered ON or move it closer to the digital indicator. WIRELESS SYSTEMS ONLY NOTE: Dual systems only TI-500 RFTM #2 not found;... -
Page 19: Specifications
Battery in digital indicator need to be recharged or replaced and both TI-500 RFTM batteries need to be replaced. Err 24 Value for SP1 is greater than value for SP2. Parameter menus blocked. Toggle calibration Err 99 switch back to its original position. Weighing platform not detected No-ad SPECIFICATIONS... -
Page 20: Troubleshooting
Transcell Tech Support: (847) 419-9180 Limited 12 month Warranty This product is warranted by Transcell Technology against manufacturing defects in material and workmanship under normal use for twelve (12) months from the date of purchase. For com- plete warranty details and service information, please contact us at the address below.
Need help?
Do you have a question about the TI-500 RF Series and is the answer not in the manual?
Questions and answers