
Related Manuals for MD SPORTS 1554829


Summary of Contents for MD SPORTS 1554829
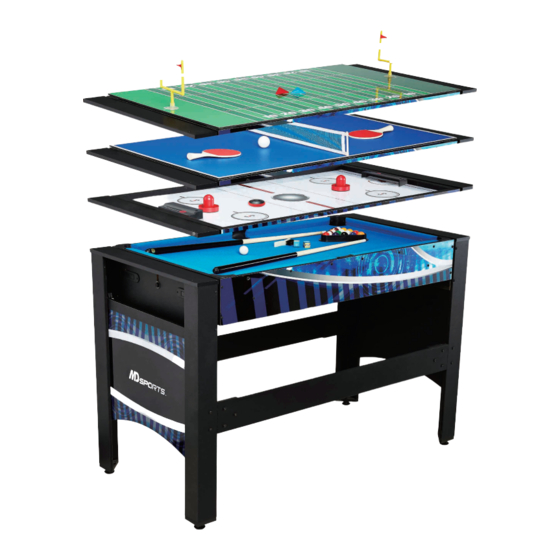
- Page 1 MODEL: 1554829 Meijer ASSEMBLY INSTRUCTIONS Please contact us before returning the product to the store. Register Now on themdsports.com and Earn a One-Year Warranty for Free!
- Page 2 Give Us Your Opinion and Receive A FREE FULL YEAR EXTENTED WARRANTY! Write a review for a recently purchased item on TheMDSports.com and receive an extended full year limited warranty, valued at $150.00. See TheMDSports.com for additional details.
- Page 3 3 - Since you build all tables upside down, please inspect tabletops or playing surfaces right away before putting together, all damaged table tops/playing surfaces need to be returned to the store. Please contact with retailer for their return policy. 1554829 www.themdsports.com (Continued on the next page.)
-
Page 4: Tools Required
3 years. No Children in Keep away from pets Do not use or keep product Strong Adults Needed outdoors. For indoor use only. Assembly Area No wet/humid conditions. 1554829 www.themdsports.com (Continued on the next page.) - Page 5 1554829 PARTS LIST Hockey Mainframe End Apron Billiard Playfield Top Rail Under Leg Side Leg Panel Leg Panel Left Leg Pedestal TT, Football, Right Leg Side Leg Brace Football Goal Surface Side Pocket Corner Pocket Leg Leveler Pusher Felt Pad...
- Page 6 1554829 PARTS LIST Hockey Goal Corner Pocket Side Pocket Plastic Strip 5 x 32mm Bushing 10mm Washer Washer Bolt 4x32mm 3x18mm Screw 3x12mm Screw 3.5x25mm Screw Screw 3.5 x 38mm 3.5x16mm 10 x 45mm Bolt 4x12mm Screw Screw Screw Triangle...
- Page 7 See FIG. 13B for details. FIG.1 3. Repeat for both ends of the table. 4. Attach the Corner Pockets (#33) and Side Pockets (#34) to the Mainframe (#1) using two Screws (#45) per Pocket. See FIG. 1. 1554829 www.themdsports.com (Continued on the next page.)
- Page 8 FIG.3 6. Attach the Side Pocket Caps (#13) and the Corner Pocket Caps (#14) to the Billiard Playfield (#2) using two Screws (#41) per Pocket Cap. See FIG. 3. 1554829 www.themdsports.com (Continued on the next page.)
- Page 9 8. Attach the Lock Pins (#32) to the End Aprons (#4) using two Screws (#41) per Lock Pin. See FIG. 5. FIG.6 FIG.6 9. Attach the Leg Pedestals (#5) to the End Aprons (#4) using three Screws (#46) per Leg Pedestal. See FIG. 5. 1554829 www.themdsports.com (Continued on the next page.)
- Page 10 10. Attach the Left Legs (#8) and Right Legs (#9) to the End Aprons (#4) using two Screws (#46) per Leg. See FIG. 8. FIG.8 FIG.8 11. Attach the Leg Panels (#6) to the Legs using four Screws (#45) per Leg Panel. See FIG. 10. 1554829 www.themdsports.com (Continued on the next page.)
- Page 11 FIG. 9 Assembly FIG. 8 Assembly FIG.10 13. Attach the FIG. 8 Assemblies to the FIG. 9 Assemblies using four Bolts (#37) and four Washers (#38) per Fig. 8 Assembly. See FIG. 10. 1554829 www.themdsports.com (Continued on the next page.)
-
Page 12: Top View Of Correct Swivel Bolt
16. Close the Lock Pins (#32) to prevent the Mainframe (#1) from flipping. See FIG. 11C. 17. Attach the Hockey Goals (#36) to the Mainframe (#1) using two Screws (#48) per Goal. See FIG. 11. 1554829 www.themdsports.com (Continued on the next page.) - Page 13 19. Peel the felt off of the Felt Pads (#17) and attach onto the bottom of the Pushers (#16). FIG.13 NOTE: Open the Lock Pins. FIG.13 20. Ensure that the billiard side is facing upwards. If not, open all four Lock Pins, swivel the table, then close the Lock Pins. 1554829 www.themdsports.com (Continued on the next page.)
- Page 14 21. Insert the Net Posts (#28) and Net (#27) into the Mainframe (#1). See FIG. 14A. 22. In order to use the Table Tennis Surface, the Table must be on the Billiard Side. 23. Assemble the Football Set. See FIG. 14. 1554829 www.themdsports.com (Continued on the next page.)
- Page 15 26. To operate the Hover Puck (#23), turn the switch on the rear of the Hover Puck to the "ON" position. The See FIG. 15. Hover Puck will operate for 20-30 minutes when fully charged. YOU ARE NOW READY TO PLAY! 1554829 www.themdsports.com (The last page)
Need help?
Do you have a question about the 1554829 and is the answer not in the manual?
Questions and answers