Table of Contents
Advertisement
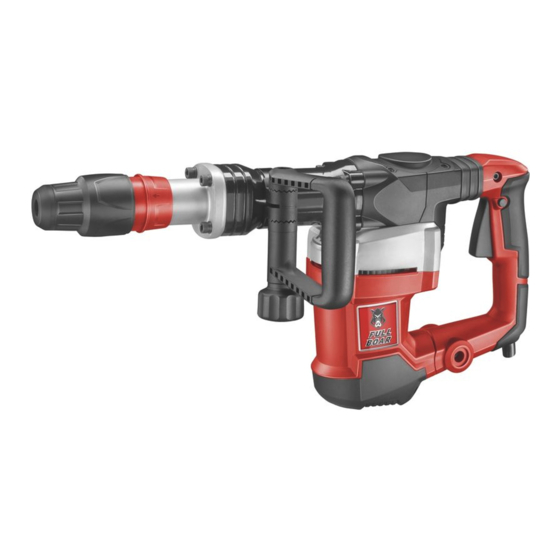
KNOW YOUR PRODUCT
DEMOLITION
HAMMER KIT
• 1500W MOTOR
• 32 JOULES
• ANTI VIBRATION
HANDLE
INSTRUCTION MANUAL
WARNING: Read all safety warnings and all instructions. Failure to follow the
warnings and instructions may result in electric shock, fire and/or serious injury.
Save all warnings and instructions for future reference.
04/16
Advertisement
Table of Contents

Related Manuals for Full Boar FBT-1100


Summary of Contents for Full Boar FBT-1100
-
Page 1: Instruction Manual
KNOW YOUR PRODUCT DEMOLITION HAMMER KIT • 1500W MOTOR • 32 JOULES • ANTI VIBRATION HANDLE INSTRUCTION MANUAL WARNING: Read all safety warnings and all instructions. Failure to follow the warnings and instructions may result in electric shock, fire and/or serious injury. Save all warnings and instructions for future reference. -
Page 2: Specifications
SPECIFICATIONS - MODEL NO. FBT-1100 Power: 1500W Input: 230-240V ~ 50Hz Impact Energy: Impact Frequency: 1900bpm Breaking Capacity: 38mm Accessory Fitment: SDS Max Weight: 10.6kg KNOW YOUR PRODUCT 1. Accessory Holder 5. Power Cord 2. Accessory Locking Sleeve 6. On/Off Trigger 3. -
Page 3: Table Of Contents
TABLE OF CONTENTS SPECIFICATIONS............Page 02 KNOW YOUR PRODUCT........... Page 02 INTRODUCTION............Page 04 SAFETY INSTRUCTIONS........... Page 04 ASSEMBLY..............Page 07 CONTROLS..............Page 09 OPERATION............... Page 10 MAINTENANCE............Page 11 DESCRIPTION OF SYMBOLS........Page 12 TROUBLE SHOOTING ..........Page 12 CONTENTS.............. -
Page 4: Introduction
INTRODUCTION Congratulations on purchasing a Full Boar Demolition Hammer Kit. Your Full Boar Demolition Hammer Kit FBT-1100 has been designed for rapid breaking and chipping of concrete, block and masonry products. ELECTRICAL SAFETY WARNING! When using mains-powered tools, basic safety precautions, including the following, should always be followed to reduce risk of fire, electric shock, personal injury and material damage. - Page 5 GENERAL SAFETY INSTRUCTIONS WARNING! Read all safety warnings and all instructions. Failure to follow the warnings and instructions may result in electric shock, fire and/or serious injury. Save all warnings and instructions for future reference. The term “power tool” in the warnings refers to your mains-operated (corded) power tool or battery-operated (cordless) power tool.
- Page 6 GENERAL SAFETY INSTRUCTIONS d. Store idle power tools out of the reach of children and do not allow persons unfamiliar with the power tool or these instructions to operate the power tool. Power tools are dangerous in the hands of untrained users. e.
-
Page 7: Assembly
ASSEMBLY WARNING! Ensure the tool has been switched off and completely stopped before performing any of the following operations. Fitting the Side Handle The side handle is adjustable to any position around the 360° handle collar. 1. Loosen the handle locking knob by rotating ant- clockwise to allow the handle to rotate. - Page 8 ASSEMBLY Removing and Fitting the Chisel The Full Boar FBT-1100 comes with 2 chisel attachments that require fitting before starting the demolition hammer. IMPORTANT! Always lubricate the accessory fitment prior to inserting them into the demolition hammer. Using your finger, apply grease sparingly to the shaft of the accessory.
-
Page 9: Controls
CONTROLS WARNING! Keep away from cigarettes, smoke and sparks when refuelling the demolition hammer. Always refuel in a well-ventilated location. On / Off Trigger Fig. 7 1. To start the demolition hammer, squeeze and hold the on/off trigger. Fig. 8 2. -
Page 10: Operation
CONTROLS Rotating the Chisel 1. Push and hold the accessory rotation lock towards the accessory to unlock the rotation. Fig. 11 2. Rotate the accessory into the desired position. 3. Release the accessory rotation lock to allow the accessory to lock into position. Fig. -
Page 11: Maintenance
MAINTENANCE KNOW YOUR PRODUCT • Keep the ventilation vents of the demolition hammer clean at all times. • After each use, blow air through the demolition hammer housing to ensure it is free from all dust particles which may build up. Build up of dust particles may cause the demolition hammer to overheat and fail. -
Page 12: Description Of Symbols
DESCRIPTION OF SYMBOLS Volts Hertz Alternating current Watts Revolutions or No load speed reciprocation per minute Millimetres Diameter Double insulated Regulator compliance mark Warning Read instruction manual Wear ear protection Wear eye protection TROUBLESHOOTING Symptom Solution Accessory is falling out Ensure that the accessory is pushed in as far as possible and the locking sleeve is released. -
Page 13: Contents
CARING FOR THE ENVIRONMENT Power tools that are no longer usable should not be disposed of with household waste but in an environmentally friendly way. Please recycle where facilities exist. Check with your local council authority for recycling advice. Recycling packaging reduces the need for landfill and raw materials. -
Page 14: Warranty
WARRANTY YOUR WARRANTY FORM SHOULD BE RETAINED BY YOU AT ALL TIMES. IN ORDER TO MAKE A CLAIM UNDER THIS WARRANTY YOU MUST RETURN THE PRODUCT TO YOUR NEAREST BUNNINGS WAREHOUSE (see www.bunnings.com.au or www.bunnings.co.nz for store locations) WITH YOUR BUNNINGS REGISTER RECEIPT. PRIOR TO RETURNING YOUR PRODUCT FOR WARRANTY PLEASE TELEPHONE OUR CUSTOMER SERVICE HELPLINE: Australia 1800 069 486 New Zealand 0508 069 486...
Need help?
Do you have a question about the FBT-1100 and is the answer not in the manual?
Questions and answers