Table of Contents
Advertisement
Advertisement
Table of Contents

Related Manuals for Audiovox DV 1680


Summary of Contents for Audiovox DV 1680
- Page 1 DV 1680 128-6000A Revision A: Changed Warranty from 12 months to 90 Days...
-
Page 2: Before Using The Dvd Player
BEFORE USING THE DVD PLAYER Important! Please read the following instructions before attempting to operate the DVD Player Types of Warning Signs There are two types of warnings in this manual, indicated by the following symbols: Indicates a Warning or caution for operation. Indicates a Warning or caution for safety. -
Page 3: Power Cord W Arnings
Power Cord W arnings If operating the DVD Player from battery power, refer to Chapter 10 of this manual. Use an approved power cord. If the original power cord is missing or lost, purchase a power cord: - That is approved for use in your country. - That is rated for the product and for the voltage and current marked on the product's electrical ratings label. -
Page 4: Selecting The Video System
China and Hong Kong. The DVD Player is compatible with both the NTSC and PAL systems. Thank you for purchasing Audiovox's portable DVD Player. Before using the DVD Player, we strongly recommend that you to read the instructions in this manual. They will help you to operate and maintain the product. -
Page 5: Table Of Contents
Table of Contents 1. Accessories List... 2. Quick User Guide... 3. Features of the DVD Player... 4. Parts of DVD Player... 5. Remote Control... 6. Initial Setup... 7. Basic System Operation... 8. External Connection... 9. Battery Installation and Use... 10. Cautions and Maintenance... 11. -
Page 6: Accessories List
1. Accessories List/Option List Check the contents of the package to make sure nothing is missing or damaged. Some parts may be optional. Contact your dealer with any questions. Accessories List 1. DVD Player 2. AC Adapter 3. Stereo Headphone 4. -
Page 8: Quick User Guide
2. Quick User Guide 2.1 Connecting the Power Refer to Chapter 10 for instructions on how to install and use the battery pack. 1. Connect the power cord to the AC adapter. 2. Connect the power cord to a power source. 3. - Page 9 Even though the laser beam will stop emitting when the cover is opened, DO NOT LOOK AT THE LASER HEAD. The laser beam could still damage your eyes. 2.4 Removing the safety card Before inserting a disc and turning on the power for the first time, be sure to remove the cardboard safety card.
- Page 10 2.8 Stopping Disc Play To stop the disc play, press the [ front of the DVD Player. 2.9 Turning the power off To turn off the DVD Player, press the POWER ON/OFF button on the right side of the DVD Player. ] button on the...
-
Page 11: Features Of The Dvd Player
3. Features of the DVD Player 3.1 Plays discs of various formats The DVD Player can play: DVD V ideos °∑ VCDs °∑ °∑ SVCDs °∑ CVDs °∑ MP3 music recorded on a CD-ROM °∑ The DVD Player will automatically identify the type of disc and select the right format to play. - Page 12 3.5 Digital Output 3.5 Digital Output The DVD Player is equipped with a digital output. You The DVD Player is equipped with a digital output. You can connect the signal to an AC3 and DTS decoder and can connect the signal to an AC3 and DTS decoder and amplifier with an optical cable to enjoy the high-end amplifier with an optical cable to enjoy the high-end effect at 5.1 channels.
-
Page 13: Parts Of Dvd Player
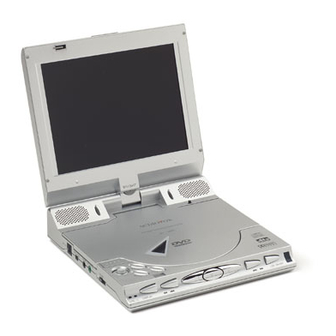
4. Parts of the DVD Player 4.1 LCD Screen The DVD Player's 6.8-inch, 4:3, no radiation TFT LCD screen provides a sharper, more colorful image. 4.2 Brightness Knob Turning the knob adjusts the brightness of screen. 4.3 Select Button and Arrow Button Use the arrow button ( a menu. - Page 14 4.8 Previous/Rewind ( Press the button to return to the previous chapter. Press and hold for a few seconds to rewind at 2X, 4X,8X, and 16X. 4.9 Stop ( ) Button Press the Stop button to stop disc play. 4.10 PAUSE ( ) Button Press the Pause button to pause disc play.
- Page 15 4.12 Press the button to go to the next chapter. Press and hold for a few seconds to fast forward at 2X, 4X, 8X and 16X. 4.13 LCD On/Off Press the LCD On/ Off Button to turn the LCD screen on or off .
- Page 16 4.17 A/V Signal Input/Output Switch Slide the switch to set the DVD Player to input or output mode. When the switch is in the IN position, all output signals from the DVD Player are muted so the DVD Player can receive input signals. MAKE SURE THE INPUT/OUTPUT SWITCH IS IN THE OUT POSITION BEFORE TRYING TO PLAY A DISC.
- Page 17 4.20 Power Switch Turns the DVD Player on or off. Press once to turn the power ON. Press again to turn the power OFF. 4.21 Power Indicator Not lit when the power is off. Red light indicates standby mode. Green light indicates busy mode. 4.22 Battery Charge Indicator Not lit when the battery is not being charged.
- Page 18 4.22 4.21...
-
Page 19: Remote Control
5. Remote Control Cautions for Remote Control Remove the battery from the remote control if it will not be used for a long time. Keep the remote control away from heat and moisture. Do not disassemble the remote control. Aim the remote control at the DVD Player's IR receiver. - Page 20 5.1 POWER Turns the DVD Player on or off. 5.2 SETUP (or 1) Normal mode: Display the system setup page, from which you can set up some system parameters. Number mode: Represents the number 1. See 5.25 for information about normal and number modes.
- Page 21 5.5 SUB-T (or 0) Normal mode: Changes the language of the subtitles. Most DVD video titles contain hidden subtitles. Number mode: Represents the number 0. See 5.25 for information about normal and number modes. 5.6 AUDIO (or 4) Normal mode: Selects an audio language. Number mode: Represents the number 4.
- Page 22 5.9 ZOOM (or +10) Normal mode: Zooms -in on the image on the screen. The DVD Player supports magnification in X2 and X4 modes. Number mode: Used to enter a number greater than 10. For example, to enter 25, press the +10 button twice, then the 5 button once.
- Page 23 5.13 5.14 5.15 5.16 5.17 5.18 5.19 5.20 5.13 PREV ( Plays the previous chapter of a DVD disc or the previous track of a CD/VCD disc. 5.14 NEXT ( Plays the next chapter of a DVD disc or the next track of a CD/VCD disc.
- Page 24 5.21 Move the highlight bar to the left. 5.22 PLAY ( Play the disc. 5.23 Move the highlight bar to the right 5.24 SEARCH Searches for a desired chapter, title or track. The searching method of MP3 is slightly dif DVD/VCD.
-
Page 25: Screen On/Off
5.26 5.27 5.28 5.25 5.25 NUM Switches between normal and number mode. Some keys on the remote control are both number keys and function keys. Press the NUM button to switch from normal mode to number mode. Press the NUM key again to switch back to normal mode. -
Page 26: Initial Setup
6. Initial Setup To display the initial set up screen, press the SETUP button on either the front panel of the DVD Player or on the remote control. The initial setup includes five menu pages: 1. GENERAL SETUP: general function setup 2. -
Page 27: Picture Mode
6.1.2 TV TYPE MULTI NTSC 6.1.3 PICTURE MODE AUTO HI-RES NONFLICKER 6.1.4 ANGLE MARK GENERAL SETUP TV DISPLAY TV TYPE >> MULTI PICTURE MODE NTSC ANGLE MARK OSD LANG AUDIO OUTPUT CAPTIONS SCREEN SAVER SET TV STANDARD GENERAL SETUP TV DISPLAY TV TYPE PICTURE MODE >>... -
Page 28: Audio Output
6.1.5 OSD (On-Screen Display) LANGUAGE ENGLISH CHINESE TV DISPLAY TV TYPE PICTURE MODE ANGLE MARK OSD LANG AUDIO OUTPUT CAPTIONS SCREEN SAVER SET OSD LANGUAGE 6.1.6 AUDIO OUTPUT ANALOG SPDIF/RAW TV DISPLAY TV TYPE SPDIF/PCM PICTURE MODE ANGLE MARK OSD LANG AUDIO OUTPUT >>... -
Page 29: Screen Saver
6.1.8 SCREEN SAVER 6.2 SPEAKER SETUP PAGE 6.2.1 DOWNMIX LT/RT STEREO 6.3 DOLBY DIGITAL SETUP 6.3.1 OPERATIONAL LINE OUT RF REMOD GENERAL SETUP TV DISPLAY TV TYPE PICTURE MODE ANGLE MARK OSD LANG AUDIO OUTPUT CAPTIONS SCREEN SAVER >> ON SCREEN SAVER --SPEAKER SETUP PAGE-- SOUND... -
Page 30: Dynamic Range
6.3.2 DUAL MONO STEREO --DOLBY DIGITAL SETUP PAGE-- LEFT MONO OPERATIONAL DUAL MONO RIGHT MONO DYNAMIC RNG >MAIN PAGE< MIXED MONO DUAL MONO(1+1) SETUP 6.3.3 DYNAMIC RANGE --DOLBY DIGITAL SETUP PAGE-- OPERATIONAL DUAL MONO DYNAMIC RNG >MAIN PAGE< DYNAMIC RANGE COMPRESSION 6.4 VIDEO SETUP 6.4.1 COLOR MODE COLOR MODE... -
Page 31: Contrast Mode
6.4.2 CONTRAST MODE --VIDEO PAGE-- COLOR MODE CONTRAST MODE >> BRIGHT MODE >MAIN PAGE< SET CONRAST MODE 6.5 PREFERENCES PAGE This function allows the user to select DVD disc viewing preferences before playing a movie. The selection must be performed with power applied to the DVD Player . In addition, the DVD disc must be removed from the DVD Player or with the disc cover open. - Page 32 6.5.3 DISC MENU --PREFERENCES PAGE-- AUDIO SUBTITLE DISC MENU >> ENGLISH COUNTRY CHINESE PARENTAL FRENCH PASSWORD SPANISH DEFAULTS JAPANESE PREFERRED MENU LANGUAGE 6.5.4 COUNTRY --PREFERENCES PAGE-- AUDIO SUBTITLE DISC MENU COUNTRY >> CHINA PARENTAL FRANCE PASSWORD HONG KONG DEFAULTS JAPAN TAIWAN PREFERRED COUNTRY CODE NOTE: After selecting the country, please refer to paragraph 6.5.5 (Parental).
- Page 33 6.5.6 PASSWORD(REMOTE CONTROL REQUIRED) --PREFERENCES PAGE-- AUDIO SUBTITLE DISC MENU COUNTRY PARENTAL PASSWORD >> CHANGE DEFAULTS CHANGE PASSWORD A). When attempting to play the DVD disc, the DVD Player would ask for the system password. B). The DVD disc could still play however , when the disc chapter plays the section that is in excess of the PG-13 rating, the chapter won't be played and the DVD Player will skip to next chapter.
- Page 34 6.5.7 DEFAULTS --PREFERENCES PAGE-- AUDIO SUBTITLE DISC MENU COUNTRY PARENTAL PASSWORD DEFAULTS >> RESET LOAD FACTORY SETTINGS Resets all settings to their default values when you want to clear preferred settings. This will not change the password.
-
Page 35: Basic System Operation
7. Basic System Operation 7.1 Connecting the Power 1. Connect the power cord of the DVD Player's AC adapter to a power source. 2. Connect the other end of the adapter to the DVD Player's DC IN jack. 7.2 Playing a Disc 1. - Page 36 7.4 Selecting the Next or /Previous Chapter or /Track Press the NEXT ( ) button to select the next chapter or track. Press the PREVIOUS ( chapter or track. 7.5 Pausing and Stepping Through a Disc 1. Press the PAUSE/STEP ( 2.
-
Page 37: External Connection
8. External Connection You can connect the DVD Player to any audiovisual equipment from the DVD Player's output terminals of DVD Player. You can also connect any audiovisual equipment to the DVD Player's input terminals. To switch the DVD Player's signal source between input and output, adjust the Input/Output switch(IN OUT). - Page 38 Attention! The DVD Player's A/V cable contains three wires: - White for audio left channel - Red for audio right channel - Yellow for video signal If not connected correctly, there will be no response from the external equipment. Most audiovisual equipment has an IN/OUT switch. Make sure that the switch on other components is set to IN when receiving incoming signals.
- Page 39 8.3 Stereo Audio Out You can connect the stereo audio out of the DVD Player to the following equipment: (1) Stereo amplifier (2) 2-channel cassette or open-reel tape deck (3) DAT (4) Mini Disc To adjust the volume, adjust the volume control of the playback component.
- Page 40 8.5 A/V Signal Input When the A/V IN/OUT switch is in the IN position, the DVD Player will receive incoming signals from the 3-in-1 A/V terminal. Use the DVD Player's AV cable to connect to the following components: (1) TV with A/V OUT terminals (2) VCR/Video Cassette DVD player (3) Cassette Recorder (4) V8 or VHS video cameras...
-
Page 41: Battery Installation And Use
9. Battery Installation and Use The DVD Player comes with a rechargeable high performance Li-ion battery. Apart from the high capacity, Li-ion batteries does not have 'memory' effect, so you do not need to discharge the excess energy before recharging the battery. Make sure to charge the battery before use. - Page 42 Battery Use and Maintenance (1) Use only the DVD Player's AC adapter to charge the battery. (2) Battery charge and discharge efficiency will be lower when the ambient temperature is under 50 ( 10 ) or over 95 (35 ). (3) Avoid recharging a fully charged battery.
-
Page 43: Cautions And Maintenance
10. Cautions and Maintenance in the best condition. temperatures, and moisture. use. Do not place the DVD Player on a hot surface. from a cold environment to a warm and humid environment. After such a move, do not operate the DVD Player for an hour . to clean contacts. - Page 44 Contact your dealer for help in locating a qualified service technician. The DVD Player's AC adapter is specially designed for the DVD Player. Do not use a substitute DC adapter. Avoid scratching the LCD screen. Always close the cover when the DVD Player is not in use.
-
Page 45: Warranty
11. Warranty AUDIOVOX ELECTRONICS CORP. (the Company) warrants to the original retail purchaser of this product that should this product or any part thereof, under normal use and conditions, be proven defective in material or workmanship within 90 days from... - Page 46 This W arranty gives you specific legal rights and you may also have other rights which vary from state to state. U.S.A. : AUDIOVOX ELECTRONICS CORPORA TION, 150 MARCUS BLVD., HAUPPAGUE, NEW YORK 1 1788 CANADA: CALL 1-800-645-4994 FOR LOCTION OF WARRANTY STATION...
-
Page 47: Troubleshooting
Problems Causes No power Bad power source Cover unable to close Disc placed incorrectly Unable to play Power is OFF No disc inside Disc placed up-side-down Dirty disc Disc deformed Condensation on DVD Player Blurred screen with mosaique Poor disc quality No sound Playback speed changed Bad contact on audio cable... -
Page 48: Product Specifications
13.Specifications Power:Universal AC to DC switching power adapter. DC 12V/2A AC to DC power adapter, approx 3.5 hours playing time with battery. Playing Discs: DVD,VCD(v2.0),CD,SVCD,MP3 Dimensions Inches (mm):6.62(168.3)W x 6.77(172)D x 1.38(35)H Weight: Approx.2.2lb(1kg), without battery pack Display: 4:3 TFT-LCD, Resolution 384 (RGB) by 234 Video Terminal: Composite input/output x 1, S video output, composite input RCAx1Audio Terminal...
Need help?
Do you have a question about the DV 1680 and is the answer not in the manual?
Questions and answers