Edimax IC-3116W Quick Installation Manual
Hide thumbs
Also See for IC-3116W:
- User manual (121 pages) ,
- Quick installation manual (35 pages) ,
- Brochure & specs (3 pages)
Table of Contents
Advertisement
Quick Links
Advertisement
Table of Contents

Related Manuals for Edimax IC-3116W


Summary of Contents for Edimax IC-3116W
- Page 1 IC-3116W Quick Installation Guide (English) 05-2015 / v2.0...
-
Page 2: Table Of Contents
I. Product Information ................3 I-1. Package Contents ................3 I-2. Front Panel ..................3 I-3. Back Panel ..................4 I-4. LED Status ..................4 I-5. Product Label ................... 5 I-6. Reset ....................5 II. Hardware Installation ................6 II-1. Mounting Kit .................. -
Page 3: Product Information
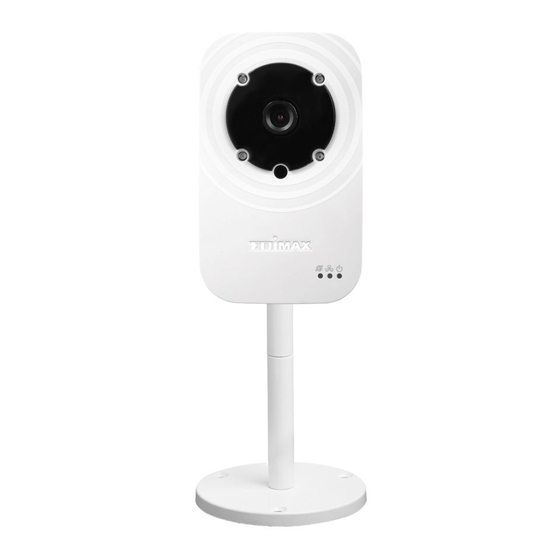
I. Product Information I-1. Package Contents IC-3116W CD-ROM Power Adapter Ethernet Cable Mounting Kit I-2. Front Panel Adjustable Lens Light Sensor Infrared LEDs Status LEDs... -
Page 4: Back Panel
I-3. Back Panel MAC/Cloud ID & Setup SSID WPS/Reset Button LAN Port 12V DC Power Port I-4. LED Status LED Color LED Status Description Network camera is on and connected to cloud server. Quick Flashing Network camera is restarting. Power Green Network camera is starting up OR Slow Flashing (1 x... -
Page 5: Product Label
I-5. Product Label The product label located on the back of the camera displays the MAC address, cloud ID and setup SSID of your network camera. The MAC address and cloud ID are the same for easy reference. The cloud ID allows you to view a live stream from your network camera remotely (from any Internet connection) as described later in III-4. -
Page 6: Hardware Installation
II. Hardware Installation II-1. Mounting Kit A stand for your network camera is included in the package contents. The stand requires some assembly. Assemble the included camera stand as shown below. The camera stand can stand by itself or be mounted to a wall: Secure the network camera to the included camera stand using the mounting hole on the rear of the camera. -
Page 7: Ii-2. Camera
II-2. Camera Follow the instructions below to ensure your camera is properly connected and ready for setup. Connect the power adapter to the network camera’s power port and to a power supply, as shown to the right. Wait a moment for the camera to power on. The camera green power LED will flash slowly when it’s ready. -
Page 8: Camera Setup
III. Camera Setup Your network camera can be up and running in just a few minutes. Follow the instructions in the next chapter to install your camera using the free EdiView II app on Android or iPhone. Then, you can also use the web based management interface to watch a live stream and further configure the camera if you need (refer to the user manual for help). - Page 9 For iOS users, go to your iPhone’s Wi-Fi settings and connect to your network camera’s SSID (EdiView.Setup**), before opening the EdiView II app. Continue to Step 4. Android users ensure your Android device’s Wi-Fi is switched on, and open the EdiView II app. Select your network camera and click “OK” to continue. Android &...
- Page 10 Please wait a moment while your camera connects to your Wi-Fi. When you see the “Setup complete” screen, click the “Live” icon to continue or wait for a few seconds to continue automatically. Setup is complete. The camera’s LED should display on and green. You should see a live stream from your network camera which you can view anytime you are connected to the Internet.
- Page 11 It is recommended that you change your camera’s password. Go to “More” in the bottom right corner and select “Settings”. You can configure your camera’s settings and functions using the icons below the live image.
-
Page 12: Iii-2. Wps (Wi-Fi Protected Setup)
III-2. WPS (Wi-Fi Protected Setup) The WPS button is a quick and easy method to establish a secure wireless connection between your network camera and your wireless router/access point. Press and hold the WPS button on your wireless router/access point for the correct length of time to activate its WPS. -
Page 13: Iii-3. Myedimax.com
III-3. Myedimax.com You can use your network camera’s Myedimax.com cloud ID to monitor your camera remotely using a web browser from any Internet connection. The network camera’s green power LED must display on for this function to work. Identify your network camera’s cloud ID. The cloud ID is displayed on the product label on the back of the network camera (see I-4.). - Page 14 If any other security warnings/prompts appear, please select “Run” or “Allow” or similar, depending on your browser. Enter your camera’s password (default password: 1234) and click “OK” to see a live stream from your network camera.
-
Page 15: Federal Communication Commission Interference Statement
Federal Communication Commission Interference Statement This equipment has been tested and found to comply with the limits for a Class B digital device, pursuant to Part 15 of FCC Rules. These limits are designed to provide reasonable protection against harmful interference in a residential installation. - Page 16 EU Declaration of Conformity English: This equipment is in compliance with the essential requirements and other relevant provisions of Directive 1995/95/EC, 2011/65/EC. Français: Cet équipement est conforme aux exigences essentielles et autres dispositions de la directive 1995/95/CE, 2011/65/CE. Čeština: Toto zařízení je v souladu se základními požadavky a ostatními příslušnými ustanoveními směrnic 1995/95/ES, 2011/65/ES.
-
Page 17: Declaration Of Conformity
Declaration of Conformity We, Edimax Technology Co., Ltd., declare under our sole responsibility, that the equipment described below complies with the requirements of the European R&TTE directive (1999/5/EC, 2006/95/EC) . Equipment: HD Wireless Day & Night Network Camera Model No.:...
Need help?
Do you have a question about the IC-3116W and is the answer not in the manual?
Questions and answers