
Subscribe to Our Youtube Channel
Related Manuals for Air Live N.TOP


Summary of Contents for Air Live N.TOP
- Page 1 N.TOP Wireless Acess Point Quick Installation Guide...
- Page 2 QR code here. Please consult with the FAQs <http://www.airlive.com/pro duct/n.top/faq> before writing to OvisLink Tech Support Team for further assistance For any other question, please read the user manual in the CD or mail to tech@airlive.com...
- Page 3 N.TOP Package Contents Please check the package contents and contact your distributor if any part is missing. N.TOP 5V DC adapter Declaration of Conformity We, Manufacturer/Importer OvisLink Corp. 5F, No.6, Lane 130, Min-Chuan Rd., Hsin-Tien Dist., New Taipei City 231, Taiwan Declare that the product 802.11n Ceiling Mount Long Range PoE AP...
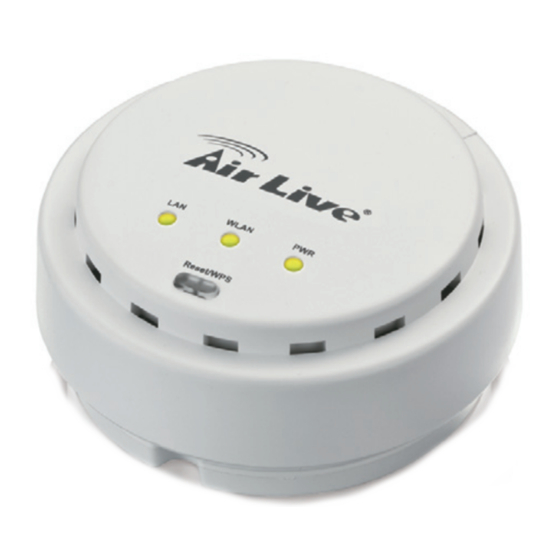
- Page 4 I/O Interface Button Reset / WPS Reset the router to factory default settings (clear all settings) or start WPS function. Reset: Press this button and hold for 10 seconds to restore all settings to factory defaults. WPS: Press this button for less than 5 seconds to start WPS function.
- Page 5 N.TOP Installation 1. Screw the bottom case into the wall. Ceiling Ceiling...
- Page 6 N.TOP Installation 2. There are two ways to power up N.TOP (1) Connect N.TOP to 802.3at/af PoE switch via RJ45 Cable System Link / Act Speed POE-GSH2004L-370 Mode 20-Port Gigabit + 4-Port UTP/SFP Combo Active PoE Web Smart Switch PoE Siwtch (2) Connect the 5V/1A adapter to power up N.TOP...
- Page 7 N.TOP Installation 3. Put the case screws back.
- Page 8 Connect N.TOP to Network a. Connect N.TOP to the LAN port of the switch. b. Connect switch to the LAN port of the router. c. Connect the PC/NB to the LAN port of the switch. N.TOP Switch LNK/ACT POE-FSH1008AT 8-port POE + 2 Combo Gigabit 802.3at...
- Page 9 Set up the Network Environment The default IP address of N.TOP is 192.168.1.254. Please set your PC/NB to the same subnet Enter the N.TOP IP address into browser to visit the N.TOP UI The default username/password is admin/airlive...
- Page 10 AirLive Central Wireless Management N.TOP via AirLive Central Wireless...
- Page 11 Support You can download the AirLive Central Wireless from <http://www.airlive.com/product/n.top/dow nload>, or scan the QR code here. For any other question, please read the user manual in the CD or mail to tech@airlive.com for technical support.
- Page 12 AirLive Central Wireless Installation 1. Please click the AirLive Central Wireless Setup file. The software will install automatically and click the AirLive Central Wireless short cut to start the program...
- Page 13 AirLive Central Wireless Installation 2. Log-in AirLive Central Wireless Program. Default username and password is admin / airlive AirLive Central Wireless Account admin Password airlive Login Exit Copyright © 2014...
- Page 14 AirLive Central Wireless Installation 3. After Log-in, the utility will start to scan N.TOP , or you can click to scan N.TOP. Then click to add the N.TOP into...
- Page 15 AirLive Central Wireless Installation 4. Click the tag which will list the N.TOPs which you add in...
- Page 16 AirLive Central Wireless Installation 5. Select the N.TOP which you want to manage, then you can change the SSID, channel , access control and system information. Click to save the setting...
- Page 17 AirLive Central Wireless Installation 6. You can change multiple N.TOPs together, tick , select the N.TOPs. Then tick the item you want to change. You also can upgrade firmware for multiple N.TOPs in system page.
- Page 18 AirLive Central Wireless Installation 7. The setting will take effect after device is reboot. Click button in the “System”...
Need help?
Do you have a question about the N.TOP and is the answer not in the manual?
Questions and answers