Table of Contents
Advertisement
SM-16SDDR / VM-16SDDR
VM-14SDDR
Professional Console Powered Mixer
OWNER'S MANUAL
1=GND,
2=HOT(+)
3=COLD(-)
SLEEVE
TIP(+)
RING(-)
+1
-50dBU
20dBU
-32dBU
MAX
Post or Pre
MAX
Digi DDR
MAX
1=GND,
2=HOT(+)
1=GND,
2=HOT(+)
1=GND,
2=HOT(+)
1=GND,
2=HOT(+)
1=GND,
3=COLD(-)
3=COLD(-)
3=COLD(-)
3=COLD(-)
3=COLD(-)
SLEEVE
TIP(+)
SLEEVE
TIP(+)
SLEEVE
TIP(+)
SLEEVE
TIP(+)
RING(-)
RING(-)
RING(-)
RING(-)
SLEEVE
SEND
RETURN
+1
-50dBU
+1
-50dBU
+1
-50dBU
+1
-50dBU
+1
20dBU
-32dBU
20dBU
-32dBU
20dBU
-32dBU
20dBU
-32dBU
20dBU
MAX
MAX
MAX
MAX
MAX
Post or Pre
Post or Pre
Post or Pre
Post or Pre
MAX
MAX
MAX
MAX
Digi DDR
Digi DDR
Digi DDR
Digi DDR
MAX
MAX
MAX
MAX
MAX
BAL STEREO
Input Channels
13
15
14
16
2=HOT(+)
1=GND,
2=HOT(+)
1=GND,
2=HOT(+)
3=COLD(-)
3=COLD(-)
All Left Inputs = Mono
9
SLEEVE
TIP(+)
SLEEVE
TIP(+)
RING(-)
RING(-)
10
SLEEVE
SEND
SLEEVE
SEND
RETURN
RETURN
-50dBU
+1
-50dBU
+1
-50dBU
-32dBU
20dBU
-32dBU
20dBU
-32dBU
9 - 10
11-12
MAX
MAX
MAX
MAX
Post or Pre
Post or Pre
Post or Pre
MAX
MAX
MAX
MAX
Digi DDR
Digi DDR
Digi DDR
MAX
MAX
MAX
MAX
UNBAL
11
12
UNBAL=
GND
BAL=
GND
RING(-)
0U
4U
MAX
Post
or
pre
Programs
MAX
4 -
4 -
3 -
3 -
13-14
2 -
2 -
1 -
1 -
-8
-10dBU
0U
4U
Delay
Reverb
MAX
Digi DDR Effect Processor
Post
or
pre
MAX
MAX
15-16
-8
-10dBU
Sends
Digi DDR
Programs
Delay
Programs
1. Delay/ECHO
50~1000 msec
2. Delay CROSS F.B
50~1000 msec
3. Delay 3 Tap PAN
50~1000 msec
4. Delay One Short
50~1000 msec
Reverb
Programs
1. Reverb Hall
2~10 sec
2. Reverb Room
0.5~5 sec
3. Reverb Plate
1~8 sec
4. Reverb AMBIENT
200~2000msec
Monitor
Digi DDR
TIP(+)
TIP(+)
Delay Level
Revarb Level
Delay Time
Revarb Time
Delay Repeat
Advertisement
Table of Contents

Related Manuals for STK Professional Audio SM-16SDDR


Summary of Contents for STK Professional Audio SM-16SDDR
- Page 1 SM-16SDDR / VM-16SDDR VM-14SDDR Professional Console Powered Mixer OWNER'S MANUAL BAL STEREO Input Channels UNBAL 1=GND, 2=HOT(+) 1=GND, 2=HOT(+) 1=GND, 2=HOT(+) 1=GND, 2=HOT(+) 1=GND, 2=HOT(+) 1=GND, 2=HOT(+) 1=GND, 2=HOT(+) 1=GND, 2=HOT(+) 3=COLD(-) 3=COLD(-) 3=COLD(-) 3=COLD(-) 3=COLD(-) 3=COLD(-) 3=COLD(-) 3=COLD(-) All Left Inputs = Mono...
-
Page 2: Table Of Contents
SM-16SDDR / VM-16SDDR VM-14SDDR Professional Console Powered Mixer Table of Contents Introduction ....................................Important Safety Instructions ..........................Warranty Information ............................... 7-10 Connecting Your System ............................. 10-13 Operating Your System ..............................14-23 Panel Description .................................. Troubleshooting ..................................25-26 Block Diagram .................................. -
Page 3: Introduction
In addition, these three kind models have a bar graphic LED display to performance conditions. While providing powerful, accurate and reliable performance along with outstanding value, your STK new SM-16SDDR/VM-16SDDR/ VM-14SDDR powered mixing console has been designed for many years of dependable service. -
Page 4: Important Safety Instructions
Important Safety Instructions 1. Read Instructions All the safety and operating instructions should be read before the appliance is operated. 2. Retain Instructions The safety and operating instructions should be retained for future reference. 3. Heed Warnings All warnings on this appliance and in the operating instructions should be adhered to. 4. - Page 5 Important Safety Instructions 13. Listening for a Lifetime Selecting fine audio equipment such as the unit you've just purchased is only the start of your musical enjoyment. Now it's time to consider how you can maximize the fun and excitement your equipment offers. STK PROFESSIONAL and the Electronic Industries Association's Consumer Electronics Group want you to get the most out of your equipment by playing it at a safe level.
-
Page 6: Warranty Information
Warranty Information UNPACKING STK LIMITED 1 YEAR WARRANTY As a part of our system of quality control, every STK STK electronics are warranted to be free from defects product is carefully inspected before leaving the factory in materials and workmanship under normal use for a to insure flawless appearance. -
Page 7: Connecting Your System
Carefully consider all of them to decide which system you will use. Note : The SM-16SDDR console powered Mixers feature flexible patching options which make possible more variations of setup than are presented here. Once familiarized with the unit's capabilities, you should be able to achieve practically any setup you desire. - Page 8 Connecting Your System 2. Powered Main+Monitors System Hookup Diagrams VM-16SDDR Powered Main(L+R) + Monitor system : Set the Amp Assign switch to the L+R/Monitor (in) position. Now that you have decided which mode and type of system operation you will use, The basic Main(L+R)+Monitor setup : One or more parallel speaker systems connected to the left side for Main, and one or more parallel speaker systems connected to the right side for Monitor system.(See following Hookup diagram) Guitar...
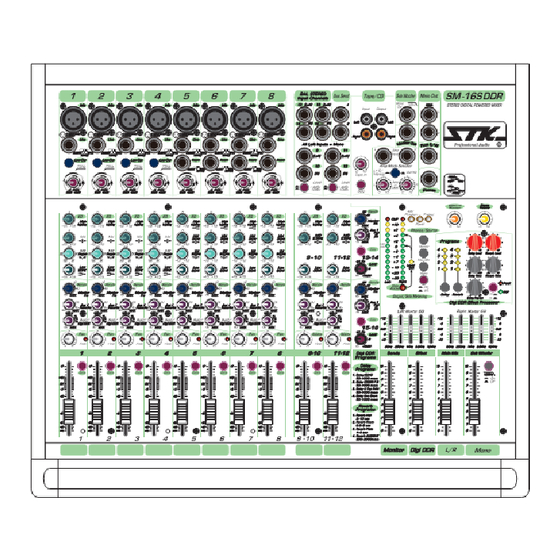
- Page 9 Connecting Your System 제품 소개 B. CONNECTORS Your SM-16SDDR/VM-16SDDR/VM-14SDDR professional console powered mixers uses several types of input and output connectors. 1. XLR Input jacks Electronically balanced inputs accept a standard XLR male connector. Pin1=ground, pin2=hot or positive(+) and pin3=cold or negative (-) (see Figure a).
-
Page 10: Operating Your System
Connecting Your System 4. RCA Phone Jacks The RCA jacks accept unbalanced male pin connectors. (See Figure e) The tip is connected to the audio signal and the sleeve to ground (earth). a. Female 3 Pin XLR Connector c. Balanced 1/4'' Stereo Connector Ring Sleeve d. - Page 11 Don’t use guitar cords for speaker cables it will be too hot. If you are not certain of your total speaker impedance load, contact your dealer for assistance. WARNING: Operating your SM-16SDDR/VM-16SDDR/VM-14SDDR powered mixer at an output impedance less than 4 ohms, and then can damage your unit and void your warranty! 8.
- Page 12 C. Graphic Equalizer use The SM-16SDDR/VM-16SDDR/VM-14SDDR is equipped with a dual 5-band equalizer that can be configured to affect master output and each main speaker output. You should think of the graphic equalizer as an extended "Tone Control." the built-in graphic equalizer(s) divide the audio spectrum into 5 segments or bands.
- Page 13 • amplifiers or power speakers last. This SM-16SDDR/VM-16SDDR/VM-14SDDR has been inspected and tested prior to being shipped. During unpacking, • carefully check that you have received all the required accessory. this is also the time to check the main unit for damage. If any damage is noticed , promptly report this to your shipping carrier.
-
Page 14: Panel Description
-32dBU This patch point allows you to insert a compressor, equalizer or any other signal processing device into 5.6.7.8(VM- 14SDDR : CH5.6) input channel strips of VM,SM-16SDDR. 3. Low Cut Switch 75Hz 18dB/octave low-cut filter eliminates unwanted subsonic frequencies, while still allowing full use of the Low Equalization(8). - Page 15 Panel Descriptions isn't, you might have to readjust these levels during the 10. Aux1 Send middle of the set. Adjusts the amount of the channel input signal supplied to 3. Adjust the channel's GAIN(4) control so that the LEDs the Aux1 output. Aux1 send is pre or post-EQ and factory- on the RIGHT meter (16) stay around "0"...
- Page 16 Selections are +4dB and -10dB. This switch attenuates the input signal by 14dB when connecting a line level device to channels 7-10(VM- 14SDDR),9-12(VM,SM-16SDDR). This is the first control that the input signals meet. It allows you to choose the level -50dBU...
- Page 17 Please refer to mono channel fader(15). 13. CH11-12/13-14(VM-14SDDR),CH13-14/15- 16(VM,SM-16SDDR) inputs for expanded more stereo channels This will help to expand two more stereo input channels. Allows 1/4" line level stereo inputs directly to the left and right mixing buss, there also feed of the monitor and aux1 sends.When no plug is inserted into the right jack, the left...
- Page 18 Ⅰ Introduction Panel Descriptions 제품 소개 FRONT PANEL SECTION 1. Tape Input (Left/Right) Allows a stereo tape machine, CD player or similar device to C. Master Section be attached via unbalanced RCA connections, and auditioned in the headphone output. To route the tape input to the headphone output.
- Page 19 This 13. Effect To Monitor Control allows considerable flexibility in the use of the SM-16SDDR/ This control used to route signal from output of the internal VM-16SDDR/VM-14SDDR powered mixer. For example,...
- Page 20 Panel Descriptions FRONT PANEL SECTION 21. Solo Mode Switch.(PFL/AFL) Controls whether solo feature is 1) After-fader listen (AFL) C. Master Section up position.2) Pre-fader listen (PFL) down position. Engaging a channel’s SOLO switch will cause this dramatic turn of events: That existing main input signals selections are replaced by the SOLO signal, the SOLO signal, appearing at the headphones, and at the right meter(left and right meters when in AFL solo mode).The audible SOLO sound levels are...
- Page 21 125Hz. turn to full left the feedback amounts are 0%. FEATURES The STK PROFESSIONAL AUDIO DIGI EFFECT processors gives the power to create original sounds with a wide range of effects.
- Page 22 VM-16SDDR/VM-14SDDR : The fuse is located in the fuse holder. SM-16SDDR : The fuse is located on the SMPS primary filter circuit board the inside of the unit. WARNING: To avoid possible equipment damage and/or personal injury, the fuse should always be replaced with the same type and rating.
- Page 23 3. IEC Socket This is where you connect the supplied AC line cord to provide AC power to the SM-16SDDR/VM-16SDDR/VM-14SDDR console powered mixer. This socket accepts the supplied 3-prong IEC AC power cord. before you plug AC power cord into the powered mixer, make sure that the voltage of your unit is the same voltage as your local AC mains supply.
-
Page 24: Troubleshooting
Troubleshooting There is no power Make sure the power cord is firmly connected to the back of the unit and to the power outlet.If using a power strip/surge- • protector, make sure that it is plugged in and switched on. If using a power strip/surge-protector, make sure that it is plugged in and switched on. -
Page 25: Block Diagram
Ⅰ Introduction Block Diagram 제품 소개... -
Page 26: Block Diagram
Ⅰ Introduction Block Diagram 제품 소개 SM-16SDDR ONLY... -
Page 27: General Specifications
Ⅰ Introduction Specifications 제품 소개 ■ General Specifications Model SM-16SDDR VM-16SDDR VM-14SDDR Output Power @ EIA THD ㎑ 8 Ω per channel 2 x 450 W 2 x 290 W 2 x 290 W 4 Ω per channel 2 x 750 W... -
Page 28: Specifications
Specifications ■ General Specifications Model SM-16SDDR VM-16SDDR VM-14SDDR 470×415×151 mm 470×415×151 mm 420×415×151 mm Dimension (W×D×H) 14.10 Kg 21.44 Kg 19.44Kg Weight/ Unit 850 VA 500 VA 500 VA Power Consumption 1/3 power 120V: 30A/250V 120V: 20A/250V 120V: 20A/250V Fuse Type/ Rating... -
Page 29: Input Specifications
Specifications ♪ Input specifications Input level Actual load For use with Connector in Input terminals Max. before Impedance nominal mixer Sensitivity Nominal clip -60 dBu -55 dBm -25 dBu 50-600Ω mic XLR Jack Mic In ㏀ (0.77mV) (1.38mV) (43.7mV) -40 dBu -35 dBu 0 dBu 600 Ω... -
Page 30: Rack Bracket Mounting
Ⅰ Introduction Rack Bracket Mounting 제품 소개 INSTRUCTION • Remove the mains and all other connections before starting. • Remove the AC power cord cable. • Unscrew the fourteen retaining screw on the left, right and front.(see Figure a) • Remove L,R wood side board and front arm and store it in a safe place •... -
Page 31: Rack Bracket Mounting
Ⅰ Introduction Rack Bracket Mounting 제품 소개 설치 방법 • 시작하기 전에 모든 연결을 해제해 주세요. • AC 전원 코드를 해제해 주세요. • 프론트와 좌, 우측의 스크류 14 개를 풀어내세요 • 좌, 우 사이드 보드와(스크류포함) 프론트 암을 떼어내 안전한 곳에 보관합니다(그림 a 참조). •... - Page 32 Owner's Manual for The STK Professional Console Powered Mixer MAY. 2013 Printed In Korea STK Professional Audio...
Need help?
Do you have a question about the SM-16SDDR and is the answer not in the manual?
Questions and answers