Table of Contents
Advertisement
Quick Links
Advertisement
Table of Contents

Related Manuals for IK Multimedia irig pads


Summary of Contents for IK Multimedia irig pads
- Page 1 MIDI groove controller USER MANUAL...
-
Page 2: Table Of Contents
Contents Table of Contents Contents English 1 iRig Pads 2 Register your iRig Pads 3 Installation and setup 3.1 iOS Devices 3.2 Mac/PC 4 Introduction 4.1 Operating Mode 5 GETTING STARTED 5.1 Default Scenes 6 ADVANCED 7 Play Mode 7.1 PADS 7.1.1 Sending Notes... - Page 3 10.2.20 Assign PC to the Footswitch Pedal 10.2.21 Assign Note to the Footswitch Pedal 10.2.22 Assign Note to the Footswitch Pedal 10.2.23 Assign CC/PC/Note/MIDI CH to the Expression Pedal 11 External iRig Pads MIDI control 11.1 Backlight control 11.2 Remote scene switching 12 Specifications...
-
Page 4: English
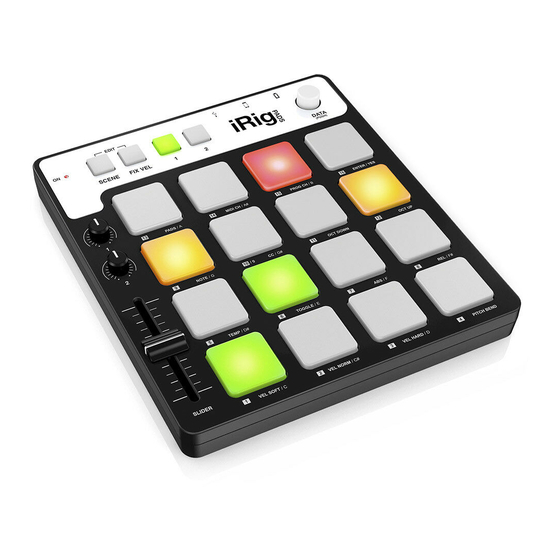
Pads is an ultra-portable MIDI groove controller for iPhone, iPod touch, iPad, Mac and PC. Smaller than an iPad and less than 1” thick, iRig Pads makes it easy to play and control virtual drum, percussion and electronic instruments, anytime and anywhere. Sixteen velocity-sensitive, backlit, multi-colored rubber pads in a standard 4x4 configuration provide the perfect solution for laying down drums, adding percussion, playing electronic instruments and cueing loops. -
Page 5: Installation And Setup
3 Installation and setup 3.1 iOS Devices 1. Connect the included “Mini-DIN to Lightning” cable to the Mini-DIN port on iRig Pads. 2. Connect the Lightning cable to the connector on your iOS device. 3. Download your preferred audio app - like SampleTank or GrooveMaker 2 - and launch it. - Page 6 English 4. If needed, connect a footswitch/expression pedal to the TRS connector on iRig Pads. 5. Connect your headphones, mixer or powered speakers to the iOS device headphone jack. WARNING: Permanent hearing loss may occur if earbuds or headphones are used at high volume.
-
Page 7: Mac/Pc
2. Connect the USB cable to a free USB port on your MAC/PC. 3. iRig Pads is a Class Compliant MIDI controller so you can use it with your preferred Audio/MIDI Software. 4. Download your preferred audio app - like SampleTank SE - and launch it. -
Page 8: Introduction
“8 Scene Editing” in this manual. iRig Pads sends MIDI data as MIDI Notes as ON and OFF and Control Changes to the host, and it can also receive MIDI data from the host to light up the pads (section “11 External iRig Pads MIDI Control”). This way any application that’s MIDI compatible can provide visual feedback via the illuminated pads. -
Page 9: Getting Started
5.1 Default Scenes When new, iRig Pads will load Scene 1 at startup. Press the “SCENE” push button and pad 1 (where Scene 1 is stored) will light up orange and pads 2, 5, 6, 7 and 8 will light up green. - Page 10 English Scene 1 (General MIDI Drum Kit) PAD1: B0 PAD2: C1 PAD3: D1 PAD4: E1 PAD5: C#1 PAD6: D#1 PAD7: F#1 PAD8: G#1 PAD9: D2 PAD10: A1 PAD11: F1 PAD12: A#1 PAD13: D#2 PAD14: F2 PAD15: C#2 PAD16: E2 Set as MIDI Channel 1 CC assignments: Knob 1: CC#10 (pan) Knob 2: CC#11 (expression)
- Page 11 English Scenes 2 (Chromatic) PAD1: C1 PAD2: C#1 PAD3: D1 PAD4: D#1 PAD5: E1 PAD6: F1 PAD7: F#1 PAD8: G1 PAD9: G#1 PAD10: A1 PAD11: A#1 PAD12: B1 PAD13: C2 PAD14: C#2 PAD15: D2 PAD16: D#2 Set as MIDI Channel 1 CC assignments: Knob 1: CC#10 (pan) Knob 2: CC#11 (expression)
- Page 12 English Scene 5 (AKAI BANK A / AKAI iMPC PRO) PAD1: C#1 PAD2: C1 PAD3: F#1 PAD4: A#4 PAD5: E1 PAD6: D1 PAD7: A#1 PAD8: G#1 PAD9: C2 PAD10: B1 PAD11: A1 PAD12: G1 PAD13: C#2 PAD14: G2 PAD15: D#2 PAD16: F2 Set as MIDI Channel 10 CC assignments:...
- Page 13 English Scene 6 (AKAI BANK B) PAD1: E-1 PAD2: F-1 PAD3: F#-1 PAD4: G-1 PAD5: G#-1 PAD6: A-1 PAD7: A#-1 PAD8: B-1 PAD9: C0 PAD10: C#0 PAD11: D0 PAD12: D#0 PAD13: E0 PAD14: F0 PAD15: F#0 PAD16: G0 Set as MIDI Channel 10 CC assignments: Knob 1: CC#10 (pan) Knob 2: CC#11 (expression)
- Page 14 English Scene 7 (AKAI BANK C) PAD1: G#0 PAD2: A0 PAD3: A#0 PAD4: B0 PAD5: C1 PAD6: C#1 PAD7: D1 PAD8: D#1 PAD9: E1 PAD10: F1 PAD11: F#1 PAD12: G1 PAD13: G#1 PAD14: A1 PAD15: A#1 PAD16: B1 Set as MIDI Channel 10 CC assignments: Knob 1: CC#10 (pan) Knob 2: CC#11 (expression)
- Page 15 English Scene 8 (AKAI BANK D) PAD1: C2 PAD2: C#2 PAD3: D2 PAD4: D#2 PAD5: E2 PAD6: F2 PAD7: F#2 PAD8: G2 PAD9: G#2 PAD10: A2 PAD11: A#2 PAD12: B2 PAD13: C3 PAD14: C#3 PAD15: D3 PAD16: D#3 Set as MIDI Channel 10 CC assignments: Knob 1: CC#10 (pan) Knob 2: CC#11 (expression)
-
Page 16: Advanced
7.1 PADS All the 16 pads on iRig Pads can send MIDI Note ON and OFF, MIDI CH and MIDI CC messages. On each pad it’s possible to program what kind of message will be sent (Note, CC or MIDI CH) and in which mode it will be sent (temporary or toggle). -
Page 17: Continuous Controls
English 7.2 Continuous Controls In addition to the pads, iRig Pads can send MIDI CCs and MIDI CH from three rotary controls and one slider. 7.2.1 Knob 1, Knob 2 These are two knobs that send values from 0 to 127 on the programmed CC, approx 64 at center position. -
Page 18: Pushbuttons
The only difference between the rotary encoder and pushbottons “1” and “2” is that the encoder knob doesn’t have any backlight. 7.4 External Pedal iRig Pads has an external pedal input that works with both sustain and expression pedals. The external pedal can be programmed to send CCs, PCs, Notes and MIDI CH. 8 Scene Editing 8.1 SCENE Button... -
Page 19: Scene Store
• The pad will turn off to confirm the scene has been deleted, and the pad light will then go off. • iRig Pads will NOT automatically exit SCENE mode to allow for further operations (like save or load). 8.5 Factory Restore Press the SCENE and FIX VEL buttons while powering up iRag Pads to return the device to its factory presets. -
Page 20: Edit Mode
English 10 Edit Mode Most settings of iRig Pads can be modified and stored in SCENES. Settings that can be personalized and set are: - Global transmit MIDI Channel - Pads Velocity Sensitivity - Shift Octaves for pads Notes messages... -
Page 21: Edit Scene Global Parameters
English 10.1 EDIT scene global parameters 10.1.1 EDIT Global transmit MIDI Channel To edit the scene transmit MIDI channel: • Enter EDIT mode. • Press pad 14 (MIDI CH). • All pads between 1 and 9 will light up GREEN. • Compose the MIDI CH number using the 1-10 pads (10 means 0). -
Page 22: Transmit A Midi Program Change
English 10.1.4 Transmit a MIDI Program Change To transmit a MIDI PC: • Enter EDIT mode. • Press pad 15 (PC). • All pads between 1 and 9 will light up GREEN. • Compose the MIDI PC number using the 1-10 pads (10 means 0). At each press the pads will flash RED. In case a wrong value is inserted EDIT pushbuttons will flash. -
Page 23: Assign Midi Ch To Pads
English • Pads 5 (temp) and 6 (toggle) will illuminate RED. • Press pad 5 or 6 depending on if you want the note behavior to be temporary (temp) or latched (toggle). The selected mode will quickly flash to confirm the selection. • Pads 7 and 8 will illuminate RED. -
Page 24: Assign Cc To Pushbuttons
English actually sent again when the Oct buttons are pressed and the octave is shifted. • When done press pad 16 (ENTER) to confirm the selection and exit the EDIT mode. 10.2.5 Assign CC to Pushbuttons To assign a CC message to a pushbutton: • Enter EDIT mode. -
Page 25: Assign Cc To Rotary Knobs
English 10.2.8 Assign CC to Rotary Knobs To assign a CC message to a Rotary Knob: • Enter EDIT mode. • Rotate the Rotary Knob you want to associate the CC to. • Pads 4, 10 and 14 will illuminate RED. • Press pad 4 if you want to assign the selected rotary knob a pitch bend control. -
Page 26: Assign Midi Ch To The Slider
English 10.2.11 Assign MIDI CH to the Slider To assign a MIDI CH to the Slider: • Enter EDIT mode. • Move the Slider. • Pads 4, 10 and 14 will illuminate. • Press pad 14 (MIDI CH). • All pads between 1 and 9 will light up GREEN. • Compose the MIDI CH number using the 1-10 pads (10 means 0). -
Page 27: Assign Midi Ch To The Data Knob
English 10.2.14 Assign MIDI CH to the DATA Knob To assign a MIDI CH to the DATA Knob: • Enter EDIT mode. • Move the DATA knob. • Pads 10, 14 and 15 will illuminate. • Press pad 14 (MIDI CH). • All pads between 1 and 9 will light up GREEN. -
Page 28: Assign Note To The Data Pushbutton
English 10.2.17 Assign Note to the DATA Pushbutton To assign a Note message to the DATA pushbutton: • Enter EDIT mode. • Press the DATA pushbutton. • Pads 9, 10, 14 and 15 will illuminate RED • Press pad 9 to assign a Note. • Pads 5 (temp) and 6 (toggle) will illuminate RED. -
Page 29: Assign Pc To The Footswitch Pedal
English 10.2.20 Assign PC to the Footswitch Pedal To assign a PC message to the footswitch pedal: • Enter EDIT mode. • Press the footswitch pedal. • Pads 9, 10, 14 and 15 will illuminate RED. • Press pad 15 to assign a PC. • Compose the MIDI PC number using the 1-10 pads (10 means 0). -
Page 30: Assign Cc/Pc/Note/Midi Ch To The Expression Pedal
(points “10.2.19”, “10.2.20”, “10.2.21” and “10.2.22”). 11 External iRig Pads MIDI control iRig Pads can switch scenes and light up pushbuttons and pads via external MIDI control. iRig Pads receives on MIDI Channel 1. 11.1 Backlight control... -
Page 31: Specifications
Remember to always connect the 30-pin or Lightning cable to the iRig Pads before connecting it to the iOS device. I don’t get any sound. In order for iRig Pads to turn on, a Core MIDI-compatible app must first be launched on your iOS device or Mac. 14 Warranty Please visit: www.ikmultimedia.com/warranty... - Page 32 PADS, GrooveMaker®, and SampleTank® are trademarks property of IK Multimedia Production Srl. iPad, iPhone, iPod touch and Mac are trademarks of Apple Inc., registered in the U.S. and other countries.
Need help?
Do you have a question about the irig pads and is the answer not in the manual?
Questions and answers