Table of Contents
Advertisement
Advertisement
Table of Contents

Subscribe to Our Youtube Channel
Related Manuals for IK Multimedia irig 2


Summary of Contents for IK Multimedia irig 2
- Page 1 Guitar interface USER MANUAL...
-
Page 2: Table Of Contents
Table of Contents Contents English iRig 2 Register your iRig 2 iRig 2 Overview Installation and setup Using iRig 2 with mixers, speakers or amplifiers Amplifier output jack THRU-FX switch Setting input level Stand adapter Specifications Warranty Support and more info... -
Page 3: English
1/4” amplifier output and Android compatibility into its sleek pocketable enclosure. Its new 1/4” output jack lets you use iRig 2 with an amplifier as a part of your live rig without the use of an adaptor. -
Page 4: Irig 2 Overview
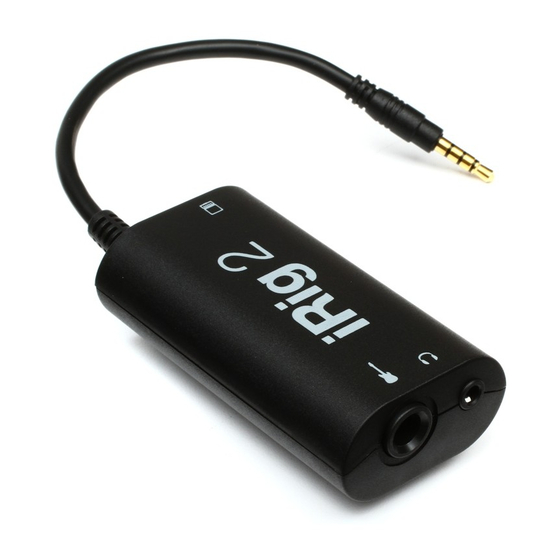
English iRig 2 Overview 1. Captive 1/8” TRRS cable 2. 1/4” TS amplifier output 3. THRU-FX switch 4. Input level control 5. 1/8” stereo headphone out 6. 1/4” TS instrument input... -
Page 5: Installation And Setup
English Installation and setup 1. Plug your iRig 2 into your device. 1/8" 2. Plug your headphones or earbuds into iRig 2. 1/8"... - Page 6 English 3. Lower the volume of your device by using the volume buttons. 4. Put your headphones on. 5. Download and launch AmpliTube. AmpliTube ikdownloads.com/irig2 WARNING: Permanent hearing loss may occur if earbuds or headphones are used at high volume. You can adapt over time to a higher volume of sound, which may sound normal but can be damaging to your hearing.
- Page 7 English 6. Connect your guitar, bass or other mono instrument to the 1/4” TS input jack on iRig 2. 1/4" 7. Adjust the input level with the thumbwheel. NEVER turn the “NO FEEDBACK” option OFF in the AmpliTube app SETUP page when using headphones or earbuds, to avoid possible feedback.
- Page 8 8. Connect an external amplifier to the 1/4” TS Amplifier output jack on iRig 2 and select the behavior of this output via the THRU-FX switch. THRU 1/4" 9. If needed, connect the detachable velcro-slot to the back of iRig 2 and fix it to any stand or pole with the velcro strap. click...
-
Page 9: Using Irig 2 With Mixers, Speakers Or Amplifiers
Amplifier output jack If needed you can connect an external amplifier to iRig 2. This is possible thanks to the “Amplifier output jack”, that allows you to send the processed signal (i.e. from a rig inside your mobile device) or a direct unprocessed... -
Page 10: Thru-Fx Switch
This lets you plug your favorite amplifier into the “Amplifier output jack” and, at the same time, connect iRig 2 to your mobile device that runs, for example, a tuner app or your favorite recording app. -
Page 11: Setting Input Level
English Setting input level You can adjust the input level of your instrument via the dedicated thumbwheel. To increase the input level rotate the thumbwheel control toward the TRRS captive cable. To decrease the input level rotate the thumbwheel control toward the 1/4” instrument input jack. For the best sound, adjust the input level so that it’s as high as possible while still retaining a “clean”... -
Page 12: Stand Adapter
English Stand adapter You can fix iRig 2 to any microphone stand or pole via the included clip and velcro strip. click... -
Page 13: Specifications
English Specifications - Instrument input: unbalanced, Hi-Z, TS 1/4” Jack, Tip: signal / Shield: ground - Instrument input impedance: 380 kOhms - Amplifier output: unbalanced, TS 1/4” Jack, Tip: signal / Shield: ground - Headphone output: 1/8” stereo headphone output - Frequency response: 20Hz-20kHz - Size (without cable): 72mm x 39mm x 21mm (2,83”... - Page 14 2, AmpliTube®, iRig® Recorder, VocaLive®, SampleTank® are trademarks property of IK Multimedia Production Srl. iPad, iPhone, iPod touch, Retina and Mac are trademarks of Apple Inc., registered in the U.S. and other countries. iPad Air, iPad mini, and Lightning are trademarks of Apple Inc. All other trademarks are property of their respective owners.
Need help?
Do you have a question about the irig 2 and is the answer not in the manual?
Questions and answers