Table of Contents
Advertisement
Advertisement
Table of Contents

Related Manuals for Denon MC7000


Summary of Contents for Denon MC7000
- Page 1 User Guide English...
-
Page 2: Table Of Contents
Table of Contents Introduction ......................4 Box Contents ....................4 Support ......................4 Setup ........................5 Single-DJ Performance ................... 5 Transitioning Between DJs ................6 Features........................ 7 Top Panel ......................7 Front Panel ..................... 12 Rear Panel ...................... 13 Operation ......................14 Mixing with Serato DJ .................. - Page 3 Playing Tracks ....................15 Pitch Functions ......................15 Beatgrid Functions ....................... 16 Loop Functions ......................17 Pad Modes ........................18 Cue Mode ........................ 18 Cue Loop Mode ...................... 19 Flip Mode ......................... 20 Roll Mode ......................... 21 Saved Loop Mode ....................22 Slicer Mode ......................
-
Page 4: Introduction
Introduction Box Contents MC7000 USB Cable Power Adapter (5 VDC, 4 A, center-positive) Software Download Card Quickstart Guide Safety & Warranty Manual Support For the latest information about this product (documentation, technical specifications, system requirements, compatibility information, etc.) and product registration, visit denondj.com. -
Page 5: Setup
6. Plug all devices into power sources, and turn on devices in proper order: • When starting a session, turn on (1) input sources, (2) MC7000, (3) output devices. • When ending a session, turn off (1) output devices, (2) MC7000, (3) input sources. -
Page 6: Transitioning Between Djs
DJ to another. To transition between DJs: 1. While DJ 1 uses MC7000 normally, use a standard USB cable to connect DJ 2’s computer to the other USB port (1 or 2) on MC7000’s rear panel. -
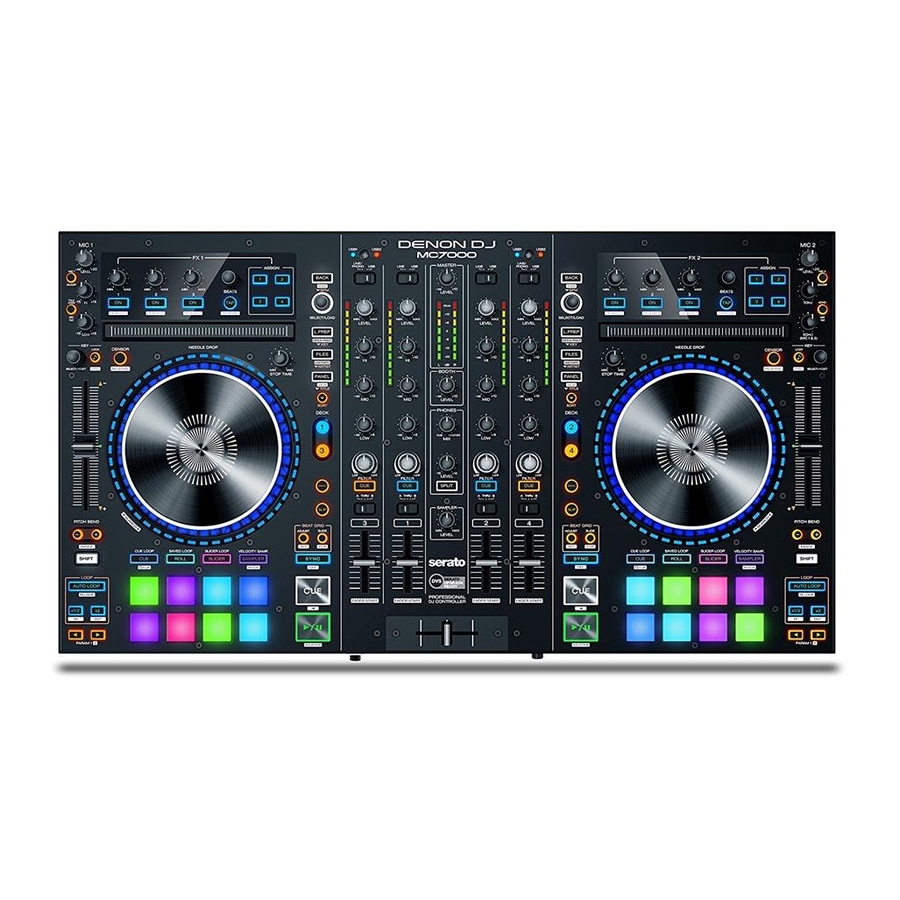
Page 7: Features
Features Top Panel 1. Input Selector: Set this switch to the desired audio source from this channel: USB (a track playing on that layer in the software), Line (a device connected to the line input on the rear panel), or Line/Phono (a device connected to the line/phono input on the rear panel). Please note that the Line/Phono selector switches on the rear panel must also be set properly. - Page 8 8. Channel Fader: Use this fader to adjust the channel’s volume level. 9. Crossfader Assign: Routes the audio playing on the corresponding channel to either side of the crossfader (L or R), or bypasses the crossfader and sends the audio directly to the program mix (center, Thru).
- Page 9 22. Split Cue: When this switch is in the On position, the headphone audio will be “split” such that all channels sent to cue channel are summed to mono and sent to the left headphone channel and the master mix is summed to mono and sent to the right channel. When the switch is in the Off position, the cue channel and master mix will be “blended”...
- Page 10 34. Key Select/Reset: Turn this knob to raise or lower the key of the track in semitone increments. Press this knob to reset the track’s key to its original key. You can use this if you have installed the Pitch ‘n Time DJ plugin from Serato. 35.
- Page 11 47. Slide/Clr: When using the software’s Beat Grid, press and hold this button and move the platter to “slide” the entire Beat Grid to the left or right. Press and hold Shift and then press this button to clear the entire Beat Grid. Important: Your track must have a set Beat Grid for the Slide/Clr button to work.
-
Page 12: Front Panel
Front Panel 1. Phones Outputs (1/4” or 1/8” / 6.35 mm or 3.5 mm): Connect headphones to these 1/4” (6.35 mm) and 1/8” (3.5 mm) jacks for monitoring the signal. The headphone volume is controlled using the Monitor Level knob. 2. -
Page 13: Rear Panel
1. Power Input: Use the included power adapter (5 VDC, 4 A, center-positive) to connect this input to your power source. 2. Power Button: Press this button to power MC7000 on or off. Power on MC7000 only after you have connected all of your input devices and before you power on your amplifiers and loudspeakers. -
Page 14: Operation
To set a deck on MC7000 to control a deck in Serato DJ, press the corresponding Deck button on MC7000 (1/3 or 2/4). The left deck on MC7000 can control Deck 1 or 3 in the software; the right deck can control Deck 2 or 4. -
Page 15: Playing Tracks
To enter a crate, playlist, or library, press the Select/Load Knob when a crate, playlist, or library is selected. To add a track to the Prepare Crate, press Load Prep when a track is selected. To show or hide the Prepare Crate, press and hold Shift and press Load Prep/Open Prep. Playing Tracks To play or pause a track loaded to a deck, press Play/Pause. -
Page 16: Beatgrid Functions
Beatgrid Functions See the Serato DJ manual to learn more about using the beatgrid. To adjust/“warp” the entire beatgrid of a track, press and hold Adjust and move the platter on the corresponding deck. Your track must have a set beatgrid for this feature to work. Important: Using this feature will change the track’s BPM. -
Page 17: Loop Functions
Loop Functions To create an auto-loop, press Auto Loop when it is unlit. A loop will be automatically created and activated at the current location. The Auto-Loop Length field in the software shows how long the loop will be. To create a manual loop, press and hold Shift and press X1/2 / Loop In at the desired starting location. -
Page 18: Pad Modes
Pad Modes The pads on each deck of MC7000 controlling Serato DJ have different functions depending on the current Pad Mode. These modes are described on the following pages. Click a name to jump to its section: Cue Mode Roll Mode... -
Page 19: Cue Loop Mode
Cue Loop Mode In Cue Loop Mode, each pad assigns a hot cue point or returns the track to that hot cue point (like Cue Mode), but in both cases, it also creates an Auto-Loop at that point. To enter Cue Loop Mode, press Cue / Cue Loop / Flip so that it lights green. To assign a hot cue point, press an unlit pad at the desired point in your track. -
Page 20: Flip Mode
Flip Mode In Flip Mode, Pads 1–6 each trigger a Flip, which you can assign in the software. See the Serato DJ manual to learn more about Flips. You can use this if you have installed the Serato Flip Expansion Pack. To enter Flip Mode, press and hold Shift and then press Cue / Cue Loop / Flip so that it lights red. -
Page 21: Roll Mode
Roll Mode Note: The pad layouts here match the software’s default Auto-Loop time division layout. If you shift the range of time divisions displayed in the software, the pad layout will change to match it. In Roll Mode, each pad triggers a momentary Loop Roll. To enter Roll Mode, press Roll / Saved Loop so that it lights aqua. -
Page 22: Saved Loop Mode
Saved Loop Mode In Saved Loop Mode, each pad will return the track to one of your saved loops. To enter Saved Loop Mode, press Roll / Saved Loop so that it lights yellow. To create a loop, press and hold Shift and press X1/2 / Loop In to set the Loop In point. Then, press and hold Shift and press X2 / Loop Out to set the Loop Out point and trigger the loop. -
Page 23: Slicer Mode
Slicer Mode Important: Your track must have a set beatgrid for this mode to work. In Slicer Mode, the eight pads represent eight sequential beats—“slices”—in the beatgrid. The currently playing slice is represented by the currently lit pad; the light will “move through the pads”... -
Page 24: Slicer Loop Mode
Slicer Loop Mode Important: Your track must have a set beatgrid for this mode to work. In Slicer Loop Mode, the eight pads represent eight sequential beats—“slices”—in the beatgrid. The currently playing slice is represented by the currently lit pad; the light will “move through the pads”... -
Page 25: Sampler Mode
Sampler Mode In Sampler Mode, the pads will control the SP-6 sampler within the software. Pads 1–6 each trigger a sample at a specified volume (you assign both the sample and its volume in the software). To enter Sampler Mode, press Sampler / Velocity Samp. so that it lights purple. To assign a sample and its volume, use the software. -
Page 26: Velocity Sampler Mode
Velocity Sampler Mode In Velocity Sampler Mode, the pads will control the SP-6 sampler within the software. Pads 1–6 each trigger a sample (which you assign in the software) at a volume proportional to how heavily you pressed them. In other words, the pads behave as they do in Sampler Mode, but they are velocity-sensitive. -
Page 27: Pitch Play Mode
Pitch Play Mode In Pitch Play Mode, each pad plays the track from a hot cue point at a different transposition (adjustable by semitones). You can use this if you have installed the Serato Pitch ‘n Time DJ Expansion Pack. See Cue Mode to learn how to assign hot cue points. -
Page 28: Playback/Performance Functions
Playback/Performance Functions To activate or deactivate a platter’s “vinyl mode,” press Vinyl. When activated, you can move the platter to “scratch” the track as you would with a vinyl record. To activate or deactivate the Censor feature, press and hold Censor. When activated, the track will play in reverse, but when you release Censor, normal playback will resume from where it would have been if you had never engaged the Censor feature (i.e., as if the track had been playing forward the whole time). -
Page 29: Effects
Effects Important: See the Serato DJ manual to learn more about using effects. To switch between Single FX Mode and Multi FX Mode, press and hold Shift and press Tap / FX Mode on the desired deck. To select an effect, do one of the following: •... -
Page 30: Technical Specifications
Technical Specifications +24 dBu Analog Output Master (balanced, maximum) +4 dBu (balanced, unity) +20 dBu (unbalanced, maximum) 0 dBu (unbalanced, unity) +24 dBu Booth (balanced, maximum) +4 dBu (balanced, unity) > 150 mW @ 40 Ω Headphones -40 dBu Analog Input Microphone (unity) -60 dBu... -
Page 31: Trademarks & Licenses
Specifications are subject to change without notice. Trademarks & Licenses Denon is a trademark of D&M Holdings Inc., registered in the U.S. and other countries. Denon DJ products are produced by inMusic Brands, Inc., Cumberland, RI 02864, USA. Serato, Serato DJ, and the Serato logo are registered trademarks of Serato Audio Research. - Page 32 denondj.com Manual Version 1.0...
Need help?
Do you have a question about the MC7000 and is the answer not in the manual?
Questions and answers