Table of Contents
Advertisement
HD WIFI CAMERA
Model Number: WF28
-Please make sure to read the complete User Manual carefully
before installing your WiFi Cam permanently.
-Keep the User Manual in a safe location for future reference in
case of operational difficulties or reconnecting the Cam with
your mobile/smart phone over the World Wide Web(WWW).
-Should you need additional information, please contact
Support@conbrov.com
USER MANUAL
Advertisement
Table of Contents

Related Manuals for Conbrov WF28


Summary of Contents for Conbrov WF28
-
Page 1: User Manual
HD WIFI CAMERA Model Number: WF28 USER MANUAL -Please make sure to read the complete User Manual carefully before installing your WiFi Cam permanently. -Keep the User Manual in a safe location for future reference in case of operational difficulties or reconnecting the Cam with your mobile/smart phone over the World Wide Web(WWW). -
Page 3: Safety Instructions
Cam, you MUST use the DC power supply provided. -Users are NOT authorized to disassemble or dismantle the Cam. Conbrov will NOT take responsibility or pay any liabilities for loss caused by such actions. -To avoid explosion, damages or bodily injuries, NEVER put the cam in an oven, microwave or fire. - Page 4 Camera hardware installation 1. Attach DC power adapter to the power cable at the bottom of the camera 2. Follow the App Download page to download the WiFi Cam app and start viewing on your mobile/ smart phone what your WiFi Cam sees. Once you see on your mobile/smart phone what your WiFi Cam sees, determine where you would like to permanently mount your Cam to best...
-
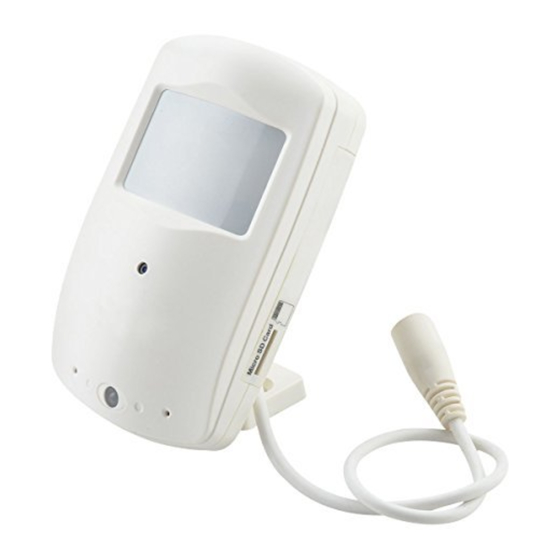
Page 5: Status Indicator
Structure IR LEDS CAMERA LENS MICRO SD SLOT MICRO SD INDICATOR BRACKET STATUS INDICATOR RESET If a reset is necessory, press the reset button and hold it for a few seconds. the WiFi cam will restart, then repeat the set up instructions. POWER CABLE... - Page 6 Indicator NETWORK STATUS INDICATOR: a. Flash slowly: In WiFi hotspot mode; or the wifi network signal is not good. b. Flash quickly: The camera is going to be re-set. c. Always on: In network mode. MICRO-SD CARD INDICATOR: a. the indicator is off means in recording b.
-
Page 7: Setting Up Camera
Setting up camera Important Notes: - If you cannot find the WIFI Cam's WIFI hotspot from your phone's WIFI list, please restart the WIFI Cam as shown on the previous page. - This WIFI Cam is designed ONLY for Android or IOS mobile/smart phone platforms. - Page 8 Setting up camera Step 2 (Setting up a connection between the WiFi Cam and your mobile/smart phone) - Power on the WiFi Cam. Wait until you see the IR LED turns off - Change your phone’s WiFi connection to “ IPCAM_XXXXXX”, This will be displayed on yourphone as six (6) digits including letters and numbers.
- Page 9 Setting up camera -Manually searching for the WiFi Cam Name your camera Input the ID number from the bottom of your camera Auto search Manually add (See bottom of WiFi Camera) Do Not Change Keep Blank...
- Page 10 Setting up camera -The WiFi Cam will be found automatically as : IPC-XXXXXX, click on that and wait until the camera is activated. IPC-E8ABFA2E8062 RCAM-007250-NZCZS This is your camera's ID found by auto search IPC-E8ABFA2E8062 RCAM-007250-NZCZS Click on this listing to start a live stream video...
- Page 11 Setting up camera - Now that you have finished the connection through the WiFi Cam’s WiFi hotspot,you can see the viewing area of the camera on your mobile/smart phone. Through WiFi hotspot -So next if you want to remotely view the camera, please go to step 4...
- Page 12 Setting up camera Step 4 (Connecting the WiFi Cam to your WiFi router to remotely view the WiFi Cam on your mobile/smart phone.) Before you connect the WiFi Cam to your WiFi router for remote viewing, please make sure you have already connected your mobile/smart phone as directed on the previous page.
- Page 13 Setting up camera -Choose WiFi Settings and choose your local WiFi name. Input your WiFi password and then tap “Save” User Settings Wifi Settings Mail Settings Alarm Settings Restore default...
- Page 14 Setting up camera Choose your own WiFi...
- Page 15 Setting up camera Input your WiFi password...
- Page 16 Setting up camera Make sure to click here to save it...
- Page 17 Setting up camera Click Yes to reboot the camera...
- Page 18 Setting up camera -Wait for the camera to be rebooted.
- Page 19 Setting up camera - Please wait 1-2 minutes until the WiFi camera is active(The green network indicator is always on)
- Page 20 Setting up camera Click here to add more cameras You can now view what your WiFi Cam sees from the WWW any where you have WiFi access on your mobile/smart phone. Important note: - If you cannot activate or see the WiFi Cam image, please move your WiFi Cam and mobile/smart phone as close to your router as possible to get a stronger WiFi signal...
- Page 21 APP menu instruction Add new camera Camera added Settings All cameras added APP Gallery recorded files System Settings...
-
Page 22: App Menu Instruction
APP menu instruction Snapshot Manually Video recording TV mode/resolution adjust Two way talking ( Not applicable for this mode) Audio from camera... - Page 23 APP menu instruction Enter settings Set camera time same as mobile Edit camera information Delete present camera Click here to check all manually recorded videos and photos in the app.
- Page 24 APP menu instruction You will get the push photo message once your camera Receive push message triggered a motion. (You have to make sure you've already set the Alarm setting to ON for Motion detection and Alarm Recording)
- Page 25 APP menu instruction Settings: Set WiFi network Set email alarm upon motion Motion alarm Wifi Settings settings Mail Settings Set user account and password Alarm Settings User Settings Restore default Restore default...
- Page 26 APP menu instruetion APP menu instruction Wifi Settings Mail Settings Modify your user Alarm Settings information and save User Settings Restore default You can invite more users to view your camera here...
- Page 27 APP menu instruetion APP menu instruction How to invite more users 1) Create a new user name and password 2) Ask the new user to download the mini WiFi Cam APP and then go to manually add the camera...
- Page 28 APP menu instruetion APP menu instruction 3) Share your camera ID and step 1 created new user name and password to the user you want to invite 4) Click save and then wait for the camera to be active on the user's mobile/smart phone.
- Page 29 APP menu instruetion APP menu instruction Stated at step 4 in setting Wifi Settings up camera section Mail Settings Alarm Settings Please input your email address, sender and receiver can input same email address. Please check and input your SMTP server address (Usually check it from your email web backend) Make sure here to switch to ON...
- Page 30 APP menu instruction Wifi Settings Mail Settings If you want to receive alarm push Alarm Settings upon motion, please switch the below buttons to on. User Settings Restore default If you don’t set mail settings, this function will not work.
-
Page 31: Product Specification
Product specification SPECIFICATIONS ITEM SPECIFICATION Video Specification 720P/VGA H.264 Image sensor OV9712 CMOS Focus Fixed Illumination (IR ON)0LUX Aperture Auto Code Rate 128-8192kbps SNR(Signal to Noise Ratio) >50DB Infra-red Sensitivity Supported Day and Time Watermark supported IR Filter Audio one way audio Infared Light 10 meters Night Vision... -
Page 32: Product Accessories
Product accessories WIFI Cam-1 DC Adapter-1 Screws and expansion plugs-2 User Manual-1 Bracket-1... - Page 34 Email: Support@conbrov.com Website: www.conbrov.com...
Need help?
Do you have a question about the WF28 and is the answer not in the manual?
Questions and answers