Table of Contents
Advertisement
Advertisement
Table of Contents

Subscribe to Our Youtube Channel
Related Manuals for ASROCK Beebox-S Series


Summary of Contents for ASROCK Beebox-S Series
-
Page 2: Copyright Notice
(including damages for loss of profits, loss of business, loss of data, interruption of business and the like), even if ASRock has been advised of the possibility of such damages arising from any defect or error in the documentation or product. - Page 3 The terms HDMI™ and HDMI High-Definition Multimedia Interface, and the HDMI logo are trademarks or registered trademarks of HDMI Licensing LLC in the United States and other countries.
-
Page 4: Important Safety Instructions
Important Safety Instructions Pay close attention to the following safety instructions before performing any of the operation. Basic safety precautions should be followed to protect yourself from harm and the product from damage: • Operation of the product should be carried out by suitably trained, qualified, and certified personnel only to avoid risk of injury from electrical shock or energy hazard. -
Page 5: Table Of Contents
How to Install the Memory Modules How to Install the VESA Bracket Positions of the Beebox series Chapter 4 Software and Utilities Operation Installing Drivers ASRock Live Update & APP Shop 4.2.1 UI Overview 4.2.2 Apps 4.2.3 BIOS & Drivers... - Page 6 4.2.4 Setting Enabling USB Ports for Windows® 7 Installation Chapter 4 UEFI SETUP UTILITY Introduction 4.1.1 UEFI Menu Bar 4.1.2 Navigation Keys Main Screen OC Tweaker Screen Advanced Screen 4.4.1 CPU Configuration 4.4.2 Chipset Configuration 4.4.3 Storage Configuration 4.4.4 Super IO Configuration 4.4.5 ACPI Configuration 4.4.6 USB Configuration Tools...
-
Page 7: Chapter 1 Introduction
In case any modifications of this documentation occur, the updated version will be available on ASRock’s website without further notice. If you require technical support related to this product, please visit our website for specific information about the model you are using. -
Page 8: Product Specifications
1.2 Product Specifications Beebox series Barebone Intel® Core i3-6100U (3M Cache, up to 2.30 GHz) / Intel® Core i5-6200U (3M Cache, up to 2.80 GHz)/ Chipset Intel® Skylake U Memory Supports DDR4 2133MHz, 2 x SO-DIMM slots, Max. 32GB Supports 1 x M.2 SSD slot M.2 slot (Support PCIe 3.0x4/SATA3 type 2260/2280 M.2 SSD) Supports 1 x 2.5”... - Page 9 Beebox series Dimension 110mm (W) x 46mm (H) x 118.5mm (L) Controller Remote Controller VESA Bracket included , supports 75 x 75 and 100 x 100 mm Volume 0.6L (Liters) Operating Tempera- 0°C~35°C ture...
-
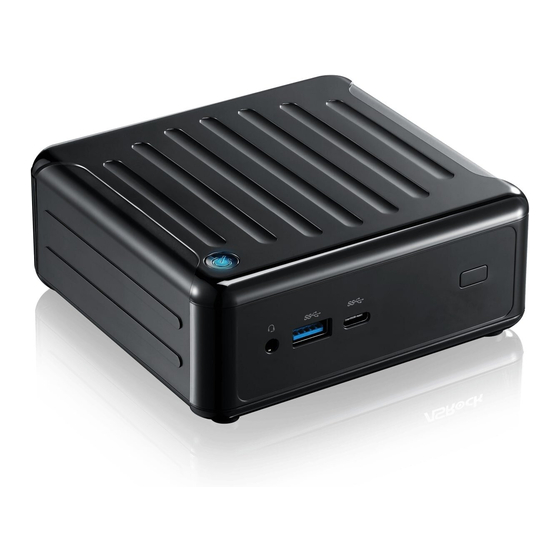
Page 10: Chapter 2 Product Overview
Chapter 2 Product Overview This chapter provides diagrams showing the location of important components of the Beebox series. 2.1 Front View Description Headphone & Microphone USB 3.0 (Type A) USB 3.1 (Type C) IR Sensor Window... -
Page 11: Rear View
Beebox series 2.2 Rear View Description DC-In *HDMI (4K/2K@60Hz) RJ-45 *HDMI (4K/2K@30Hz) Kensington Lock Slot USB 3.0 (Type A) *DisplayPort 1.2 *The Beebox series support dual display video output. You can use HDMI (4K/2K@60Hz) and DisplayPort or HDMI (4K/2K@60Hz) and HDMI (4K/2K@30Hz) ports at the same time. -
Page 12: Inside View
2.3 Inside View Description M.2 WiFi Module M.2 SSD slot (PCIe/SATA, type 2260/2280) SATA 3.0 Connector DDR4 SO-DIMM Slots Clear CMOS Pad *Clear CMOS Pad allows you to clear the data in CMOS. To clear CMOS, disconnect the power supply and short the Clear CMOS Pad. Hard disk drive tray *HDD support: 2.5"... -
Page 13: Chapter 3 Hardware Installation
Beebox series Chapter 3 Hardware Installation This chapter helps you install or remove important components. 3.1 How to Remove the Bottom Case 1. Remove the four screws on the bottom case. 2. Then lift up and remove the bottom panel.. -
Page 14: How To Remove The M.2 Wifi Module
3.2 How to Remove the M.2 WiFi Module 1. Disconnect the two antenna cables from the M.2 WiFi Module by lifting the clips. 2. Remove the screw that holds the M.2 WiFi Module in place. 3. Carefully pull the M.2 WiFi Module from the slot and remove it. -
Page 15: How To Install The M.2 Ssd (Type 2260)
Beebox series 3.3 How to Install the M.2 SSD (Type 2260) 1. Locate the M.2 slot on the motherboard. 2. Carefully insert the M.2 SSD into the slot. 3. Tighten the screw to secure the M.2 SSD to the motherboard. -
Page 16: How To Install The M.2 Ssd (Type 2280)
3.4 How to Install the M.2 SSD (Type 2280) 1. Remove the standoff screw. 2. Tighten the screw to secure the extended bracket to the motherboard. Extended Bracket. 3. Carefully insert the M.2 SSD into the slot. 4. Tighten the screw to secure the M.2 SSD to the motherboard. -
Page 17: How To Install The 2.5-Inch Hard Drive
Beebox series 3.5 How to Install the 2.5-inch Hard Drive 1. Remove the four screws on the bottom case. Then lift up and remove the bottom panel. 2. Unscrew the four screws that hold the HDD cage in place. 3. Install the HDD in the cage using the four screws. Then connect the SATA cable to the HDD. - Page 18 4. Attach the HDD cage to the bottom panel and secure it using the four screws. 5. Connect the SATA Data and Power Cable to the motherboard and reinstall the bottom panel. 6. Align the three latches on the bottom panel with the three latch holes on the chassis. Then reinstall the bottom panel until it 7.
-
Page 19: How To Install The Memory Modules
Beebox series 3.6 How to Install the Memory Modules 1. The Beebox series requires DDR4 SO-DIMM. 2. For dual channel configuration, you always need to install identical (the same brand, speed, size and chip-type) DDR4 SO-DIMM pairs. The SO-DIMM only fits in one correct orientation. It will cause permanent damage to the motherboard and the DIMM if you force the DIMM into the slot at incorrect orientation. -
Page 20: How To Install The Vesa Bracket
3.7 How to Install the VESA Bracket 1. Attach the two screws to the base of the Beebox series. 2. Attach the VESA Bracket to the rear of a compatible display using the four screws. *Choose mounting holes depending on the mounting hole pattern of your LCD screen (75 mm ×... -
Page 21: Positions Of The Beebox Series
Beebox series 3.8 Positions of the Beebox series The Beebox series can be placed in vertical or horizontal position. Horizontal Position Vertical Position Wall-mounted *Please note that keeping the Beebox series in a vertical position will ensure better cooling performance. USB Power On Function: USB Power On Function allows system power on via USB keyboard/mouse. -
Page 22: Chapter 4 Software And Utilities Operation
Chapter 4 Software and Utilities Operation 4.1 Installing Drivers The Support CD that comes with the motherboard contains necessary drivers and useful utilities that enhance the motherboard’s features. Running The Support CD To begin using the support CD, insert the CD into your CD-ROM drive. The CD automatically displays the Main Menu if “AUTORUN”... -
Page 23: Asrock Live Update & App Shop
Double-click on your desktop to access ASRock Live Update & APP Shop utility. *You need to be connected to the Internet to download apps from the ASRock Live Update & APP Shop. 4.2.1 UI Overview Category Panel Hot News... -
Page 24: Apps
4.2.2 Apps When the "Apps" tab is selected, you will see all the available apps on screen for you to download. Installing an App Step 1 Find the app you want to install. The most recommended app appears on the left side of the screen. The other various apps are shown on the right. - Page 25 Beebox series Step 3 If you want to install the app, click on the red icon to start downloading. Step 4 When installation completes, you can find the green "Installed" icon appears on the upper right corner. To uninstall it, simply click on the trash can icon *The trash icon may not appear for certain apps.
- Page 26 Upgrading an App You can only upgrade the apps you have already installed. When there is an available new version for your app, you will find the mark of "New Version" appears below the installed app icon. Step 1 Click on the app icon to see more details. Step 2 Click on the yellow icon to start upgrading.
-
Page 27: Bios & Drivers
Beebox series 4.2.3 BIOS & Drivers Installing BIOS or Drivers When the "BIOS & Drivers" tab is selected, you will see a list of recommended or critical updates for the BIOS or drivers. Please update them all soon. Step 1 Please check the item information before update. -
Page 28: Setting
4.2.4 Setting In the "Setting" page, you can change the language, select the server location, and determine if you want to automatically run the ASRock Live Update & APP Shop on Windows startup. -
Page 29: Enabling Usb Ports For Windows® 7 Installation
Intel® USB 3.0 eXtensible Host Controller (xHCI) drivers packed into the ISO file. Requirements A Windows® 7 installation disk or USB drive • A Windows® PC • Win7 USB Patcher (included in the ASRock Support CD or downloaded from • website) - Page 30 Instructions Step 1 Insert the Windows® 7 installation disk or USB drive to your system. Step 2 Extract the tool (Win7 USB Patcher) and launch it. Step 3 Select "Create a Windows 7 installation disk with a USB device". Step 4 Locate your Win7 source folder or your ISO file.
- Page 31 Beebox series Step 5 Select the USB storage, compact disk or destination folder for the new Windows 7 installation file. Step 6 Click “Start” to begin. Step 7 Now you are able to install Windows® 7 on Braswell or Skylake with the new burned CD. Or please use the patched ISO image to make an OS USB drive to install the OS.
-
Page 32: Chapter 4 Uefi Setup Utility
Chapter 4 UEFI SETUP UTILITY 4.1 Introduction This section explains how to use the UEFI SETUP UTILITY to configure your system. You may run the UEFI SETUP UTILITY by pressing <F2> or <Del> right after you power on the computer, otherwise, the Power-On-Self-Test (POST) will continue with its test routines. -
Page 33: Navigation Keys
Beebox series 4.1.2 Navigation Keys Use < > key or < > key to choose among the selections on the menu bar, and use < > key or < > key to move the cursor up or down to select items, then press <Enter>... -
Page 34: Main Screen
4.2 Main Screen When you enter the UEFI SETUP UTILITY, the Main screen will appear and display the system overview. My Favorite Display your collection of BIOS items. Press F5 to add/remove your favorite items. -
Page 35: Oc Tweaker Screen
Beebox series 4.3 OC Tweaker Screen In the OC Tweaker screen, you can set up overclocking features. Because the UEFI software is constantly being updated, the following UEFI setup screens and descriptions are for reference purpose only, and they may not exactly match what you see on your screen. -
Page 36: Dram Timing Configuration
DRAM Configuration DRAM Tweaker Fine tune the DRAM settings by leaving marks in checkboxes. Click OK to confirm and apply your new settings. DRAM Timing Configuration CAS# Latency (tCL) The time between sending a column address to the memory and the beginning of the data in response. - Page 37 Beebox series Load User Default Load previously saved user defaults.
-
Page 38: Advanced Screen
4.4 Advanced Screen In this section, you may set the configurations for the following items: CPU Configuration, Chipset Configuration, Storage Configuration, Super IO Configura- tion, ACPI Configuration and USB Configuration. Setting wrong values in this section may cause the system to malfunction. UEFI Configuration Active Page on Entry Select the default page when entering the UEFI setup utility. -
Page 39: Cpu Configuration
Beebox series 4.4.1 CPU Configuration Intel Hyper Threading Technology Intel Hyper Threading Technology allows multiple threads to run on each core, so that the overall performance on threaded software is improved. Active Processor Cores Select the number of cores to enable in each processor package. CPU C States Support Enable CPU C States Support for power saving. - Page 40 CPU Thermal Throttling Enable CPU internal thermal control mechanisms to keep the CPU from overheat- ing. No-Execute Memory Protection Processors with No-Execution Memory Protection Technology may prevent certain classes of malicious buffer overflow attacks. Intel Virtualization Technology Intel Virtualization Technology allows a platform to run multiple operating systems and applications in independent partitions, so that one computer system can function as multiple virtual systems.
-
Page 41: Chipset Configuration
Beebox series 4.4.2 Chipset Configuration Primary Graphics Select a primary VGA. Top of Lower Usable DRAM Set the maximum value of TOLUD. Set this item to Dynamic to allow TOLUD to adjust automatically based on the largest MMIO length of the installed graphic controller. - Page 42 Share Memory Configure the size of memory that is allocated to the integrated graphics processor when the system boots up. Inte(R) Ethernet Connection I219-V Enable or disable the onboard network interface controller (Intel® I219V). Onboard HD Audio Enable/disable onboard HD audio. Set to Auto to enable onboard HD audio and automatically disable it when a sound card is installed.
-
Page 43: Storage Configuration
Beebox series 4.4.3 Storage Configuration SATA Controller(s) Enable/disable the SATA controllers. SATA Mode Selection AHCI: Supports new features that improve performance. RAID: Combine multiple disk drives into a logical unit. AHCI (Advanced Host Controller Interface) supports NCQ and other new features that will improve SATA disk performance but IDE mode does not have these advantages. - Page 44 Hard Disk S.M.A.R.T. S.M.A.R.T stands for Self-Monitoring, Analysis, and Reporting Technology. It is a monitoring system for computer hard disk drives to detect and report on various indicators of reliability.
-
Page 45: Super Io Configuration
Beebox series 4.4.4 Super IO Configuration CIR Controller Use this item to enable or disable the CIR controller. The default value is [Enabled]. -
Page 46: Acpi Configuration
4.4.5 ACPI Configuration Suspend to RAM It is recommended to select auto for ACPI S3 power saving. ACPI HEPT Table Enable the High Precision Event Timer for better performance. PCIE Devices Power On Allow the system to be waked up by a PCIE device and enable wake on LAN. CIR Power On Use this item to enable or disable CIR to power on the system. - Page 47 Beebox series Allow the system to be waked up by an USB keyboard or remote controller. USB Mouse Power On Allow the system to be waked up by an USB mouse.
-
Page 48: Usb Configuration
4.4.6 USB Configuration Legacy USB Support Enable or disable Legacy OS Support for USB 2.0 devices. If you encounter USB compatibility issues it is recommended to disable legacy USB support. Select UEFI Setup Only to support USB devices under the UEFI setup and Windows/Linux operating systems only. -
Page 49: Tools
In order to prevent users from bypassing OMG, guest accounts without permission to modify the system time are required. UEFI Tech Service Contact ASRock Tech Service if you are having trouble with your PC. Please setup network configuration before using UEFI Tech Service. Easy RAID Installer Easy RAID Installer helps you to copy the RAID driver from the support CD to your USB storage device. -
Page 50: Network Configuration
Save UEFI files in your USB storage device and run Instant Flash to update your UEFI. Internet Flash - DHCP (Auto IP), Auto ASRock Internet Flash downloads and updates the latest UEFI firmware version from our servers for you. Please setup network configuration before using Internet Flash. -
Page 51: Hardware Health Event Monitoring Screen
Beebox series 4.6 Hardware Health Event Monitoring Screen This section allows you to monitor the status of the hardware on your system, including the parameters of the CPU temperature, motherboard temperature, fan speed and voltage. CPU Fan 1 Setting Select a fan mode for CPU Fans 1. This option is set to set to Standard Mode by default. -
Page 52: Security Screen
4.7 Security Screen In this section you may set or change the supervisor/user password for the system. You may also clear the user password. Supervisor Password Set or change the password for the administrator account. Only the administrator has authority to change the settings in the UEFI Setup Utility. Leave it blank and press enter to remove the password. -
Page 53: Boot Screen
Beebox series 4.8 Boot Screen This section displays the available devices on your system for you to configure the boot settings and the boot priority. Fast Boot Fast Boot minimizes your computer's boot time. In fast mode you may not boot from an USB storage device. - Page 54 Full Screen Logo Enable to display the boot logo or disable to show normal POST messages. AddOn ROM Display Enable AddOn ROM Display to see the AddOn ROM messages or configure the AddOn ROM if you've enabled Full Screen Logo. Disable for faster boot speed. Boot Failure Guard If the computer fails to boot for a number of times the system automatically restores the default settings.
- Page 55 Beebox series Launch PXE OpROM Policy Select UEFI only to run those that support UEFI option ROM only. Select Legacy only to run those that support legacy option ROM only. Select Do not launch to not execute both legacy and UEFI option ROM. Launch Video OpROM Policy Select UEFI only to run those that support UEFI option ROM only.
-
Page 56: Exit Screen
4.9 Exit Screen Save Changes and Exit When you select this option the following message, “Save configuration changes and exit setup?” will pop out. Select [OK] to save changes and exit the UEFI SETUP UTILITY. Discard Changes and Exit When you select this option the following message, “Discard changes and exit setup?”... -
Page 57: Contact Information
Contact Information If you need to contact ASRock or want to know more about ASRock, you’re welcome to visit ASRock’s website at http://www.asrock.com; or you may contact your dealer for further information. For technical questions, please submit a support request form at http://www.asrock.com/support/tsd.asp...
Need help?
Do you have a question about the Beebox-S Series and is the answer not in the manual?
Questions and answers