Table of Contents
Advertisement
Quick Links
Advertisement
Table of Contents

Subscribe to Our Youtube Channel
Related Manuals for ASROCK NUC BOX 6100


Summary of Contents for ASROCK NUC BOX 6100
-
Page 1: User Manual
NUC BOX 6100 User Manual Version 1.0 Published December 2016... -
Page 2: Important Safety Instructions
Important Safety Instructions Pay close attention to the following safety instructions before performing any of the operation. Basic safety precautions should be followed to protect yourself from harm and the product from damage: • Operation of the product should be carried out by suitably trained, qualified, and certified personnel only to avoid risk of injury from electrical shock or energy hazard. - Page 3 The terms HDMI™ and HDMI High-Definition Multimedia Interface, and the HDMI logo are trademarks or registered trademarks of HDMI Licensing LLC in the United States and other countries.
-
Page 4: Table Of Contents
How to Install the 2.5-inch Hard Drive How to Install the Memory Modules (DDR3 Low Voltage (1.35V)) How to Install the VESA Bracket Positions of the NUC BOX 6100 Chapter 4 Software and Utilities Operation Installing Drivers Chapter 5 UEFI SETUP UTILITY Introduction 5.1.1... - Page 5 Main Screen Advanced Screen 5.3.1 CPU Configuration 5.3.2 Chipset Configuration 5.3.3 Storage Configuration 5.3.4 Super IO Configuration 5.3.5 ACPI Configuration 5.3.6 USB Configuration 5.3.7 Platform Trust Technology Hardware Health Event Monitoring Screen Security Screen Boot Screen Exit Screen...
-
Page 6: Chapter 1 Introduction
Chapter 1 Introduction Because the hardware specifications might be updated, the content of this documentation will be subject to change without notice. 1.1 Package Contents • NUC BOX 6100 Barebone System with: NUC BOX 6100 Chassis Motherboard (pre-installed) M.2 WiFi Module (Optional) *The barebone system does not include memory, hard drive and mSATA SSD. -
Page 7: Product Specifications
NUC BOX 6100 1.2 Product Specifications NUC BOX 6100 Barebone Intel® 6 Gen Core U Processor (Core i3-6100U) Windows®7 64-bit & 10 64-bit By CPU Chipset Memory 2 x DDR4 2133 MHz SO-DIMM up to 32G Graphic Intel® HD Graphics 520... - Page 8 CE , FCC Class A tions * For NUC BOX 6100 series, it is not recommended to install 2.5” HDD. If you install the 2.5” HDD, please keep the NUC BOX in a vertical position to ensure better cooling performance.
-
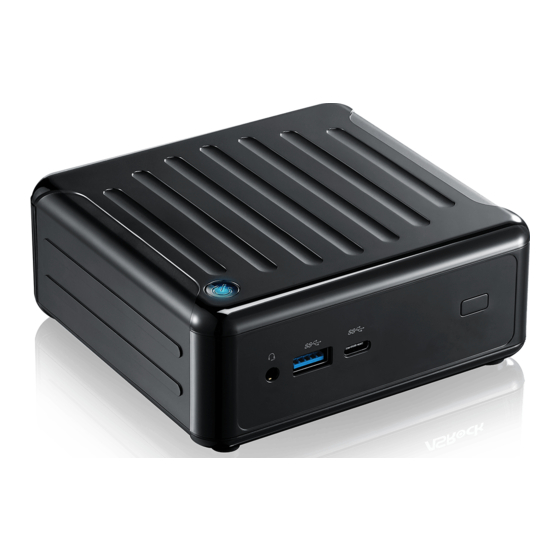
Page 9: Chapter 2 Product Overview
NUC BOX 6100 Chapter 2 Product Overview This chapter provides diagrams showing the location of important components of the NUC BOX 6100. 2.1 Front View Description Headphone & Microphone USB 3.0 (Type A) USB 3.1 (Type C) IR Sensor Window... -
Page 10: Rear View
2.2 Rear View Description DC-In HDMI RJ-45 Kensington Lock Slot USB 3.0 (Type A) *DisplayPort *To use DisplayPort as a display output, please connect your monitor/display to HDMI Port when installing OS system. This DisplayPort only supports DP to D-Sub dongle and does not support DP to HDMI dongle and DP to DVI dongle. -
Page 11: Inside View
NUC BOX 6100 2.3 Inside View Description M.2 WiFi Module (Optional) mSATA Slot SATA 3.0 Connector SO-DIMM Slots Clear CMOS Pad *Clear CMOS Pad allows you to clear the data in CMOS. To clear CMOS, disconnect the power supply and short the Clear CMOS Pad. -
Page 12: Chapter 3 Hardware Installation
NUC BOX 6100 Chapter 3 Hardware Installation This chapter helps you install or remove important components. 3.1 How to Remove the Bottom Case 1. Remove the four screws on the bottom case. 2. Then lift up and remove the bottom panel.. -
Page 13: How To Remove The M.2 Wifi Module (Optional)
3.2 How to Remove the M.2 WiFi Module (Optional) 1. Disconnect the two antenna cables from the M.2 WiFi Module by lifting the clips. 2. Remove the screw that holds the M.2 WiFi Module in place. 3. Carefully pull the M.2 WiFi Module from the slot and remove it. -
Page 14: How To Install The Msata Ssd
NUC BOX 6100 3.3 How to Install the mSATA SSD 1. Locate the mSATA slot on the motherboard. 2. Carefully insert the mSATA SSD into the slot. 3. Tighten the screw to secure the mSATA SSD to the motherboard. -
Page 15: How To Install The 2.5-Inch Hard Drive
3.4 How to Install the 2.5-inch Hard Drive 1. Remove the four screws on the bottom case. Then lift up and remove the bottom panel. 2. Unscrew the four screws that hold the HDD cage in place. 3. Install the HDD in the cage using the four screws. Then connect the SATA cable to the HDD. - Page 16 NUC BOX 6100 4. Attach the HDD cage to the bottom panel and secure it using the four screws. 5. Connect the SATA Data and Power Cable to the motherboard and reinstall the bottom panel. 6. Align the three latches on the bottom panel with the three latch holes on the chassis.
-
Page 17: How To Install The Memory Modules (Ddr3 Low Voltage (1.35V))
3.5 How to Install the Memory Modules (DDR3 Low Voltage (1.35V)) 1. The NUC BOX 6100 requires DDR3L SO-DIMM (1.35V). 2. For dual channel configuration, you always need to install identical (the same brand, speed, size and chip-type) DDR3L SO-DIMM pairs. -
Page 18: How To Install The Vesa Bracket
NUC BOX 6100 3.6 How to Install the VESA Bracket 1. Attach the two screws to the base of the NUC BOX 6100. 2. 2. Attach the VESA Bracket to the rear of a compatible display using the four screws. -
Page 19: Positions Of The Nuc Box 6100
The NUC BOX 6100 can be placed in vertical or horizontal position. Horizontal Position Vertical Position Wall-mounted *Please note that keeping the NUC BOX 6100 in a vertical position will ensure better cooling performance. USB Power On Function: USB Power On Function allows system power on via USB keyboard/mouse. -
Page 20: Chapter 4 Software And Utilities Operation
NUC BOX 6100 Chapter 4 Software and Utilities Operation 4.1 Installing Drivers The Support CD that comes with the motherboard contains necessary drivers and useful utilities that enhance the motherboard’s features. Running The Support CD To begin using the support CD, insert the CD into your CD-ROM drive. The CD automatically displays the Main Menu if “AUTORUN”... -
Page 21: Chapter 5 Uefi Setup Utility
Chapter 5 UEFI SETUP UTILITY 5.1 Introduction This section explains how to use the UEFI SETUP UTILITY to configure your system. You may run the UEFI SETUP UTILITY by pressing <F2> or <Del> right after you power on the computer, otherwise, the Power-On-Self-Test (POST) will continue with its test routines. -
Page 22: Navigation Keys
NUC BOX 6100 5.1.2 Navigation Keys Use < > key or < > key to choose among the selections on the menu bar, and use < > key or < > key to move the cursor up or down to select items, then press <Enter>... -
Page 23: Main Screen
5.2 Main Screen When you enter the UEFI SETUP UTILITY, the Main screen will appear and display the system overview. -
Page 24: Advanced Screen
NUC BOX 6100 5.3 Advanced Screen In this section, you may set the configurations for the following items: CPU Configuration, Chipset Configuration, Storage Configuration, Super IO Configuration, ACPI Configuration, USB Configuration and Platform Trust Technology. Setting wrong values in this section may cause the system to malfunction. -
Page 25: Cpu Configuration
5.3.1 CPU Configuration Intel SpeedStep Technology Intel SpeedStep technology allows processors to switch between multiple frequencies and voltage points for better power saving and heat dissipation. CPU C States Support Enable CPU C States Support for power saving. It is recommended to keep C1, C6 and C7 all enabled for better power saving. -
Page 26: Chipset Configuration
NUC BOX 6100 5.3.2 Chipset Configuration DRAM Voltage (1.35V) Use this to configure DRAM Voltage (1.35V). The default value is [Auto]. Primary Graphics Adapter Select a primary VGA. Share Memory Configure the size of memory that is allocated to the integrated graphics processor when the system boots up. -
Page 27: Onboard Lan
Onboard LAN Enable or disable the onboard network interface controller. Deep S5 Configure deep sleep mode for power saving when the computer is shut down. Restore on AC/Power Loss Select the power state after a power failure. If [Power Off] is selected, the power will remain off when the power recovers. -
Page 28: Storage Configuration
NUC BOX 6100 5.3.3 Storage Configuration SATA Controller(s) Enable/disable the SATA controllers. SATA Mode Selection AHCI: Supports new features that improve performance. AHCI (Advanced Host Controller Interface) supports NCQ and other new features that will improve SATA disk performance. Aggressive Link Power Management Aggressive Link Power Management allows SATA devices to enter a low power state during periods of inactivity to save power. -
Page 29: Super Io Configuration
5.3.4 Super IO Configuration CIR controller Enable or disable the CIR Controller. -
Page 30: Acpi Configuration
NUC BOX 6100 5.3.5 ACPI Configuration Suspend to RAM It is recommended to select auto for ACPI S3 power saving. PCIE Device Power On Allow the system to be waked up by a PCIE device and enable wake on LAN. - Page 31 USB Mouse Power On Allow the system to be waked up by an USB mouse.
-
Page 32: Usb Configuration
NUC BOX 6100 5.3.6 USB Configuration Legacy USB Support Enable Legacy USB Support. AUTO option disables legacy support if no USB devices are connected. DISABLE option will keep USB devices available only for EFI applications. -
Page 33: Platform Trust Technology
5.3.7 Platform Trust Technology Security Device Support Enable to activate Firmware Trusted Platform Module (fTPM) security for your hard disk drives. -
Page 34: Hardware Health Event Monitoring Screen
NUC BOX 6100 5.4 Hardware Health Event Monitoring Screen This section allows you to monitor the status of the hardware on your system, including the parameters of the CPU temperature, motherboard temperature, fan speed and voltage. CPU Fan 1 Setting Select a fan mode for CPU Fans 1, or choose Customize to set 5 CPU temperatures and assign a respective fan speed for each temperature. -
Page 35: Security Screen
5.5 Security Screen In this section you may set or change the supervisor/user password for the system. You may also clear the user password. Supervisor Password Set or change the password for the administrator account. Only the administrator has authority to change the settings in the UEFI Setup Utility. Leave it blank and press enter to remove the password. -
Page 36: Boot Screen
NUC BOX 6100 5.6 Boot Screen This section displays the available devices on your system for you to configure the boot settings and the boot priority. Fast Boot Fast Boot minimizes your computer's boot time. In fast mode you may not boot from an USB storage device. - Page 37 Full Screen Logo Enable to display the boot logo or disable to show normal POST messages. AddOn ROM Display Enable AddOn ROM Display to see the AddOn ROM messages or configure the AddOn ROM if you've enabled Full Screen Logo. Disable for faster boot speed. Boot Failure Guard If the computer fails to boot for a number of times the system automatically restores the default settings.
- Page 38 NUC BOX 6100 CSM (Compatibility Support Module) Enable to launch the Compatibility Support Module. Please do not disable unless you’re running a WHCK test. If you are using Windows 8.1 64-bit and all of your devices support UEFI, you may also disable CSM for faster boot speed.
-
Page 39: Exit Screen
5.7 Exit Screen Save Changes and Exit When you select this option the following message, “Save configuration changes and exit setup?” will pop out. Select [OK] to save changes and exit the UEFI SETUP UTILITY. Discard Changes and Exit When you select this option the following message, “Discard changes and exit setup?”...
Need help?
Do you have a question about the NUC BOX 6100 and is the answer not in the manual?
Questions and answers