Thuraya seastar User Manual
Hide thumbs
Also See for seastar:
- Installation manual (2 pages) ,
- Quick start manual (2 pages) ,
- Firmware upgrade procedure (3 pages)
Table of Contents
Advertisement
Quick Links
Advertisement
Table of Contents

Related Manuals for Thuraya seastar


Summary of Contents for Thuraya seastar
- Page 1 Thuraya SeaStar SYSTEM USER GUIDE Thuraya SeaStar...
-
Page 2: Table Of Contents
TABLE OF CONTENTS ......REGULATORY INFORMATION ......... 1. INTRODUCTION ........2. GETTING STARTED ........3. USING THE SeaStar ....... How to make call ............... GEO fencing & Tracking ....... Black & White List .......... GmPRS ...... -
Page 3: Regulatory Information
16W. When low signal strength, burst power may beyond standards of design, manufacture and intended use of the equipment. 20W. For the steady operation, the input voltage for SeaStar System needs a 36W Westone Communications co. ltd, assumes no liability for the customer's failure to power supply (may be 12V DC@3A or 24V DC@1.5A). -
Page 4: Introduction
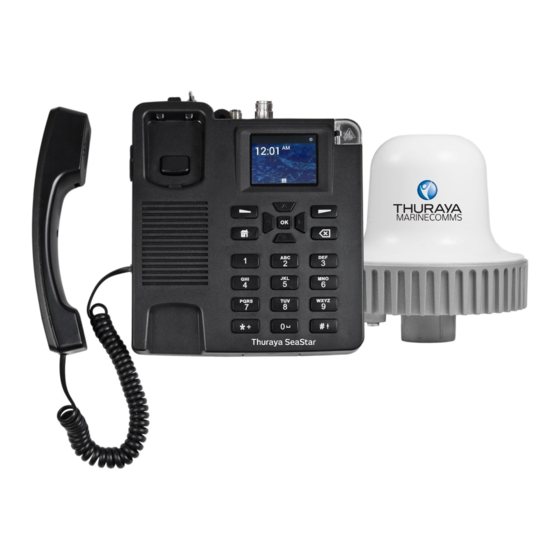
Equipment Ventilation The Thuraya SeaStar is a voice satellite terminal with a built-in GPS tracking system specially designed for reliable performance in the harsh maritime environment. To ensure adequate cooling of the terminal, 5cm of unobstructed space must be This affordable, easy-to-install and user-friendly terminal enables users to make... - Page 5 -25°C to +55°C Storage Temperature -40°C to +80°C Antenna Unit Active Antenna Base Terminal (BDU) Omni-directional active Thuraya satellite antenna with build-in active GPS Operating Temperature -15°C to +55°C antenna Storage Temperature -20°C to +70°C Up to 75 meters of LMR400 (or equivalent) co-axial satellite antenna cable...
- Page 6 10W / 16W Consumption Active Antenna (D x H) 164×170mm Operating Humidity Up to 95% (non-condensing) at 40°C SAT Cable General specifications GPS Cable Thuraya Approved Compliant to CE, RoHS, WEEE, REACH, IEC60945 Weight Service Base Terminal 1.2kg Voice Active Antenna 1.1kg...
- Page 7 SAT RF Cable (25 meters with TNC Male connectors) SIM Card Slot Micro USB Port SIM Card Slot: To insert Thuraya SIM Card Mini USB Port: Power Cable It is for Terminal maintenance and Firmware upgrade. For more information, please contact your distributor...
- Page 8 Serial Port DC Input RJ-45 Port Power ON/OFF Serial Port: This is a 3 wires (TX, RX and ground) RS232 port. It is for SAT Port GPS Port Grounding Stud communication module maintenance and Firmware upgrade. DC Input: Power input connector is used for connecting the external power For more information, please contact your distributor source (10.8 - 31.2V) to the Base Terminal and active antenna.
-
Page 9: Getting Started
Thuraya SeaStar system and connect all the cables according Installing the SIM card Mounting Port The Thuraya SeaStar system requires a valid SIM card to access the satellite network and configure the settings of the Base Terminal SAT signal Port... - Page 10 If the security code open and user change another card or do not insert SIM card, SeaStar will turn into the protected mode and display the figure below. When this is displayed, that means no SIM card insert or the wrong SIM card has been inserted, please restore the original SIM card and restart SeaStar to go out of the protected mode.
-
Page 11: Using The Seastar
3. USING THE SeaStar Keypad- Description and Functions Keys Description / Functions ⑨ Left Function Key ⑩ The Function of this key depends on the guiding ① text shown on the display above this key ② Right Function Key ③... - Page 12 This indicator line shows status symbols of the operating conditions of the When entering a phone number, press this key SeaStar terminal to insert a *, press and hold this key to insert a + When entering a text number...
-
Page 13: Status Indicators
Making / End a Voice Call seconds to start auto dialing Note: Before making a voice call, please make sure SeaStar has registered the network and signal strength could be usable ( 00 <country code> <phone number> and press key or wait for 4... - Page 14 To accept an incoming call, lift up the handset from the cradle respective sub-menus. Receiving a call When there is an incoming call, the SeaStar terminal will: Ring The calling party's number will be displayed on the screen The corresponding name of contact will be displayed if the number is stored in...
- Page 15 Table below summarizes the functionalities within each The Contacts menu allows you to store, retrieve and update names and phone menu option: numbers of your contacts. Contacts browse is divided into A~G, H~N, O~T, U~Z Icon Description Contacts This menu manages your user contacts History This menu allows you to view call histories Messages...
- Page 16 1. First, use 4-Way navigation buttons to the choose the contacts who needs to delete 2. Press Left Function key to pop up menu 3. Use the 4-Way navigation buttons to move the focus on the Delete Contacts Note: You can also delete the selected contacts by pressing the Clear key.
- Page 17 1. Use the 4-Way navigation buttons to choose the contacts who need to be edited 2. Press key to browse contacts 3. Press Left Function key to pop up three options: Edit, Call, Send SMS 2. Use the Up and Down arrow of 4-Way navigation buttons to choose the call record which needs to be edited 4.
- Page 18 4. The following instructions detail the making of a Call, Send SMS and Add to contacts (If it isn’t in contacts box)/Edit this contacts (If it is in contacts box) Messages Menu After entering into messages menu, the user can enter into message preview interface, the interface will display recently send and receive messages.
- Page 19 < a >: English input method <123>: Numbers input To add a number, press and hold the desired number key. Insert symbols to your message: To get a list of special symbols, press Using the 4-Way arrow key, navigate to the desired symbol. 3.
- Page 20 3. Use Left and Right arrow of 4-Way navigation buttons to focus to Delete session 3. Then it will pop up two option: From up to bottom is SMS center number, Deliver report 4. Press key to pop up confirm delete option SMS service center number could set SMS and email center number, this function belongs to advanced setting option, it is strongly recommended that the user should not modify it...
- Page 21 Note: If you want to change this password, please input the right password and press triple Down arrow of 4-Way navigation buttons to switch the focus to choose Security option and press Satellite Settings Menu This menu has 5 sub-menus: GPS setting, Black and white list, Emergency, Security and RJ11 impedance settings Next press twice Down arrow of 4-Way navigation buttons to switch the focus First of all, user need enter the correct password to into this menu...
- Page 22 After input the correct password, SeaStar will entry the Satellite Settings Menu, Press Left Function key to pop up the sub-menu and use down and this menu has 5 sub-menus: GPS setting, Black and white list, Emergency, arrow of 4-Way navigation buttons to switch the focus to choose Alert...
- Page 23 Use 4-Way navigation buttons to choose south and north latitude, fill degree, minute and second in the corresponding coordinate (All degree, minute and second are integers) Return to the Alert area menu, press key to enter into edit interface, when the settings done, Geo fencing icon will display Then choose area type, circular or rectangular Circular: Fill in the center point coordinate, radius length (Unit...
- Page 24 GPS Tracking Open the GPS tracking setting, firstly use UP and Down arrow of 4-Way navigation buttons to choose the time interval (Unit minute, min 2 minutes, max 999999 minutes) or distance (Unit meter, min 2 minutes, max 999999 minutes) interval Rectangular: the center point coordinate, the half-length of ☆...
- Page 25 When select the Save and start tracking, the terminal will save the settings Under the menu, the sub-list would show Disenabled block list, Enabled white and start send SMS to the set Contacts list, Enabled black list The above-mentioned method can close the GPS tracking Enable white list, 10 contacts can be set, if tracking or emergency functions are being used ensure that the related tracking and alert numbers are in the white list...
- Page 26 In the emergency contacts edit interface, alert message content can be edited Note: less than 50 characters When enable Black or White list, the menu below will show the intercepted call records or messages, click to enter and view After all the editing, click Left Function key to save , while Right Function key to cancel...
- Page 27 When in emergency, to notify pre-configured contacts during an emergency. PIN code includes Set PIN1 code Press and hold the RED key for 2 seconds to trigger the SMS alert Alert Button Security code sets security code. Set the password according to the following steps.
- Page 28 Security code different impedance settings, it is very important to do an appropriate set up before you connect sub circuit switch phone or PBX with the SeaStar Entering user management interface, input the password which needs to be set and input again to confirm the password.
- Page 29 Display First item: Brightness Press to enter into the backlight brightness adjustment menu, use Left and Right arrow 4-Way navigation buttons to adjust the brightness and use the Right Function key to save and return Second item: Phone Ringtone Choose incoming ring and press key to save Second item: Display Sleep Press...
- Page 30 first item: Select time zone About SeaStar Press key to enter About Thuraya SeaStar equipment option, this menu displays the phone current status, android related legal information and version information Press left soft key to choose sort method (Time zone sort or city name sort).
- Page 31 The first item: Status It could display the Signal strength , Service state, Mobile network state, IMEI, IMEI, ICCID, Modem Version and GPS Version The others item These items are about Android Legal Information, satellite model number and some other version information GmPRS Dialer Tools Menu Tool menu includes Calendar and GmPRS Dialer...
- Page 32 Finally, Press Left Function key again to shut down GmPRS Dialer The user could use cables to connect SeaStar satellite phone’s RJ45 interface function and disconnect to the internet and computer.
- Page 33 During the upgrade process, please make sure that the power supply is continuous Micro USB Port Wait for several minutes until the upgrade process completed, and SeaStar screen will restart and display the mean menu Wait a moment, SeaStar screen will display an Upgrade menu prompt...
- Page 34 Thuraya Telecommunications Company is in compliance with the Directive 2011/65/EU of the European Parliament - RoHS ( Restriction of Hazardous Substances) with respect to the following substances: 1.
Need help?
Do you have a question about the seastar and is the answer not in the manual?
Questions and answers