
Related Manuals for Room essentials 417087


Summary of Contents for Room essentials 417087
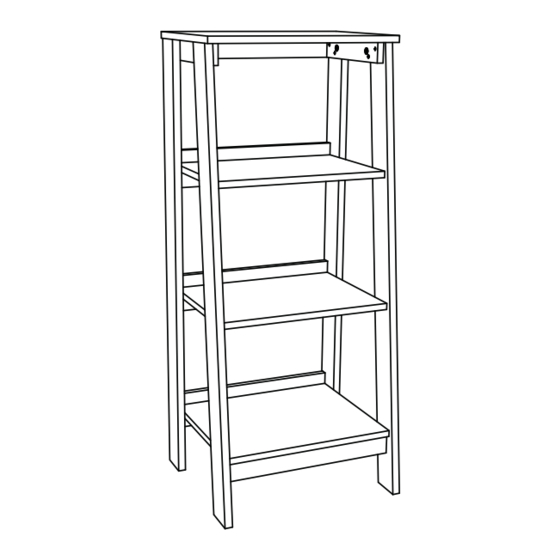
- Page 1 3-shelf bookcase style # 417087 (espresso) dpci # 249 - 05 - 0026 >> assembly instructions...
-
Page 2: Before You Begin
1. Check for damaged or missing parts. Visit www.sauder.com/services to order missing supplies. 2. Use the carton as a working surface to prevent product damage during assembly. 3. Gather all tools prior to assembly. tools needed tip shown actual size 417087... - Page 3 United States and Canada (except holidays) replacement parts, please visit our web site. Consumer Services 1-800-523-3987 Lot #: 392221 Most replacement parts ship from our facility in one or two business days. Date Purchased:______________ 06 / 16 / 16 417087...
- Page 4 While not all parts are labeled, some of the parts will have a label or an inked letter on the edge to help distinguish similar parts from each other. Use this part list to help identify similar parts. ITEM DESCRIPTION QUANTITY top shelf middle shelf bottom shelf back right front leg left front leg right rear leg left rear leg skirt side skirt 417087...
- Page 5 Using a screw that is too long will cause damage. Before beginning assembly, separate each type of screw. Carefully study the screw diagrams (SHOWN ACTUAL SIZE). Pay close attention to the color of each screw. You may receive extra hardware with your unit. 417087...
- Page 6 Insert a CONNECTOR SCREW (8S) into each HIDDEN CONNECTOR (5F). Use your hammer to tap a HIDDEN CONNECTOR (5F) with SCREW into the BOTTOM SHELF (D2). Repeat this step tapping two HIDDEN CONNECTORS (5F) with SCREWS into the SHELVES (B2 and C2). 417087...
- Page 7 Insert the metal end of the CAM DOWEL into the HIDDEN CAM. Push eight HIDDEN CAMS (1F) into the SKIRTS (J2 and K). Then, insert the metal end of a CAM DOWEL (2F) into each HIDDEN CAM. 417087...
- Page 8 (1F) x 18 hidden cam Arrow Hole The arrow in the HIDDEN CAM must point toward the hole in the edge of the board. Push eighteen HIDDEN CAMS (1F) into the SHELVES (B2, C2, and D2) and BACKS (E2). 417087...
- Page 9 4. (18 used) (8F) x 18 cam screw Turn eighteen CAM SCREWS (8F) into the LEGS (F, G, H, and I). NOTE: Be sure to use the exact holes shown for the CAM SCREWS. 417087...
- Page 10 Unfi nished edge Surface with HIDDEN CAMS (10S) x 8 silver 1-1/8" fl at head screw Unfi nished edge Fasten the SIDE SKIRTS (K) to the LEGS (F, G, H, and I). Use eight SILVER 1-1/8" FLAT HEAD SCREWS (10S). 417087...
- Page 11 Fasten the BACKS (E2) to the RIGHT REAR LEG (H). Tighten three HIDDEN CAMS. NOTE: Be sure the METAL PINS (1R) in the LEG (H) insert into the holes in the ends of the BACKS (E2). Insert three METAL PINS (1R) into the smaller holes in the BACKS (E2). 417087...
- Page 12 S u r H I D i t h f a c S u r H I D Fasten the SHELVES (B2, C2, and D2) to the LEGS (F and H). Tighten six HIDDEN CAMS. 417087...
- Page 13 Fasten the SHELVES (B2, C2, and D2) and BACKS (E2) to the LEGS (G and I). Tighten nine HIDDEN CAMS. NOTE: Be sure the METAL PINS (1R) in the ends of the BACKS (E2) insert into the holes in the LEGS (G and I). 417087...
- Page 14 Fasten the TOP (A) to the SIDE SKIRTS (K). Tighten four HIDDEN CAMS. HIDDEN CAMS NOTE: The SKIRT on the TOP should be located toward the back of the unit. Fasten a SKIRT (J2) to the BOTTOM SHELF (D2). Tighten two HIDDEN CAMS. 417087...
- Page 15 HIDDEN CONNECTOR. While pushing the screw into the hole of the adjoining part, turn the screwdriver clockwise to tighten. Fasten the SHELVES (B2, C2, and D2) to the BACKS (E2). Tighten three HIDDEN CONNECTORS. 417087...
- Page 16 Use a BLACK 9/16" LARGE HEAD SCREW (1S) through the other end of the SAFETY STRAP and into the pre-drilled hole in the upper SKIRT (J2). NOTE: Before moving your unit to a different location, unscrew the SAFETY DRYWALL ANCHOR (61M) from your wall. The nylon sheath will remain behind your wall. 417087...
- Page 17 NOTE: You may need to use a hammer to tap the COVERS onto the SCREWS and HIDDEN CAMS. NOTE: Please read the back pages of the instruction booklet for important safety information. This completes assembly. Clean with your favorite furniture polish or a damp cloth. Wipe dry. 417087...
- Page 18 6. For Warranty inquiries or claims, please visit our website www.sauder.com. You can also contact Sauder at 1-800-523-3987. Sauder may require Warranty claims to be submitted in writing to Sauder Woodworking Co., 502 Middle Street, Archbold, OH 43502 USA. Please include your sales receipt or other proof of purchase and a specifi c description of the product defect. 417087...
- Page 19 2. This certifi cate applies to compliance of this product with the CPSC Ban on Lead-Containing Paint (16 CFR 1303). 3. This product is manufactured by: Sauder Woodworking Company 502 Middle Street Archbold, Ohio 43502 (419) 446-2711 June 2016 4. Date of Manufacture: ________________ 417087...
Need help?
Do you have a question about the 417087 and is the answer not in the manual?
Questions and answers