Table of Contents
Advertisement
INSTRUCTION MANUAL
SENSIT® P400 GAS MONITOR
For use with combustible gases and optionally available oxygen and toxic gases.
7WA6
@Sensit-Direct.com
Intrinsically safe for use in:
SENSIT
GOLD instruments are Approved
®
UL913,
For Class 1, Division 1, Groups A, B, C and D
Hazardous locations when used with approved
alkaline batteries or rechargeable battery pack.
IP65
-20° C to 50° C
Temp code: T4,
SENSIT Technologies
SENSIT-Direct.com
Read and understand instructions before use.
Manufactured by:
II 2 G
0891
Ex d ia IIC T4, Gb, IP65
-20° C to 50° C
DEMKO 12 ATEX 1102012
1.888.475.
Advertisement
Table of Contents

Subscribe to Our Youtube Channel
Related Manuals for Sensit P400


Summary of Contents for Sensit P400
- Page 1 INSTRUCTION MANUAL SENSIT® P400 GAS MONITOR Read and understand instructions before use. For use with combustible gases and optionally available oxygen and toxic gases. Intrinsically safe for use in: SENSIT GOLD instruments are Approved ® UL913, II 2 G 0891...
- Page 2 Warning: To maintain intrinsic safety, service must be performed by factory authorized technicians with approved replacement parts only. CAUTION: Lithium backup cell may explode if mistreated. Do not recharge, disassemble or dispose of in fire. SENSIT-Direct.com @Sensit-Direct.com 1.888.475.
-
Page 3: Table Of Contents
Operational Specificaitons ......7 Sensor Specifications & Alarms ....9-10 Function Indicators ........11 Battery Installation .......12-13 Operation and Use ......14-22 Bump Test - Calibration ......23 P400 Motorized Pump ......27 User Menu .........28-30 Warranty ........Back Cover SENSIT-Direct.com @Sensit-Direct.com 1.888.475. -
Page 4: General Description
General Description The Sensit P400 is a state of the art personal gas monitor used to alert users of potentially hazardous gases in the work area. This monitor may have 1-5 sensors installed including combustible gas (LEL only), oxygen and/or 2 additional toxics such as CO, SO2, HCN and H2S. -
Page 5: Parts And Accesories
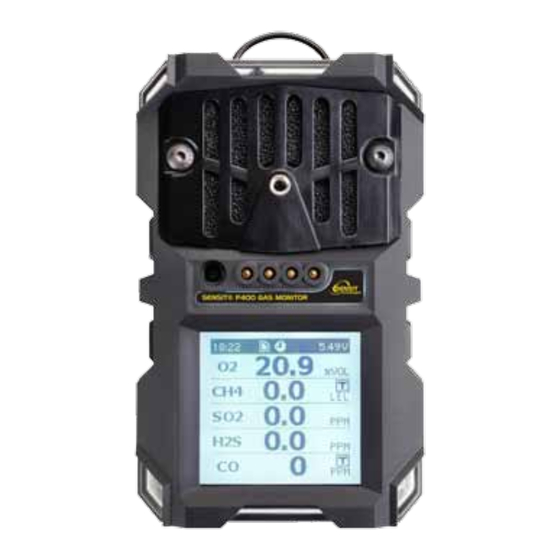
SENSIT® P400 GAS MONITOR BELT CLIP (ON BACK) COMPLIANCE/STATUS INDICATOR ALARM LEDs SENSOR AREA SENSOR FILTER FUNCTION BUTTONS SOUNDER GRAPHIC DISPLAY w/BACK LIGHT PArTS AND ACCESSOrIES Standard Accessories Optional Accessories (Included with Instrument) • Confined space entry probe • Four alkaline batteries w/hand aspirator •... -
Page 6: Physical Specificaitons
3 Service can only be performed by factory authorized personnel. 3 Tampering with this product may void warranty. 3 Only use Sensit Technologies approved parts and accessories. 3 Do not change batteries or service in a combustible atmosphere. 3 Never use an instrument known to be damaged or out of calibration. -
Page 7: Operational Specificaitons
10% increments. Power Source: 4 “AA” type alkaline batteries Use only PROCELL PC1500 NiMH rechargeable battery pack SENSIT PART NO 871-00021 Pump flow: ≥0.35 lpm (optional external pump) Battery life: ≥ 24 hours continuous operation (alkaline) ≥ 15 hours cont. operation (rechargeable) Response Time: Initial response <3 seconds... - Page 8 SENSIT-Direct.com @Sensit-Direct.com 1.888.475.
-
Page 9: Sensor Specifications & Alarms
Low Alarm = 10ppm; High Alarm = 25ppm; HH not activated; Calibration gas is 25ppm H2S. Hydrogen Cyanide (electrochemical) 0 – 30ppm; 0.1ppm resolution; ±1ppm or 10% of read accuracy; Low Alarm = 4.7ppm; High Alarm= 10ppm; HH not activated; Calibration gas is 10ppm HCN. SENSIT-Direct.com @Sensit-Direct.com 1.888.475. -
Page 10: Sensor Specifications & Alarms
Low Alarm = 1ppm; High Alarm = 5ppm; HH not activated; Calibration gas is 5ppm ETO. Phosphine (electrochemical) 0 – 10ppm; 0.1ppm resolution; ±1ppm or 10% of read accuracy; Low Alarm = 1ppm; High Alarm = 5ppm; HH not activated; Calibration gas is 5ppm PH3. SENSIT-Direct.com @Sensit-Direct.com 1.888.475. -
Page 11: Function Indicators
ETO = Ethylene Oxide = Chlorine PH3 = Phosphine SO2 = Sulfur Dioxide Consult Sensit Technologies for additional sensor availability. Combustible gas sensing displays the calibration gas type used. Ch4=methane; PRO=propane; PEN=Pentane; The letter “P” indicates the pump is operating A SD card symbol indicates datalogging is activated “... -
Page 12: Battery Installation
4. Insert the bottom of the battery compartment cover into the housing and rotate the cover into position. 5. Tighten the four retaining screws. Do not over tighten. SENSIT-Direct.com @Sensit-Direct.com 1.888.475. -
Page 13: Battery Installation
Operation - Battery Installation - Rechargeable Pack Caution: Always change batteries in an environment free of combustible gas. Use only Sensit Technologies approved battery pack. Follow your local regulations for proper disposal of the rechargeable battery pack. 1. The battery compartment is located on the... -
Page 14: Operation And Use
(100vac – 240vac) using supplied wall adapter. Do Not Substitute a. The green LED will illuminate 2. Lay the P400 face down into the charger cradle. a. Green LED on and flashing Red LED indicate charging in progress b. Green and Red LED constantly on indicate full charge c. - Page 15 Snapshots – View instant saves (100) which includes all readings and date/time (102 Maximum Entries) k. Event Log – displays all alarm events including date/time (120 Maximum Entries) l. Settings – Display operational info such as alarm settings m. Supervisor – Supervisor adjustable features (password protected) SENSIT-Direct.com @Sensit-Direct.com 1.888.475.
- Page 16 FAIL indicating a failure to the combustible gas sensor A countdown timer will show the amount of time remaining before the instrument turns off. Pressing the two top buttons will also power the instrument off immediately. Consult Sensit Technologies for further assistance. SENSIT-Direct.com @Sensit-Direct.com 1.888.475.
- Page 17 Onscreen selection allows SKIP or BUMP. iii. Bump test is updated automatically for next required test upon successful completion. g. Sensit Logo will be displayed Working display 3. All readings show horizontally “gas type” “concentration” “unit of measure” and IDS status (if enabled).
- Page 18 LOW alarms when TWA alarms are activated can the sound be muted and the vibrator deactivated by pressing any button (Using snooze feature in supervisor menu-default is off so no mute is possible). The LED’s will continue to flash during the mute phase. SENSIT-Direct.com @Sensit-Direct.com 1.888.475.
- Page 19 15. Battery low indication will activate when the battery voltage reaches 4.1v. At 4.0v the instrument will turn off. 16. If the automatic power off alert activates press any button to add one additional hour of runtime. SENSIT-Direct.com @Sensit-Direct.com 1.888.475.
- Page 20 Alarms Caution: During any alarm follow company procedures! The Sensit P400 has a wide range of alarm types that can be activated through the User Set Up menu. The alarm types range from those with a simple set point to those using TWA and STEL measurements required by those customers with more sophisticated users or operational standards as implemented by an industrial hygienist.
- Page 21 (based on 8 hours per OSHA) will not change. The P400 is capable of monitoring up 5 gases and as a result it is possible to have multiple alarms due to a multiple gas hazard.
- Page 22 Allow to dry. If the filter is heavily soiled or damaged, replace with a new filter. 4. Place the filter over the sensor area and replace the sensor cover. Secure with screws. SENSIT-Direct.com @Sensit-Direct.com 1.888.475.
-
Page 23: Bump Test - Calibration
Use of gas to test each sensor type is required. EXAMPLE: An LEL (calibrated to CH4), CO, O2 and H2S version of the P400 will use a 2.5%vol CH4 (50%LEL), 100 ppm CO, 18.5% O2, 25 ppm H2S with balance nitrogen test gas. - Page 24 2. Place the instrument in the instrument cradle 3. Press and release the “Bump Test” button on the SCal 400 Station display. 4. When the display reads “PASS” SCal the test is complete. 5. Remove the instrument. 6. Allow all sensors to clear. SENSIT-Direct.com @Sensit-Direct.com 1.888.475.
- Page 25 13. Low sensor output is indicated by a FAIL message. Recalibration or repair is needed. The display will indicate failure. Press any button to continue. 14. Remove and turn off gas supply. 15. Remove the calibration cover from the instrument. 16. Allow 60 seconds for all sensors to clear. SENSIT-Direct.com @Sensit-Direct.com 1.888.475.
- Page 26 4. Place the instrument in the instrument cradle. 5. Press and release the “CALIBRATE” button on the SCal Station display. 6. When the SCal display reads “PASS” the test is complete. Remove the instrument. 8. Allow all sensors to clear. SENSIT-Direct.com @Sensit-Direct.com 1.888.475.
-
Page 27: P400 Motorized Pump
Using Manual Aspirated Sample Assembly 1. Attach assembly by tightening the thumb screw to the P400 sensor cover. 2. Check aspiratory assembly for proper flow block. 3. Aspirate 3 times, plus 1 time for every 3 foot of tubing. Be sure to fully collapse aspirator during sampling. -
Page 28: User Menu
Menu User Menu is designed to enhance the operation of the Sensit P400. There are limited selections for a field user. These are divided among control types of historical data review/download and entry fields. History items can be reviewed only. Entry fields allow an action to be performed. - Page 29 8. CAL DUE ACK - Enables cal due acknowledge (default = DISABLED) ZERO FAIL ACKNOWLEDGE - Enables zero fail acknowledge. (default = DISABLED) 10. BUMP INTERVAL - Set up bump required interval. (1-30 days; default = DISABLED) SENSIT-Direct.com @Sensit-Direct.com 1.888.475.
-
Page 30: User Menu
18. CLEAR LOGS - Clears all logs except automatic data log. 19. CLEAR DATA LOG - Clears automatic data log. 20. SET PASSWORD - Allows user to change supervisor menu password. 21. ACTIVATE PEAK HOLD MODE - Allow Peak Hold Mode to display in user menu SENSIT-Direct.com @Sensit-Direct.com 1.888.475. - Page 31 SENSIT-Direct.com @Sensit-Direct.com 1.888.475.
-
Page 32: Warranty
Warranty Your Sensit P400 is warranted to be free from defects in materials and workmanship for a period of two years after purchase (excluding calibration and batteries). The circuit board is warranted for 5 years. If within the warranty period, your instrument should become inoperative from such defects the unit will be repaired or replaced at our option.
Need help?
Do you have a question about the P400 and is the answer not in the manual?
Questions and answers