Advertisement
Available languages
Available languages
USB Multimeter
Art.no 36-4717
Model UT61D
Note: This is only a quick-start guide. For complete instructions
please refer to the accompanying CD.
Please read the entire instruction manual before use and save it for
future reference. We reserve the right for any errors in text or images
and for making any necessary technical changes to this document.
If you should have any questions concerning technical problems
please contact our Customer Services.
1. Safety instructions
•
This meter is designed for indoor use.
•
Do not use this meter if it or the test leads appear to be
damaged, or if you suspect that the meter might not work
properly.
•
Make sure that your fingers are behind the finger guards when
using the test leads.
•
Make sure that the power is turned off before working on
the power circuit. Even low voltages can be dangerous!
•
To avoid shocks you need to be careful when you work with
voltage higher then 60 V DC or 30 V AC RMS. Voltages higher
than this pose a risk of heavy electric shocks.
•
Set the right measuring range using the selector before
starting to measure and do not change the range whilst taking
a measurement.
•
This meter is protected by fuses, but they will not protect
the meter from all kinds of misuse.
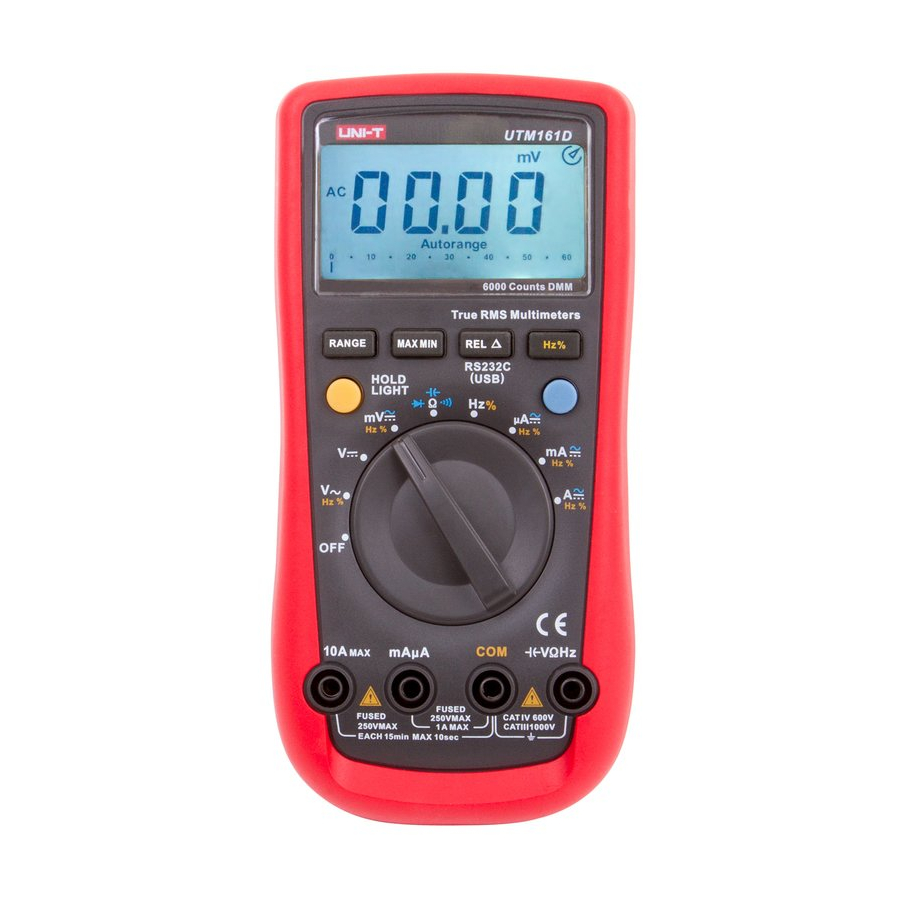
2. Functions
1
2
8
3
9
4
10
5
6
11
7
12
1. LCD display
2. [ Max Min ]
•
Press to switch between max and min measured value.
•
Hold in for two seconds to return to normal display.
GREAT BRITAIN • customer service tel: 0845 300 9799 e-mail: customerservice@clasohlson.co.uk internet: www.clasohlson.com/uk
3. [ Range ]
•
Press once to enter manual settings mode; the buzzer
sounds once.
•
Press repeatedly to advance through the measuring ranges;
the buzzer sounds.
•
Hold in for two seconds to return to Autorange (automatic
measuring range setup).
4. [ Hold/Light ]
•
Press to save a reading (data hold function), press once
more to delete the reading.
•
Hold in for two seconds to turn on the display backlight for
10 seconds.
5. Multifunction selector
8 different measuring functions and off switch.
6.
Test lead sockets
7.
Test lead sockets
8. [ REL ▲/RS 232 (USB) ]
•
Press once to enter REL mode.
•
Press once to exit REL mode.
•
Hold in for two seconds to activate or deactivate the RS232/
USB function. The sleep function is exited when the RS232/
USB function is activated and
disappears from
the display.
9. [ Hz % ]
•
Press to measure frequency.
•
Press to select Duty Cycle value.
10. Alternative functions (blue button)
Press to select alternative functions for the settings modes
in blue.
11.
Test lead sockets
12.
Test lead sockets
Display symbols
The data hold function is activated.
The sleep mode is activated.
Indicates a negative reading.
Indicator for AC measurement.
Indicator for DC measurement.
The Autorange is activated (meter automatically selects
the range with best resolution).
Indicator for manual range mode (not on this model).
The reading is too high for this measuring range.
Indicator for the diode test.
The continuity buzzer is activated.
Maximum and minimum reading.
Data output in progress (USB/RS232).
Low battery warning – replace the battery.
REL is activated, the stored value minus the present value
is displayed.
Resistance, Ω Ohm, kΩ (kiloohm), MΩ (megaohm).
Voltage, mV (millivolt), V (volt).
Current, μA (microampere), mA (milliampere),
A (ampere).
Capacitance; nF (nanofarad), μF (microfarad),
mF (millifarad).
Frequency, Hz (hertz), kHz (kilohertz),
MHz (megahertz).
3. Operation
•
Warning: Consult a qualified electrician before using
the instrument if you are at all unsure about its usage.
•
Always ensure that the correct function and range is selected.
If in doubt about the correct range, start with the highest and
work downwards.
•
When measuring voltage always ensure that the meter
is switched to the correct function range and not set to
the current, resistance or diode test range. Always ensure
that you use the correct test lead socket for the type of
measurement to be made.
•
Make sure that the object to be measured is not "live", i.e.
conducting any current before connecting test leads in series
with it (such as when measuring current).
•
Make sure that the test leads are in good condition with no
damage to the insulation.
4. Voltage measurement
Measuring DC voltage
1. Connect the black test
lead to
and
the red test lead to
.
2. Set the function selector
to
for DC voltage
measurement.
3. If you wish to change
the range manually,
press [ Range ]
several times.
4. Connect the test leads
across the source or
load to be measured.
Measuring AC voltage
1. Connect the black test
lead to
and
the red test lead to
.
2. Set the function selector
to
for AC voltage
measurement.
3. If you wish to change
the range manually,
press [ Range ]
several times.
4. Connect the test leads
across the source or
load to be measured.
5. DC and AC Current measurement
1. Connect the black test
lead to
and
the red test lead to
(for 0–600 mA)
or to
(for the range
600 mA – 10 A).
2. Set the function selector
to
,
or .
3. The meter is preset to
measure DC, change
to AC using the blue
button (10).
4. Connect the test leads
in series with the current
source to be measured.
5. When measuring current
between 600 mA and
10 A (without fuse) follow
the method above but
connect the red test lead
to
instead.
6. Resistance measurement
1. Connect the black test
lead to
and
the red test lead to
.
2. Set the function selector
to the resistance
measurement
.
3. Connect the test leads
across the circuit to
be tested.
7. Hold mode
1. Press the [ Hold/Light ] to save the present reading.
2. The buzzer sounds once and
appears on the display when
Hold is activated.
3. The reading is deleted if you press the button once again.
8. Backlight
Hold in [ Hold/Light ] for two seconds to turn on the backlight.
The light will turn off automatically after 10 seconds.
Advertisement
Table of Contents

Related Manuals for UNI-T UT61D


Summary of Contents for UNI-T UT61D
- Page 1 Press once to enter manual settings mode; the buzzer • Warning: Consult a qualified electrician before using 1. Connect the black test sounds once. Art.no 36-4717 Model UT61D the instrument if you are at all unsure about its usage. lead to • Press repeatedly to advance through the measuring ranges; •...
- Page 2 Tryck en gång för att öppna manuell inställning. • Varning! Rådfråga en yrkesman innan du börjar, om du är det 1. Koppla den svarta Summern ljuder en gång. Art.nr 36-4717 Modell UT61D minsta osäker på instrumentets användning. testkabeln till • Tryck flera gånger för att stega genom mätområdet.
- Page 3 Trykk én gang for å åpne for manuell innstilling; summeren • Advarsel! Forhør deg med en fagperson før instrumentet tas avgir lyd. 1. Den sorte testkabelen Art.nr. 36-4717 Modell UT61D i bruk ved minste usikkerhet av bruken. kobles til • Trykk flere ganger for å endre måleområde; summeren avgir ett alarmsignal.
- Page 4 Aktivoi manuaalinen tila painamalla yhden kerran; merkkiääni • Varoitus! Jos olet yhtään epävarma laitteen käytöstä, käänny 1. Liitä musta testausjohdin soi kerran. Tuotenro 36-4717 Malli UT61D ammattilaisen puoleen ennen laitteen käyttöä. liitäntään • Selaa mittausaluetta painamalla useamman kerran; • Tarkista, että olet valinnut oikean toiminnon ja mittausalueen.
- Page 5 • Immer sicherstellen, dass die richtige Funktion und der richtige der Summer ertönt. und die rote an Art.Nr. 36-4717 Modell UT61D Messbereich eingestellt wird. Bei Unsicherheit über den richtigen • Ca. zwei Sekunden lang drücken, um zu Autorange zurück- (bei Messungen Messbereich immer mit dem höchsten anfangen und bei Bedarf zukehren (automatische Einstellung des Messbereichs).
Need help?
Do you have a question about the UT61D and is the answer not in the manual?
Questions and answers