Table of Contents
Advertisement
Advertisement
Table of Contents

Related Manuals for Kaito KA700


Summary of Contents for Kaito KA700
- Page 3 INTRODUCTION Thank You: Thank you for purchasing the KA700 multi-band radio receiver. Please read the manual thoroughly before operating and keep this book in a safe place for future reference. With proper care, you will receive many years of trouble-free service from your new radio.
- Page 4 FEATURES World Band Receiver FM: 87.0-108.0MHz or 64.0-108.0MHz AM: 520-1710KHz Or 522-1710 K Hz WB: 162.40-162.55MHz, with the Alert function Direct tuning / Manual tuning / Auto-tuning MP3 Music Play Supports WAV, MP3, WMA, Recorded file Format: WAV Dial number to select music file, max. number is 9999 Micro SD(TF) card music play / Bluetooth music play Lyrics display Random / Repeat music play...
- Page 5 Lamps: 5 LED Reading lamp, 1 LED Flashlight and SOS light...
-
Page 6: Table Of Contents
INDEX LOCATION OF CONTROLS ............1 DEFINITION OF KEY OPERATIONS ..........5 LOCK / UNLOCK KEYS ..............5 LITHIUM BATTERY POWER SUPPLY .......... 6 INSTALLING BATTERY ..........6 BATTERY CONSUMPTION INDICATOR ......6 CHARGING THE LITHIUM BATTERY ........7 CHARGED BY PC ............... 8 CRANK POWER .............. - Page 7 INDEX PLAY BACK THE RECORDED FILES ..... 23 CALENDAR ..............24 PLAYING MUSIC ............. 24 PLAY AND PAUSE ........... 25 SELECT MUSIC FILES ..........25 A-B REPEAT ............26 REPEAT MODE SELECTION ........26 EQUALIZER SELECTION ..........26 LYRICS DISPLAY .............. 27 DELETE MUSIC FILES ............
-
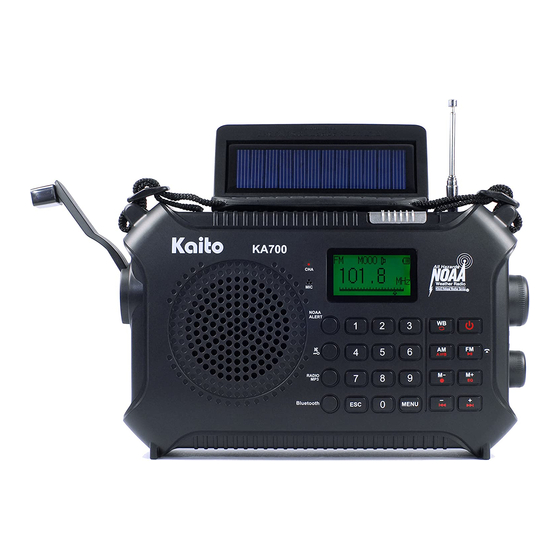
Page 8: Location Of Controls
OCATION OF CONTROLS LOCATION OF CONTROLS FRONT... - Page 9 OCATION OF CONTROLS REAR 1. Speaker 2. Crank power 3. Tuning knob: Rotate to tune or select 4. Volume knob: Rotate to tune V+ / V- 5. Flashlight / SOS light 5-LED reading lights 7. Flash / SOS / LED light switch push button 8.
- Page 10 LOCATION OF CONTROLS 11. In radio mode: WB button In music mode: Choose play cycle mode 12. In radio mode: FM button, press to select FM stereo / mono In music mode: Play / Pause In recording mode: Pause / Continue 13.
- Page 11 20. Escape button : Press to exit In main menu : Press to display time In recording mode: Press to end recording and Auto store the recorded file into the memory 21. Bluetooth 22. Radio / MP3 mode selection 23. Mute button Long press to lock / unlock keys 24.
-
Page 12: Definition Of Key Operations
/ backward LOCK / UNLOCK KEYS KA700 is equipped with a key lock and unlock function, which you can manually turn on and off. When the radio is on, this will prevent you from accidentally pressing the buttons and changing the station... -
Page 13: Lithium Battery Power Supply
LITHIUM BATTERY POWER SUPPLY LITHIUM BATTERY POWER SUPPLY Please use only the Kaito lithium battery supplied with the radio to power this product. Use of any other battery may cause problems such as fire or explosion. INSTALL THE BATTERY 1. Turn off the radio and open the battery cover. -
Page 14: Charging The Lithium Battery
LITHIUM BATTERY SUPPLY CHARGING THE LITHIUM BATTERY External Adapter (not included) Please use a compatible adapter (5V DC/500mA, USB port) to charge the radio. 1. Install the lithium battery. 2. To charge the battery connect the Micro-USB cable to the radio and the other end to a USB power adapter 3. -
Page 15: Charged By Pc
LITHIUM BATTERY SUPPLY CHARGED BY PC 1. Connect the radio and the computer with the provided USB cable. 2. While charging, the battery symbol shown on the ”moves from right to left. Display“ 3. The battery symbol stops moving when the battery Is full charged. -
Page 16: Solar Power
LITHIUM BATTERY SUPPLY SOLAR POWER Solar panel is designed to run the radio under sunlight; it can also charge the battery pack at a very slow rate. So theoretically it will charge the battery, but it is better to crank it to charge the battery. Put the radio under the strong sunlight, and set the power at OFF, the sunlight will charge the battery, but you may not note it because it is a very slow charge. -
Page 17: How To Play The Radio
POWER ON / OFF - Radio: FM / AM / WB Radio - Music: MP3 music play mode - Ebook: Text reading mode - System Settings - Calendar NOTE: Press <ESC> in Main Menu to display the time.When the time is displayed, press <MENU> to go to Main Menu. HOW TO PLAY THE RADIO In Main Menu, select Radio and press to listen to FM, the... -
Page 18: Choose Bands
FM FREQUENCY RANGE CHOOSE BANDS In Radio Mode, press to select your desired band. The display will show the band symbol that you are listening to. When listening to WB, press to change <m> bands. SELECT FM FREQUENCY RANGE When listening to FM, press <MENU> to enter the below sub-menu: - Save: Store the station into memory manually - Delete: Delete single memory... -
Page 19: 9K/10K Am Tuning Steps
9K/10K AM TUNING STEPS ”shows in the display, stereo listening is selected, listening. If“ press again to change mono listening and the mono symbol“ ”will show. You can not hear stereo sound when the radio signal you are receiving is mono. Suggestion: 1. -
Page 20: Volume / Mute
TUNING IN STATIONS VOLUME / MUTE To increase volume, press <VOL+>; To decrease volume, press <VOL->, the volume adjustment will be shown inn the display. Press to mute, press again to restore the sound. TUNING IN STATIONS When attempting to tune in stations, stay away from electrical equipment and AC power disturbances. -
Page 21: Using Telescopic Antenna
Using built-in antenna: The built-in internal ferrite rod antenna works for the AM band only. Rotate the radio position to get the best reception. So the radio location affects the AM reception, the good direction of the radio can get you a much better reception on AM. Six tuning methods: Manual tuning, Auto tuning, Jog tuning, Direct frequency entry, Auto search (ATS) and memory recall. -
Page 22: Jog Tuning
the auto-tuned station frequency is inaccurate, please use manual tuning to find the accurate frequency point. Jog tuning: 1. Turn on the radio and select [Radio] in Main Menu. 2. Adjust the volume to an appropriate level and choose your desired band. 3. -
Page 23: Memory Recall
1. Turn on the radio and select [Radio] in Main Menu. 2. Adjust the volume to an appropriate level and choose your desired band. 3. Input the frequency numbers that corresponds to a station’s frequency by using the key board ,and then press the band button to enter the station you need. - Page 24 1. Press to open the Bluetooth function. 2. Open the mobile devices’ Bluetooth to search radio Bluetooth <Kaito>, and click it to connect. 3. After the connection is successful, you can play the music of mobile devices, press <ESC> to exit.
- Page 25 这里的符号? button, the LCD will show the recording time and how many minutes you can record on the micro SD card. When you want the recording to stop just press ESC, the station will mute for a second, then it gets back to the radio station. The recorded file will be stored in the JLREC folder.
- Page 26 then press Menu to enter Tools sub menu , under the Tools sub-menu, select alarm by press Menu . In the Alarm menu, Select Alarm On, set up alarm time (The radio will be turned on by the time you set up here), in the Alarm Cycle, select Ring Once (Or others), in the Alarm Mode, select Radio Recording, then select exit and press Menu button to exit the Radio Schedule...
- Page 27 Manage the recorded Files In order to find out what you recorded, please follow the steps below to play it back. The MP3 music files and recorded voice files are stored in the SD card in different folders. The MP3 and WAV music are sorted and displayed under different folders when they were created.
- Page 28 here. Select the one you just recorded and play it by pressing Menu button. If you want to delete a single music, you can delete it by select YES in the LCD and press Menu button to confirm it. You may delete one single file or all files on SD card selecting Delete ALL.
-
Page 29: Delete Singal / All Memories
RADIO RECORDING 4. Press or turn the tuning knob to select the recorded file required, and press <MENU> to play. DELETE SINGLE / ALL MEMORIES Press <MENU> in radio mode, and select either <Delete> or <Delete all>, then press <MENU> again to delete single memory or all memories. -
Page 30: Mic Recording
MIC RECORDING NOTE: 1. While recording, some keys will be disabled. 2. If both Micro SD card is inserted Before recording, the recorded file will be stored in the one that shows on the radio’s display. MIC RECORDING In any mode except for radio mode, you can activate the MIC recording function by long pressing ,While recording, please get the audio source close to the built-in MIC. -
Page 31: Calendar
PLAYING MUSIC CALENDAR Select [Calendar] in Main Menu, press <MENU> to Display the date, time and day of the week. You can use <Tuning knob> to adjust the year, month and day to see the corresponding day of the week. When adjusting the date, press <MENU>... -
Page 32: Play And Pause
PLAYING MUSIC NOTE: Please insert or remove the Micro-SD card only when radio is powered off. Do not remove the Micro-SD card when the music is playing. If Music mode can not be entered, please check if the Micro-SD card inserted correctly. -
Page 33: A-B Repeat
PLAYING MUSIC A-B REPEAT When the music is playing, press once to set the start point A, shows on the display and “B” starts flashing. When the playing process reaches your desired location, press again to set the ending point B. Now the radio will repeat playing from A to B. -
Page 34: Lyrics Display
PLAYING MUSIC LYRICS DISPLAY Support both Chinese and English display. The lyrics must be in .Irc format, use the same name as the song and location in the same folder. Due to many Chinese versions on the market, you may have some characters that are unreadable. -
Page 35: System Settings
PLAYING MUSIC When reading, press to enter below settings: <MENU> - File selection: Select a particular file - Play set: Manual or Auto play selection - Playback speed - Enter main: Enter Main Menu - ESC SYSTEM SETTINGS Select in Main Menu, press to enter [System settings] <MENU>... -
Page 36: Sleep Timer
SLEEP TIMER NOTE: Operate time for each step is about 5 seconds. Press in Main Menu can play the time on the display. <ESC> SLEEP TIMER In System Settings, select , press [Tools] [Sleep timer] <MENU> enter, Press to adjust the auto turn off timer from 00 - 90, select 00 to turn off the sleep timer. -
Page 37: Language Selection
CONTRAST SET LANGUAGE SELECTION Select [Language] in System Settings, press to enter <MENU> language selection mode, press to select your desired language. CONTRAST SET Select [Contrast] in System Settings, press to enter. <MENU> Press to adjust from 00-16, press <MENU> confirm and exit. -
Page 38: Alarm Set
ALARM SET ALARM SET In System settings, select [Tools] - [Alarm]. Press <MENU> to enter the below settings: - Alarm Off Repeatedly pressing to turn on or off the alarm. <MENU> [Alarm off] indicates the alarm is off, [Alarm on] indicates is activated. -
Page 39: Esc
RESET RADIO: Auto turn on the radio with the last radio station listened to. Auto turn on the radio with the music file in the micro SD card that selected. - ESC When the alarm is active, appears on the display, the radio will alarm with the selected mode when reaching the present time. -
Page 40: Use As An Active Loudspeaker (Line-In)
LINE - IN USE AS AN ACTIVE LOUDSPEAKER (LINE-IN) The radio has a line-in function, so it can be used as an active loudspeaker by connecting it to other media devices such as a laptop, voice recorder or other MP3 players with the line-in cable. Plug one end of the line-in cable to the earphone jack of the media device, and the other end into <AUX>... -
Page 41: Care And Maintence
CARE AND MAINTENANCE CARE AND MAINTENANCE 1. Keep it dry. Rain, humidity and other types of liquids or moisture can contain minerals that may cause corrosion to components . If the radio does accidentally get wet, remove the battery and wait for the radio to dry completely before placing it back. -
Page 42: Battery Safety Information
BATTERY SAFETY INFORMATION BATTERY SAFETY INFORMATION 1. Use the battery under normal conditions, temperature: (0 - 35 )℃ ℃ ℃ ℃ , relative humidity: 65± ± ± ± 20%. Under normal circumstances, the battery can be charged and discharged about 300 times. -
Page 43: Troubleshooting
TROUBLESHOOTING TROUBLESHOOTING 1. Can not turn on the radio. Possibly the battery drained, please charge the battery. 2. Can not be connected to a computer. Please do the connection in radio off mode. The USB cable maybe damaged, please try another one. -
Page 44: Specifications
SPECIFICATIONS Memory Supports micro-SD/TF card 64M-32G Music format MP3 WMA WAV Access rate MP3: 16-320Kbps WMA: 8-384Kbps Frequency range FM: 87.0-108MHz 64.0-108MHz AM: 522-1710KHz WB: 162.40-162.55MHz ≤ ≤ ≤ ≤ 10mW*2 Earphone output Communication standard USB 2.0(high speed) Max. output(Speaker) About 500mW Max. - Page 45 KA700 Multi-Band Radio with AM/FM/ Weather NOAA Bluetooth Connected Speaker Audio Recorder and Time Scheduled Recorder MP3 Music Player with Micro-SD card Slot V.100815...
Need help?
Do you have a question about the KA700 and is the answer not in the manual?
Questions and answers
How do I get weather alerts on the weather radio
The Kaito KA700 weather radio receives weather alerts automatically from NOAA weather stations. When an alert signal is transmitted by NOAA, the radio detects it and notifies the user.
This answer is automatically generated
My speaker will not work on any of the NOAA, AM, or FM channels. The ear plug works, so it is not the amp etc. I have tried the different channels mentioned above at all volume levels with a fully charged battery.