Table of Contents
Advertisement
Available languages
Available languages
Quick Links
Advertisement
Table of Contents

Related Manuals for Canon mp280 series


Summary of Contents for Canon mp280 series
- Page 1 Як користуватися цим посібником Друк цього посібника MC-4713-V1.00 Короткий посібник Повний посібник Усунення неполадок Містяться загальні Детально описується відомості про цей продукт. робота цього продукту.
- Page 2 Як користуватися цим посібником Друк цього посібника MP-4513-V1.00 Повний посібник Зміст Огляд апарата Завантаження паперу й оригінальних документів Основні компоненти Завантаження паперу Відображення індикаторів та основні функції Завантаження оригіналів Копіювання Регулярне обслуговування Копіювання документів Якщо кольори на роздруківках виглядають Копіювання фотографій блідими...
- Page 3 Повний посібник Усунення неполадок Зміст > Огляд апарата Огляд апарата У цьому розділі описані назви компонентів апарата та основні функції, з якими потрібно ознайомитися перед його використанням. Основні компоненти Вигляд спереду Вигляд ззаду Вигляд внутрішніх частин Панель керування Відображення індикаторів та основні функції На...
-
Page 4: Основні Компоненти
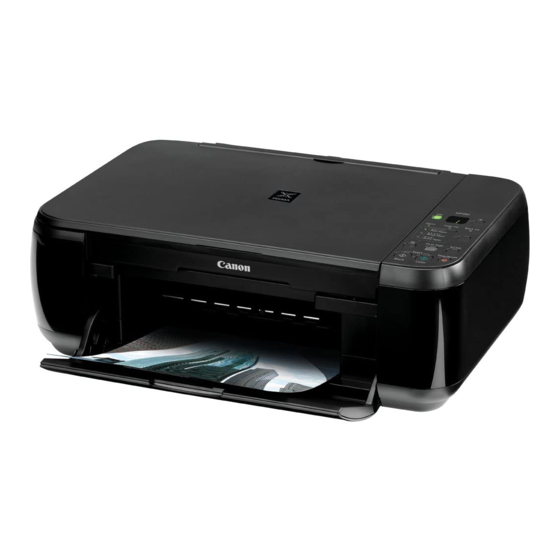
Повний посібник Усунення неполадок > Зміст Огляд апарата > Основні компоненти C001 Основні компоненти Вигляд спереду Вигляд ззаду Вигляд внутрішніх частин Панель керування Вигляд спереду Кришка для притиснення документів Відкрийте її, щоб розмістити оригінал на склі експонування. Підпора для паперу Підніміть... - Page 5 Скло експонування Завантажуйте оригінал для копіювання або сканування. Панель керування Використовується для зміни параметрів апарата або для керування ним. Див. розділ Панель керування Примітка Світлодіодний індикатор та індикатори на панелі керування, окрім індикатора ЖИВЛЕННЯ (POWER) , згасають, якщо апарат не використовується протягом близько...
- Page 6 (11) Кришки фіксації картриджів із чорнилом Надійно зафіксуйте картриджі FINE. (12) Тримач картриджа FINE Установіть картриджі FINE. Кольоровий картридж FINE потрібно встановлювати в ліве гніздо ( ), а чорний картридж FINE — у праве ( (13) Картриджі FINE (картриджі з чорнилом) Змінний...
- Page 7 Кнопка УВІМК. (ON)/Індикатор ЖИВЛЕННЯ Вмикає та вимикає живлення. Перш ніж увімкнути живлення, обов’язково закрийте кришку для притиснення документів. Важливо Від’єднання шнура живлення Від’єднуючи шнур живлення після вимкнення живлення апарата, переконайтеся, що ЖИВЛЕННЯ (POWER) не підсвічується. Якщо від’єднати шнур живлення індикатор від...
- Page 8 Кнопка Стоп/Скинути (Stop/Reset) Слугує для скасування операцій. Можна також натиснути цю кнопку, щоб скасувати завдання друку, копіювання або сканування, що виконуються. Кнопка Колір (Color) Слугує для початку кольорового копіювання. Можна також натиснути цю кнопку, щоб підтвердити вибір елемента настроювання. Кнопка Чорний (Black) * Слугує...
- Page 9 Повний посібник Усунення неполадок > Зміст Огляд апарата > Відображення індикаторів та основні функції C002 Відображення індикаторів та основні функції Апарат можна використовувати для копіювання або виконання операцій із технічного обслуговування без комп’ютера. У цьому розділі описується відображення на світлодіодному індикаторі та основні функції на панелі керування.
- Page 10 Коди технічного обслуговування (Технічне обслуговування), Щоб виконати технічне обслуговування апарата, натискайте кнопку доки на світлодіодному індикаторі не з’явиться потрібний код, а потім натисніть кнопку Чорний (Black) або Колір (Color) Код технічного Операція Див. обслуговування Друк зразка для перевірки Друк зразка для перевірки сопел сопел.
- Page 11 допомоги з боку сервісного центру. неполадок» в on-screen manual: Повний посібник . Докладніше див. у розділі « Усунення На початок сторінки...
- Page 12 Повний посібник Усунення неполадок Зміст > Копіювання Копіювання Окрім звичайних копій, можна робити збільшені або зменшені копії , що відповідатимуть розміру сторінки, а також копії надрукованих фотографій без полів. Копіювання документів Вибір розміру сторінки між A4 та 8,5 x 11 дюймів (Letter) Копіювання...
-
Page 13: Копіювання Документів
Повний посібник Усунення неполадок > Зміст Копіювання > Копіювання документів C021 Копіювання документів У цьому розділі описано процедуру копіювання документа формату A4 або Letter на звичайному папері. Для виконання процедури див. примітки та опис процедури на довідковій сторінці. Потрібно приготувати: Оригінали... - Page 14 Розмістіть оригінал на склі експонування. Див. розділ Завантаження оригіналів Завантажте оригінальний документ СТОРОНОЮ ДЛЯ КОПІЮВАННЯ ВНИЗ і вирівняйте його , як показано нижче. відносно позначки вирівнювання Після цього обережно закрийте кришку для притиснення документів. Примітка Докладніше про типи та характеристики оригіналів, які можна копіювати, а також про...
- Page 15 Після кожного натискання кнопки [ + ] кількість копій на світлодіодному індикаторі збільшується на одну. Коли з’являється літера , кількість копій встановлено на «20». Повторно натисніть кнопку [ + ], щоб повернутися до «1». Щоб зробити 10 — 19 копій Відобразіть...
- Page 16 оригінальний документ, поки триває процес копіювання. Примітка Щоб скасувати копіювання, натисніть кнопку Стоп/Скинути (Stop/Reset) . Вибір розміру сторінки між A4 та 8,5 x 11 дюймів (Letter) Можна вибирати розмір паперу, завантаженого у задній лоток, між A4 та 8,5 x 11 дюймів (Letter). Ця...
- Page 17 Повний посібник Усунення неполадок > Зміст Копіювання > Копіювання фотографій C023 Копіювання фотографій У цьому розділі описано процедуру копіювання роздрукованої фотографії на фотопапері формату 10 x 15 см / 4 x 6 дюймів. Потрібно приготувати: Роздруковані фотографії. Фотопапір для друку. Див. розділ Використовувані...
- Page 18 - Фотопапір 10 x 15 см або 4 x 6 дюймів Можна вибирати розмір паперу, завантаженого у задній лоток, між A4 або 8,5 x 11 дюймів (Letter), незважаючи на розмір, вказаний на панелі керування. Див. розділ Вибір розміру сторінки між A4 та 8,5 x 11 дюймів (Letter) Якщо...
- Page 19 Повний посібник Усунення неполадок > Зміст Копіювання > Копіювання з підгонкою до сторінки C024 Копіювання з підгонкою до сторінки Функція копіювання за розміром сторінки дозволяє копіювати оригінал, розмір якого автоматично збільшується або зменшується відповідно до вибраного розміру сторінки. Підготуйтеся до копіювання. Див.
- Page 20 Letter. Щоб встановити значення якості друку на «Швидкий», натисніть та утримуйте кнопку Колір (Color) або Чорний (Black) протягом 2 або більше секунд у кроці 5. Див. розділ Щоб встановити значення якості друку на «Швидкий» (швидкість- перевага) Щоб скасувати копіювання, натисніть кнопку Стоп/Скинути (Stop/Reset) . На...
- Page 21 Повний посібник Усунення неполадок Зміст > Сканування Сканування Можна зберегти зіскановані дані на комп’ютері та редагувати або обробляти їх за допомогою прикладної програми, що входить до комплекту постачання. Збереження даних сканування на комп’ютері Підготовка до сканування за допомогою панелі керування Збереження...
- Page 22 електронний посібник: Повний посібник Важливо Зауважте, що компанія Canon не несе відповідальність за пошкодження або втрату даних, спричинені будь-якими факторами, у тому числі строку гарантійного періоду апарата. Підготовка до сканування за допомогою панелі керування Перед початком сканування оригінальних документів підтвердьте наведені нижче умови.
- Page 23 Примітка Положення або розмір оригіналу може не бути відскановано правильно залежно від типу оригіналу. У цьому випадку див. on-screen manual: посібник, щоб змінити параметри в Повний Document Type і Document Size програми MP Navigator EX відповідно до оригіналу, та відскануйте його. Коли...
- Page 24 Повний посібник Усунення неполадок Зміст > Друк із комп’ютера Друк із комп’ютера У цьому розділі описано процедуру друку документів або фотографій з комп’ютера. За допомогою програми Easy-PhotoPrint EX, що входить до комплекту постачання апарата, можна легко надрукувати фотографії, зняті цифровою камерою. Друк...
- Page 25 Повний посібник Усунення неполадок > > Друк фотографій (Easy-PhotoPrint EX) Зміст Друк із комп’ютера C051 Друк фотографій (Easy-PhotoPrint EX) Друкуйте збережені на комп’ютері дані зображення, використовуючи програму Easy-PhotoPrint EX, що входить до комплекту постачання апарата. У цьому розділі описано процедуру друку фотографій без полів на фотопапері формату 10 x 15 см / 4 x 6 дюймів.
- Page 26 Див. розділ Використання різних функцій програми Easy-PhotoPrint EX Вибір фотографії для друку. Виберіть папку, у якій зберігаються зображення. Клацніть зображення, яке потрібно надрукувати. Кількість копій позначається як «1», а вибране зображення відображається в області вибраних зображень (A). Можна вибрати одночасно два або більше зображень. Примітка...
- Page 27 на апараті або клацніть Cancel Printing на моніторі стану принтера. Щоб відобразити монітор стану принтера, на панелі завдань клацніть піктограму принтера. В ОС Windows Vista або Windows XP клацніть піктограму Canon XXX Printer (де « XXX » — назва апарата) на панелі завдань.
- Page 28 Повний посібник Усунення неполадок > > Друк фотографій (Easy-PhotoPrint EX) Зміст Друк із комп’ютера > Використання різних функцій програми Easy-PhotoPrint EX C052 Використання різних функцій програми Easy-PhotoPrint EX У цьому розділі представлено кілька корисних функцій програми Easy-PhotoPrint EX. Докладніші відомості див. в on-screen manual: Повний...
- Page 29 Повний посібник Усунення неполадок > Зміст Друк із комп’ютера > Друк документів C053 Друк документів У цьому розділі описано процедуру друку документа формату A4 на звичайному папері. Докладніші відомості див. в on-screen manual: Повний посібник Примітка Операції можуть бути різними — це залежить від встановленого програмного забезпечення. Щоб...
- Page 30 Примітка Коли в Commonly Used Settings вибрано такий об’єкт для друку, як Business Document або Photo Printing, елементи в Additional Features будуть вибрані автоматично. Крім того, з’являться також параметри, що відповідають об’єктові друку, зокрема тип носія та якість друку. Перевірте відображувані параметри. Тепер...
- Page 31 на апараті або клацніть Cancel Printing на моніторі стану принтера. Щоб відобразити монітор стану принтера, на панелі завдань клацніть піктограму принтера. В ОС Windows Vista (надалі «Windows Vista») або Windows XP клацніть Canon XXX Printer (де « XXX » — назва апарата) на панелі завдань.
- Page 32 Повний посібник Усунення неполадок > Зміст Друк із комп’ютера > Друк веб-сторінок (Easy-WebPrint EX) C054 Друк веб-сторінок (Easy-WebPrint EX) Програма Easy-WebPrint EX забезпечує можливість швидкого та легкого друку веб-сторінок для браузера Internet Explorer. Можна друкувати веб-сторінки з автоматично зміненим розміром для заповнення всієї ширини паперу...
- Page 33 На початок сторінки...
- Page 34 (F) Піктограма елемента, яка дає змогу відобразити головний екран, відображає або приховує меню ярликів тощо. Photo Print Друк фотографій, створених за допомогою цифрової камери. Use Scanner Сканування фотографій і документів. Canon Web Service Завантаження вмісту або матеріалів із веб-сайту для друку.
- Page 35 поки не будуть змінені параметри за промовчанням. Щоб запустити програму Solution Menu EX із меню Пуск (Start), виберіть пункт Усі програми (All Programs), Canon Utilities, Solution Menu EX, а потім Solution Menu EX. Якщо головний екран Solution Menu EX не відображається після запуску програми...
- Page 36 Примітка Окрім фотодруку доступні функції створення альбомів, календарів та інших елементів, пов’язаних із фотографіями. Докладніше про операції та функції програми див. у розділі Друк фотографій (Easy- PhotoPrint EX) Easy-WebPrint EX Після встановлення програми Easy-WebPrint EX до екрану браузера Internet Explorer додається панель...
- Page 37 Повний посібник Усунення неполадок Зміст > Завантаження паперу й оригінальних документів Завантаження паперу й оригінальних документів У цьому розділі описуються типи паперу або оригінальних документів, які можна завантажувати, а також способи завантаження паперу у задній лоток та розміщення оригінальних документів для копіювання...
-
Page 38: Завантаження Паперу
дюймів, 101,6 x 203,2 мм / 4 x 8 дюймів, 13 x 18 см/5 x 7 дюймів або 55,0 x 91,0 мм / 2,16 x 3, 58 дюйма (формату картки), для виконання тестового друку може спричинити зминання паперу. Примітка Для друку фотографій рекомендується використовувати фірмовий фотопапір Canon. Використовувані типи носіїв Докладніше про фірмовий папір Canon див. у розділі Можна використовувати звичайний папір для копіювання. - Page 39 Перемістіть напрямники для паперу (A), щоб відкрити їх, і завантажте папір по центру заднього лотка СТОРОНОЮ ДЛЯ ДРУКУ ДО СЕБЕ. Посуньте напрямники паперу (A), щоб вирівняти обидві сторони стосу паперу. Не притискайте напрямники для паперу надто сильно. Папір може подаватися неправильно. Важливо...
- Page 40 Примітка Завантажуйте аркуші паперу лише до позначки максимального завантаження (D). Примітка Під час завантаження паперу апаратом можна почути шум. Після завантаження паперу Під час копіювання виберіть розмір і тип завантаженого паперу за допомогою панелі керування на апараті. Копіювання Див. розділ Під...
- Page 41 Повний посібник Усунення неполадок > > Зміст Завантаження паперу й оригінальних документів Завантаження паперу > Завантаження конвертів C074 Завантаження конвертів Можна виконувати друк на конвертах European DL та US #10. Адреса автоматично повертається і друкується відповідно до напрямку подавання конверта під керуванням...
- Page 42 Відкрийте підпору для паперу. Не піднімайте підпору для паперу. Обережно відкрийте лоток виведення паперу, а потім — подовжувач вивідного лотка. Перемістіть напрямники для паперу (A), щоб відкрити їх, і завантажте конверти по центру заднього лотка СТОРОНОЮ З АДРЕСОЮ ДО СЕБЕ. Клапан...
- Page 43 Визначте настройки у драйвері принтера. Виберіть Envelope у Commonly Used Settings на вкладці Quick Setup. Виберіть DL Env. або Comm. Env. #10 у вікні Envelope Size Setting. Виберіть значення Landscape для параметра Orientation. Важливо Якщо належним чином не вказати розмір конверта або орієнтацію, адреса може бути надрукованою...
- Page 44 Примітка Номер моделі фірмового паперу Canon вказано в дужках. Фірмовий папір Canon може бути відсутній у продажу — це залежить від того, в якій країні або регіоні був придбаний апарат. У США папір не продається за номером моделі. Купуйте папір за назвою.
- Page 45 - Параметри типу носія - Драйвер принтера: Photo Paper Pro Platinum Glossy Photo Paper "Everyday Use" <GP-501> - Параметри типу носія - Драйвер принтера: Glossy Photo Paper Photo Paper Glossy <GP-502> - Параметри типу носія - Драйвер принтера: Glossy Photo Paper Photo Paper Plus Glossy II <PP-201>...
- Page 46 Щільність паперу від 17 до 28 фунтів/від 64 до 105 g/m (за винятком фірмового паперу Canon) Не використовуйте папір більшої або меншої щільності (крім фірмового паперу Canon), оскільки він може застрягнути в апараті. Примітки щодо зберігання паперу Виймайте з упаковки тільки необхідну кількість паперу, робіть це безпосередньо перед...
- Page 47 Двосторонній друк недоступний для повномасштабного друку без полів. Можна використовувати папір формату A5, B5 і Legal, а також конверти для повномасштабного друку без полів. Можна використовувати звичайний папір для повномасштабного друку без полів лише під час друку з комп’ютера. Однак це може призвести до низької якості друку. Ми рекомендуємо використовувати звичайний...
- Page 48 Надто тонкий папір (щільністю менше 17 фунтів/64 g/m Надто товстий папір (щільністю більше 28 фунтів/105 g/m , за винятком фірмового паперу Canon) Папір, тонший за листівку, у тому числі обрізаний до потрібного формату звичайний або альбомний папір (для друку на папері формату А5 або менше) Листівки...
- Page 49 Повний посібник Усунення неполадок > Зміст Завантаження паперу й оригінальних документів > Завантаження оригіналів C077 Завантаження оригіналів Завантаження оригіналів Оригінали, які можна завантажувати Завантаження оригіналів Розмістіть оригінальні документи для копіювання або сканування на склі експонування. Важливо Після завантаження оригіналу переконайтеся, що кришка для притиснення документів надійно...
- Page 50 Щоб забезпечити найкращу якість друку, апарат дає змогу робити відступи вздовж кожного із країв носія. Фактичною областю друку буде область всередині цих полів. (B) 3,0 мм / 0,12 дюйма (C) 5,0 мм / 0,20 дюйма (D) 3,4 мм / 0,13 дюйма (6,4 мм / 0,25 дюйма для паперу формату Letter і Legal) (E) 3,4 мм...
- Page 51 Повний посібник Усунення неполадок > > Зміст Завантаження паперу й оригінальних документів Завантаження оригіналів > Оригінали, які можна завантажувати C079 Оригінали, які можна завантажувати Можна виконувати копіювання чи сканування наведених нижче оригіналів. Типи Текстовий документ, журнал або газета оригіналів: Надрукована фотографія, листівка, візитка або диск (BD/DVD/CD тощо) макс.
- Page 52 Повний посібник Усунення неполадок Зміст > Регулярне обслуговування Регулярне обслуговування У цьому розділі описано спосіб чищення апарата, якщо кольори роздруківок виглядають блідими, заміни картриджа FINE у разі закінчення чорнила, а також потрібні дії у разі неправильного подавання паперу. Якщо кольори на роздруківках виглядають блідими або кольори друкуються...
- Page 53 Повний посібник Усунення неполадок > Зміст Регулярне обслуговування > Якщо друк став блідим або кольори друкуються некоректно C093 Якщо кольори на роздруківках виглядають блідими або кольори друкуються некоректно Якщо зображення на роздруківках розмите або кольори надруковано неправильно, ймовірно, закупорено сопла друкуючої головки (картриджі FINE). Виконайте нижчеподану процедуру, щоб надрукувати...
- Page 54 Крок 4 Заміна картриджа FINE Див. розділ Примітка Якщо проблему не вдалося вирішити після заміни картриджа FINE, зверніться до сервісного центру. Якщо зображення на роздруківках неоднорідне, наприклад у вигляді зміщення паралельних ліній: Див. розділ Вирівнювання друкуючої головки Примітка Операції з технічного обслуговування можна також виконувати з комп’ютера. Докладніші...
- Page 55 Повний посібник Усунення неполадок > > Зміст Регулярне обслуговування Якщо кольори на роздруківках виглядають блідими або кольори друкуються некоректно > Друк зразка для перевірки сопел C094 Друк зразка для перевірки сопел Роздрукуйте зразок для перевірки сопел, щоб визначити, чи правильно подається чорнило із сопел друкуючої...
- Page 56 Повний посібник Усунення неполадок > > Зміст Регулярне обслуговування Якщо кольори на роздруківках виглядають блідими або кольори друкуються некоректно > Перевірка зразка для перевірки сопел C095 Перевірка зразка для перевірки сопел Перевірте зразок для перевірки сопел і за потреби виконайте чищення друкуючої головки. Перевірте...
- Page 57 Повний посібник Усунення неполадок > > Зміст Регулярне обслуговування Якщо кольори на роздруківках виглядають блідими або кольори друкуються некоректно > Чищення друкуючої головки C096 Чищення друкуючої головки Якщо надрукований зразок перевірки сопел містить пропущені лінії або горизонтальні білі смуги, виконайте чищення друкуючої головки. Чищення усуває закупорку сопел і нормалізує стан друкуючої головки.
- Page 58 Повний посібник Усунення неполадок > > Зміст Регулярне обслуговування Якщо кольори на роздруківках виглядають блідими або кольори друкуються некоректно > Глибоке чищення друкуючої головки C097 Глибоке чищення друкуючої головки Якщо після виконання стандартної процедури чищення друкуючої головки якість друку не підвищується, виконайте...
- Page 59 Повний посібник Усунення неполадок > > Зміст Регулярне обслуговування Якщо кольори на роздруківках виглядають блідими або кольори друкуються некоректно > Вирівнювання друкуючої головки C098 Вирівнювання друкуючої головки Якщо паралельні лінії друкуються зі зміщенням або якість друку незадовільна, відрегулюйте положення друкуючої головки. Примітка...
- Page 60 Важливо Не торкайтеся будь-яких надрукованих частин на аркуші вирівнювання друкуючої головки. Будьте обережні, щоб не забруднити аркуш вирівнювання друкуючої головки. Якщо аркуш забрудниться або викривиться, сканування може відбуватися неправильно. Відскануйте аркуш вирівнювання друкуючої головки, щоб відрегулювати її положення. Завантажте аркуш вирівнювання друкуючої головки на скло експонування. Завантажте...
- Page 61 Апарат починає сканувати аркуш вирівнювання друкуючої головки, а її положення буде відрегульовано автоматично. Після завершення настройки положення друкуючої головки індикатор повертається до режиму очікування копіювання. Зніміть аркуш вирівнювання друкуючої головки зі скла експонування. Важливо Не відкривайте кришку для притиснення документів і не переміщуйте завантажений аркуш...
- Page 62 Повний посібник Усунення неполадок > > Заміна картриджа FINE Зміст Регулярне обслуговування C091 Заміна картриджа FINE За появи попереджень або помилок про рівень чорнила, що залишилося, на світлодіодному індикаторі з’явиться код помилки з метою інформування про помилку. Див. «Відображення коду помилки на світлодіодному індикаторі» у розділі « Усунення...
- Page 63 Поради щодо використання апарата Докладніше про це див. у розділі Переконайтеся, що живлення апарата ввімкнено, після чого відкрийте лоток виведення паперу. Підніміть модуль сканування (кришку), після чого закріпіть його у відкритій позиції за допомогою модуля сканування (C). Тримач картриджа FINE переміститься в положення для заміни. Увага! Не...
- Page 64 Важливо Обережно поводьтеся з картриджем FINE, щоб уникнути забруднення одягу або робочого місця чорнилом. Утилізуйте порожні картриджі FINE згідно з місцевим законодавством і встановленими нормами щодо утилізації витратних матеріалів. Підготуйте новий картридж FINE. Вийміть новий картридж FINE з упаковки та обережно видаліть жовтогарячу захисну...
- Page 65 Переконайтеся, що кришку фіксації картриджа з чорнилом закрито повністю. Примітка Якщо кришку фіксації картриджів із чорнилом закрито неправильно, натискайте її до клацання. (E) Повністю закрита кришка (F) Неповністю закрита кришка (кришка розташована під нахилом) Важливо Апарат не може виконувати друк, доки не буде встановлено обидва картриджі FINE — кольоровий...
- Page 66 Якщо паралельні лінії друкуються зі зміщенням або положення друкуючої головки є неправильним, відрегулюйте положення друкуючої головки. Див. розділ Вирівнювання друкуючої головки На початок сторінки...
- Page 67 Повний посібник Усунення неполадок > > Заміна картриджа FINE Зміст Регулярне обслуговування > Перевірка стану чорнила C092 Перевірка стану чорнила Стан чорнила можна перевірити за допомогою індикатора Чорнило на панелі керування або за допомогою екрана комп’ютера. Примітка Індикатор рівня чорнила апарата служить для визначення рівня чорнила, що залишився. Повним...
- Page 68 Щоб перевірити інформацію про картридж FINE, клацніть меню Ink Details. Примітка Під час друку також відкрийте монітор стану принтера, клацнувши піктограму принтера на панелі завдань. В ОС Windows Vista або Windows XP клацніть піктограму Canon XXX Printer (де «XXX » — назва апарата) на панелі завдань. На початок сторінки...
- Page 69 Повний посібник Усунення неполадок > > Чищення апарата Зміст Регулярне обслуговування Чищення апарата У цьому розділі описано спосіб чищення внутрішніх компонентів апарата. Чищення ролика подавання паперу Чищення внутрішніх компонентів апарата (Чищення піддона) Чищення виступних внутрішніх компонентів апарата На початок сторінки...
- Page 70 Повний посібник Усунення неполадок > > Зміст Регулярне обслуговування Чищення апарата > Чищення ролика подавання паперу C099 Чищення ролика подавання паперу Якщо ролик подавання паперу забруднився або на ньому наявний паперовий пил, це може спричинити неправильне подавання паперу. У такому випадку очистьте ролик подавання паперу. У результаті чищення ролик подавання паперу зношується, тому...
- Page 71 Повний посібник Усунення неполадок > > Зміст Регулярне обслуговування Чищення апарата > Чищення внутрішніх компонентів апарата (Чищення піддона) C101 Чищення внутрішніх компонентів апарата (Чищення піддона) Вичистіть внутрішні компоненти апарата від забруднень. У разі забруднення внутрішніх компонентів апарата роздруківки можуть також виходити забрудненими, тому рекомендується регулярно...
- Page 72 чищення піддона вдруге. Примітка Під час виконання повторного чищення піддона, використовуйте новий аркуш паперу. Якщо вирішити проблему після повторного чищення піддона не вдається, можливо, забруднено виступні внутрішні компоненти апарата. Див. розділ Чищення виступних внутрішніх компонентів апарата , щоб почистити їх. На...
- Page 73 Повний посібник Усунення неполадок > > Зміст Регулярне обслуговування Чищення апарата > Чищення виступних внутрішніх компонентів апарата C102 Чищення виступних внутрішніх компонентів апарата Увага! Перед початком чищення апарата обов’язково вимкніть його та від’єднайте від нього шнур живлення. Якщо виступні внутрішні компоненти апарата забруднено чорнилом, усуньте чорнило за допомогою ватного...
- Page 74 Повний посібник Усунення неполадок Зміст > Додаток Додаток Законодавчі обмеження щодо експлуатації виробу та використання зображень Поради щодо використання апарата На початок сторінки...
- Page 75 Повний посібник Усунення неполадок > Зміст Додаток > Законодавчі обмеження щодо експлуатації виробу та використання зображень Законодавчі обмеження щодо експлуатації виробу та використання зображень Копіювання, сканування, друк або використання репродукцій нижченаведених документів може бути заборонено законом. Наведений перелік є неповним. Якщо у вас виникли сумніви, зверніться до юридичного представника...
- Page 76 Повний посібник Усунення неполадок > Зміст Додаток > Поради щодо використання апарата C112 Поради щодо використання апарата У цьому розділі наведені поради щодо використання апарата та друку з оптимальною якістю. Чорнило використовується для різних цілей. Як використовувати чорнило для інших цілей, окрім друку? Чорнило...
- Page 77 Скручений папір спричинює зминання. Розрівняйте скручений папір, після чого знову завантажте його. Докладніше див. у розділі « Усунення неполадок » в on-screen manual: Повний посібник Порада! Після завантаження паперу обов’язково вкажіть настройки для паперу! Завантаживши папір, обов’язково виберіть його в параметрі Media Type у драйвері принтера або...
- Page 78 притиснення документів! Не кладіть жодні предмети на кришку для притиснення документів. Вони потраплять у задній лоток унаслідок відкривання кришки для притиснення документів, що призведе до збою в роботі апарата. Окрім того, розміщуйте апарат у місці, де на нього не падатимуть жодні предмети. Порада! Ретельно...
- Page 79 перевірити, чи вони не закупорені. Якщо сопла друкуючої головки закупорені, кольори можуть стати нечіткими, а роздруківки розмитими. У цьому випадку Надрукуйте зразок для перевірки сопел Перегляньте роздрукований зразок для чистки сопел, щоб перевірити, чи вони не закупорені. Якщо кольори на роздруківках виглядають блідими або кольори друкуються некоректно Див.
- Page 80 MC-4753-V1.00 Короткий посібник Друк Друк Сканування Друк із комп’ютера Друк за допомогою стандартного програмного Копіювання забезпечення Що таке Easy-PhotoPrint EX? Усунення неполадок Друк фотографій Як користуватися цим Запуск Easy-PhotoPrint EX посібником Вибір фотографії Друк цього посібника Вибір паперу Друк Технічне обслуговування Створення...
- Page 81 Використання функції усунення ефекту «червоних очей» Використання функції освітлення обличчя Використання функції збільшення чіткості рис обличчя Використання функції цифрового розгладження обличчя Використання функції усунення вад Настроювання зображень Вікно «Корекція/покращення зображень» Створення нерухомих зображень із відеозображень Вікно захоплення відеокадру та друку відеозображення...
- Page 82 Збереження Встановлення свят Встановлення вигляду календаря Відкриття збережених файлів Друк за допомогою іншого програмного забезпечення Різні методи друку Друк із простим настроюванням Настроювання розміру та орієнтації сторінки Встановлення кількості копій та порядку виконання друку Встановлення поля для скріплення Виконання друку без полів Друк...
- Page 83 Операції з драйвером принтера Драйвер принтера Canon IJ Драйвер принтера XPS Як відкрити вікно встановлення драйвера принтера Вкладка «Технічне обслуговування» Монітор стану Canon IJ Попередній перегляд Canon IJ Сканування Сканування Сканування зображень Сканування зображень Перед початком сканування Розміщення документів Сканування з панелі керування апарата...
- Page 84 Встановлення паролів для файлів PDF Відкриття/редагування файлів PDF, захищених паролем Екрани MP Navigator EX Екран режиму навігації Вкладка «Сканування/імпорт документів або зображень» Перегляд та використання зображень на вкладці «Комп’ютер» Вкладка «Індивідуальне сканування за допомогою одиночного клацання» Екран автоматичного сканування (вікно сканування/імпорту) Діалогове...
- Page 85 Сканування за допомогою іншого програмного забезпечення Що таке ScanGear (драйвер сканера)? Сканування з додатковими параметрами за допомогою ScanGear (драйвер сканера) Запуск ScanGear (драйвер сканера) Сканування в основному режимі Сканування в розширеному режимі Сканування в режимі автоматичного сканування Одночасне сканування кількох документів за допомогою...
- Page 86 Створення копій Зменшення або збільшення копії Використання зручних функцій копіювання Вибір розміру сторінки між A4 та Letter Копіювання без полів (Копія без полів) Усунення неполадок Усунення неполадок Якщо виникає помилка Апарат не вмикається Відображення коду помилки на світлодіодному індикаторі Індикатор попередження горить жовтогарячим Індикатор...
- Page 87 Повідомлення на екрані комп’ютера Відображається повідомлення «Номер помилки: B200. Сталася помилка принтера. Вимкніть принтер і від’єднайте шнур живлення принтера від джерела живлення, а потім зверніться до сервісного центру». Відображається повідомлення «Номер помилки: ****. Сталася помилка принтера. Вимкніть принтер, а потім увімкніть...
- Page 88 зображення виглядає перекошеним Документ розміщено правильно, але відскановане зображення має змінену орієнтацію Якщо усунути неполадку не вдається Поширені запитання Інструкції з використання (драйвер принтера) Загальні примітки (драйвер сканера) Використання Easy-PhotoPrint EX Використання MP Navigator EX...
- Page 89 Повний посібник > Як користуватися цим посібником Як користуватися цим посібником Робота з панеллю змісту Робота з вікном пояснення Друк цього посібника Використання ключових слів для пошуку документів Реєстрація документів до свого посібника Символи, які використовуються в цьому документі Торговельні марки та ліцензії На...
- Page 90 > Повний посібник Як користуватися цим посібником > Робота з панеллю змісту Робота з панеллю змісту Якщо клацнути заголовок документа, відображуваного на панелі змісту, розміщеній у лівій частині on-screen manual, відповідні документи цього заголовка відображуються праворуч у вікні пояснення. Якщо клацнути піктограму ліворуч...
- Page 91 > Повний посібник Як користуватися цим посібником > Робота з вікном пояснення Робота з вікном пояснення Вікно пояснення (1) Клацніть рядок символів зеленого кольору, щоб перейти до відповідного документа. (2) Курсор переміститься на початок цього документа. Вікно, що використовується в поясненні операцій У...
- Page 92 > Повний посібник Як користуватися цим посібником > Друк цього посібника Друк цього посібника Клацніть , щоб відобразити вікно друку в лівій частині електронного посібника. Примітка Клацніть , щоб закрити або відобразити вікно друку. , а потім — Сторінка (Page Setup), відобразиться діалогове вікно Сторінка Якщо...
- Page 93 Друк поточного документа Друк вибраних документів Друк свого посібника Друк усіх документів Примітка Можна вибрати тип, який потрібно надрукувати, а потім легко вказати параметри принтера на вкладці Настроюв. друку (Print Setup). Друк поточного документа Можна надрукувати документ, що наразі відображується. У...
- Page 94 Клацніть Вибрати все (Select All), щоб встановити прапорці біля всіх заголовків документів. Клацніть Очистити все (Clear All), щоб зняти прапорці біля всіх заголовків документів. Клацніть Попер. перегляд (Print Preview), щоб відобразити та перевірити результати друку перед його безпосереднім виконанням. Клацніть вкладку Настроюв. друку (Print Setup) На...
- Page 95 Примітка Якщо зняти прапорець біля заголовка документа, такий документ не друкується. Клацніть Вибрати все (Select All), щоб встановити прапорці біля всіх заголовків документів. Клацніть Очистити все (Clear All), щоб зняти прапорці біля всіх заголовків документів. Клацніть Попер. перегляд (Print Preview), щоб відобразити та перевірити результати друку перед...
- Page 96 > > Використання ключових слів для пошуку документів Повний посібник Як користуватися цим посібником Використання ключових слів для пошуку документів Для пошуку потрібного документа можна ввести ключове слово. Можна виконувати пошук усіх документів у наразі відображуваному on-screen manual. Клацніть Вікно пошуку відображується в лівій частині on-screen manual. Примітка...
- Page 97 Клацніть Розпочати пошук (Start Searching) Розпочнеться пошук, і у списку результатів пошуку відобразяться заголовки документів, які містять ключові слова. Якщо пошук виконується з використанням кількох ключових слів, його результати будуть відображені таким чином. [Док. що містять абсолютний відповідник] ([Documents Containing Perfect Match]) Документи, які...
- Page 98 > > Реєстрація документів до свого посібника Повний посібник Як користуватися цим посібником Реєстрація документів до свого посібника Зареєструйте часто використовувані документи як документи у своєму посібнику, щоб мати змогу легко переглядати їх будь-коли. Відображення документа Відкрийте документ, який потрібно додати до свого посібника. Клацніть...
- Page 99 На панелі змісту виберіть заголовок документа, який потрібно додати до свого посібника, а потім клацніть Додати в мій посібник (Add to My Manual) у нижньому правому куті панелі. Відкрийте свій посібник Якщо двічі клацнути (або вибрати та натиснути клавішу Enter) заголовок документа, що відображається...
- Page 100 > Повний посібник Як користуватися цим посібником > Символи, які використовуються в цьому документі Символи, які використовуються в цьому документі Застереження Вказівки, ігнорування яких може призвести до смерті або серйозних травм внаслідок неправильної експлуатації обладнання. Ці вказівки необхідно виконувати для дотримання правил безпеки експлуатації...
- Page 101 > Повний посібник Як користуватися цим посібником > Торговельні марки та ліцензії Торговельні марки та ліцензії Microsoft є зареєстрованим товарним знаком корпорації Microsoft Corporation. Windows є товарним знаком або зареєстрованим товарним знаком корпорації Microsoft Corporation у США та/або інших країнах. Windows Vista є...
- Page 102 > Друк із комп’ютера Повний посібник Друк із комп’ютера Друк за допомогою стандартного програмного забезпечення Друк за допомогою іншого програмного забезпечення На початок сторінки...
- Page 103 > > Друк за допомогою стандартного програмного забезпечення Повний посібник Друк із комп’ютера Друк за допомогою стандартного програмного забезпечення Що таке Easy-PhotoPrint EX? Друк фотографій Створення альбому Друк календарів Друк наклейок Друк із компонуванням Корекція та покращення фотографій Створення нерухомих зображень із відеозображень Завантаження...
- Page 104 You can also print borderless photos easily. Important Easy-PhotoPrint EX can only be used with Canon inkjet printers. It does not support some Canon compact photo printers, including SELPHY CP series. If a printer that supports Easy-PhotoPrint EX is not installed, you cannot print items you create.
- Page 105 MOV ( .mov) Important Only MOV format videos recorded with Canon digital cameras are supported. When selecting an image, if there is a TIFF file in the selected folder, the image may not be displayed correctly or Easy-PhotoPrint EX may shut down depending on the TIFF format. In such cases, move the TIFF file to another folder or recreate the file in a different data format, and then select the folder again.
- Page 106 File Formats (Extensions) Supported by Easy-PhotoPrint EX Easy-PhotoPrint EX Photo Print file (.el6) Easy-PhotoPrint EX Album file (.el1) Easy-PhotoPrint EX Stickers file (.el2) Easy-PhotoPrint EX Calendar file (.el4) Easy-PhotoPrint EX Layout file (.el5) Page top...
-
Page 107: Printing Photos
> Printing from a Computer > > Printing Photos Advanced Guide Printing with the Bundled Application Software A010 Printing Photos Easy-PhotoPrint EX allows you to print your favorite photos in a variety of layouts. You can also create borderless photos easily. Corrections suitable for photos can be applied automatically when printing. - Page 108 How Can I Move (or Copy) the Saved File? Which Side of the Displayed Image Does the Printing Start from? How Do I Print with Even Margins? Page top...
- Page 109 > Starting Advanced Guide Printing with the Bundled Application Software Easy-PhotoPrint EX A011 Starting Easy-PhotoPrint EX From the Start menu, select All Programs > Canon Utilities > Easy-PhotoPrint EX > Easy-PhotoPrint EX. Easy-PhotoPrint EX starts and Menu appears. Page top...
-
Page 110: Selecting A Photo
> Printing from a Computer > > Printing Photos > Advanced Guide Printing with the Bundled Application Software Selecting a Photo A012 Selecting a Photo Click Photo Print from Menu. The Select Images screen appears. Important The thumbnails (reduced images) displayed in the screen may appear as follows: - A black line appears along an edge of the image. - Page 111 Click the image you want to print. The number of copies appears as "1" below the clicked image, while the selected image itself will appear in the selected image area. Note To delete an image in the selected image area, select the image you want to delete and click (Delete Imported Image).
-
Page 112: Selecting The Paper
> Printing from a Computer > > Printing Photos > Advanced Guide Printing with the Bundled Application Software Selecting the Paper A013 Selecting the Paper Click Select Paper. The Select Paper screen appears. Set the following items according to the printer and paper to be used: Printer Paper Source Paper Size... - Page 113 > Printing from a Computer > > Printing Photos > Printing Advanced Guide Printing with the Bundled Application Software A014 Printing Click Layout/Print. The Layout/Print screen appears. Important The thumbnails (reduced images) displayed in the screen may appear as follows: - A black line appears along an edge of the image.
- Page 114 How Do I Print with Even Margins? Note You can crop images or print dates on photos. Cropping Photos (Photo Print) Printing Dates on Photos (Photo Print) You can correct or enhance the selected image before printing. Correcting and Enhancing Photos You can specify advanced Photo Print settings (number of copies, print quality, etc.) in the Preferences dialog box.
-
Page 115: Creating An Album
> Printing from a Computer > > Creating an Album Advanced Guide Printing with the Bundled Application Software A020 Creating an Album Easy-PhotoPrint EX allows you to create your own personalized photo album. Steps Starting Easy-PhotoPrint EX Selecting the Paper and Layout Selecting a Photo Editing Printing... - Page 116 Questions and Answers How Can I Move (or Copy) the Saved File? What Is "C1" or "C4"? Page top...
- Page 117 > Advanced Guide Printing with the Bundled Application Software Starting Easy-PhotoPrint EX A021 Starting Easy-PhotoPrint EX From the Start menu, select All Programs > Canon Utilities > Easy-PhotoPrint EX > Easy-PhotoPrint EX. Easy-PhotoPrint EX starts and Menu appears. Page top...
- Page 118 > Printing from a Computer > > Creating an Album > Advanced Guide Printing with the Bundled Application Software Selecting the Paper and Layout A022 Selecting the Paper and Layout Click Album from Menu. The Page Setup screen appears. Set the following items in the General Settings section: Paper Size Orientation Cover...
- Page 119 If you want to change the layout, click Layout..The Change Layout dialog box appears. In the Change Layout dialog box, you can change the layout or select whether to print the date (on which the picture was taken) on the photo. Note The layouts that can be selected may vary depending on the Paper Size, Orientation, Double page album, or the type of page selected (front cover, inside pages or back cover).
- Page 120 > Printing from a Computer > > Creating an Album > Advanced Guide Printing with the Bundled Application Software Selecting a Photo A023 Selecting a Photo Click Select Images. The Select Images screen appears. Select the folder that contains the image you want to print from the folder tree area. The images in the folder will be displayed as thumbnails (miniatures).
- Page 121 The selected image(s) is (are) displayed in the selected image area. You can also select the image(s) you want to print by dragging it (them) into the selected image area. Note To delete an image in the selected image area, select the image you want to delete and click (Delete Imported Image).
- Page 122 > Printing from a Computer > > Creating an Album > Advanced Guide Printing with the Bundled Application Software Editing A024 Editing Click Edit. The Edit screen appears. Edit your album if necessary. Changing Layout Changing Background Adding Photos Swapping Positions of Photos Replacing Photos Changing Position, Angle and Size of Photos Cropping Photos...
- Page 123 C3: Inside the back cover C4: Back cover "C2"/"C3" appears only when the Leave the inside of front cover blank/Leave the inside of back cover blank checkbox is selected in the Cover Options dialog box. Saving Note See Help for details on the Edit screen. Page top...
- Page 124 > Printing from a Computer > > Creating an Album > Advanced Guide Printing with the Bundled Application Software Printing A025 Printing Click Print Settings. The Print Settings screen appears. Set the following items according to the printer and paper to be used: Printer Media Type Copies...
- Page 125 Click Print. Note See Help for details on the Print Settings screen. Page top...
-
Page 126: Printing Calendars
> Printing from a Computer > > Printing Calendars Advanced Guide Printing with the Bundled Application Software A040 Printing Calendars Easy-PhotoPrint EX allows you to create your own calendar using your favorite photos. Steps Starting Easy-PhotoPrint EX Selecting the Paper and Layout Selecting a Photo Editing Printing... - Page 127 Opening Saved Files Questions and Answers How Can I Move (or Copy) the Saved File? Page top...
- Page 128 > Advanced Guide Printing with the Bundled Application Software Starting Easy-PhotoPrint EX A041 Starting Easy-PhotoPrint EX From the Start menu, select All Programs > Canon Utilities > Easy-PhotoPrint EX > Easy-PhotoPrint EX. Easy-PhotoPrint EX starts and Menu appears. Page top...
- Page 129 > Printing from a Computer > > Printing Calendars > Advanced Guide Printing with the Bundled Application Software Selecting the Paper and Layout A042 Selecting the Paper and Layout Click Calendar from Menu. The Page Setup screen appears. Set the following items in the General Settings section: Paper Size Orientation Start from...
- Page 130 Note See Help for details on the Page Setup screen. Page top...
- Page 131 > Printing from a Computer > > Printing Calendars > Advanced Guide Printing with the Bundled Application Software Selecting a Photo A043 Selecting a Photo Click Select Images. The Select Images screen appears. Select the folder that contains the image you want to print from the folder tree area. The images in the folder will be displayed as thumbnails (miniatures).
- Page 132 Note You can correct or enhance the selected image before printing. Correcting and Enhancing Photos See Help for details on the Select Images screen. Page top...
- Page 133 > Printing from a Computer > > Printing Calendars > Advanced Guide Printing with the Bundled Application Software Editing A044 Editing Click Edit. The Edit screen appears. Edit the calendar if necessary. Changing Layout Changing Background Adding Photos Swapping Positions of Photos Replacing Photos Changing Position, Angle and Size of Photos Cropping Photos...
- Page 134 See Help for details on the Edit screen. Page top...
- Page 135 > Printing from a Computer > > Printing Calendars > Advanced Guide Printing with the Bundled Application Software Printing A045 Printing Click Print Settings. The Print Settings screen appears. Set the following items according to the printer and paper to be used: Printer Media Type Copies...
- Page 136 Click Print. Note See Help for details on the Print Settings screen. Page top...
-
Page 137: Printing Stickers
> Printing from a Computer > > Printing Stickers Advanced Guide Printing with the Bundled Application Software A050 Printing Stickers You can print your favorite photos on compatible sticker sheets. Steps Starting Easy-PhotoPrint EX Selecting the Paper and Layout Selecting a Photo Editing Printing Try This... - Page 138 Page top...
- Page 139 > Advanced Guide Printing with the Bundled Application Software Starting Easy-PhotoPrint EX A051 Starting Easy-PhotoPrint EX From the Start menu, select All Programs > Canon Utilities > Easy-PhotoPrint EX > Easy-PhotoPrint EX. Easy-PhotoPrint EX starts and Menu appears. Page top...
- Page 140 > Printing from a Computer > > Printing Stickers > Advanced Guide Printing with the Bundled Application Software Selecting the Paper and Layout A052 Selecting the Paper and Layout Click Stickers from Menu. The Page Setup screen appears. Set the following items in the General Settings section: Paper Size Orientation Print date...
- Page 141 > Printing from a Computer > > Printing Stickers > Advanced Guide Printing with the Bundled Application Software Selecting a Photo A053 Selecting a Photo Click Select Images. The Select Images screen appears. Select the folder that contains the image you want to print from the folder tree area. The images in the folder will be displayed as thumbnails (miniatures).
- Page 142 Note You can correct or enhance the selected image before printing. Correcting and Enhancing Photos See Help for details on the Select Images screen. Page top...
- Page 143 > Printing from a Computer > > Printing Stickers > Editing Advanced Guide Printing with the Bundled Application Software A054 Editing Click Edit. The Edit screen appears. Edit the stickers if necessary. Adding Photos Swapping Positions of Photos Replacing Photos Changing Position, Angle and Size of Photos Cropping Photos Printing Dates on Photos...
- Page 144 > Printing from a Computer > > Printing Stickers > Advanced Guide Printing with the Bundled Application Software Printing A055 Printing Click Print Settings. The Print Settings screen appears. Set the following items according to the printer and paper to be used: Printer Media Type Copies...
- Page 145 See Help for details on the Print Settings screen. Page top...
- Page 146 > Printing from a Computer > > Printing Layout Advanced Guide Printing with the Bundled Application Software A150 Printing Layout You can add text to your favorite photos and print them in a variety of layouts. Steps Starting Easy-PhotoPrint EX Selecting the Paper and Layout Selecting a Photo Editing...
- Page 147 How Can I Move (or Copy) the Saved File? Page top...
- Page 148 > Starting Advanced Guide Printing with the Bundled Application Software Easy-PhotoPrint EX A151 Starting Easy-PhotoPrint EX From the Start menu, select All Programs > Canon Utilities > Easy-PhotoPrint EX > Easy-PhotoPrint EX. Easy-PhotoPrint EX starts and Menu appears. Page top...
- Page 149 > Printing from a Computer > > Printing Layout > Advanced Guide Printing with the Bundled Application Software Selecting the Paper and Layout A152 Selecting the Paper and Layout Click Layout Print from Menu. The Page Setup screen appears. Set the following items in the General Settings section: Paper Size Orientation Print date...
- Page 150 Page top...
- Page 151 > Printing from a Computer > > Printing Layout > Advanced Guide Printing with the Bundled Application Software Selecting a Photo A153 Selecting a Photo Click Select Images. The Select Images screen appears. Select the folder that contains the image you want to print from the folder tree area. The images in the folder will be displayed as thumbnails (miniatures).
- Page 152 Note You can correct or enhance the selected image before printing. Correcting and Enhancing Photos See Help for details on the Select Images screen. Page top...
- Page 153 > Printing from a Computer > > Printing Layout > Editing Advanced Guide Printing with the Bundled Application Software A154 Editing Click Edit. The Edit screen appears. Edit the layout if necessary. Changing Layout Adding Photos Swapping Positions of Photos Replacing Photos Changing Position, Angle and Size of Photos Cropping Photos...
- Page 154 Page top...
- Page 155 > Printing from a Computer > > Printing Layout > Printing Advanced Guide Printing with the Bundled Application Software A155 Printing Click Print Settings. The Print Settings screen appears. Set the following items according to the printer and paper to be used: Printer Media Type Copies...
- Page 156 Click Print. Note See Help for details on the Print Settings screen. Page top...
- Page 157 > Printing from a Computer > Advanced Guide Printing with the Bundled Application Software > Correcting and Enhancing Photos A060 Correcting and Enhancing Photos You can correct and enhance images. Click (Correct/Enhance Images) in the Select Images or Edit screen, or in the Layout/Print screen of Photo Print.
- Page 158 You can also blur the outline of the subjects or remove the base color. Adjusting Images Page top...
- Page 159 > Printing from a Computer > > Advanced Guide Printing with the Bundled Application Software Correcting and Enhancing Photos > Using the Auto Photo Fix Function A066 Using the Auto Photo Fix Function This function will automatically analyze the captured scene and apply suitable corrections. Important The Auto Photo Fix function is not available for Photo Print.
- Page 160 The image appears in Preview. Note If only one image is selected, the thumbnail list does not appear below Preview. Make sure that Auto is selected. Click Auto Photo Fix, then click OK. The entire photo is corrected automatically and the (Correction/Enhancement) mark appears on the upper left of the image.
- Page 161 > Printing from a Computer > > Advanced Guide Printing with the Bundled Application Software Correcting and Enhancing Photos > Using the Red-Eye Correction Function A061 Using the Red-Eye Correction Function You can correct red eyes caused by a camera flash. You can perform the Red-Eye Correction function either automatically or manually.
- Page 162 Auto Correction Make sure that Auto is selected. Click Red-Eye Correction. Click OK. Red eyes are corrected and the (Correction/Enhancement) mark appears on the upper left of the image. Important Areas other than the eyes may be corrected depending on the image. Note (Compare) to display the images before and after the correction side by side so that Click...
- Page 163 Red eye is corrected and the (Correction/Enhancement) mark appears on the upper left of the image. Note (Compare) to display the images before and after the correction side by side so that Click you can compare and check the result. Click Undo to undo the preceding correction operation.
- Page 164 > Printing from a Computer > > Advanced Guide Printing with the Bundled Application Software Correcting and Enhancing Photos > Using the Face Brightener Function A062 Using the Face Brightener Function You can brighten dark faces caused by bright background. Note You can brighten dark photos caused by bright background automatically by selecting Auto Photo Fix.
- Page 165 Click Manual, then click Correct/Enhance. Click Face Brightener. Note Effect levels can be changed using the slider below Face Brightener. Move the cursor over the image. The shape of the cursor changes to (Cross). Drag to select the area you want to correct, then click OK that appears over the image.
- Page 166 Important The corrections will be lost if you exit before saving corrected images. Page top...
- Page 167 > Printing from a Computer > > Advanced Guide Printing with the Bundled Application Software Correcting and Enhancing Photos > Using the Face Sharpener Function A063 Using the Face Sharpener Function You can sharpen out-of-focus faces in a photo. You can perform the Face Sharpener function either automatically or manually. Select photos in the Select Images screen, then click (Correct/Enhance Images).
- Page 168 Click Face Sharpener. Note Effect levels can be changed using the slider below Face Sharpener. Click OK. The face is sharpened and the (Correction/Enhancement) mark appears on the upper left of the image. Note Click (Compare) to display the images before and after the correction side by side so that you can compare and check the result.
- Page 169 The facial area in and around the selected area is sharpened and the (Correction/ Enhancement) mark appears on the upper left of the image. Note You can also drag to rotate the selected area. (Compare) to display the images before and after the correction side by side so that Click you can compare and check the result.
- Page 170 > Printing from a Computer > > Advanced Guide Printing with the Bundled Application Software Correcting and Enhancing Photos > Using the Digital Face Smoothing Function A064 Using the Digital Face Smoothing Function You can enhance skin beautifully by removing blemishes and wrinkles. You can perform the Digital Face Smoothing function either automatically or manually.
- Page 171 Click Digital Face Smoothing. Note Effect levels can be changed using the slider below Digital Face Smoothing. Click OK. Skin is enhanced beautifully and the (Correction/Enhancement) mark appears on the upper left of the image. Note Click (Compare) to display the images before and after the enhancement side by side so that you can compare and check the result.
- Page 172 Skin in and around the selected area is enhanced beautifully and the (Correction/Enhancement) mark appears on the upper left of the image. Note You can also drag to rotate the selected area. Click (Compare) to display the images before and after the enhancement side by side so that you can compare and check the result.
- Page 173 > Printing from a Computer > > Advanced Guide Printing with the Bundled Application Software Correcting and Enhancing Photos > Using the Blemish Remover Function A065 Using the Blemish Remover Function You can remove moles. Select photos in the Select Images screen, then click (Correct/Enhance Images).
- Page 174 Note Move the cursor over the image. The shape of the cursor changes to (Cross). Drag to select the area you want to enhance, then click OK that appears over the image. Moles in and around the selected area are removed and the (Correction/Enhancement) mark appears on the upper left of the image.
-
Page 175: Adjusting Images
> Printing from a Computer > > Advanced Guide Printing with the Bundled Application Software Correcting and Enhancing Photos > Adjusting Images A067 Adjusting Images You can make fine adjustments to the overall brightness, contrast, etc. of images. Select photos in the Select Images screen, then click (Correct/Enhance Images). - Page 176 Contrast Sharpness Blur Show-through Removal Note (Compare) to display the images before and after the adjustment side by side so that Click you can compare and check the result. Click Advanced to make fine adjustments to the image brightness and color tone. See " Advanced "...
- Page 177 > Printing from a Computer > > Advanced Guide Printing with the Bundled Application Software Correcting and Enhancing Photos > Correct/Enhance Images Window A068 Correct/Enhance Images Window You can correct/enhance images in this window. To display the Correct/Enhance Images window, click (Correct/Enhance Images) in the Select Images or Edit screen, or in the Layout/Print screen of Photo Print.
- Page 178 Auto Photo Fix Applies automatic corrections suitable for photos. Important The Auto Photo Fix function is not available for Photo Print. Photo Print allows you to automatically apply suitable corrections to all photos when printing, by selecting Enable Auto Photo Fix in Color correction for printing on the Advanced tab of the Preferences dialog box. To display the Preferences dialog box, click (Settings) in the Layout/Print screen or select Preferences...
- Page 179 Automatically corrects/enhances all images displayed in the thumbnail list. Applies the selected effect to the selected image or all images. Reset Selected Image Cancels all corrections and enhancements applied to the selected image. Save Selected Image Saves the corrected/enhanced image (the selected one). Save All Corrected Images Saves all the corrected/enhanced images displayed in the thumbnail list.
- Page 180 Removes show-through of text from the reverse side or removes the base color. Adjust the show- through level to prevent text on the reverse side of thin document or the base color of the document from appearing on the image. Move the slider to the right to increase the show-through removal effect.
- Page 181 color tone are adjusted in the Advanced Adjustment dialog box. Defaults Resets each adjustment (brightness, contrast, sharpness, blur, and show-through removal). Reset Selected Image Cancels all corrections, enhancements and adjustments applied to the selected image. Save Selected Image Saves the corrected/enhanced/adjusted image (the selected one). Save All Corrected Images Saves all the corrected/enhanced/adjusted images displayed in the thumbnail list.
- Page 182 Removes moles in the selected area. Applies the selected effect to the specified area. Undo Cancels the latest correction/enhancement. Reset Selected Image Cancels all corrections, enhancements and adjustments applied to the selected image. Save Selected Image Saves the corrected/enhanced/adjusted image (the selected one). Save All Corrected Images Saves all the corrected/enhanced/adjusted images displayed in the thumbnail list.
- Page 183 This function is supported under Windows XP or later. However, it is not supported under the 64-bit editions of Windows XP. This function is not available when ZoomBrowser EX Ver.6.5 or later (supplied with Canon digital cameras supporting MOV format video recording) is not installed.
- Page 184 Note Only MOV format videos recorded with Canon digital cameras are displayed. The selected video plays. Select the video from which you want to capture still images and click OK. The selected video plays in Preview of the Video Frame Capture window.
- Page 185 Display the Auto Frame Capture Settings area, then use (Set start time/Set end time) in the Preview area to specify the time range. In the Auto Frame Capture Settings area, select a capture method and click Capture. You can correct the captured still images in the Correct Captured Frames window. To display the Correct Captured Frames window, select the image(s) you want to correct in the Captured frame(s) area, then click (Correct image).
- Page 186 This function is supported under Windows XP or later. However, it is not supported under the 64-bit editions of Windows XP. This function is not available when ZoomBrowser EX Ver.6.5 or later (supplied with Canon digital cameras supporting MOV format video recording) is not installed.
- Page 187 Print Area You can print the captured still images. Note This function is available only when the Movie Print window is displayed via Solution Menu EX. Media Type Displays the media type specified in the Print Settings dialog box. Page Size Displays the paper size specified in the Print Settings dialog box.
- Page 188 Select Video Displays the Select Video dialog box. Select a folder, then select the video from which you want to capture still images. Save Saves the still images selected in the Captured frame(s) area. Exit Click to close the Video Frame Capture/Movie Print window. (2) Preview Area The video selected in the Select Video dialog box appears in Preview.
- Page 189 When you select an image, a checkmark appears in its checkbox. (Clear all check-marks) Cancels all image selections in the Captured frame(s) area. (Correct image) Displays the Correct Captured Frames window in which you can correct all the images selected in the Captured frame(s) area.
- Page 190 (2) Toolbar (Reduce/Enlarge frame) Reduces or enlarges the displayed image. (Whole frame) Displays the entire image in Preview. (Compare) Displays the Compare Captured Frames window. You can compare the images before and after the correction side by side. The image before the correction is displayed on the left, and the image after the correction is displayed on the right of the window.
- Page 191 Please also check terms of service in the photo sharing site before using the work of others. Canon is not responsible for the any copyright problems by using this function. This function is supported under Windows XP or later.
- Page 192 (Add Image). When you click (Import photos from photo sharing sites), a message about created works and personality rights appear. To hide the message, select the Do not show this message again checkbox. See " Import Photos from Photo Sharing Sites Window "...
- Page 193 > Printing from a Computer > > Advanced Guide Printing with the Bundled Application Software Downloading Images from Photo Sharing Sites > Import Photos from Photo Sharing Sites Window A171 Import Photos from Photo Sharing Sites Window In this window, you can search for images on photo sharing sites on the Internet and download the images you want to print.
- Page 194 Sort by Select how to sort the search results in the Thumbnail window. Select Popularity or Date. You cannot change the setting after a search. Number of Results per Page Select the number of images displayed in the Thumbnail window, from 10, 20 and 30. You cannot change the setting after a search.
- Page 195 Commercial work along with your creation. - You may not use the work for commercial purposes. Share Alike (CC license) - Even if your creation is built upon the work of others, you must apply the same conditions to it as those set out for the original work by the licensor.
- Page 196 thumbnail. To select an image, click the thumbnail or checkbox. Important Due to limitations of photo sharing sites, if the search results exceed 4,000 images, the same images as those displayed in the page containing the 4,001st image will be displayed in all the subsequent pages.
-
Page 197: Questions And Answers
> Printing from a Computer > Advanced Guide Printing with the Bundled Application Software > Questions and Answers A200 Questions and Answers How Can I Move (or Copy) the Saved File? Which Side of the Displayed Image Does the Printing Start from? How Do I Print with Even Margins? What Is "C1"... - Page 198 > Printing from a Computer > > Advanced Guide Printing with the Bundled Application Software Questions and Answers > How Can I Move (or Copy) the Saved File? A095 How Can I Move (or Copy) the Saved File? If you want to move (or copy) a file created and saved with Easy-PhotoPrint EX from one folder to another, you need to move (or copy) the folder that was automatically created when originally saving that file as well.
- Page 199 > Printing from a Computer > > Advanced Guide Printing with the Bundled Application Software Questions and Answers > Which Side of the Displayed Image Does the Printing Start from? A096 Which Side of the Displayed Image Does the Printing Start from? As shown below, printing starts from the left side of the image displayed in the Layout/Print screen.
- Page 200 > Printing from a Computer > > Advanced Guide Printing with the Bundled Application Software Questions and Answers > How Do I Print with Even Margins? A097 How Do I Print with Even Margins? When you print on a bordered layout, the margins on the left and right or the top and bottom may become wider than the other, depending on the image and printer.
- Page 201 > Printing from a Computer > > Advanced Guide Printing with the Bundled Application Software Questions and Answers > What Is "C1" or "C4"? A098 What Is "C1" or "C4"? When an album is printed, labels such as "C1" and "C4" are printed as page numbers. The "C1"...
- Page 202 > Printing from a Computer > > Photo Print Settings Advanced Guide Printing with the Bundled Application Software A101 Photo Print Settings Printing Vivid Photos Reducing Photo Noise Cropping Photos (Photo Print) Printing Dates on Photos (Photo Print) Printing Multiple Photos on One Page Printing an Index Printing ID Photos (ID Photo Print) Printing Photo Information...
- Page 203 > Printing from a Computer > > Photo Print Settings > Advanced Guide Printing with the Bundled Application Software Printing Vivid Photos A071 Printing Vivid Photos Select the Vivid Photo checkbox in the Select Paper screen to boost the colors in a photo before printing. Important This function is available only with a printer that supports Vivid Photo.
-
Page 204: Reducing Photo Noise
> Printing from a Computer > > Photo Print Settings > Advanced Guide Printing with the Bundled Application Software Reducing Photo Noise A072 Reducing Photo Noise When a photo is taken in a dark location such as night scene using digital camera, noise may appear in the image. - Page 205 > Printing from a Computer > > Photo Print Settings > Advanced Guide Printing with the Bundled Application Software Cropping Photos (Photo Print) A073 Cropping Photos (Photo Print) Cropping a photo is the act of removing the unnecessary portions of the photo by selecting the necessary portions.
- Page 206 Page top...
- Page 207 > Printing from a Computer > > Photo Print Settings > Advanced Guide Printing with the Bundled Application Software Printing Dates on Photos (Photo Print) A074 Printing Dates on Photos (Photo Print) To print the date the photo was taken on the photo, click (Date Settings) in the Layout/Print screen, then select the Print date checkbox in the Date Settings dialog box.
- Page 208 > Printing from a Computer > > Photo Print Settings > Advanced Guide Printing with the Bundled Application Software Printing Multiple Photos on One Page A076 Printing Multiple Photos on One Page You can print multiple photos on one page by selecting a multiple-photo layout in the Layout/Print screen. Note See the following section for details on how to select photos.
-
Page 209: Printing An Index
> Printing from a Computer > > Photo Print Settings > Advanced Guide Printing with the Bundled Application Software Printing an Index A077 Printing an Index You can print an index of selected photos. An index print shows the thumbnails of the photos in one page. - Page 210 Page top...
- Page 211 > Printing from a Computer > > Photo Print Settings > Advanced Guide Printing with the Bundled Application Software Printing ID Photos (ID Photo Print) A078 Printing ID Photos (ID Photo Print) You can print a variety of ID photos. Important The photo may not qualify as an official ID photo depending on its use.
- Page 212 To display the Preferences dialog box, click (Settings) or select Preferences... from the File menu. ID photos can only be printed on 4"x6" 10x15cm paper. Page top...
- Page 213 > Printing from a Computer > > Photo Print Settings > Advanced Guide Printing with the Bundled Application Software Printing Photo Information A079 Printing Photo Information You can print the photo and the Exif information side by side. To print them, select Letter 8.5"x11" or A4 for Paper Size in the Select Paper screen, and select Captured Info from the layouts in the Layout/Print screen.
-
Page 214: Saving Photos
> Printing from a Computer > > Photo Print Settings > Advanced Guide Printing with the Bundled Application Software Saving Photos A092 Saving Photos You can save edited photos. The information of cropping and layout can be saved. Click Save in the Layout/Print screen. When the Save As dialog box appears, specify the save location and file name, then click Save. -
Page 215: Opening Saved Files
> Printing from a Computer > > Photo Print Settings > Advanced Guide Printing with the Bundled Application Software Opening Saved Files A093 Opening Saved Files You can open files created with Easy-PhotoPrint EX. Click Library from Menu. The Open dialog box appears. You can check files created and saved with Easy-PhotoPrint EX in icon view (only for Windows 7/ Windows Vista) or thumbnail view. - Page 216 Page top...
-
Page 217: Other Settings
> Printing from a Computer > > Other Settings Advanced Guide Printing with the Bundled Application Software A102 Other Settings Changing Layout Changing Background Adding Photos Swapping Positions of Photos Replacing Photos Changing Position, Angle and Size of Photos Cropping Photos Framing Photos Printing Dates on Photos Attaching Comments to Photos... -
Page 218: Changing Layout
> Printing from a Computer > > > Advanced Guide Printing with the Bundled Application Software Other Settings Changing Layout A080 Changing Layout You can change the layout of each page separately. (Change Layout). Select the page you want to change the layout of in the Edit screen, then click Select the layout you want to use in the Change Layout dialog box and click OK. - Page 219 Important The layouts of all pages are changed to the selected layout. All images that do not fit in the new layout will be collected on the last page. Note The layouts that can be selected may vary depending on the Paper Size and Orientation. Layout Print Important If the new layout has a different number of frames per page from the current layout, the following will...
- Page 220 Page top...
- Page 221 > Printing from a Computer > > > Advanced Guide Printing with the Bundled Application Software Other Settings Changing Background A081 Changing Background You can change the background of each page. Important You cannot change the background of the Stickers and Layout Print. Click Background...
- Page 222 Select from samples will be displayed only if Album has been selected. Various backgrounds are available on our website besides those saved in the application. Click Search backgrounds... to access the Canon website from which you can download additional materials for free.
- Page 223 Note See Help for details on how to set the background in the Change Background dialog box. Page top...
-
Page 224: Adding Photos
> Printing from a Computer > > Advanced Guide Printing with the Bundled Application Software Other Settings > Adding Photos A082 Adding Photos You can add images to pages. Select the page you want to add photos to in the Edit screen, then click (Add Image). - Page 225 Page top...
- Page 226 > Printing from a Computer > > > Advanced Guide Printing with the Bundled Application Software Other Settings Swapping Positions of Photos A083 Swapping Positions of Photos You can swap the positions of images. Click (Swap Image Positions) in the Edit screen. Note The screen(s) for Album printing is (are) used as example(s) in the following descriptions.
- Page 227 > Printing from a Computer > > > Advanced Guide Printing with the Bundled Application Software Other Settings Replacing Photos A084 Replacing Photos You can replace an image with another image. Select the image you want to replace in the Edit screen, then click (Replace Selected Image).
- Page 228 > Printing from a Computer > > > Advanced Guide Printing with the Bundled Application Software Other Settings Changing Position, Angle and Size of Photos A085 Changing Position, Angle and Size of Photos You can adjust the position, angle and size of images. Select the image of which you want to change the position or size in the Edit screen and click (Edit Image) or double-click the image.
-
Page 229: Cropping Photos
> Printing from a Computer > > > Advanced Guide Printing with the Bundled Application Software Other Settings Cropping Photos A086 Cropping Photos Cropping an image is the act of removing the unnecessary portions of the image by selecting the necessary portions. - Page 230 > Printing from a Computer > > > Framing Advanced Guide Printing with the Bundled Application Software Other Settings Photos A087 Framing Photos You can add frames to images. Important You cannot add frames to images in Stickers and Layout Print. Select the image you want to frame in the Edit screen and click (Edit Image) or double-click the image.
- Page 231 Various frames are available on our website besides those saved in the application. Click Search frames... to access the Canon website from which you can download additional materials for free. Internet connection is required to access the website. Internet connection fees apply.
- Page 232 > Printing from a Computer > > > Printing Advanced Guide Printing with the Bundled Application Software Other Settings Dates on Photos A088 Printing Dates on Photos You can print dates on images. Select the image you want to print the date on in the Edit screen and click (Edit Image) or double- click the image.
- Page 233 Page top...
- Page 234 > Printing from a Computer > > > Advanced Guide Printing with the Bundled Application Software Other Settings Attaching Comments to Photos A089 Attaching Comments to Photos You can attach comments to images and display them in your album. The photo name, shooting date and comments are displayed (from top to bottom) in a comment box.
- Page 235 Select the Show comment box checkbox. Select the checkboxes of the items you want to display, and enter comments. Set the size and color of font, and position of the comments, etc., then click OK. Note See Help for details on comments. Page top...
- Page 236 > Printing from a Computer > > Advanced Guide Printing with the Bundled Application Software Other Settings > Adding Text to Photos A090 Adding Text to Photos You can add text to photos. Click (Add Text) in the Edit screen and drag the mouse over the area in which you want to add text. Note The screen(s) for Album printing is (are) used as example(s) in the following descriptions.
- Page 237 > Printing from a Computer > > > Saving Advanced Guide Printing with the Bundled Application Software Other Settings A091 Saving You can save edited items. Click Save in the Edit or Print Settings screen. Note The screen(s) for Album printing is (are) used as example(s) in the following descriptions. The screen(s) may vary depending on what you create.
-
Page 238: Setting Holidays
> Printing from a Computer > > > Setting Advanced Guide Printing with the Bundled Application Software Other Settings Holidays A099 Setting Holidays You can add holidays to your calendar. Click Set Holidays... in the Page Setup screen of Calendar, or click (Setup Period/Holiday) in the Edit screen and click Set Holidays... - Page 239 Enter the name in Holiday Name and specify the date. Select the Set as Holiday checkbox to display that day as a holiday in your calendar. Note See Help for details on each dialog box. Page top...
- Page 240 > Printing from a Computer > > > Setting Advanced Guide Printing with the Bundled Application Software Other Settings Calendar Display A100 Setting Calendar Display You can customize the calendar display (fonts, lines, colors, position, size, etc.). Click Settings... in the Page Setup screen of Calendar, or select a calendar in the Edit screen and click (Setup Calendar) to display the Calendar Settings dialog box.
- Page 241 > Printing from a Computer > > > Opening Advanced Guide Printing with the Bundled Application Software Other Settings Saved Files A103 Opening Saved Files You can open files created with Easy-PhotoPrint EX. Click Library from Menu. The Open dialog box appears. You can check files created and saved with Easy-PhotoPrint EX in icon view (only for Windows 7/ Windows Vista) or thumbnail view.
- Page 242 Easy-PhotoPrint EX supports the following file formats (extensions). - Easy-PhotoPrint EX Album file (.el1) - Easy-PhotoPrint EX Stickers file (.el2) - Easy-PhotoPrint EX Calendar file (.el4) - Easy-PhotoPrint EX Layout file (.el5) You can open files created with Easy-PhotoPrint EX with the following methods, besides from Library in Menu.
- Page 243 > Повний посібник Друк із комп’ютера > Друк за допомогою іншого програмного забезпечення Друк за допомогою іншого програмного забезпечення Різні методи друку Змінення якості друку та корекція даних зображення Огляд драйвера принтера На початок сторінки...
-
Page 244: Various Printing Methods
> Printing from a Computer > Printing with Other Application Software > Various Printing Methods Advanced Guide Various Printing Methods Printing with Easy Setup Setting a Page Size and Orientation Setting the Number of Copies and Printing Order Setting the Stapling Margin Execute Borderless Printing Fit-to-Page Printing Scaled Printing... -
Page 245: Printing With Easy Setup
> Printing from a Computer > Printing with Other Application Software > > Advanced Guide Various Printing Methods Printing with Easy Setup P000 Printing with Easy Setup The simple setup procedure for carrying out appropriate printing on this machine, is as follows: Open the printer driver setup window Select a frequently used profile... -
Page 246: Setting A Page Size And Orientation
> Printing from a Computer > Printing with Other Application Software > > Advanced Guide Various Printing Methods Setting a Page Size and Orientation P400 Setting a Page Size and Orientation The paper size and orientation are essentially determined by the application. When the page size and orientation set for Page Size and Orientation on the Page Setup tab are same as those set with the application, you do not need to select them on the Page Setup tab. - Page 247 Page top...
-
Page 248: Setting The Number Of Copies And Printing Order
> Printing from a Computer > Printing with Other Application Software > > Advanced Guide Various Printing Methods Setting the Number of Copies and Printing Order P001 Setting the Number of Copies and Printing Order The procedure for specifying the number of copies and printing order is as follows: You can also set the number of copies on the Quick Setup tab. - Page 249 : Print from Last Page: /Collate : Print from Last Page: /Collate Complete the setup Click OK. When you execute print, the specified number of copies will be printed with the specified printing order. Important When the application software that you used to create the document has the same function, give priority to the printer driver settings.
-
Page 250: Setting The Stapling Margin
> Printing from a Computer > Printing with Other Application Software > > Advanced Guide Various Printing Methods Setting the Stapling Margin P002 Setting the Stapling Margin The procedure for setting the staple side and the margin width is as follows: Open the printer driver setup window Specify the side to be stapled... - Page 251 Note The printer automatically reduces the print area depending on the staple position margin. Complete the setup Click OK on the Page Setup tab. When you execute print, the data is printed with the specified staple side and margin width. Important Staple Side and Specify Margin...
-
Page 252: Execute Borderless Printing
> Printing from a Computer > Printing with Other Application Software > > Advanced Guide Various Printing Methods Execute Borderless Printing P003 Execute Borderless Printing The borderless printing function allows you to print data without any margin by enlarging the data so that it extends slightly off the paper. - Page 253 Check the paper size Check the Page Size list. When you want to change, select another page size from the list. The list displays only sizes that can be used for borderless printing. Adjust the amount of extension from the paper If necessary, adjust the amount of extension using the Amount of Extension slider.
- Page 254 border before printing. Page top...
-
Page 255: Fit-To-Page Printing
> Printing from a Computer > Printing with Other Application Software > > Fit- Advanced Guide Various Printing Methods to-Page Printing P004 Fit-to-Page Printing The procedure for printing a document that is automatically enlarged or reduced to fit the page size to be used is as follows: Open the printer driver setup window... - Page 256 The current settings are displayed in the settings preview on the left side of the printer driver. Complete the setup Click OK. When you execute print, the document will be enlarged or reduced to fit to the page size. Page top...
-
Page 257: Scaled Printing
> Printing from a Computer > Printing with Other Application Software > > Advanced Guide Various Printing Methods Scaled Printing P005 Scaled Printing The procedure for printing a document with pages enlarged or reduced is as follows: Open the printer driver setup window Set scaled printing Select Scaled from the Page Layout list on the Page Setup tab. - Page 258 Specify a scaling factor Directly type in a value into the Scaling box. The current settings are displayed in the settings preview on the left side of the printer driver. Complete the setup Click OK. When you execute print, the document will be printed with the specified scale. Important When the application software which you created the original has the scaled printing function, configure the settings on your application software.
- Page 259 Selecting Scaled changes the printable area of the document. Page top...
-
Page 260: Page Layout Printing
> Printing from a Computer > Printing with Other Application Software > > Advanced Guide Various Printing Methods Page Layout Printing P006 Page Layout Printing The page layout printing function allows you to print more than one page image on a single sheet of paper. - Page 261 Pages To change the number of pages to be printed on a single sheet of paper, select the number of pages from the list. You can also set 2-Page Print or 4-Page Print on the Quick Setup tab. Page Order To change the page arrangement order, select an icon from the list to change the page placement order.
-
Page 262: Poster Printing
> Printing from a Computer > Printing with Other Application Software > > Advanced Guide Various Printing Methods Poster Printing P401 Poster Printing The poster printing function allows you to enlarge image data, divide it into several pages, and print these pages on separate sheets of paper. - Page 263 Set the number of image divisions and the pages to be printed If necessary, click Specify..., specify the following settings in the Poster Printing dialog box, and then click OK. Image Divisions Select the number of divisions (vertical x horizontal). As the number of divisions increases, the number of sheets used for printing increases, allowing you to create a larger poster.
- Page 264 Note Click the deleted pages to display them again. Right-click the settings preview to select Print all pages or Delete all pages. Complete the setup After completing the page selection, click OK. When you execute print, only specified pages will be printed. Important When Poster is selected, the Duplex Printing, Staple Side and Print from Last Page appear grayed out and are unavailable.
-
Page 265: Booklet Printing
> Printing from a Computer > Printing with Other Application Software > > Advanced Guide Various Printing Methods Booklet Printing P402 Booklet Printing The booklet printing function allows you to print data for a booklet. Data is printed on both sides of the paper. - Page 266 Margin for stapling Select which side should the stapling margin be on when the booklet is completed. Insert blank page To leave one side of a sheet blank, check the check box, and select the page to be left blank. Margin Enter the margin width.
-
Page 267: Duplex Printing
> Printing from a Computer > Printing with Other Application Software > > Advanced Guide Various Printing Methods Duplex Printing P007 Duplex Printing The procedure for printing data on both sides of a sheet of paper is as follows: You can also set duplex printing in Additional Features on the Quick Setup tab. Open the printer driver setup window Set duplex printing... - Page 268 Complete the setup Click OK on the Page Setup tab. When you execute print, the document is first printed on one side of a sheet of paper. After one side is printed, reload the paper correctly according to the message. Then click OK to print the opposite side.
-
Page 269: Stamp/Background Printing
> Printing from a Computer > Printing with Other Application Software > > Advanced Guide Various Printing Methods Stamp/Background Printing P403 Stamp/Background Printing Stamp or Background may be unavailable when certain printer drivers are used. The Stamp function allows you to print a stamp text or a bitmap over or behind document data. It also allows you to print date, time and user name. - Page 270 With the XPS printer driver, the Stamp/Background... button has become the Stamp... button and only the stamp function can be used. Select a stamp Check the Stamp check box, and select the stamp to be used from the list. The current settings are displayed in the settings preview on the left side of the Page Setup tab. Set the stamp details If necessary, specify the following settings, and then click OK.
- Page 271 Complete the setup Click OK on the Page Setup tab. When you execute print, the data is printed with the specified background. Important When Borderless is selected, the Stamp/Background... (Stamp...) button appears grayed out and is unavailable. Note The stamp and background are not printed on blank sheets inserted with the Insert blank page function of booklet printing.
-
Page 272: Registering A Stamp
> Printing from a Computer > Printing with Other Application Software > > Advanced Guide Various Printing Methods Stamp/Background Printing > Registering a Stamp P404 Registering a Stamp This feature may be unavailable when certain printer drivers are used. You can create and register a new stamp. You can also change and register some of the settings of an existing stamp. - Page 273 Click Define Stamp... The Stamp Settings dialog box opens. Configure the stamp while viewing the preview window Stamp tab Select Text, Bitmap, or Date/Time/User Name that matches your purpose for Stamp Type. For Text registration, the characters must already be entered in Stamp Text. If necessary, change the TrueType Font, Style, Size, and Outline settings.
- Page 274 Check the Stamp check box in the Stamp/Background (Stamp) dialog box, and then select the title of the stamp to be changed from the Stamp list. Click Define Stamp... The Stamp Settings dialog box opens. Configure the stamp while viewing the preview window Overwrite save the stamp Click Save overwrite on the Save settings tab.
-
Page 275: Registering Image Data To Be Used As A Background
> Printing from a Computer > Printing with Other Application Software > > Advanced Guide Various Printing Methods Stamp/Background Printing > Registering Image Data to be Used as a Background P405 Registering Image Data to be Used as a Background This feature may be unavailable when certain printer drivers are used. - Page 276 and Background cannot be used. Click Select Background... The Background Settings dialog box opens. Select the image data to be registered to the background Click Select File..Select the target bitmap file (.bmp), and then click Open. Specify the following settings while viewing the preview window Layout Method Select how the background image data is to be placed.
- Page 277 Save the background Click Save overwrite on the Save settings tab. When you want to save the background with a different title, enter a new title in the Title box and click Save. Click OK when the confirmation message appears. Complete the setup Click OK.
-
Page 278: Printing An Envelope
P406 Printing an Envelope If you are using the XPS printer driver, replace "Canon IJ Status Monitor" with "Canon IJ XPS Status Monitor" when reading this information. For details on how to load an envelope into the machine, refer to "Loading Paper" in the manual: Basic Guide. - Page 279 To hide the guide messages, check the Do not show this message again. check box. To show the guide again, click the View Printer Status... button on the Maintenance tab, and start the Canon IJ Status Monitor. Then click Envelope Printing from Display Guide Message of the Option menu, and change the setting to on.
-
Page 280: Displaying The Print Results Before Printing
P009 Displaying the Print Results before Printing If you are using the XPS printer driver, replace "Canon IJ Status Monitor" with "Canon IJ XPS Status Monitor" when reading this information. You can display and check the print result before printing. -
Page 281: Setting Paper Dimensions (Custom Size)
> Printing from a Computer > Printing with Other Application Software > > Advanced Guide Various Printing Methods Setting Paper Dimensions (Custom Size) P010 Setting Paper Dimensions (Custom Size) You can specify the height and width of paper when its size cannot be selected from the Page Size. Such a paper size is called "custom size."... - Page 282 Set the custom paper size Specify Units, and enter the Width and Height of the paper to be used. Then click OK. Complete the setup Click OK on the Page Setup tab. When you execute print, the data is printed with the specified paper size. Page top...
-
Page 283: Changing The Print Quality And Correcting Image Data
> Printing from a Computer > Printing with Other Application Software > Changing the Print Quality and Advanced Guide Correcting Image Data Changing the Print Quality and Correcting Image Data Selecting a Combination of the Print Quality Level and a Halftoning Method Printing a Color Document in Monochrome Specifying Color Correction Optimal Photo Printing of Image Data... -
Page 284: Selecting A Combination Of The Print Quality Level And A Halftoning Method
> Printing from a Computer > Printing with Other Application Software > Changing the Print Quality and Advanced Guide Correcting Image Data > Selecting a Combination of the Print Quality Level and a Halftoning Method P011 Selecting a Combination of the Print Quality Level and a Halftoning Method You can individually set the combined representation method for the print quality level and the halftoning method. - Page 285 Setting the print quality and halftone expression method Move the Quality slider to select the quality level. Select the expression method in Halftoning and click OK. Note Halftones refer to color shades between the darkest color and the brightest color. The printer replaces the color shades with a collection of small dots to express the halftones.
-
Page 286: Printing A Color Document In Monochrome
> Printing from a Computer > Printing with Other Application Software > Changing the Print Quality and Advanced Guide Correcting Image Data > Printing a Color Document in Monochrome P012 Printing a Color Document in Monochrome The procedure for printing a color document in monochrome is as follows: You can also set a grayscale printing in Additional Features on the Quick Setup tab. - Page 287 Note During Grayscale Printing, color inks may be used as well as black ink. Page top...
-
Page 288: Specifying Color Correction
You can specify the color correction method suited to the type of document to be printed. Normally, the printer driver adjusts the colors by using Canon Digital Photo Color so that data is printed with color tints that most people prefer. This method is suitable for printing sRGB data. - Page 289 Driver Matching By using Canon Digital Photo Color, you can print sRGB data with color tints that most people prefer. Driver Matching is the default setting for color correction. ICM/ICC Profile Matching Adjusts the colors by using an ICC profile when printing.
-
Page 290: Optimal Photo Printing Of Image Data
Describes the procedure for printing sRGB data by using the color correction function of the printer driver. To print using Canon Digital Photo Color The printer prints data with color tints that most people prefer, reproducing colors of the original image data and producing three-dimensional effects and high, sharp contrasts. -
Page 291: Adjusting Colors With The Printer Driver
You can specify the color correction function of the printer driver to print sRGB data with color tints that most people prefer through the use of Canon Digital Photo Color. When printing from an application software that can identify ICC profiles and allows you to specify them, use a printing ICC profile in the application software, and select settings for color management. - Page 292 Set the other items If necessary, click Color Adjustment tab, and adjust the color balance (Cyan, Magenta, Yellow) and adjust Brightness, Intensity, and Contrast settings, and then click OK. Complete the setup Click OK on the Main tab. When you execute print, the printer driver adjusts the colors when printing the data. Related Topics Selecting a Combination of the Print Quality Level and a Halftoning Method Specifying Color Correction...
-
Page 293: Printing With Icc Profiles
Specify an ICC Profile from the Application Software and Print the Data When you print the editing and touch-up results of Adobe Photoshop, Canon Digital Photo Professional, or any application software that allows you to specify input and printing ICC profiles, you print by effectively using the color space of the input ICC profile specified in the image data. - Page 294 Select color correction Click Matching tab, and select None for Color Correction. Set the other items If necessary, click Color Adjustment tab, and adjust the color balance (Cyan, Magenta, Yellow) and adjust Brightness, Intensity, and Contrast settings, and then click OK. Complete the setup Click OK on the Main tab.
- Page 295 Select the print quality For Print Quality, select High, Standard, or Fast according to your purpose. Select the manual color adjustment Select Manual for Color/Intensity, and click Set..Manual Color Adjustment dialog box opens. Select color correction Click Matching tab, and select ICM or ICC Profile Matching for Color Correction. Select the input profile Select an Input Profile that matches the color space of the image data.
- Page 296 Select Adobe RGB (1998). Important When the application software specifies an input profile, the input profile setting of the printer driver becomes invalid. When no input ICC profiles are installed on your computer, Adobe RGB (1998) will not be displayed. You can install ICC profiles from the Setup CD-ROM that accompanies the machine. Set the other items If necessary, click Color Adjustment tab, and adjust the color balance (Cyan, Magenta, Yellow) and adjust Brightness, Intensity, and Contrast settings, and then click OK.
-
Page 297: Adjusting Color Balance
> Printing from a Computer > Printing with Other Application Software > Changing the Print Quality and Advanced Guide Correcting Image Data > Adjusting Color Balance P017 Adjusting Color Balance You can adjust the color tints when printing. Since this function adjusts color balance of the output by changing the ink ratios of each color, it changes the total color balance of the document. - Page 298 Adjust color balance There are individual sliders for Cyan, Magenta, and Yellow. Each color becomes stronger when the corresponding slider is moved to the right, and becomes weaker when the corresponding slider is moved to the left. For example, when cyan becomes weaker, the color red becomes stronger. You can also directly enter a value linked to the slider.
-
Page 299: Adjusting Brightness
> Printing from a Computer > Printing with Other Application Software > Changing the Print Quality and Advanced Guide Correcting Image Data > Adjusting Brightness P018 Adjusting Brightness You can change the brightness of the overall image data during printing. This function does not change pure white or pure black but it changes the brightness of the intermediate colors. - Page 300 Complete the setup Click OK on the Main tab. When you execute print, the data is printed at the specified brightness. Related Topics Selecting a Combination of the Print Quality Level and a Halftoning Method Specifying Color Correction Adjusting Color Balance Adjusting Intensity Adjusting Contrast Page top...
-
Page 301: Adjusting Intensity
> Printing from a Computer > Printing with Other Application Software > Changing the Print Quality and Advanced Guide Correcting Image Data > Adjusting Intensity P019 Adjusting Intensity You can dilute (brighten) or intensify (darken) the colors of the overall image data during printing. The following sample shows the case when the intensity is increased so that all colors become more intense when the image data is printed. - Page 302 Important Adjust the slider gradually. Complete the setup Click OK on the Main tab. When you execute print, the image data is printed with the adjusted intensity. Related Topics Selecting a Combination of the Print Quality Level and a Halftoning Method Specifying Color Correction Adjusting Color Balance Adjusting Brightness...
-
Page 303: Adjusting Contrast
> Printing from a Computer > Printing with Other Application Software > Changing the Print Quality and Advanced Guide Correcting Image Data > Adjusting Contrast P020 Adjusting Contrast You can adjust the image contrast during printing. To make the differences between the light and dark portions of images greater and more distinct, increase the contrast. - Page 304 After adjusting each color, click OK. Important Adjust the slider gradually. Complete the setup Click OK on the Main tab. When you execute print, the image is printed with the adjusted contrast. Related Topics Selecting a Combination of the Print Quality Level and a Halftoning Method Specifying Color Correction Adjusting Color Balance Adjusting Brightness...
-
Page 305: Simulating An Illustration
> Printing from a Computer > Printing with Other Application Software > Changing the Print Quality and Advanced Guide Correcting Image Data > Simulating an Illustration P021 Simulating an Illustration This feature is unavailable when the XPS printer driver is used. With the Simulate Illustration function, you can print full-color or 256-color image data so that it looks like a hand-drawn illustration. - Page 306 > Printing from a Computer > Printing with Other Application Software > Changing the Print Quality and Advanced Guide Correcting Image Data > Representing Image Data with a Single Color P022 Representing Image Data with a Single Color This feature is unavailable when the XPS printer driver is used. With the Monochrome Effects function, you can benefit from coloring effects such as changing a photograph to a sepia tone image.
- Page 307 Important When the Grayscale Printing check box on the Main tab is checked, Monochrome Effects appears grayed out and is unavailable. Page top...
- Page 308 > Printing from a Computer > Printing with Other Application Software > Changing the Print Quality and Advanced Guide Correcting Image Data > Presenting Image Data with Vivid Colors P023 Presenting Image Data with Vivid Colors This feature is unavailable when the XPS printer driver is used. The Vivid Photo function allows you to print image data with vivid colors.
-
Page 309: Smoothing Jagged Outlines
> Printing from a Computer > Printing with Other Application Software > Changing the Print Quality and Advanced Guide Correcting Image Data > Smoothing Jagged Outlines P407 Smoothing Jagged Outlines This feature is unavailable when the XPS printer driver is used. The Image Optimizer function reduces the jagged outlines that are produced when photos and graphics are enlarged with your application. - Page 310 It may take longer to complete printing when the image optimizer is used. Page top...
-
Page 311: Changing Color Properties To Improve Coloration
> Printing from a Computer > Printing with Other Application Software > Changing the Print Quality and Advanced Guide Correcting Image Data > Changing Color Properties to Improve Coloration P408 Changing Color Properties to Improve Coloration This feature is unavailable when the XPS printer driver is used. The Photo Optimizer PRO function corrects colors of digital camera images or scanned images. - Page 312 Click OK. When you execute print, the printer corrects the photo coloring and prints out the photos. Important Photo Optimizer PRO does not function when: Background is set in the Stamp/Background dialog box on the Page Setup tab. Define Stamp... is selected in the Stamp/Background dialog box on the Page Setup tab, and the bitmapped stamp is configured.
- Page 313 > Printing from a Computer > Printing with Other Application Software > Changing the Print Quality and Advanced Guide Correcting Image Data > Reducing Photo Noise P024 Reducing Photo Noise This feature is unavailable when the XPS printer driver is used. With the Photo Noise Reduction function, you can reduce the digital camera noise and improve the image quality of the digital print.
- Page 314 Note It is recommended to select Normal for most cases. Select Strong if you have selected Normal and the noise still bothers you. Depending on application software or resolution of image data, effects of digital camera noise reduction may not be obvious. When this function is used for other than photos taken by digital cameras, image may be distorted.
-
Page 315: Overview Of The Printer Driver
Printing with Other Application Software > Overview of the Printer Driver Advanced Guide Overview of the Printer Driver Printer Driver Operations Canon IJ Printer Driver XPS Printer Driver How to Open the Printer Driver Setup Window Maintenance Tab Canon IJ Status Monitor... - Page 316 Printing an Envelope Displaying the Print Results before Printing Overview of the Printer Driver Setting Paper Dimensions (Custom Size) Canon IJ Printer Driver XPS Printer Driver Changing the Print Quality and Correcting Image Data How to Open the Printer Driver Setup Window...
-
Page 317: Canon Ij Printer Driver
P025 Canon IJ Printer Driver The Canon IJ printer driver is software that is installed on your computer for printing data on this machine. The Canon IJ printer driver converts the print data created by your Windows application into data that your printer can understand, and sends the converted data to the printer. -
Page 318: Xps Printer Driver
Printing with Other Application Software > Overview of the Printer Driver Advanced Guide > Canon IJ Printer Driver > XPS Printer Driver P416 XPS Printer Driver The following two printer drivers can be installed on Windows Vista SP1 or later:... -
Page 319: How To Open The Printer Driver Setup Window
> Overview of the Printer Driver Advanced Guide > Canon IJ Printer Driver > How to Open the Printer Driver Setup Window P409 How to Open the Printer Driver Setup Window The printer driver setup window can be displayed through the application software in use or the Start menu of the Windows. -
Page 320: Maintenance Tab
Printing with Other Application Software > Overview of the Printer Driver Advanced Guide > Canon IJ Printer Driver > Maintenance Tab P410 Maintenance Tab The Maintenance tab allows you to perform machine maintenance or change the settings of the machine. -
Page 321: Canon Ij Status Monitor
When Errors Occur The Canon IJ Status Monitor is automatically displayed if an error occurs (e.g., if the printer runs out of paper or if the ink is low). In such cases, take the appropriate action as described. -
Page 322: Canon Ij Preview
P412 Canon IJ Preview The Canon IJ Preview is an application software that displays what the print result will look like before a document is actually printed. The preview reflects the information that is set within the printer driver and allows you to check the document layout, print order, and number of pages. - Page 323 > Друк із панелі керування апарата Повний посібник Друк із панелі керування апарата Копіювання На початок сторінки...
- Page 324 > > Копіювання Повний посібник Друк із панелі керування апарата Копіювання Створення копій Зменшення або збільшення копії Використання зручних функцій копіювання На початок сторінки...
- Page 325 > > Повний посібник Друк із панелі керування апарата Копіювання > Створення копій U031 Створення копій Щоб отримати інформацію про основну процедуру створення копій, див. розділ Копіювання Зменшення або збільшення копії Використання зручних функцій копіювання На початок сторінки...
- Page 326 > > > Зменшення або збільшення копії Повний посібник Друк із панелі керування апарата Копіювання U033 Зменшення або збільшення копії Функція копіювання за розміром сторінки дозволяє копіювати оригінал, розмір якого автоматично збільшується або зменшується відповідно до вибраного розміру сторінки. Примітка Можна...
- Page 327 Примітка Натисніть кнопку Стоп/Скинути (Stop/Reset) , щоб повернути кількість копій на значення 1. Натисніть кнопку Колір (Color) для виконання копіювання у кольорі або кнопку Чорний (Black) — для виконання чорно-білого копіювання. Апарат розпочне копіювання з підгонкою до сторінки. Зніміть оригінал зі скла експонування після завершення копіювання. Щоб...
- Page 328 > > Повний посібник Друк із панелі керування апарата Копіювання > Використання зручних функцій копіювання U036 Використання зручних функцій копіювання Вибір розміру сторінки між A4 та Letter Можна вибирати розмір паперу, завантаженого в задній лоток, між A4 та Letter. Вибір розміру сторінки між A4 та Letter Копія...
- Page 329 > > > > Повний посібник Друк із панелі керування апарата Копіювання Використання зручних функцій копіювання Вибір розміру сторінки між A4 та Letter U097 Вибір розміру сторінки між A4 та Letter Можна вибирати розмір паперу, завантаженого в задній лоток, між A4 та Letter. Ця...
- Page 330 > > > > Повний посібник Друк із панелі керування апарата Копіювання Використання зручних функцій копіювання Копіювання без полів (Копія без полів) U039 Копіювання без полів (Копія без полів) Можна копіювати зображення на фотопапір таким чином, щоб вони заповнювали аркуш, не залишаючи...
- Page 331 Примітка Натисніть кнопку Стоп/Скинути (Stop/Reset) , щоб повернути кількість копій на значення 1. Натисніть кнопку Колір (Color) для виконання копіювання у кольорі або кнопку Чорний (Black) — для виконання чорно-білого копіювання. Апарат розпочне копіювання без полів. Зніміть оригінал зі скла експонування після завершення копіювання. Щоб...
- Page 332 > Сканування Повний посібник Сканування Сканування зображень Сканування з панелі керування апарата Сканування за допомогою стандартного програмного забезпечення Сканування за допомогою іншого програмного забезпечення Інші методи сканування На початок сторінки...
-
Page 333: Сканування Зображень
> > Сканування зображень Повний посібник Сканування Сканування зображень Сканування зображень Перед початком сканування Розміщення документів На початок сторінки... - Page 334 > > > Сканування зображень Повний посібник Сканування Сканування зображень U046 Сканування зображень За допомогою цього апарата можна легко сканувати зображення та зберігати їх на комп’ютері. Крім того, можна сканувати зображення, вказуючи додаткові параметри з комп’ютера за допомогою прикладної програми. Виберіть...
- Page 335 > > > Перед початком сканування Повний посібник Сканування Сканування зображень U047 Перед початком сканування Переконайтеся, що оригінал, який потрібно зісканувати, відповідає вимогам, встановленим для оригіналу, який потрібно розташувати на склі експонування. Щоб отримати інформацію про вимоги та способи розміщення оригіналу на склі експонування, див. розділ...
-
Page 336: Placing Documents
> > Scanning Images > Placing Documents Advanced Guide Scanning S005 Placing Documents Learn how to place documents on the machine's Platen. Place documents correctly according to the type of document to be scanned. Otherwise, documents may not be scanned correctly. Important Do not place objects on the Document Cover. - Page 337 scanned. that cannot be placed away from the edges/ arrow (alignment mark) of the Platen may be saved as PDF files. To save in a format other than PDF, scan by specifying the file format. 0.039 inches (1 mm) Placing Multiple Documents Allow 0.39 inches (1 cm) or more space between the edges (diagonally striped area) of the Platen and documents, and between documents.
- Page 338 > > Сканування з панелі керування апарата Повний посібник Сканування Сканування з панелі керування апарата Переадресація даних сканування на комп’ютер за допомогою панелі керування апарата Додаток: Різні параметри сканування На початок сторінки...
- Page 339 > > Повний посібник Сканування Сканування з панелі керування апарата > Переадресація даних сканування на комп’ютер за допомогою панелі керування апарата U051 Переадресація даних сканування на комп’ютер за допомогою панелі керування апарата Можна переадресувати дані сканування на комп’ютер за допомогою панелі керування апарата. Апарат...
- Page 340 Щоб отримати інформацію про спосіб розміщення оригіналу на склі експонування, див. розділ Розміщення документів Натисніть кнопку СКАН. . Починається сканування, і зображення переадресуються на комп’ютер відповідно до параметрів, указаних у програмі MP Navigator EX. Зніміть оригінал зі скла експонування після завершення сканування. Укажіть...
- Page 341 > > > Appendix: Various Scan Advanced Guide Scanning Scanning with Using the Operation Panel of the Machine Settings S010 Appendix: Various Scan Settings Specifying how to respond when scanning using the Operation Panel of the machine Selecting a Response to Commands from the Operation Panel Using MP Navigator EX Page top...
- Page 342 > > > Appendix: Various Scan Advanced Guide Scanning Scanning with Using the Operation Panel of the Machine > Selecting a Response to Commands from the Operation Panel Using MP Navigator EX Settings S007 Selecting a Response to Commands from the Operation Panel Using MP Navigator EX MP Navigator EX enables you to specify how to respond when scanning using the Operation Panel of the machine.
- Page 343 Note See the section below for details. Scanner Button Settings Tab (Save to PC) Click OK. The operation will be performed according to the settings when you start scanning using the Operation Panel of the machine. Page top...
- Page 344 > Повний посібник Сканування > Сканування за допомогою стандартного програмного забезпечення Сканування за допомогою стандартного програмного забезпечення Що таке MP Navigator EX (програмне забезпечення з комплекту сканера)? Спроба сканування Корисні функції MP Navigator EX Утилізація зображень у програмі MP Navigator EX Екрани...
- Page 345 > > Scanning with the Bundled Application Software > What Is MP Navigator EX (Supplied Advanced Guide Scanning Scanner Software)? S101 What Is MP Navigator EX (Supplied Scanner Software)? MP Navigator EX is an application that enables you to easily scan photos and documents. It is suitable even for beginners.
- Page 346 Scan/Import Window Use the Scan/Import window to scan photos and documents. View & Use Window Use the View & Use window to select what you want to do with the scanned images. Note See " File Formats " for data formats (extensions) supported by MP Navigator EX. Page top...
-
Page 347: Let's Try Scanning
> > Scanning with the Bundled Application Software Advanced Guide Scanning > Let's Try Scanning S100 Let's Try Scanning Try scanning using MP Navigator EX. Starting MP Navigator EX Starting MP Navigator EX Scanning with a simple operation Easy Scanning with Auto Scan Scanning documents, photos, magazines, etc. - Page 348 Let's Try Scanning Navigator EX S111 Starting MP Navigator EX Starting MP Navigator EX From the Start menu, select All Programs > Canon Utilities > MP Navigator EX 4.0 > MP Navigator EX 4.0. MP Navigator EX starts. Starting One-click Mode Click (Switch Mode) at the bottom left of the screen.
- Page 349 Note Select the Show this window at startup checkbox in the Navigation Mode screen to always open the Navigation Mode screen at startup. If this checkbox is not selected, the last used screen appears at startup. Page top...
-
Page 350: Easy Scanning With Auto Scan
> > Scanning with the Bundled Application Software > Advanced Guide Scanning Let's Try Scanning > Easy Scanning with Auto Scan S108 Easy Scanning with Auto Scan Scan documents easily by automatically detecting the document type. Important Supported document types are photos, postcards, business cards, magazines, newspapers, text documents and BD/DVD/CD. - Page 351 A message about placing documents appears. Click Open Manual to open this guide (if it is installed). Click OK to start scanning. Note Click Cancel to cancel the scan. When scanning is completed, the Scan Complete dialog box opens. Select Scan or Exit. Select Scan to scan the next document, or select Exit to end.
- Page 352 Save the scanned images. Saving Saving as PDF Files Page top...
- Page 353 > > Scanning with the Bundled Application Software > > Scanning Photos Advanced Guide Scanning Let's Try Scanning and Documents S102 Scanning Photos and Documents Scan photos and documents placed on the Platen. Place the document on the Platen. Placing Documents Start MP Navigator EX and open the Navigation Mode screen.
- Page 354 Note When you select Magazine(Color), the descreen function will be enabled and scanning takes longer than usual. To disable the descreen function, deselect the Descreen checkbox in the Scan Settings dialog box. Select Text(OCR) to extract the text in the image and convert to editable text data using MP Navigator EX.
- Page 355 Edit the scanned images as required. Use Edit Tools to rotate images, select a part of an image, etc. See the Edit Tools in "Photos/Documents (Platen) Screen (Scan/Import Window) " for details. Note First select images to edit. (Selected images are outlined in orange.) Drag the mouse or use Shift + arrow keys to select multiple images.
- Page 356 > > Scanning with the Bundled Application Software > > Scanning Advanced Guide Scanning Let's Try Scanning Multiple Documents at One Time S105 Scanning Multiple Documents at One Time You can scan two or more photos (small documents) at one time by setting Document Size to Auto Detect (Multiple Documents) in the Scan Settings dialog box of MP Navigator EX.
- Page 357 Click Specify..Select Auto Detect (Multiple Documents) for Document Size. When setting is completed, click OK. Scan Settings Dialog Box (Photos/Documents) Click Scan.
- Page 358 Multiple documents are scanned at one time. Note Click Cancel to cancel the scan. When scanning is completed, the Scan Complete dialog box opens. Select Scan or Exit. Select Scan to scan the next document, or select Exit to end. The scanned images appear in the Thumbnail window.
- Page 359 Saving as PDF Files Note If you want to preview the images before scanning, use ScanGear. Scanning Multiple Documents at One Time with ScanGear (Scanner Driver) Page top...
- Page 360 > > Scanning with the Bundled Application Software > > Scanning Images Advanced Guide Scanning Let's Try Scanning Larger than the Platen (Stitch Assist) S106 Scanning Images Larger than the Platen (Stitch Assist) Stitch Assist allows you to scan the left and right halves of a large document separately and combine the scanned images back into one image.
- Page 361 Click Specify..Select Stitch Assist for Document Size, then specify the scanning resolution as required. When setting is completed, click OK. Scan Settings Dialog Box (Photos/Documents) Click Scan.
- Page 362 The Stitch-assist window opens. Place the left half of the document face-down on the Platen. Click Scan. The left half of the document is scanned and appears in the Stitch-assist window. Note Click Cancel to cancel the scan.
- Page 363 Place the right half of the document face-down on the Platen. Click Scan. The right half of the document is scanned. Note Click Cancel to cancel the scan. Adjust the scanned image as required. Use the icons to swap the left and right halves, rotate the image 180 degrees or enlarge/reduce the image.
- Page 364 Important This function is not available while the image is enlarged/reduced. (Enlarge) Enlarges the displayed image. (Reduce) Reduces the displayed image. (Full-screen) Displays the entire image. Note Enlarge/Reduce does not affect the actual size of the scanned image. When the document is scanned upside down, the image displayed in the Stitch-assist window will also be upside down.
- Page 365 Save the scanned images. Saving Saving as PDF Files Page top...
- Page 366 > > Scanning with the Bundled Application Software > Advanced Guide Scanning Let's Try Scanning > Easy Scanning with One-click S104 Easy Scanning with One-click You can complete "from scanning to saving", etc. at one time by simply clicking the corresponding icon. Place the document on the Platen.
- Page 367 Click the corresponding icon. Custom Scan with One-click Tab One-click Mode Screen Select Document Type according to the document to be scanned. Set the document size and scanning resolution as required. Start scanning. Starts scanning. Note Click Cancel to cancel the scan. Page top...
- Page 368 > > Scanning with the Bundled Application Software > Useful MP Navigator EX Functions Advanced Guide Scanning S400 Useful MP Navigator EX Functions With MP Navigator EX, you can correct/enhance scanned images beautifully, and search saved images quickly. Correcting/enhancing images automatically Correcting/Enhancing Images Automatically Correcting/enhancing images manually Correcting/Enhancing Images Manually...
- Page 369 > > Scanning with the Bundled Application Software > Useful MP Navigator EX Functions > Advanced Guide Scanning Correcting/Enhancing Images Automatically S401 Correcting/Enhancing Images Automatically MP Navigator EX will analyze and correct/enhance scanned images automatically. Scan documents into MP Navigator EX and save them, then open the View & Use window from the Navigation Mode screen and select the photos you want to correct/ enhance.
- Page 370 Note If you selected only one image in the View & Use window, the thumbnail list does not appear and only the preview image appears. Make sure that Auto is selected. Click Auto Photo Fix, Face Sharpener or Digital Face Smoothing. Important Once image is corrected with Auto Photo Fix and saved, it cannot be corrected again with Auto Photo Fix.
- Page 371 Click OK. The entire image is corrected/enhanced automatically and (Correct/Enhance) mark appears on the upper left of the thumbnail and preview image. Note Click Reset Selected Image to undo the correction/enhancement. Select the Apply to all images checkbox to correct/enhance all selected images. Click Save Selected Image or Save All Corrected Images.
- Page 372 > > Scanning with the Bundled Application Software > Useful MP Navigator EX Functions > Advanced Guide Scanning Correcting/Enhancing Images Manually S402 Correcting/Enhancing Images Manually You can correct/enhance scanned images manually. Scan documents into MP Navigator EX and save them, then open the View & Use window from the Navigation Mode screen and select the photos you want to correct/ enhance.
- Page 373 Note If you selected only one image in the View & Use window, the thumbnail list does not appear and only the preview image appears. Select Manual, then click Correct/Enhance. Click Face Brightener, Face Sharpener, Digital Face Smoothing or Blemish Remover.
- Page 374 The portion in and around the selected area is corrected/enhanced and (Correct/Enhance) mark appears on the upper left of the thumbnail and preview image. Note You can also drag to rotate the rectangle. Click Undo to undo the latest correction/enhancement. Click Reset Selected Image to cancel all corrections, enhancements and adjustments applied to the selected image.
- Page 375 > > Scanning with the Bundled Application Software > Useful MP Navigator EX Functions > Advanced Guide Scanning Adjusting Images S406 Adjusting Images You can make fine adjustments to the overall brightness, contrast, etc. of images. Scan documents into MP Navigator EX and save them, then open the View & Use window from the Navigation Mode screen and select the photos you want to adjust.
- Page 376 Note If you selected only one image in the View & Use window, the thumbnail list does not appear and only the preview image appears. Select Manual, then click Adjust. Move the slider of the item you want to adjust and set the effect level. When you move a slider, (Correct/Enhance) mark appears on the upper left of the thumbnail and preview image.
- Page 377 To save only the images you like, select them and click Save Selected Image. To save all images, click Save All Corrected Images. The file format of adjusted images is JPEG/Exif. Click Exit. Important The adjustments will be lost if you exit before saving adjusted images. Page top...
-
Page 378: Searching Images
> > Scanning with the Bundled Application Software > Useful MP Navigator EX Functions > Advanced Guide Scanning Searching Images S407 Searching Images In the View & Use window of the Navigation Mode screen, you can search images saved on your computer and open them in MP Navigator EX. - Page 379 Search in If you know where to look for, select the drive, folder or network from Specify Folder. File Name If you know the file name, enter it. A word or phrase in the file Enter a word or phrase included in the items selected in More Advanced Options. Important For PDF files, you can only search for those created with MP Navigator EX.
- Page 380 checkbox, text in Maker, Model, Description and User Comment is searched. If you select the PDF text checkbox, text in PDF files is searched. Important Text in password-protected PDF files cannot be searched. Search subfolders Select this checkbox to search subfolders. Case sensitive Select this checkbox to match case.
- Page 381 > > Scanning with the Bundled Application Software > Useful MP Navigator EX Functions > Advanced Guide Scanning Classifying Images into Categories S403 Classifying Images into Categories Display images scanned with MP Navigator EX by category. You can classify images displayed in Unclassified automatically, and also create custom categories.
- Page 382 Documents: Business Card, Postcard, Standard Size, PDF File, Others Custom categories: Displays your custom categories. ." To create custom categories, see " Creating Custom Categories Unclassified: Displays images that are not classified. Note Click Classify Images to classify images displayed in Unclassified automatically. Click Cancel to stop.
- Page 383 View & Use Window Page top...
- Page 384 > > Scanning with the Bundled Application Software > Utilizing Images in MP Navigator EX Advanced Guide Scanning S500 Utilizing Images in MP Navigator EX You can scan images using MP Navigator EX and edit or print the saved images. See the corresponding sections below for details on saving scanned images.
- Page 385 > > Scanning with the Bundled Application Software > Utilizing Images in MP Navigator EX > Advanced Guide Scanning Saving S112 Saving Save images scanned with MP Navigator EX to a computer. Select the checkboxes of the images you want to save, then click Save. In the Save dialog box, specify the save settings.
- Page 386 Windows XP: MP Navigator EX folder in My Pictures folder Click Save. Scanned images are saved according to the settings. To further use/edit the scanned images on MP Navigator EX, click Open saved location in the Save Complete dialog box. Creating/Editing PDF Files Printing Documents Printing Photos...
- Page 387 > > Scanning with the Bundled Application Software > Utilizing Images in MP Navigator EX > Advanced Guide Scanning Saving as PDF Files S113 Saving as PDF Files Save images scanned with MP Navigator EX as PDF files. Select the checkboxes of the images you want to save, then click Save as PDF file. In the Save as PDF file dialog box, specify the save settings.
- Page 388 Note By default, the scanned images are saved in the following folders. Windows 7: MP Navigator EX folder in My Pictures folder Windows Vista: MP Navigator EX folder in Pictures folder Windows XP: MP Navigator EX folder in My Pictures folder You can set passwords for PDF files.
- Page 389 > > Scanning with the Bundled Application Software > Utilizing Images in MP Navigator EX > Advanced Guide Scanning Creating/Editing PDF Files S501 Creating/Editing PDF Files Create/edit PDF files using MP Navigator EX. After scanning documents and saving them, open the View &...
- Page 390 If a password-protected PDF file is selected, you will be prompted to enter the password. Opening/Editing Password-protected PDF Files Add/delete pages as required. To add an existing file, click Add Page and select the file. To delete a page, select it and click Delete Selected Pages.
- Page 391 as well. Click Open PDF file on the list. The application associated with the file extension (.pdf) by the operating system starts. Important Password-protected PDF files cannot be opened in applications not supporting PDF security. Files may not open if an application that can be associated with PDF files is not installed. Use the application to edit/print the file.
-
Page 392: Printing Documents
> > Scanning with the Bundled Application Software > Utilizing Images in MP Navigator EX > Advanced Guide Scanning Printing Documents S502 Printing Documents You can print multiple scanned images at one time, print at specific quality, etc. using MP Navigator EX. Scan documents into MP Navigator EX and save them, then open the View &... - Page 393 Important At normal-size (100%), some images may be printed small or with some portions cropped. In that case, select Auto to resize the print in proportion to the paper size. Click Print. Starts printing. Note When printing a multiple-page PDF file via Print Document, printing may take time depending on your computer.
- Page 394 > > Scanning with the Bundled Application Software > Utilizing Images in MP Navigator EX > Advanced Guide Scanning Printing Photos S503 Printing Photos You can print photos using MP Navigator EX or an application that accompanies the machine. After scanning documents and saving them, open the View &...
- Page 395 Click Print Photo on the list. Specify print settings as required. In the displayed dialog box, specify paper size, print count, etc. Print Photo Dialog Box Click Print. Starts printing. Note To cancel while spooling, click Cancel. To cancel while printing, click Cancel Printing in the confirmation window for the printer status.
- Page 396 > > Scanning with the Bundled Application Software > Utilizing Images in MP Navigator EX > Advanced Guide Scanning Sending via E-mail S504 Sending via E-mail Send scanned images via e-mail. Important MP Navigator EX is compatible with the following e-mail software programs: - Microsoft Outlook - Windows Mail (Windows Vista) - Outlook Express (Windows XP)
- Page 397 Specify the e-mail software program, destination folder and file name. Send via E-mail Dialog Box Note You can select a compression type when sending JPEG images via e-mail. Click Set... to open a dialog box and select a compression type from High(Low Compression), Standard or Low(High Compression).
-
Page 398: Editing Files
> > Scanning with the Bundled Application Software > Utilizing Images in MP Navigator EX > Advanced Guide Scanning Editing Files S505 Editing Files You can edit images or convert them to text using MP Navigator EX or an application that accompanies the machine. - Page 399 Converting Documents to Text Scan text in scanned magazines and newspapers and display it in Notepad (included with Windows). Important PDF files cannot be converted to text. Select images and click Edit/Convert. Click Convert to text file on the list. Notepad (included with Windows) starts and editable text appears.
- Page 400 > > Scanning with the Bundled Application Software > Utilizing Images in MP Navigator EX > Advanced Guide Scanning Setting Passwords for PDF Files S508 Setting Passwords for PDF Files Set passwords for opening, editing and printing PDF files. You can set two passwords: one for opening the file and one for editing/printing it. This section explains how to set passwords for images scanned into the Scan/Import window of MP Navigator EX and how to set passwords for existing files via the View &...
- Page 401 The Password Security -Settings dialog box opens. Setting Passwords for Existing Files In the View & Use window, select image/PDF files and click PDF. Click Create/Edit PDF file on the list. Creating/Editing PDF Files Edit files in the Create/Edit PDF file window, then click Save Selected Pages or Save All Pages.
- Page 402 Important Up to 32 single-byte alphanumeric characters can be used for the password. Passwords are case sensitive. Select both checkboxes to set both Document Open Password and Permissions Password. You cannot use the same password for both. Click OK. The Confirm Document Open Password or Confirm Permissions Password dialog box opens. Document Open Password Permissions Password Re-enter the password and click OK.
- Page 403 Related Topic Opening/Editing Password-protected PDF Files Page top...
- Page 404 > > Scanning with the Bundled Application Software > Utilizing Images in MP Navigator EX > Advanced Guide Scanning Opening/Editing Password-protected PDF Files S509 Opening/Editing Password-protected PDF Files Enter a password to open or edit/print password-protected PDF files. Password entry method varies by operation. The following procedures are examples only. Important You can open, edit or print only PDF files whose passwords were set with MP Navigator EX.
- Page 405 The Password dialog box opens. Enter the password and click OK. The PDF file opens in the Zoom in dialog box. Note To reopen the file after closing the Zoom in dialog box, re-enter the password. Entering a Password (Permissions Password) to Edit or Print a File In the View &...
- Page 406 To create a PDF file or edit the file, select Create/Edit PDF file on the list. To print the file, click Print Document. In the Password dialog box, you will be prompted to enter a password. Note If the Document Open Password is set as well, the Document Open Password will be required, then the Permissions Password will be required.
- Page 407 > > Scanning with the Bundled Application Software > MP Navigator EX Screens Advanced Guide Scanning S700 MP Navigator EX Screens Learn about the screens and functions of MP Navigator EX. Scan/Import Documents or Images Tab Auto Scan Screen (Scan/Import Window) Scan Settings Dialog Box (Auto Scan) Photos/Documents (Platen) Screen (Scan/Import Window) Scan Settings Dialog Box (Photos/Documents)
- Page 408 > > Scanning with the Bundled Application Software > MP Navigator EX Screens > Advanced Guide Scanning Navigation Mode Screen S735 Navigation Mode Screen This is one of the startup screens of MP Navigator EX. Select an icon at the top of the screen to display the corresponding tab. Use each tab depending on what you want to do.
- Page 409 Page top...
- Page 410 > > Scanning with the Bundled Application Software > MP Navigator EX Screens Advanced Guide Scanning > Scan/ Import Documents or Images Tab S702 Scan/Import Documents or Images Tab Select Scan/Import in the Navigation Mode screen to display the Scan/Import Documents or Images tab. Scan photos and documents.
- Page 411 > > Scanning with the Bundled Application Software > MP Navigator EX Screens Advanced Guide Scanning > View & Use Images on your Computer Tab S703 View & Use Images on your Computer Tab Select View & Use in the Navigation Mode screen to display the View & Use Images on your Computer tab.
- Page 412 Preferences The Preferences dialog box opens. In the Preferences dialog box, you can make advanced settings to MP Navigator EX functions. Preferences Dialog Box (Guide) Opens this guide. Related Topic Opening Images Saved on a Computer Page top...
- Page 413 > > Scanning with the Bundled Application Software > MP Navigator EX Screens > Custom Advanced Guide Scanning Scan with One-click Tab S704 Custom Scan with One-click Tab Select One-click in the Navigation Mode screen to display the Custom Scan with One-click tab. You can complete "from scanning to saving", etc.
- Page 414 application settings. Custom Dialog Box Start scanning by clicking the button Select this checkbox and click an icon to start scanning immediately. (Switch Mode) Switches to One-click Mode. The One-click Mode screen appears. One-click Mode Screen Show this window at startup Select this checkbox to open the Main Menu at startup.
- Page 415 > > Scanning with the Bundled Application Software > MP Navigator EX Screens Advanced Guide Scanning > Auto Scan Screen (Scan/Import Window) S744 Auto Scan Screen (Scan/Import Window) Select Scan/Import in the Navigation Mode screen and click Auto Scan or click Auto Scan in the Scan/ Import window to open the Auto Scan screen (Scan/Import window).
- Page 416 Settings and Operation Buttons (View & Use) Click this when you want to open images and PDF files saved on your computer. The View & Use window opens. View & Use Window Auto Scan Displays the screen for scanning documents by automatically detecting the document type, etc. Photos/Documents (Platen) Click this when you want to scan photos, documents, magazines and other printed materials.
- Page 417 (Rotate Left) Rotates the target image (outlined in orange) 90 degrees counter-clockwise. (Rotate Right) Rotates the target image (outlined in orange) 90 degrees clockwise. (Invert) Inverts the target image (outlined in orange) horizontally. (Trimming) Trims the target image (outlined in orange). "Trimming" is the act of selecting the area you want to keep in a photo and discarding the rest.
- Page 418 Related Topic Easy Scanning with Auto Scan Page top...
- Page 419 > > Scanning with the Bundled Application Software > MP Navigator EX Screens Advanced Guide Scanning > Scan Settings Dialog Box (Auto Scan) S745 Scan Settings Dialog Box (Auto Scan) The Scan Settings dialog box opens when you click Specify... in the Scan/Import window. Document Type Auto Mode is set.
- Page 420 > > Scanning with the Bundled Application Software > MP Navigator EX Screens > Photos/ Advanced Guide Scanning Documents (Platen) Screen (Scan/Import Window) S708 Photos/Documents (Platen) Screen (Scan/Import Window) Select Scan/Import in the Navigation Mode screen and click Photos/Documents (Platen) or click Photos/ Documents (Platen) in the Scan/Import window to open the Photos/Documents (Platen) screen (Scan/ Import window).
- Page 421 Important You cannot select Document Type if the Use the scanner driver checkbox is selected. Specify... Specify the document size, resolution, and other advanced scan settings. Scan Settings Dialog Box (Photos/Documents) Important Specify... is not available if the Use the scanner driver checkbox is selected. Use the scanner driver Select this checkbox when you want to scan with ScanGear (scanner driver).
- Page 422 (Select All) Selects all images in the Thumbnail window. (Cancel All) Cancels all image selections in the Thumbnail window. (Rotate Left) Rotates the target image (outlined in orange) 90 degrees counter-clockwise. (Rotate Right) Rotates the target image (outlined in orange) 90 degrees clockwise. (Invert) Inverts the target image (outlined in orange) horizontally.
- Page 423 (Cancel Selection) Cancels the selection of the target image (outlined in orange) in the Selected Images area. Selected Images Area Images selected in the Thumbnail window are displayed. Related Topic Scanning Photos and Documents Page top...
- Page 424 > > Scanning with the Bundled Application Software > MP Navigator EX Screens Advanced Guide Scanning > Scan Settings Dialog Box (Photos/Documents) S713 Scan Settings Dialog Box (Photos/Documents) The Scan Settings dialog box opens when you click Specify... in the Scan/Import window. In the Scan Settings dialog box, you can make advanced scan settings.
- Page 425 Auto Photo Fix / Auto Document Fix The displayed item varies by Document Type. Auto Photo Fix This is displayed when Document Type is Color Photo. Select this checkbox to automatically analyze the captured scene (landscape, night scene, etc.) and apply suitable corrections. Auto Document Fix This is displayed when Document Type is Color Document, Black and White Document or Magazine(Color).
- Page 426 Note Select this checkbox when Document Type is text document and show-through is apparent in the scanned image. Correct slanted document Select this checkbox to detect the scanned text and correct the angle (within -0.1 to -10 degrees or +0.1 to +10 degrees) of the document.
-
Page 427: Save Dialog Box
> > Scanning with the Bundled Application Software > MP Navigator EX Screens Advanced Guide Scanning > Save Dialog Box S716 Save Dialog Box The Save dialog box opens when you click Save in the Scan/Import window. In the Save dialog box, you can make settings for saving images to a computer. Save in Displays the folder in which to save the scanned images. - Page 428 > > Scanning with the Bundled Application Software > MP Navigator EX Screens Advanced Guide Scanning > Save as PDF file Dialog Box S717 Save as PDF file Dialog Box In the Save as PDF file dialog box, you can make advanced settings for saving scanned images as PDF files.
- Page 429 Save each of the selected images as a separate PDF file. PDF(Multiple Pages) Save multiple images in one PDF file. Note PDF(Multiple Pages) is displayed when multiple images are selected. PDF(Add Page) Add the scanned images to a PDF file. The images are added to the end of the PDF file. You cannot rearrange the pages of the PDF file to which the images are added.
- Page 430 > > Scanning with the Bundled Application Software > MP Navigator EX Screens > PDF Advanced Guide Scanning Settings Dialog Box S736 PDF Settings Dialog Box In the PDF Settings dialog box, you can specify the PDF compression type and other advanced settings for creating PDF files.
- Page 431 - Documents containing figures/images - Hand-written documents - Documents containing both vertical and horizontal lines (tables) PDF Compression Select a compression type for saving. Standard It is recommended that you normally select this setting. High Compresses the file size when saving, allowing you to reduce the load on your network/server. Important Highly compressed PDF images may degrade if you repeatedly save them with high compression.
- Page 432 > > Scanning with the Bundled Application Software > MP Navigator EX Screens Advanced Guide Scanning > View & Use Window S711 View & Use Window Select View & Use in the Navigation Mode screen and click My Box (Scanned/Imported Images), Specify Folder or Recently Saved Images to open the View &...
- Page 433 My Box (Scanned/Imported Images) Displays folders of images (grouped by year, year/month and year/month/date) in My Box in tree view. Select a folder to display its contents in the Thumbnail window to the right. Image date is the scanned, captured or updated date. Specify Folder Displays all hard disks and folders in tree view.
- Page 434 (Cancel All) Cancels all image selections in the Thumbnail window. (Image Correction/Enhancement) Allows you to correct the target image (outlined in orange). Click this button to open the Correct/ Enhance Images window in which you can correct/enhance images and also adjust the brightness, contrast, etc.
- Page 435 Note A lock icon appears for PDF files with Document Open Password set. Thumbnails may appear as "?" in the following cases. - Opening unsupported images - File size is too large and there is not enough memory to display the image - The file is corrupted When Images are Sorted by Categories Scanned images are displayed by category.
- Page 436 Specific Categories Displays categories containing images, along with the contained images. More images will be displayed in the Thumbnail window, allowing you to find or move images easily. Note Immediately after opening the View & Use window, categories containing images appear along with the contained images, and All Categories is displayed.
- Page 437 > > Scanning with the Bundled Application Software > MP Navigator EX Screens > Create/ Advanced Guide Scanning Edit PDF file Window S715 Create/Edit PDF file Window Click PDF in the View & Use window, then click Create/Edit PDF file on the list to open the Create/Edit PDF file window.
- Page 438 Deletes the selected image. Add Page Allows you to select and add an existing PDF file. Note A password will be required to add a password-protected PDF file. Undo Cancels the latest change made. Reset Cancels all the changes made. Save Selected Pages Opens the Save as PDF file dialog box.
- Page 439 (Reduce) Reduces the image displayed in Preview. (Full-screen) Displays the entire image. (Thumbnail Mode) Switches to Thumbnail Mode. The pages are displayed in thumbnail view. Page top...
- Page 440 > > Scanning with the Bundled Application Software > MP Navigator EX Screens > Print Advanced Guide Scanning Document Dialog Box S718 Print Document Dialog Box Click Print in the View & Use window, then click Print Document on the list to open the Print Document dialog box.
- Page 441 Print a reduced or enlarged image by specifying a scale in increments of 1%. Auto Scale is adjusted automatically according to the detected paper width and the selected paper size. Image may be printed rotated 90 degrees depending on its size. Scale Select a scale from the list.
- Page 442 > > Scanning with the Bundled Application Software > MP Navigator EX Screens > Print Advanced Guide Scanning Photo Dialog Box S729 Print Photo Dialog Box Click Print in the View & Use window, then click Print Photo on the list to open the Print Photo dialog box. Important The Print Photo dialog box will not open if Easy-PhotoPrint EX is installed.
- Page 443 Select this checkbox to print the image on an entire sheet of paper without borders. Important Page Layout setting will be disabled when you select Borderless Printing. This setting is only available with printers that support borderless printing. Orientation Specify the print orientation. Important This setting is available only when Page Layout is Normal-size Printing.
- Page 444 > > Scanning with the Bundled Application Software > MP Navigator EX Screens > Send via Advanced Guide Scanning E-mail Dialog Box S719 Send via E-mail Dialog Box Click Send in the View & Use window, then click Attach to E-mail on the list to open the Send via E-mail dialog box.
- Page 445 Page top...
- Page 446 > > Scanning with the Bundled Application Software > MP Navigator EX Screens Advanced Guide Scanning > Correct/ Enhance Images Window S712 Correct/Enhance Images Window Click (Image Correction/Enhancement) in the View & Use window or click Fix photo images in Image Handling Buttons to open the Correct/Enhance Images window.
- Page 447 Auto Photo Fix Applies automatic corrections suitable for photos. Prioritize Exif Info Select this checkbox to apply corrections primarily based on the settings made at the time of shooting. Deselect this checkbox to apply corrections based on the image analysis results. It is recommended that you normally select this setting.
- Page 448 "Correcting/Enhancing Images Manually " for details. Adjustment Brightness Adjusts the overall image brightness. Move the slider to the left to darken and right to brighten the image. Contrast Adjusts the contrast of the image. Adjust the contrast when the image is flat due to lack of contrast. Move the slider to the left to decrease and right to increase the contrast of the image.
- Page 449 Brightness/Contrast Adjust the brightness and contrast of the image. Move the Brightness slider to the left to darken and right to brighten the image. Move the Contrast slider to the left to decrease and right to increase the contrast of the image. Tone Adjust the brightness balance by specifying Highlight (the brightest level), Shadow (the darkest level) and Midtone (the color in the middle of Highlight and Shadow).
- Page 450 Exit Closes the Correct/Enhance Images window. Correction/Enhancement Face Brightener Corrects the entire image to brighten the facial area in and around the selected area. You can adjust the effect level using the slider. Face Sharpener Corrects the entire image to sharpen the facial area in and around the selected area. You can adjust the effect level using the slider.
- Page 451 (Rotate Right) Rotates the image 90 degrees clockwise. (Invert) Inverts the image horizontally. (Trimming) Trimming is the act of selecting the area you want to keep in a photo and discarding the rest. In the displayed window, drag the white frame to specify the trimming area. Move the cursor inside the white frame and drag to move the trimming area.
- Page 452 Page top...
- Page 453 > > Scanning with the Bundled Application Software > MP Navigator EX Screens > One-click Advanced Guide Scanning Mode Screen S701 One-click Mode Screen Click (Switch Mode) at the bottom left of the Navigation Mode screen to display the One-click Mode screen.
- Page 454 Preferences Dialog Box (Guide) Opens this guide. Important The following restrictions apply when you scan with Document Type set to Auto Mode in the Save dialog box or Custom dialog box. When you want to convert text in the scanned image to text data, specify Document Type (do not select Auto Mode).
- Page 455 > > Scanning with the Bundled Application Software > MP Navigator EX Screens Advanced Guide Scanning > Auto Scan Dialog Box S742 Auto Scan Dialog Box Click Auto Scan on the Custom Scan with One-click tab or click Auto in the One-click Mode screen to open the Auto Scan dialog box.
- Page 456 The color tone may change from the source image due to corrections. In that case, deselect the checkbox and scan. Save Settings File name Enter the file name of the image to be saved (up to 64 characters). When saving multiple files, 4 digits are appended to each file name.
- Page 457 Saves and applies the specified settings. Click Cancel instead of Apply to cancel the specified settings. Cancel Cancels the specified settings. The current screen closes. Defaults Returns all settings in the screen to their defaults. Scan Scans and saves documents with the specified settings. When Save as type is Auto, a confirmation appears.
- Page 458 > > Scanning with the Bundled Application Software > MP Navigator EX Screens Advanced Guide Scanning > Save Dialog Box (One-click Mode Screen) S721 Save Dialog Box (One-click Mode Screen) Click Save to PC on the Custom Scan with One-click tab or click Save in the One-click Mode screen to open the Save dialog box.
- Page 459 To reduce moire, set Document Type to Magazine. Color Mode Select how to scan the document. Document Size Select the size of the document to be scanned. When you select Custom, a screen in which you can specify the document size appears. Select a Units, then enter the Width and Height and click OK.
- Page 460 Note When Auto is selected, files are saved in the following formats according to the document type. Photos, postcards, BD/DVD/CD and business cards: JPEG Magazines, newspapers and text documents: PDF You can change the file format from Set..Images saved as PDF files may not open depending on the application. In that case, select an option other than Auto in Save as type.
- Page 461 Application Settings Open with You can select whether to open the View & Use window or Explorer after saving the images. Start scanning by clicking the one-click button Select this checkbox to start scanning when you click an icon in One-click Mode. Apply Saves and applies the specified settings.
- Page 462 > > Scanning with the Bundled Application Software > MP Navigator EX Screens Advanced Guide Scanning > Scan Settings Dialog Box (One-click Mode Screen) S734 Scan Settings Dialog Box (One-click Mode Screen) The Scan Settings dialog box opens when you click Specify... in a dialog box of the One-click Mode screen.
- Page 463 Important When you select Auto Detect, the image may not be scanned at the correct position and size. In that case, change the size to the actual document size (A4, Letter, etc.) and align a corner of the document with the corner at the arrow (alignment mark) of the Platen. Scanning Resolution Select the resolution at which to scan documents.
- Page 464 Note Use ScanGear (scanner driver)'s Advanced Mode tab to correct gutter shadows when scanning non-standard size documents or when custom cropping frames are set. "Gutter Shadow Correction " for details. Reduce Show-through Select this checkbox to sharpen text in a document or reduce show-through in newspapers. Note Select this checkbox when Document Type is text document and show-through is apparent in the scanned image.
- Page 465 Page top...
- Page 466 > > Scanning with the Bundled Application Software > MP Navigator EX Screens Advanced Guide Scanning > Save Dialog Box S731 Save Dialog Box The Save dialog box opens when you scan from the Save dialog box or Custom dialog box of the One- click Mode screen after selecting Open the save dialog box after scanning the image (Input Exif information).
- Page 467 Setting Passwords for PDF Files Important PDF, PDF(Multiple Pages) and PDF(Add Page) cannot be selected for images scanned from the Custom dialog box. You cannot select JPEG/Exif when Color Mode is Black and White. Set... When Save as type is JPEG/Exif You can specify a compression type for JPEG files.
- Page 468 > > Scanning with the Bundled Application Software > MP Navigator EX Screens > Exif Advanced Guide Scanning Settings Dialog Box S732 Exif Settings Dialog Box You can input Exif information into a file to be saved. "Exif" is a standard format for embedding various shooting data in digital camera images (JPEG).
- Page 469 > > Scanning with the Bundled Application Software > MP Navigator EX Screens > PDF Advanced Guide Scanning Dialog Box S725 PDF Dialog Box Click Save as PDF file on the Custom Scan with One-click tab or click PDF in the One-click Mode screen to open the PDF dialog box.
- Page 470 that case, change the size to the actual document size (A4, Letter, etc.) and align a corner of the document with the corner at the arrow (alignment mark) of the Platen. Resolution Select the resolution at which to scan documents. Resolution Specify...
- Page 471 To change the file, click Browse... to specify another one. Important Images can only be added to PDF files created with MP Navigator EX. You cannot specify PDF files created with other applications. PDF files edited in other applications cannot be specified as well.
- Page 472 > > Scanning with the Bundled Application Software > MP Navigator EX Screens Advanced Guide Scanning > Save as PDF file Dialog Box S730 Save as PDF file Dialog Box The Save as PDF file dialog box opens when you scan from the PDF dialog box of the One-click Mode screen after selecting Open the save dialog box after scanning the image.
- Page 473 PDF(Add Page) cannot be selected for images scanned using the Operation Panel of the machine. If a password-protected PDF file is edited, the passwords will be deleted. Reset the passwords. Setting Passwords for PDF Files Set... Make advanced settings for creating PDF files. See " PDF Settings Dialog Box "...
- Page 474 > > Scanning with the Bundled Application Software > MP Navigator EX Screens > Mail Advanced Guide Scanning Dialog Box S722 Mail Dialog Box Click Attach to E-mail on the Custom Scan with One-click tab or click Mail in the One-click Mode screen to open the Mail dialog box.
- Page 475 Resolution Select the resolution at which to scan documents. Resolution Use the scanner driver Select this checkbox to display the ScanGear (scanner driver) screen and make advanced scan settings. Color Mode, Document Size, Resolution and other settings in the Mail dialog box will be disabled. Specify these settings in the ScanGear screen.
- Page 476 Select Add... to open the Select Mail Program dialog box in which you can select an e-mail software program. If the e-mail software program you want to use is not listed, click Add to List and select it. Start scanning by clicking the one-click button Select this checkbox to start scanning when you click an icon in One-click Mode.
- Page 477 > > Scanning with the Bundled Application Software > MP Navigator EX Screens > OCR Advanced Guide Scanning Dialog Box S724 OCR Dialog Box Click OCR on the Custom Scan with One-click tab or in the One-click Mode screen to open the OCR dialog box.
- Page 478 Select this checkbox to display the ScanGear (scanner driver) screen and make advanced scan settings. Color Mode, Document Size, Resolution and other settings in the OCR dialog box will be disabled. Specify these settings in the ScanGear screen. Specify... Opens the Scan Settings dialog box in which you can make advanced scan settings. Scan Settings Dialog Box (One-click Mode Screen) Note When scanning slanted documents, select the Correct slanted document checkbox to improve...
- Page 479 - Documents containing text with font size outside the range of 8 points to 40 points (at 300 dpi) - Slanted documents - Documents placed upside down or documents with text in the wrong orientation (rotated characters) - Documents containing special fonts, effects, italics, or hand-written text - Documents with narrow line spacing - Documents with colors in the background of text - Documents containing multiple languages...
- Page 480 > > Scanning with the Bundled Application Software > MP Navigator EX Screens > Custom Advanced Guide Scanning Dialog Box S726 Custom Dialog Box Click Custom on the Custom Scan with One-click tab or in the One-click Mode screen to open the Custom dialog box.
- Page 481 Note To reduce moire, set Document Type to Magazine. Color Mode Select how to scan the document. Document Size Select the size of the document to be scanned. When you select Custom, a screen in which you can specify the document size appears. Select a Units, then enter the Width and Height and click OK.
- Page 482 Magazines, newspapers and text documents: PDF You can change the file format from Set..Images saved as PDF files may not open depending on the application. In that case, select an option other than Auto in Save as type. You cannot set passwords for PDF files. If you select JPEG/Exif when Document Type is not Auto Mode , the Save the JPEG/Exif file in AdobeRGB checkbox will be selectable.
- Page 483 Note For further procedures, refer to the application's manual. Reset Cancels the application setting. Set... Allows you to select an application to start. Start scanning by clicking the one-click button Select this checkbox to start scanning when you click an icon in One-click Mode. Apply Saves and applies the specified settings.
-
Page 484: Preferences Dialog Box
> > Scanning with the Bundled Application Software > MP Navigator EX Screens > Advanced Guide Scanning Preferences Dialog Box S705 Preferences Dialog Box Click Preferences to open the Preferences dialog box. In the Preferences dialog box, you can specify general MP Navigator EX settings and how to respond when scanning using the Operation Panel, via the General and Scanner Button Settings tabs. -
Page 485: General Tab
> > Scanning with the Bundled Application Software > MP Navigator EX Screens > General Advanced Guide Scanning S740 General Tab On the General tab, you can specify general MP Navigator EX settings. Product Name Displays the product name of the machine that MP Navigator EX is currently configured to use. If the displayed product is not the one you want to use, select the desired product from the list. - Page 486 displayed. Important You can change which items are installed during installation from the Setup CD-ROM selecting Custom Install. If you choose not to install some applications with Custom Install, the corresponding MP Navigator EX functions will be unavailable. To use those functions, install the corresponding applications.
- Page 487 > > Scanning with the Bundled Application Software > MP Navigator EX Screens Advanced Guide Scanning > Scanner Button Settings Tab (Save to PC) S707 Scanner Button Settings Tab (Save to PC) On the Scanner Button Settings tab, you can specify how to respond when scanning using the Operation Panel of the machine.
- Page 488 Automatically save the image to your computer after scanning it Select this to save the images to your computer as specified after scanning them. The File Name, Save as type and Save in settings will be displayed. Important If you select this function, you will not be able to set passwords for PDF files. File Name Enter the file name of the image to be saved (up to 64 characters).
- Page 489 Save to a Subfolder with Current Date Select this checkbox to create a subfolder in the folder specified in Save in with the current date and save scanned files in it. A subfolder with a name such as "2010_01_01" (Year_Month_Date) will be created.
- Page 490 > > Scanning with the Bundled Application Software > MP Navigator EX Screens Advanced Guide Scanning > Scan Settings Dialog Box (Scanner Button Settings) S743 Scan Settings Dialog Box (Scanner Button Settings) The Scan Settings dialog box opens when you click Specify... on the Scanner Button Settings tab of the Preferences dialog box.
- Page 491 > > Scanning with the Bundled Application Software Advanced Guide Scanning > Appendix: Opening Files Other than Scanned Images S011 Appendix: Opening Files Other than Scanned Images You can save or print data other than scanned images using MP Navigator EX. Using images saved on a computer Opening Images Saved on a Computer Page top...
- Page 492 > > Scanning with the Bundled Application Software > Advanced Guide Scanning Appendix: Opening Files Other than Scanned Images > Opening Images Saved on a Computer S507 Opening Images Saved on a Computer You can open images saved on a computer and print them or attach them to e-mail using MP Navigator EX.
- Page 493 Select the images you want to use, then select what you want to do with them. See the corresponding sections below for details on using images. Creating/Editing PDF Files Printing Documents Printing Photos Sending via E-mail Editing Files Page top...
- Page 494 > Повний посібник Сканування > Сканування за допомогою іншого програмного забезпечення Сканування за допомогою іншого програмного забезпечення Що таке ScanGear (драйвер сканера)? Сканування з додатковими параметрами за допомогою ScanGear (драйвер сканера) Корекція зображень і настроювання кольорів за допомогою ScanGear (Драйвер сканера) Екрани...
-
Page 495: What Is Scangear (Scanner Driver)
> > Scanning with Other Application Software Advanced Guide Scanning > What Is ScanGear (Scanner Driver)? S201 What Is ScanGear (Scanner Driver)? ScanGear (scanner driver) is software required for scanning documents. It enables you to specify the output size and make image corrections when scanning. ScanGear can be started from MP Navigator EX or from other applications that are compatible with a standard interface called TWAIN. - Page 496 Auto Scan Mode Use the Auto Scan Mode tab to scan easily by simply placing the document on the Platen and clicking Scan. Page top...
-
Page 497: Scanning With Advanced Settings Using Scangear (Scanner Driver)
> > Scanning with Other Application Software Advanced Guide Scanning > Scanning with Advanced Settings Using ScanGear (Scanner Driver) S200 Scanning with Advanced Settings Using ScanGear (Scanner Driver) Starting ScanGear (scanner driver) Starting ScanGear (Scanner Driver) Scanning documents after making simple image corrections Scanning in Basic Mode Scanning documents after making advanced image corrections and brightness/color adjustments Scanning in Advanced Mode... -
Page 498: Starting Scangear (Scanner Driver)
> > Scanning with Other Application Software > Advanced Guide Scanning Scanning with Advanced Settings Using ScanGear (Scanner Driver) > Starting ScanGear (Scanner Driver) S202 Starting ScanGear (Scanner Driver) Use ScanGear (scanner driver) to make image corrections and color adjustments when scanning. ScanGear can be started from MP Navigator EX or an application. - Page 499 Select the Use the scanner driver checkbox in Scan Settings, then click Scan. The ScanGear screen appears. Important Use the scanner driver is not displayed in the Auto Scan dialog box or PDF dialog box. Starting from an Application Follow these steps (example) to start ScanGear from an application. The procedure varies depending on the application.
-
Page 500: Scanning In Basic Mode
> > Scanning with Other Application Software > Advanced Guide Scanning Scanning with Advanced Settings Using > Scanning in Basic Mode ScanGear (Scanner Driver) S203 Scanning in Basic Mode Use the Basic Mode tab to scan easily by following the on-screen steps. This section explains how to scan a single document. - Page 501 Preview image appears in the Preview area. Note Colors are adjusted based on the document type selected in Select Source. Set Destination. Set Output Size. Output size options vary by the item selected in Destination. Adjust the scan area (cropping frame) as required. Adjust the size and position of the cropping frame (scan area) on the preview image.
-
Page 502: Scanning In Advanced Mode
> > Scanning with Other Application Software > Advanced Guide Scanning Scanning with Advanced Settings Using ScanGear (Scanner Driver) > Scanning in Advanced Mode S205 Scanning in Advanced Mode Use the Advanced Mode tab to specify the color mode, output resolution, image brightness, color tone, etc. - Page 503 Set Input Settings. Input Settings Click Preview. Preview image appears in the Preview area. Note If you scan without preview, the show-through reduction function will be active. This function is useful when scanning magazines. However, when scanning photos, the color tone of the scanned image may differ from the source due to the show-through reduction function.
- Page 504 > > Scanning with Other Application Software > Advanced Guide Scanning Scanning with Advanced Settings Using ScanGear (Scanner Driver) > Scanning in Auto Scan Mode S207 Scanning in Auto Scan Mode Use the Auto Scan Mode tab to scan easily by automatically detecting the type of document placed on the Platen.
- Page 505 Related Topic Auto Scan Mode Tab Page top...
-
Page 506: Scanning Multiple Documents At One Time With Scangear (Scanner Driver)
> > Scanning with Other Application Software > Advanced Guide Scanning Scanning with Advanced Settings Using ScanGear (Scanner Driver) > Scanning Multiple Documents at One Time with ScanGear (Scanner Driver) S208 Scanning Multiple Documents at One Time with ScanGear (Scanner Driver) You can scan two or more photos (small documents) on the Platen at one time on the Basic Mode tab and Advanced Mode tab of ScanGear (scanner driver). - Page 507 Click Preview. Thumbnails of the preview images appear in the Preview area. Images are cropped (scan areas are specified) automatically according to the document size. Set Destination. Set Output Size. Adjust the scan areas (cropping frames) and set Image corrections as required. Note You can correct each image separately.
- Page 508 Click Scan. Scanning Multiple Documents in Whole Image View Follow these steps if thumbnails are not displayed correctly when previewed or if you want to scan multiple documents as a single image. Note Positions of slanted documents are not corrected in whole image view. After previewing images, click (Thumbnail) on the Toolbar.
- Page 509 Note ScanGear's response after scanning can be specified in Status of ScanGear dialog after scanning on the Scan tab of the Preferences dialog box. Scan Tab Page top...
-
Page 510: Correcting Images And Adjusting Colors With Scangear (Scanner Driver)
> > Scanning with Other Application Software Advanced Guide Scanning > Correcting Images and Adjusting Colors with ScanGear (Scanner Driver) S300 Correcting Images and Adjusting Colors with ScanGear (Scanner Driver) The following sections provide you with tips and know-how on advanced scanning techniques involving color/brightness adjustment, etc. -
Page 511: Correcting Images (Unsharp Mask, Reduce Dust And Scratches, Fading Correction, Etc.)
> > Scanning with Other Application Software > Advanced Guide Scanning Correcting Images and Adjusting Colors with ScanGear (Scanner Driver) > Correcting Images (Unsharp Mask, Reduce Dust and Scratches, Fading Correction, etc.) S308 Correcting Images (Unsharp Mask, Reduce Dust and Scratches, Fading Correction, etc.) The Image Settings functions on the Advanced Mode tab of ScanGear (scanner driver) allow you to enhance the outline of the subjects, reduce dust/scratches and correct faded colors when scanning... - Page 512 None Auto Sharpening slightly out-of-focus images Set Unsharp Mask to ON. Reducing gradations and stripe patterns Set Descreen to ON. Note Printed photos and pictures are displayed as a collection of fine dots. "Moire" is a phenomenon where uneven gradation or a stripe pattern appears when such photos or pictures printed with fine dots are scanned.
- Page 513 Reducing graininess Set Grain Correction to Low, Medium or High according to the degree of graininess. None Medium Correcting backlit images Set Backlight Correction to Low, Medium or High according to the degree of backlight. None Medium Correcting shadows that appear between pages when scanning open booklets Set Gutter Shadow Correction to Low, Medium or High according to the degree of shadows.
-
Page 514: Adjusting Colors Using A Color Pattern
> > Scanning with Other Application Software > Advanced Guide Scanning Correcting Images and Adjusting Colors with > Adjusting Colors Using a Color Pattern ScanGear (Scanner Driver) S301 Adjusting Colors Using a Color Pattern You can preview color changes and reproduce natural colors by using the color pattern function in ScanGear (scanner driver)'s Basic Mode tab. - Page 515 Click an arrow in Color Adjustment to emphasize the corresponding color. Cyan & red, magenta & green and yellow & blue are complementary color pairs (each pair produces a shade of gray when mixed). You can reproduce the natural colors of the scene by reducing the cast color and increasing the complementary color.
-
Page 516: Adjusting Saturation And Color Balance
> > Scanning with Other Application Software > Advanced Guide Scanning Correcting Images and Adjusting Colors with ScanGear (Scanner Driver) > Adjusting Saturation and Color Balance S303 Adjusting Saturation and Color Balance In ScanGear (scanner driver)'s Advanced Mode tab, click (Saturation/Color Balance). - Page 517 entire picture due to the weather or ambient strong colors. Move (Slider) under Color Balance to the left or right to emphasize the corresponding color. Cyan & Red Magenta & Green Yellow & Blue These are complementary color pairs (each pair produces a shade of gray when mixed). You can reproduce the natural colors of the scene by reducing the cast color and increasing the complementary color.
-
Page 518: Adjusting Brightness And Contrast
> > Scanning with Other Application Software > Advanced Guide Scanning Correcting Images and Adjusting Colors with ScanGear (Scanner Driver) > Adjusting Brightness and Contrast S304 Adjusting Brightness and Contrast In ScanGear (scanner driver)'s Advanced Mode tab, click (Brightness/Contrast). Note Click (Down arrow) to switch to detailed view. - Page 519 Note Only Grayscale will be displayed in Channel when Color Mode is Grayscale. Brightness Adjust the image brightness. Move (Slider) under Brightness to the left to darken and right to brighten the image. You can also enter a value (-127 to 127). Darkened Original image Brightened...
-
Page 520: Adjusting Histogram
> > Scanning with Other Application Software > Advanced Guide Scanning Correcting Images and Adjusting Colors with > Adjusting Histogram ScanGear (Scanner Driver) S305 Adjusting Histogram In ScanGear (scanner driver)'s Advanced Mode tab, click (Histogram). Note Click Defaults to reset all adjustments in the current window. Channel Each dot of an image is a mixture of Red, Green and Blue in various proportions (gradation). - Page 521 (1) Bright area (2) Dark area (3) Whole image More data is distributed to the More data is distributed to the Data is widely distributed between the shadow side. highlight side. highlight and shadow. Adjusting Histograms (Using the Slider) Select a Channel, then move (Black-point Slider) or (White-point Slider) to specify the level to be set as the shadow or highlight.
- Page 522 Moving the Mid-point Slider Move the Mid-point Slider to specify the level to be set as the middle of the tonal range. Images with more data distributed to the highlight side Move the Mid-point Slider toward the highlight side. Images with more data distributed to the shadow side Move the Mid-point Slider toward the shadow side.
-
Page 523: Adjusting Tone Curve
> > Scanning with Other Application Software > Advanced Guide Scanning Correcting Images and Adjusting Colors with ScanGear (Scanner Driver) > Adjusting Tone Curve S306 Adjusting Tone Curve In ScanGear (scanner driver)'s Advanced Mode tab, click (Tone Curve Settings). Note Click Defaults to reset all adjustments in the current window. - Page 524 Adjusting Tone Curve In Select Tone Curve, select a tone curve from No correction, Overexposure, Underexposure, High contrast, Reverse the negative/positive image and Edit custom curve. No correction (No adjustment) Overexposure (Convex curve) The midtone data of the input side is stretched toward the highlight of the output side, resulting in a bright-toned image when viewed on a monitor.
- Page 525 Edit custom curve You can drag specific points on the Tone Curve to freely adjust the brightness of the corresponding areas. Page top...
-
Page 526: Setting Threshold
> > Scanning with Other Application Software > Advanced Guide Scanning Correcting Images and Adjusting Colors with > Setting Threshold ScanGear (Scanner Driver) S307 Setting Threshold The brightness of color and grayscale images is expressed in a value between 0 and 255. However, in creating black and white images, all colors are mapped to either black (0) or white (255). -
Page 527: Scangear (Scanner Driver) Screens
> > Scanning with Other Application Software Advanced Guide Scanning > ScanGear (Scanner Driver) Screens S800 ScanGear (Scanner Driver) Screens The following sections describe ScanGear (scanner driver)'s screens and functions, and how to use ScanGear. Basic Mode Tab Advanced Mode Tab Input Settings Output Settings Image Settings... -
Page 528: Basic Mode Tab
> > Scanning with Other Application Software > > Advanced Guide Scanning ScanGear (Scanner Driver) Screens Basic Mode Tab S801 Basic Mode Tab This mode allows you to scan easily by following the on-screen steps. This section describes the settings and functions available on the Basic Mode tab. Settings and Operation Buttons Toolbar Preview Area... - Page 529 Display Preview Image Preview Performs a trial scan. Note When using the machine for the first time, scanner calibration starts automatically. Wait a while until the preview image appears. Destination Select what you want to do with the scanned image. Print Select this to print the scanned image on a printer.
- Page 530 Select an output size in pixels. A cropping frame of the selected monitor size will be displayed and the portion within the cropping frame will be scanned. You can drag the cropping frame to enlarge/reduce it while maintaining the aspect ratio. Add/Delete...
- Page 531 Auto Document Fix Sharpens text in a document or magazine for better readability. Important When this checkbox is selected in ScanGear (scanner driver) started from MP Navigator EX, the files can be saved in JPEG/Exif or PDF format only. Scanning may take longer than usual when this checkbox is selected. The color tone may change from the source image due to corrections.
- Page 532 (Thumbnail)/ (Whole Image) Switches the view in the Preview area. Preview Area (Rotate Left) Rotates the preview image 90 degrees counter-clockwise. - The result will be reflected in the scanned image. - The image returns to its original state when you preview again. (Rotate Right) Rotates the preview image 90 degrees clockwise.
- Page 533 Thumbnails of images cropped to the document size are displayed. Only the images with the checkbox selected will be scanned. Note When multiple images are previewed, different outlines indicate different selection status. - Focus Frame (thick blue outline): The displayed settings will be applied. - Selected Frame (thin blue outline): The settings will be applied to the Focus Frame and Selected Frames simultaneously.
- Page 534 Related Topic Scanning in Basic Mode Page top...
-
Page 535: Advanced Mode Tab
> > Scanning with Other Application Software > > Advanced Guide Scanning ScanGear (Scanner Driver) Screens Advanced Mode Tab S803 Advanced Mode Tab This mode allows you to make advanced scan settings such as the color mode, output resolution, image brightness and color tone. This section describes the settings and functions available on the Advanced Mode tab. - Page 536 Enter Setting Name and click Add. The name appears in Favorite Settings List. When you click Save, the item appears in the Favorite Settings list and can be selected, along with the predefined items. To delete an item, select it in Favorite Settings List and click Delete. Click Save to save settings displayed in Favorite Settings List.
- Page 537 Preview Performs a trial scan. Scan Scanning starts. Note When scanning starts, the progress will be displayed. Click Cancel to cancel the scan. When scanning is completed, a dialog box prompting you to select the next action may open. Follow the prompt to complete. For details, see Status of ScanGear dialog after scanning in " Scan Tab "...
- Page 538 (Thumbnail)/ (Whole Image) Switches the view in the Preview area. Preview Area (Clear) Click this button to delete the preview image. It also resets the Toolbar and color adjustment settings. (Crop) Allows you to specify the scan area by dragging the mouse. (Move Image) If an enlarged image is too large to fit in the Preview area, you can click this button and drag the image across the screen until the part you want to see is displayed.
- Page 539 Removes the selected cropping frame. (Information) Displays the version of ScanGear and the current scan settings (document type, etc.). (Open Guide) This page appears. Preview Area Preview Area This is where a trial image is displayed after you click Preview. You can also check the results of the settings (image corrections, color adjustments, etc.) made in "...
- Page 540 Note You can specify the scan area (cropping frame) on the displayed image. In thumbnail view, you can only create one cropping frame per image. In whole image view, you can create multiple cropping frames. Adjusting Cropping Frames Related Topic Scanning in Advanced Mode Page top...
-
Page 541: Input Settings
> > Scanning with Other Application Software > > Input Advanced Guide Scanning ScanGear (Scanner Driver) Screens Settings S804 Input Settings Input Settings allows you to set the following items: Select Source The type of document to be scanned is displayed. Paper Size Select the size of the document to be scanned. - Page 542 Select this mode to scan black and white photos, or to create black and white images. This mode renders the image in 256 levels (8 bit) of black and white. Black and White Select this mode to scan photos and documents in black and white. This mode renders the image in black and white.
-
Page 543: Output Settings
> > Scanning with Other Application Software > > Advanced Guide Scanning ScanGear (Scanner Driver) Screens Output Settings S805 Output Settings Output Settings allows you to set the following items: Output Resolution Select the resolution to scan at. The higher the resolution (value), the more detail in your image. Select a resolution from the options displayed by clicking the button, or enter a value within the range of 25 dpi to 19200 dpi (in 1 dpi increments). - Page 544 Output Settings or specify a value (by 1%) for %. The maximum value available for % depends on the Output Resolution. % can be specified for up to 19200 dpi (the maximum available output resolution). Paper Size (L, etc.) & Monitor Size (1024 x 768 pixels, etc.) (Width), (Height) and scale cannot be specified.
- Page 545 message appears when you click Scan. It is recommended that you adjust the settings to reduce Data Size. To continue, scan in whole image view. Page top...
-
Page 546: Image Settings
> > Scanning with Other Application Software > > Advanced Guide Scanning ScanGear (Scanner Driver) Screens Image Settings S806 Image Settings Important Do not apply these functions to images without moire, dust/scratches or faded colors. The color tone may be adversely affected. Image correction results may not be reflected in the preview image. - Page 547 Applies Image Adjustment suitable for magazines. Newspaper Applies Image Adjustment suitable for newspapers. Document Applies Image Adjustment suitable for text documents. Important You can set Image Adjustment after preview. You can set this setting when Recommended is selected on the Color Settings tab of the Preferences dialog box.
- Page 548 Fading correction will not be applied. Select this to correct a small amount of fading and colorcast. Medium It is recommended that you normally select this setting. High Select this to correct a large amount of fading and colorcast. This can affect the tone of the image. Important You can set Fading Correction after preview.
- Page 549 Gutter Shadow Correction Use this function to correct shadows that appear between pages when scanning open booklets. When you set the Gutter Shadow Correction setting in the preview image, the result will be reflected. Preview the effects before scanning, as results vary depending on the type of document and how it is pressed.
-
Page 550: Color Adjustment Buttons
> > Scanning with Other Application Software > > Color Advanced Guide Scanning ScanGear (Scanner Driver) Screens Adjustment Buttons S807 Color Adjustment Buttons The Color Adjustment Buttons allow you to make fine corrections to the image brightness and color tones. You can adjust the image's overall brightness or contrast, and adjust its highlight and shadow values (histogram) or balance (tone curve). - Page 551 (Histogram) A histogram allows you to see the data concentration at each brightness level of an image. You can specify the darkest level (shadow) and brightest level (highlight) within an image, cut the levels and expand the middle of the tonal range of the image. Adjusting Histogram (Tone Curve Settings) Adjust the brightness of an image by selecting the type of graph (tone curve) showing the balance of...
- Page 552 Enter Setting Name and click Add. The name appears in Tone Curve Settings List or Threshold Settings List. Click Save to save. You can load and apply the saved tone curve/threshold settings to a preview image. To load the settings, select the saved item from the pull-down menu. To delete an item, select it in Tone Curve Settings List or Threshold Settings List and click Delete.
- Page 553 > > Scanning with Other Application Software > Advanced Guide Scanning ScanGear (Scanner Driver) Screens > Auto Scan Mode Tab S813 Auto Scan Mode Tab This mode allows you to scan easily by simply placing documents on the Platen and clicking a button. On the Auto Scan Mode tab, documents are automatically detected.
- Page 554 Important When this checkbox is selected in ScanGear (scanner driver) started from MP Navigator EX, the files can be saved in JPEG/Exif or PDF format only. Scanning may take longer than usual when this checkbox is selected. You can set this setting when Recommended is selected on the Color Settings tab of the Preferences dialog box.
- Page 555 > > Scanning with Other Application Software > > Advanced Guide Scanning ScanGear (Scanner Driver) Screens Preferences Dialog Box S808 Preferences Dialog Box Click Preferences... in the ScanGear (scanner driver) screen to open Preferences dialog box. In the Preferences dialog box, you can make advanced settings to ScanGear functions via the Scanner, Preview, Scan and Color Settings tabs.
-
Page 556: Scanner Tab
> > Scanning with Other Application Software > > Advanced Guide Scanning ScanGear (Scanner Driver) Screens Scanner Tab S812 Scanner Tab On the Scanner tab, you can specify the following settings. Quiet Mode Select this checkbox to reduce scanner sound by slowing down the scanner head when previewing or scanning documents. - Page 557 Page top...
-
Page 558: Preview Tab
> > Scanning with Other Application Software > > Advanced Guide Scanning ScanGear (Scanner Driver) Screens Preview Tab S809 Preview Tab On the Preview tab, you can specify the following settings. Preview at Start of ScanGear Select what to do with Preview when ScanGear (scanner driver) is started. Automatically Execute Preview ScanGear will automatically start previewing at startup. - Page 559 No cropping frame will be displayed after previewing. Cropping Size for Thumbnail View Select the cropping size for thumbnails of scanned documents. Larger Displays 105% (in width and height) of the area displayed for the standard size. Standard The standard size. Smaller Displays 95% (in width and height) of the area displayed for the standard size.
-
Page 560: Scan Tab
> > Scanning with Other Application Software > Advanced Guide Scanning ScanGear (Scanner Driver) Screens > Scan S810 Scan Tab On the Scan tab, you can specify the following settings. Status of ScanGear dialog after scanning Select what to do with ScanGear (scanner driver) after scanning images. Close ScanGear automatically Select this to return to the original application when scanning is completed. -
Page 561: Color Settings Tab
> > Scanning with Other Application Software > > Color Advanced Guide Scanning ScanGear (Scanner Driver) Screens Settings Tab S811 Color Settings Tab On the Color Settings tab, you can specify the following settings. Color Adjustment Select either of the following. You can select one when Color Mode is Color or Grayscale. - Page 562 characteristics of the monitor. Adjust the value if your monitor's gamma value does not match the default value set in ScanGear, and the colors of the original image are not accurately reflected in the monitor. Click Defaults to return to the default Monitor Gamma value (2.20). Note Refer to the manual of your monitor to check its gamma value.
- Page 563 > > Scanning with Other Application Software Advanced Guide Scanning > Appendix: Useful Information on Scanning S012 Appendix: Useful Information on Scanning Adjusting the cropping frame (scan area) Adjusting Cropping Frames Selecting the best resolution Resolution Learning about file formats File Formats Learning about Color Matching Color Matching...
- Page 564 > > Scanning with Other Application Software > > Advanced Guide Scanning Appendix: Useful Information on Scanning Adjusting Cropping Frames S802 Adjusting Cropping Frames You can specify the scan area by creating a cropping frame on the image displayed in the Preview area of the ScanGear (scanner driver) screen.
- Page 565 The cursor will change into (Crosshair arrow) when it is positioned within a cropping frame. Click and drag the mouse to move the entire cropping frame. Note In Advanced Mode tab, you can specify the cropping frame size by entering the values into (Width) and (Height) in Input Settings.
- Page 566 You can create multiple cropping frames and apply different scan settings to each cropping frame. You can also select multiple cropping frames by clicking them while pressing the Ctrl key. If you select multiple cropping frames and change the settings on a tab at the right of ScanGear, the settings will be applied to all the selected cropping frames.
- Page 567 > > Scanning with Other Application Software > > Advanced Guide Scanning Appendix: Useful Information on Scanning Resolution S309 Resolution What is Resolution? The data in the image you have scanned is a collection of dots carrying information about brightness and color.
- Page 568 Scale: 200% Setting the Resolution in ScanGear (Scanner Driver) In ScanGear, you can specify the resolution with Output Resolution in Output Settings on the Advanced Mode tab. Example of Appropriate Resolution when Printing to Scale The scanning resolution is automatically set so that the value set in Output Resolution will be the resolution of the scanned image.
- Page 569 Important If you double the resolution, the file size quadruples. If the file is too large, the processing speed will slow down significantly, and you will experience inconvenience such as lack of memory. Set the minimum required resolution according to the use of the image. Page top...
-
Page 570: File Formats
> > Scanning with Other Application Software > > Advanced Guide Scanning Appendix: Useful Information on Scanning File Formats S310 File Formats You can select a file format when saving scanned images. You should specify the most suitable format according to how you want to use the image on which application. Available file formats vary by application and computer (Windows or Macintosh). -
Page 571: Color Matching
> > Scanning with Other Application Software > > Advanced Guide Scanning Appendix: Useful Information on Scanning Color Matching S815 Color Matching Color Matching adjusts devices as shown below to match the colors of an image displayed on a monitor or a printed image with the colors of the original document. - Page 572 > Повний посібник Сканування > Інші методи сканування Інші методи сканування Сканування за допомогою драйвера WIA Сканування за допомогою панелі керування (лише Windows XP) На початок сторінки...
-
Page 573: Scanning With Wia Driver
> > Advanced Guide Scanning Other Scanning Methods > Scanning with WIA Driver S604 Scanning with WIA Driver You can scan an image from a WIA-compliant application and use the image in that application. Windows Image Acquisition (WIA) is a driver model implemented in Windows XP or later. It allows you to scan documents without using an application. - Page 574 File type Select a file format from JPEG, BMP, PNG and TIFF. Resolution (DPI) Enter the resolution. Specify a value between 50 dpi and 600 dpi. 300 dpi is set by default. Resolution Brightness Move the slider to adjust the brightness. Move it to the left to darken and right to brighten the image.
- Page 575 Brightness Move the slider to adjust the brightness. Move it to the left to darken and right to brighten the image. You can also enter a value (-127 to 127). Contrast Move the slider to adjust the contrast. Moving it to the left will decrease the contrast of the image, thus softening the image.
-
Page 576: Scanning Using The Control Panel (Windows Xp Only)
You can scan images via the Control Panel of Windows XP using the WIA driver. From the Start menu, select Control Panel. Click Printers and Other Hardware > Scanners and Cameras, then double-click WIA Canon (model name). The Scanner and Camera Wizard dialog box opens. Click Next. - Page 577 Move the slider to adjust the contrast. Moving it to the left will decrease the contrast of the image, thus softening the image. Moving it to the right will increase the contrast of the image, thus sharpening the image. You can also enter a value (-127 to 127). Resolution (DPI) Enter the resolution.
-
Page 578: Технічне Обслуговування
> Технічне обслуговування Повний посібник Технічне обслуговування Чищення апарата Вирівнювання друкуючої головки Технічне обслуговування з комп’ютера На початок сторінки... - Page 579 > > Чищення апарата Повний посібник Технічне обслуговування Чищення апарата Чищення Чищення зовнішньої поверхні апарата Чищення скла експонування та кришки для притиснення документів На початок сторінки...
- Page 580 > > > Чищення Повний посібник Технічне обслуговування Чищення апарата U059 Чищення У цьому розділі описана процедура чищення, яка потрібна для підтримання апарата в робочому стані. Важливо Не використовуйте для чищення зовнішніх частин апарата папір на основі тканини, паперові рушники, грубі тканини та інші матеріали подібної фактури, оскільки вони можуть залишити на поверхні...
- Page 581 > > Повний посібник Технічне обслуговування Чищення апарата > Чищення зовнішньої поверхні апарата U060 Чищення зовнішньої поверхні апарата Обов’язково використовуйте м’які тканини, наприклад тканину для протирання окулярів, і обережно витирайте нею бруд із поверхні. У разі потреби розправте складки на тканині перед чищенням.
- Page 582 > > Повний посібник Технічне обслуговування Чищення апарата > Чищення скла експонування та кришки для притиснення документів U061 Чищення скла експонування та кришки для притиснення документів Важливо Перед початком чищення апарата обов’язково вимкніть його та від’єднайте від нього шнур живлення. Обережно...
- Page 583 > > Вирівнювання друкуючої головки Повний посібник Технічне обслуговування Вирівнювання друкуючої головки Вирівнювання друкуючої головки На початок сторінки...
- Page 584 > > > Вирівнювання друкуючої Повний посібник Технічне обслуговування Вирівнювання друкуючої головки головки U096 Вирівнювання друкуючої головки Якщо паралельні лінії друкуються зі зміщенням або якість друку незадовільна, відрегулюйте положення друкуючої головки. Примітка За умови низького рівня чорнила, що залишилося, аркуш вирівнювання друкуючої головки не буде...
- Page 585 Важливо Не торкайтеся будь-яких надрукованих частин на аркуші вирівнювання друкуючої головки. Будьте обережні, щоб не забруднити аркуш вирівнювання друкуючої головки. Якщо аркуш забрудниться або викривиться, сканування може відбуватися неправильно. Відскануйте аркуш вирівнювання друкуючої головки, щоб відрегулювати її положення. 1. Завантажте аркуш вирівнювання друкуючої головки на скло експонування. Завантажте...
- Page 586 > > Технічне обслуговування з комп’ютера Повний посібник Технічне обслуговування Технічне обслуговування з комп’ютера Чищення друкуючих головок Чищення роликів подавання паперу Вирівнювання положення друкуючої головки Перевірка сопел друкуючої головки Чищення внутрішніх компонентів апарата На початок сторінки...
-
Page 587: Cleaning The Print Heads
> Maintenance > Performing Maintenance from a Computer > Cleaning the Print Heads Advanced Guide P026 Cleaning the Print Heads The print head cleaning function allows you to unclog clogged nozzles in the print head. Perform print head cleaning if printing is faint or a specific color fails to print, even though there is enough ink. The procedure for cleaning the print heads is as follows: Cleaning Open the... - Page 588 The Nozzle Check dialog box opens after the confirmation message. Check the results To check whether the print quality has improved, click Print Check Pattern. To cancel the check process, click Cancel. Important Cleaning consumes a small amount of ink. Deep Cleaning consumes a larger amount of ink than Cleaning.
-
Page 589: Cleaning The Paper Feed Rollers
> Maintenance > Performing Maintenance from a Computer > Cleaning the Paper Feed Rollers Advanced Guide P027 Cleaning the Paper Feed Rollers Cleans the paper feed roller. Perform feed roller cleaning when there are paper particles sticking to the paper feed roller and paper is not fed properly. The procedure for performing the feed roller cleaning is as follows: Roller Cleaning Prepare the machine... -
Page 590: Aligning The Print Head Position
> Maintenance > Performing Maintenance from a Computer > Aligning the Print Head Position Advanced Guide P028 Aligning the Print Head Position Print head alignment corrects the installation positions of the print head and improves deviated colors and lines. This machine supports two head alignment methods: automatic head alignment and manual head alignment. - Page 591 When you have entered all the necessary values, click OK. Note If it is difficult to pick the best pattern, pick the setting that produces the least noticeable vertical white streaks. (A) Less noticeable vertical white streaks (B) More noticeable vertical white streaks If it is difficult to pick the best pattern, pick the setting that produces the least noticeable horizontal white streaks.
- Page 592 When you have entered all the necessary values, click OK. Note If it is difficult to pick the best pattern, pick the setting that produces the least noticeable vertical white streaks. (A) Less noticeable vertical white streaks (B) More noticeable vertical white streaks Confirm the displayed message and click OK The third pattern is printed.
- Page 593 When you have entered all the necessary values, click OK. Note If it is difficult to pick the best pattern, pick the setting that produces the least noticeable horizontal white stripes. (A) Less noticeable horizontal white stripes (B) More noticeable horizontal white stripes Note To print and check the current setting, open the Start Print Head Alignment dialog box, and click Print Alignment Value.
-
Page 594: Checking The Print Head Nozzles
> Maintenance > Performing Maintenance from a Computer > Checking the Print Head Nozzles Advanced Guide P029 Checking the Print Head Nozzles The nozzle check function allows you to check whether the print heads are working properly by printing a nozzle check pattern. -
Page 595: Cleaning Inside The Machine
> Maintenance > Performing Maintenance from a Computer > Cleaning Inside the Machine Advanced Guide P030 Cleaning Inside the Machine Perform bottom plate cleaning before you execute duplex printing to prevent smudges on the back side of the paper. Also perform bottom plate cleaning if ink smudges caused by something other than print data appear on the printed page. - Page 596 > Змінення параметрів апарата Повний посібник Змінення параметрів апарата Змінення параметрів апарата з комп’ютера На початок сторінки...
- Page 597 > > Змінення параметрів апарата з комп’ютера Повний посібник Змінення параметрів апарата Змінення параметрів апарата з комп’ютера Змінення параметрів друку Реєстрація часто використовуваних профілів друку Установлення картриджа з чорнилом, який потрібно використовувати Керування живленням апарата Зменшення шуму апарата Змінення робочого режиму апарата На...
-
Page 598: Changing The Print Options
> Changing the Machine Settings > Changing Machine Settings from Your Computer > Changing the Advanced Guide Print Options P413 Changing the Print Options You change the detailed print driver settings for print data that is sent from an application software. Specify this option if you encounter print failures such as part of an image data being cut off. -
Page 599: Registering A Frequently Used Printing Profile
> Changing the Machine Settings > Changing Machine Settings from Your Computer > Registering a Advanced Guide Frequently Used Printing Profile P417 Registering a Frequently Used Printing Profile You can register the frequently used printing profile to Commonly Used Settings on the Quick Setup tab. Unnecessary printing profiles can be deleted at any time. - Page 600 Save the settings Enter a name in the Name field, and if necessary, set the items in Options..Then click OK. The printing profile is saved, and the Quick Setup tab is displayed again. The name and icon are added to the Commonly Used Settings list. Important To save the page size, orientation, and number of copies that was set in each sheet, click Options..., and check each item.
-
Page 601: Setting The Ink Cartridge To Be Used
> Changing the Machine Settings > Changing Machine Settings from Your Computer > Setting the Ink Advanced Guide Cartridge to be Used P033 Setting the Ink Cartridge to be Used This feature enables you to specify the most appropriate ink cartridge among installed cartridges according to an intended use. -
Page 602: Managing The Machine Power
> Changing the Machine Settings > Changing Machine Settings from Your Computer > Managing the Advanced Guide Machine Power P414 Managing the Machine Power This function allows you to manage the machine power from the printer driver. The procedure for managing the printer power is as follows: Power Off The Power Off function turns off the machine. -
Page 603: Reducing The Machine Noise
> Changing the Machine Settings > Changing Machine Settings from Your Computer > Reducing the Advanced Guide Machine Noise P034 Reducing the Machine Noise This function allows you to reduce the operating noise. Select when you wish to reduce the operating noise of the printer at night, etc. -
Page 604: Changing The Machine Operation Mode
> Changing the Machine Settings > Changing Machine Settings from Your Computer > Changing the Advanced Guide Machine Operation Mode P035 Changing the Machine Operation Mode If necessary, switch between various modes of machine operation. The procedure for configuring Custom Settings is as follows: Custom Settings Open the printer driver setup window... -
Page 605: Усунення Неполадок
Повний посібник > Усунення неполадок Усунення неполадок Якщо виникає помилка Апарат не вмикається Відображення коду помилки на світлодіодному індикаторі Відсутність інформації на світлодіодному індикаторі Не вдається встановити драйвери MP Не вдається встановити прикладну програму Не вдається належним чином встановити підключення до комп’ютера за допомогою кабелю Незадовільна... - Page 606 > Повний посібник Усунення неполадок > Якщо виникає помилка U302 Якщо виникає помилка Якщо в процесі друку сталася помилка, наприклад через брак паперу у принтері або зминання паперу, автоматично відображається повідомлення з рекомендаціями щодо усунення неполадки. Виконайте потрібні дії, описані в повідомленні. Формулювання повідомлення залежить від версії встановленої...
- Page 607 > > Апарат не вмикається Повний посібник Усунення неполадок U303 Апарат не вмикається Перевірка 1: натисніть кнопку УВІМК. Перевірка 2: переконайтеся, що шнур живлення надійно приєднаний до гнізда підключення шнура живлення апарата, після чого знову увімкніть апарат. Перевірка 3: від’єднайте апарат від джерела живлення, зачекайте щонайменше...
- Page 608 > Повний посібник Усунення неполадок > Відображення коду помилки на світлодіодному індикаторі U305 Відображення коду помилки на світлодіодному індикаторі Індикатор попередження горить жовтогарячим Якщо в апараті сталася помилка, індикатор Попередження (Alarm) горить жовтогарячим, а на світлодіодному індикаторі відображається наведений нижче код помилки. Перевірте код помилки, що...
- Page 609 світлодіодному фірма Canon рекомендує індикаторі) використовувати нові оригінальні картриджі Canon. Будь ласка, майте на увазі, що фірма Canon не несе відповідальності за будь-які несправності та неправильну роботу, спричинені продовженням друку за умови відсутності чорнила. E, 1, 4 Картридж FINE не...
- Page 610 принтері. Установіть сумісний картридж FINE. Регулярне обслуговування (відображення на світлодіодному індикаторі) E, 1, 5 Картридж FINE не Ймовірно, картридж FINE не вдається розпізнати. встановлено належним чином. Відкрийте модуль сканування (кришку) та встановіть картридж FINE належним чином. Регулярне обслуговування (відображення на світлодіодному...
- Page 611 (відображення на світлодіодному індикаторі) E, 5, 0 Не вдалося виконати Натисніть кнопку Стоп/Скинути сканування аркуша (Stop/Reset) , щоб відхилити вирівнювання друкуючої помилку, а потім виконайте головки. відповідні дії, описані нижче. Переконайтеся, що аркуш вирівнювання друкуючої головки розміщено на склі експонування належним чином та...
- Page 612 Код помилки Дія P, 0, 2 Скасуйте друк із свого комп’ютера та вимкніть апарат. Після цього усуньте зім’ ятий папір або захисний матеріал, який перешкоджає руху тримача картриджа FINE, а потім увімкніть апарат ще раз. Важливо Будьте обережні — не торкайтеся компонентів...
- Page 613 > Повний посібник Усунення неполадок > Відсутність інформації на світлодіодному індикаторі U343 Відсутність інформації на світлодіодному індикаторі Якщо індикатор ЖИВЛЕННЯ (POWER) вимкнено: УВІМК. . Апарат не увімкнений. Приєднайте шнур живлення та натисніть кнопку Якщо індикатор ЖИВЛЕННЯ (POWER) світиться: Можливо, світлодіодний індикатор перебуває в режимі заставки. На панелі керування натисніть...
- Page 614 > > Не вдається встановити драйвери MP Повний посібник Усунення неполадок U308 Не вдається встановити драйвери MP Якщо процес встановлення не розпочинається навіть після того, як у пристрій читання дисків вставлено Компакт-диск із програмою встановлення (Setup CD-ROM) , виконайте вказані нижче...
- Page 615 Якщо процес встановлення не йде далі екрана Printer Connection, переконайтеся, що кабель USB надійно приєднано до порту USB пристрою та до комп’ютера, після чого виконайте описану нижче процедуру, щоб перевстановити драйвери MP. Примітка Залежно від використовуваного типу комп’ютера може відобразитися повідомлення Принтер...
- Page 616 Якщо драйвери MP були встановлені неправильно, видаліть їх, перезавантажте комп’ютер, а потім перевстановіть драйвери MP. Видалення непотрібних драйверів MP Під час повторного встановлення драйверів MP виконайте команду Custom Install на Компакт- диску із програмою встановлення (Setup CD-ROM) , потім виберіть MP Drivers. Примітка...
- Page 617 Потрібен доступ до Інтернету під час установлення або завантаження програми Easy-WebPrint EX. З користувача стягується плата за підключення. Перевірка 2: чи вибрано програму Canon Easy-WebPrint EX у меню Панелі інструментів (Toolbars) меню Вигляд (View) браузера Internet Explorer? Якщо Canon Easy-WebPrint EX не вибрано, функція Easy-WebPrint вимикається. Виберіть...
- Page 618 > > Не вдається належним чином встановити підключення до комп’ютера Повний посібник Усунення неполадок за допомогою кабелю USB U309 Не вдається належним чином встановити підключення до комп’ютера за допомогою кабелю USB Швидкість друку чи сканування низька/Підключення Hi-Speed USB не працює/ Відображається...
- Page 619 > > Незадовільна якість результатів друку Повний посібник Усунення неполадок U310 Незадовільна якість результатів друку Якщо результати друку незадовільні, наприклад, трапляються білі смуги, перекіс прямих ліній або неоднорідність кольорів, спершу перевірте параметри паперу та якості друку. Перевірка 1: чи відповідають параметри розміру сторінки та типу носія...
- Page 620 > > Повний посібник Усунення неполадок Незадовільна якість результатів друку > Не вдається виконати завдання друку повністю U311 Не вдається виконати завдання друку повністю Перевірка 1: чи не є розмір даних для друку надто великим? Клацніть Print Options на вкладці Page Setup. Після цього встановіть прапорець Prevent loss of print data у...
- Page 621 > > > Друк не виконується/ Повний посібник Усунення неполадок Незадовільна якість результатів друку Надруковане зображення нечітке/Неправильні кольори/Білі смуги U313 Друк не виконується/Надруковане зображення нечітке/ Неправильні кольори/Білі смуги Друк не виконується Надруковане зображення нечітке Неправильні кольори Білі смуги...
- Page 622 Перевірка 1: чи перевірено параметри паперу та якості друку? Незадовільна якість результатів друку Перевірка 2: чи встановлено картридж FINE належним чином? Якщо кришку фіксації картриджа не закрито повністю, чорнило може подаватися неправильно. Відкрийте модуль сканування (кришку), відкрийте кришку фіксації картриджа, потім закрийте її. Закриваючи...
- Page 623 друку, переконайтеся, що папір завантажено стороною, призначеною для друку, вгору. Друк на неправильній стороні такого паперу може призвести до нечіткого друку або друку з низькою якістю. Для отримання докладнішої інформації про визначення сторони для друку див. інструкцію з експлуатації, яка надається в комплекті постачання паперу. Перевірка...
- Page 624 > > > Кольори роздруківок нечіткі Повний посібник Усунення неполадок Незадовільна якість результатів друку U314 Кольори роздруківок нечіткі Перевірка 1: увімкніть корекцію кольорів. Якщо під час друку фотографій або інших графічних зображень активувати корекцію кольорів у драйвері принтера, якість кольорів на роздруківках може покращитися. Виберіть...
- Page 625 На початок сторінки...
- Page 626 > > Повний посібник Усунення неполадок Незадовільна якість результатів друку > Перекіс прямих ліній U315 Перекіс прямих ліній Перевірка 1: чи перевірено параметри паперу та якості друку? Незадовільна якість результатів друку Перевірка 2: виконайте вирівнювання друкуючої головки. Якщо паралельні лінії друкуються зі зміщенням або якість друку незадовільна, відрегулюйте положення...
- Page 627 Перевірка 3: чи використовується для друку фотографій фотопапір? Під час друку даних із високою насиченістю кольорів, наприклад фотографій або зображень із насиченими кольорами, рекомендується використовувати фотопапір Photo Paper Plus Glossy II або інший спеціальний папір Canon. Завантаження паперу й оригінальних документів На початок сторінки...
- Page 628 > > Повний посібник Усунення неполадок Незадовільна якість результатів друку > Папір містить забруднення/ Подряпини на поверхні роздруківок U317 Папір містить забруднення/Подряпини на поверхні роздруківок Папір містить забруднення Краї паперу забруднені Поверхня роздруківок забруднена Подряпини на поверхні роздруківок Перевірка 1: чи перевірено параметри паперу та якості друку? Незадовільна...
-
Page 629: Prevent Paper Abrasion
забруднитися або не подаватися належним чином. У такому разі виконайте процедуру, описану нижче, для корекції скручування паперу. 1. Скрутіть папір у напрямку, протилежному скручуванню паперу, як показано нижче. 2. Переконайтеся, що папір вирівняно. Для виконання друку на папері, скручування якого вдалося виправити, рекомендується завантажувати... - Page 630 Щоб встановити параметр за допомогою комп’ютера Відкрийте вікно настроювання драйвера принтера, потім у розділі Custom Settings на вкладці Maintenance установіть прапорець Prevent paper abrasion, а потім клацніть Send. Докладніше про те, як відкрити вікно настроювання драйвера принтера, див. у розділі Відкриття...
- Page 631 Примітка Щоб запобігти забрудненню внутрішніх компонентів апарата, встановіть правильний розмір паперу. Перевірка 10: встановіть для параметра Ink Drying Wait Time більше значення. Виконання цієї операції забезпечує достатню кількість часу для висихання друкованої поверхні та запобігає забрудненню паперу та появі подряпин на папері. Переконайтеся, що...
- Page 632 > > Повний посібник Усунення неполадок Незадовільна якість результатів друку > Зворотна сторона паперу забруднена чорнилом U318 Зворотна сторона паперу забруднена чорнилом Перевірка 1: чи перевірено параметри паперу та якості друку? Незадовільна якість результатів друку Перевірка 2: виконайте чищення піддона, щоб очистити внутрішні елементи...
- Page 633 > > > З обох сторін роздруківки Повний посібник Усунення неполадок Незадовільна якість результатів друку містяться вертикальні риски U319 З обох сторін роздруківки містяться вертикальні риски Перевірка 1: чи перевірено параметри типу паперу та якості друку? Незадовільна якість результатів друку Перевірка...
- Page 634 > > > Кольори неоднорідні або є білі Повний посібник Усунення неполадок Незадовільна якість результатів друку смуги U320 Кольори неоднорідні або є білі смуги Кольори неоднорідні Є смуги Перевірка 1: чи перевірено параметри паперу та якості друку? Незадовільна якість результатів друку Перевірка...
- Page 635 години виконайте глибоке чищення друкуючої головки ще раз. Якщо після повторного глибокого чищення друкуючої головки усунути неполадку не вдається: Можливо, закінчилося чорнило. Замініть картридж FINE. Перевірка 3: виконайте вирівнювання друкуючої головки. Вирівнювання друкуючої головки Примітка Якщо проблема не вирішується після виконання вирівнювання друкуючої головки, виконайте...
- Page 636 > Повний посібник Усунення неполадок > Друк не починається U321 Друк не починається Перевірка 1: переконайтеся, що шнур живлення надійно приєднано до апарата, після чого ввімкніть апарат. ЖИВЛЕННЯ (POWER) Блимання індикатора зеленим свідчить про виконання ініціалізації апарата. Зачекайте, доки індикатор ЖИВЛЕННЯ...
- Page 637 Printer (де «XXX» — назва апарата), а потім виберіть пункт Властивості (Properties). Перейдіть на вкладку Порти (Ports), щоб підтвердити параметри порту. Переконайтеся, що порт із назвою USBnnn (де «n» — це цифра) і Canon XXX Printer, що відображаються у стовпці Printer, вибрано для Print to the following port(s).
- Page 638 > > Копіювання/друк припиняється до завершення завдання Повний посібник Усунення неполадок U322 Копіювання/друк припиняється до завершення завдання Перевірка 1: чи виконував апарат друк безперервно протягом тривалого періоду? Якщо протягом тривалого часу апарат безперервно перебуває у процесі друку, друкуюча головка може перегрітися. Щоб захистити друкуючу головку, апарат може тимчасово припинити друк...
- Page 639 > > Апарат працює, але чорнило не подається Повний посібник Усунення неполадок U323 Апарат працює, але чорнило не подається Перевірка 1: чи не закупорені сопла друкуючої головки? Роздрукуйте зразок для перевірки сопел, щоб визначити, чи правильно подається чорнило із сопел друкуючої головки. Докладніше...
- Page 640 > Повний посібник Усунення неполадок > Швидкість друку нижча за очікувану U324 Швидкість друку нижча за очікувану Перевірка 1: чи виконується друк у режимі Quiet Mode? Якщо в комп’ютері для друку вибрано Quiet Mode, швидкість друку зменшується. Щоб збільшити швидкість друку, не друкуйте в режимі Quiet Mode. Зменшення...
- Page 641 > Повний посібник Усунення неполадок > Тримач для картриджа FINE не переміщується до потрібної позиції для заміни U325 Тримач для картриджа FINE не переміщується до потрібної позиції для заміни Перевірка 1: чи вимкнено індикатор ЖИВЛЕННЯ (POWER) ? ЖИВЛЕННЯ (POWER) Переконайтеся, що індикатор горить...
- Page 642 > Повний посібник Усунення неполадок > Неправильне подавання паперу U326 Неправильне подавання паперу Перевірка 1: під час завантаження паперу переконайтеся, що ви дотримуєтеся наведених нижче інструкцій. Перед завантаженням двох або більше аркушів паперу перегорніть їх. Перед завантаженням двох або більше аркушів паперу вирівняйте їхні краї. Під...
- Page 643 , щоб видалити його. Якщо аркуш розірвався в задньому лотку, див. розділ Зминання паперу Якщо в задньому лотку виявлено будь-які сторонні предмети, обов’язкового вимкніть апарат, відключіть його від джерела живлення, а потім вийміть сторонній предмет. Перевірка 5: очистьте ролик подавання паперу. Регулярне...
-
Page 644: Зминання Паперу
> > Зминання паперу Повний посібник Усунення неполадок U328 Зминання паперу Примітка Якщо під час виконання друку потрібно вимкнути апарат для усунення зім’ятого паперу, натисніть кнопку Стоп/Скинути (Stop/Reset) , щоб скасувати виконання завдань друку перед вимкненням апарата. Сталося зминання паперу в лотку виведення паперу або задньому лотку В... - Page 645 > > > Сталося зминання паперу в лотку виведення Повний посібник Усунення неполадок Зминання паперу паперу або задньому лотку U349 Сталося зминання паперу в лотку виведення паперу або задньому лотку Видаліть папір, виконавши описану нижче процедуру. Повільно вийміть папір із лотка виведення паперу або із заднього лотка (залежно...
- Page 646 > > Повний посібник Усунення неполадок Зминання паперу > В інших випадках U353 В інших випадках Переконайтеся у зазначеному нижче. Перевірка 1: чи немає навколо лотка виведення паперу сторонніх предметів? Перевірка 2: чи є в задньому лотку сторонні предмети? Якщо в задньому лотку виявлено будь-які сторонні предмети, обов’язкового вимкніть апарат, відключіть...
- Page 647 > Повний посібник Усунення неполадок > Повідомлення на екрані комп’ютера U331 Повідомлення на екрані комп’ютера Відображається повідомлення Error Number: B200 A printer error has occurred. Turn the printer off and unplug the power cord of the printer from the power supply. Then contact the service center. Відображається...
- Page 648 (Properties). Перейдіть на вкладку Порти (Ports), щоб підтвердити параметри порту. Переконайтеся, що порт із назвою USBnnn (де «n» — це цифра) і Canon XXX Printer, що відображаються у стовпці Printer, вибрано для Print to the following port(s). Якщо параметри неправильні: Повторно...
- Page 649 and Sound), після чого виберіть пункт Диспетчер пристроїв (Device Manager). У разі відображення екрана Служба захисту користувачів (User Account Control) дотримуйтесь інструкцій на екрані. В ОС Windows XP виберіть пункт Панель керування (Control Panel), Продуктивність та обслуговування (Performance and Maintenance), Система (System), після чого виберіть...
- Page 650 Якщо ви погоджуєтеся взяти участь у програмі опитувань: Натисніть кнопку Agree, а потім виконуйте інструкції, що з’являтимуться на екрані. Інформацію про використання принтера буде надіслано через Інтернет. Якщо інструкції, які з’являлися на екрані, виконано, у подальшому інформація надсилатиметься автоматично, а екран підтвердження більше не відображатиметься. Примітка...
- Page 651 інструкцій на екрані. 2. Виберіть пункт Canon Inkjet Printer/Scanner/Fax Extended Survey Program. 3. Виберіть пункт Change. Якщо натиснути кнопку Yes після виконання інструкцій на екрані, відобразиться екран підтвердження під час наступного опитування. Якщо вибрати пункт No, інформацію буде надіслано автоматично.
- Page 652 назва апарата), а потім виберіть пункт Scan properties. Якщо з’являється екран Служба захисту користувачів (User Account Control), клацніть Так (Yes). Відкрийте вкладку Дії (Events) на екрані WIA Canon XXX ser Properties (де «XXX» — назва апарата). Виберіть пункт Запустити цю програму (Start this program) для розділу Дії...
- Page 653 Виберіть Пуск (Start) > Панель керування (Control Panel) > Устаткування та звук (Hardware and Sound) > Сканери та камери (Scanners and Cameras). Виберіть WIA Canon XXX ser (де «XXX» — назва апарата), а потім натисніть кнопку Властивості (Properties). Якщо з’являється екран Служба захисту користувачів (User Account Control), клацніть...
-
Page 654: Problems With Scanning
> Advanced Guide Troubleshooting > Problems with Scanning S901 Problems with Scanning Scanner Does Not Work ScanGear (Scanner Driver) Does Not Start Error Message Appears and the ScanGear (Scanner Driver) Screen Does Not Appear Scan Quality (Image Displayed on the Monitor) Is Poor Scanned Image Is Surrounded by Extra White Areas Cannot Scan Multiple Documents at One Time Cannot Scan Properly in Auto Scan Mode... -
Page 655: Scanner Does Not Work
> > > Scanner Does Not Work Advanced Guide Troubleshooting Problems with Scanning S902 Scanner Does Not Work Check 1: Make sure that the machine is turned on. Check 2: Connect the USB cable to a different USB port on the computer. Check 3: If the USB cable is connected to a USB hub, remove it from the USB hub and connect it to a USB port on the computer. -
Page 656: Scangear (Scanner Driver) Does Not Start
> > Advanced Guide Troubleshooting Problems with Scanning > ScanGear (Scanner Driver) Does Not Start S903 ScanGear (Scanner Driver) Does Not Start Check 1: Make sure that the MP Drivers is installed. If it is not installed, insert the Setup CD-ROM into the computer's disc drive, then select Custom Install and install MP Drivers. -
Page 657: Error Message Appears And The Scangear (Scanner Driver) Screen Does Not Appear
> > Advanced Guide Troubleshooting Problems with Scanning > Error Message Appears and the ScanGear (Scanner Driver) Screen Does Not Appear S904 Error Message Appears and the ScanGear (Scanner Driver) Screen Does Not Appear Check 1: Make sure that the machine is turned on. Check 2: Turn off the machine, then reconnect the USB cable and replug the power cord. -
Page 658: Scan Quality (Image Displayed On The Monitor) Is Poor
> > > Scan Quality (Image Displayed on the Monitor) Is Poor Advanced Guide Troubleshooting Problems with Scanning S905 Scan Quality (Image Displayed on the Monitor) Is Poor Check 1: Increase the scanning resolution. Resolution Check 2: Set the scale to 100%. Some applications do not display images clearly if the image is too small. - Page 659 Color Settings Tab Page top...
-
Page 660: Scanned Image Is Surrounded By Extra White Areas
> > Advanced Guide Troubleshooting Problems with Scanning > Scanned Image Is Surrounded by Extra White Areas S906 Scanned Image Is Surrounded by Extra White Areas Check: Specify the scan area. Click (Auto Crop) in whole image view of ScanGear (scanner driver) to automatically display the cropping frame (scan area) according to the document size. - Page 661 > > > Cannot Scan Multiple Documents at One Time Advanced Guide Troubleshooting Problems with Scanning S907 Cannot Scan Multiple Documents at One Time Check 1: Make sure that the documents are placed correctly on the Platen. Placing Documents Check 2: Scan each item individually. Some applications do not support multiple image scanning.
- Page 662 > > Advanced Guide Troubleshooting Problems with Scanning > Cannot Scan Properly in Auto Scan Mode S916 Cannot Scan Properly in Auto Scan Mode Check 1: Make sure that the documents are placed correctly on the Platen. Placing Documents Check 2: Multiple image scanning may not be supported. Some applications do not support multiple image scanning.
-
Page 663: Slow Scanning Speed
> > Advanced Guide Troubleshooting Problems with Scanning > Slow Scanning Speed S908 Slow Scanning Speed Check 1: To view the image on a monitor, set the output resolution to around 150 dpi. To print, set it to around 300 dpi. Resolution Check 2: Set Fading Correction, Grain Correction, etc. -
Page 664: "There Is Not Enough Memory." Message Is Displayed
> > > "There is not enough memory." Message Is Displayed Advanced Guide Troubleshooting Problems with Scanning S909 "There is not enough memory." Message Is Displayed Check 1: Exit other applications and try again. Check 2: Reduce the resolution or output size and scan again. Resolution Page top... -
Page 665: Computer Stops Operating During Scanning
> > > Computer Stops Operating during Scanning Advanced Guide Troubleshooting Problems with Scanning S910 Computer Stops Operating during Scanning Check 1: Restart the computer, reduce the output resolution in ScanGear (scanner driver) and scan again. Check 2: Delete unnecessary files to obtain sufficient free hard disk space, then scan again. -
Page 666: Scanner Does Not Work After Upgrading Windows
"Deleting the Unnecessary MP Drivers " for details. Step 2: Uninstall MP Navigator EX. From the Start menu, select All Programs > Canon Utilities > MP Navigator EX 4.0 > MP Navigator EX Uninstall. Note In Windows 7 or Windows Vista, a confirmation/warning dialog box may appear when installing, uninstalling or starting up software. -
Page 667: Software Problems
> Advanced Guide Troubleshooting > Software Problems S930 Software Problems E-mail Software Program You Want to Use Does Not Appear in the Screen for Selecting an E-mail Software Program Scanned Image Is Printed Enlarged (Reduced) Scanned Image Is Enlarged (Reduced) on the Computer Monitor Scanned Image Does Not Open Page top... - Page 668 > > Software Problems Advanced Guide Troubleshooting > E-mail Software Program You Want to Use Does Not Appear in the Screen for Selecting an E-mail Software Program S931 E-mail Software Program You Want to Use Does Not Appear in the Screen for Selecting an E-mail Software Program Check 1: MP Navigator EX may not support the e-mail software program.
- Page 669 > > Software Problems > Scanned Image Is Printed Enlarged (Reduced) Advanced Guide Troubleshooting S932 Scanned Image Is Printed Enlarged (Reduced) Check: Set the printing size in the application. Page top...
-
Page 670: Scanned Image Is Enlarged (Reduced) On The Computer Monitor
> > Software Problems > Scanned Image Is Enlarged (Reduced) on the Computer Advanced Guide Troubleshooting Monitor S933 Scanned Image Is Enlarged (Reduced) on the Computer Monitor Check 1: Change the display setting in the application. For details, refer to the application's manual. If you have any questions, contact the manufacturer of the application. -
Page 671: Scanned Image Does Not Open
> > Software Problems > Scanned Image Does Not Open Advanced Guide Troubleshooting S934 Scanned Image Does Not Open Check: If the file format is not supported by the application, scan the image again and save it in a popular file format such as JPEG. For details, refer to the application's manual. - Page 672 > > MP Navigator EX Problems Advanced Guide Troubleshooting S940 MP Navigator EX Problems Cannot Scan at the Correct Size Position or Size of the Image Cannot be Detected Correctly When Scanning Using the Operation Panel Document Is Placed Correctly, but the Scanned Image Is Slanted Document Is Placed Correctly, but the Orientation Changes in the Scanned Image Page top...
-
Page 673: Cannot Scan At The Correct Size
> > MP Navigator EX Problems Advanced Guide Troubleshooting > Cannot Scan at the Correct Size S941 Cannot Scan at the Correct Size Check 1: Make sure that the documents are placed correctly on the Platen. Placing Documents Check 2: Set Document Size to the actual document size and scan again. If the matching size is not found, scan at a larger size and trim the image. - Page 674 > > MP Navigator EX Problems > Position or Size of the Image Cannot be Detected Advanced Guide Troubleshooting Correctly When Scanning Using the Operation Panel S942 Position or Size of the Image Cannot be Detected Correctly When Scanning Using the Operation Panel Check 1: Make sure that the documents are placed correctly on the Platen.
- Page 675 > > MP Navigator EX Problems > Document Is Placed Correctly, but the Scanned Image Advanced Guide Troubleshooting Is Slanted S943 Document Is Placed Correctly, but the Scanned Image Is Slanted Check: In MP Navigator EX, deselect the Correct slanted document checkbox and scan again.
- Page 676 > > MP Navigator EX Problems > Document Is Placed Correctly, but the Orientation Advanced Guide Troubleshooting Changes in the Scanned Image S944 Document Is Placed Correctly, but the Orientation Changes in the Scanned Image Check: In MP Navigator EX, deselect the Detect the orientation of text documents and rotate images checkbox and scan again.
- Page 677 Якщо усунути неполадку не вдається за допомогою наданих у цьому розділі порад, зверніться в пункт продажу апарата або сервісний центр. Персонал служби технічної підтримки Canon надає клієнтам кваліфіковане обслуговування. Увага! Якщо під час роботи апарата ви почуєте незвичайний звук, побачите дим або відчуєте запах, негайно...
- Page 678 > Повний посібник Усунення неполадок > Поширені запитання U340 Поширені запитання Друк не виконується/Надруковане зображення нечітке/Неправильні кольори/Білі смуги Апарат працює, але чорнило не подається Не вдається встановити драйвери MP Друк не починається Копіювання/друк припиняється до завершення завдання Помилка під час запису/Помилка під час виведення/Помилка зв’язку Незадовільна...
- Page 679 > Advanced Guide Troubleshooting > Instructions for Use (Printer Driver) P036 Instructions for Use (Printer Driver) This printer driver is subject to the following restrictions. Keep the following points in mind when using the printer driver. Restrictions on the Printer Driver With some applications, the Copies setting in the Page Setup tab of the printer driver may not be enabled.
- Page 680 4. Open Word's Print dialog box again. 5. Open the printer driver setup window again and click OK. 6. Start printing. If bitmap printing is enabled in Adobe Illustrator (Adobe Systems Inc), printing may take time or some data may not be printed, printing may take time or some data may not be printed. Print after unchecking the Bitmap Printing check box in the Print dialog box.
-
Page 681: General Notes (Scanner Driver)
> Advanced Guide Troubleshooting > General Notes (Scanner Driver) S004 General Notes (Scanner Driver) ScanGear (scanner driver) is subject to the following restrictions. Keep these points in mind when using Scanner Driver Restrictions When using the NTFS file system, the TWAIN data source may not be invoked. This is because the TWAIN module cannot be written to the winnt folder for security reasons. - Page 682 Custom Insert in the Insert Picture from Scanner or Camera screen. Otherwise, images may not be scanned correctly. When scanning images into Microsoft Office 2007 (Word, Excel, PowerPoint, etc.), use Microsoft Clip Organizer. Images may not be scanned correctly in some applications. In that case, increase the operating system's virtual memory and retry.
- Page 683 > Додаток Повний посібник Додаток Область друку Прикріплення/від’єднання кришки для притиснення документів Редагування документа для друку або повторний друк історії друку Видалення непотрібного завдання друку Оновлення драйверів MP Видалення On-screen Manuals Транспортування апарата Відкриття вікна настроювання драйвера принтера Примітка про від’єднання шнура живлення Надавання...
- Page 684 Щоб забезпечити найкращу якість друку, апарат дає змогу робити відступи вздовж кожного із країв носія. Фактичною областю друку буде область всередині цих полів. Рекомендована область друку : Компанія Canon рекомендує виконувати друк у межах цієї області. Область друку : Область, у якій можливий друк.
- Page 685 > > Повний посібник Додаток Область друку > Інші формати паперу, окрім Letter, Legal та конвертів U502 Інші формати паперу, окрім Letter, Legal та конвертів Формат Область, призначена для друку (ширина x висота) 141,2 x 202,0 мм / 5,56 x 7,95 дюйма 203,2 x 289,0 мм...
-
Page 686: Letter, Legal
> > Повний посібник Додаток Область друку > Letter, Legal U503 Letter, Legal Формат Область, призначена для друку (ширина x висота) Letter 203,2 x 271,4 мм / 8,00 x 10,69 дюйма 203,2 x 347,6 мм / 8,00 x 13,69 дюйма Legal* * Цей... - Page 687 > > Повний посібник Додаток Область друку > Конверти U505 Конверти Формат Рекомендована область друку (ширина x висота) Європейський DL (European DL)* 103,2 x 179,5 мм / 4,06 x 7,07 дюйма US Comm. Env. #10* 98,0 x 200,8 мм / 3,86 x 7,91 дюйма * Цей...
- Page 688 > Повний посібник Додаток > Прикріплення/від’єднання кришки для притиснення документів U514 Прикріплення/від’єднання кришки для притиснення документів Від’єднання кришки для притиснення документів: Утримайте кришку для притиснення документів у вертикальній позиції. Прикріплення кришки для притиснення документів: Як показано на ілюстрації нижче, вставте обидві петлі (A) кришки для притиснення документів, тримаючи...
-
Page 689: Editing The Print Document Or Reprinting From The Print History
Editing the Print Document or Reprinting from the Print History This function is unavailable when the standard IJ printer driver is used. In the Canon IJ XPS preview window, you can edit the print document or retrieve the document print history to print the document. - Page 690 Check the Preview before printing check box on the Quick Setup tab or the Main tab. Complete the setup Click OK. The Canon IJ XPS Preview will start and the print result will be displayed before printing. Editing print documents and print pages Combining print documents You can combine multiple print documents to form a single document.
- Page 691 Reprinting from the Print History When you click Save Print History on the File menu to enable the setting, the document printed from the preview is saved, and you can reprint the document with the same settings. Displaying the print history Select the Start menu ->...
-
Page 692: Deleting The Undesired Print Job
P037 Deleting the Undesired Print Job If you are using the XPS printer driver, replace "Canon IJ Status Monitor" with "Canon IJ XPS Status Monitor" when reading this information. If the printer does not start printing, cancelled or failed print job data may be remaining. - Page 693 > Повний посібник Додаток > Оновлення драйверів MP Оновлення драйверів MP Завантаження останніх драйверів MP Видалення непотрібних драйверів MP Перед встановленням драйверів MP Встановлення драйверів MP На початок сторінки...
-
Page 694: Obtaining The Latest Mp Drivers
> Appendix > Updating the MP Drivers > Obtaining the Latest MP Drivers Advanced Guide P038 Obtaining the Latest MP Drivers The MP Drivers include a printer driver and scanner driver (ScanGear). By updating the MP Drivers to the latest version of the MP Drivers, unresolved problems may be solved. Access our web site through the Internet and download the latest MP Drivers for your model. -
Page 695: Deleting The Unnecessary Mp Drivers
> Appendix > Updating the MP Drivers Advanced Guide > Deleting the Unnecessary MP Drivers P039 Deleting the Unnecessary MP Drivers The MP Drivers which you no longer use can be deleted. When deleting the MP Drivers, first exit all programs that are running. The procedure to delete the unnecessary MP Drivers is as follows: When There is an Uninstaller Start the uninstaller... - Page 696 If you are using Windows Vista, when the User Account Control dialog box appears, click Continue. Then when the confirmation message appears, click Yes. The icon is deleted. Select the printer driver to be deleted If you are using Windows 7, click any icon in Printers and Faxes. On the commandbar, click Print server properties, and then click the Drivers tab.
-
Page 697: Before Installing The Mp Drivers
> Appendix > Updating the MP Drivers > Before Installing the MP Drivers Advanced Guide P040 Before Installing the MP Drivers This section describes the items that you should check before installing the MP Drivers. You should also refer to this section if the MP Drivers cannot be installed. Checking the Machine Status Properly connect the personal computer and the machine. -
Page 698: Installing The Mp Drivers
> Appendix > Updating the MP Drivers > Installing the MP Drivers Advanced Guide P041 Installing the MP Drivers You can access our web site through the Internet and download the latest MP Drivers for your model. The procedure for installing the downloaded MP Drivers is as follows: Turn off the machine Start the installer Double-click the icon of the downloaded file. - Page 699 Page top...
- Page 700 Щоб видалити on-screen manuals, встановлені на вашому комп’ютері, виконайте описану нижче процедуру. Перед видаленням on-screen manuals закрийте всі відкриті on-screen manuals. Клацніть Пуск (Start) > Усі програми (All Programs) > Canon XXX Manual (де «XXX» — це ім’я апарата) > Uninstall. Коли з’явиться повідомлення про підтвердження, клацніть OK.
- Page 701 > > Транспортування апарата Повний посібник Додаток U510 Транспортування апарата Для переміщення апарата використовуйте лише оригінальні пакувальні матеріали. За їх відсутності обережно розмістіть апарат у твердій коробці, використовуючи для пакування додаткові захисні матеріали. Важливо Не можна транспортувати або зберігати апарат на похилих поверхнях, у вертикальному або перевернутому...
- Page 702 > > Відкриття вікна настроювання драйвера принтера Повний посібник Додаток U511 Відкриття вікна настроювання драйвера принтера Вікно встановлення драйвера принтера можна відкрити за допомогою використовуваного програмного забезпечення або меню «Пуск» операційної системи Windows. Відкриття вікна настроювання драйвера принтера за допомогою програмного забезпечення...
- Page 703 > Повний посібник Додаток > Примітка про від’єднання шнура живлення U516 Примітка про від’єднання шнура живлення Від’єднуйте шнур живлення згідно з нижченаведеною процедурою. Важливо Під час від’єднання шнура живлення натисніть кнопку УВІМК. (ON) , а потім переконайтеся, що індикатор ЖИВЛЕННЯ (POWER) вимкнуто.
- Page 704 На початок сторінки...
-
Page 705: Sharing The Printer On A Network
In case an error occurred when a document is printed by the client system to a shared printer, the error message of Canon IJ Status Monitor will be displayed both on the client system and the print server system. For regular printing, Canon IJ Status Monitor will be displayed only on the client system. -
Page 706: Settings On Print Server
> Appendix > Advanced Guide Sharing the Printer on a Network > Settings on Print Server P043 Settings on Print Server When you use the printer on a network, set up the printer driver for sharing on the server system. The procedure for setting up the print server systems is as follows: Install the printer driver on the print server system For details on installation instructions, refer to the "Install the Software"... -
Page 707: Settings On Client Pc
> Appendix > > Settings on Client PC Advanced Guide Sharing the Printer on a Network P044 Settings on Client PC After setting up the print server system, set up the client system. The procedure for setting up the client systems is as follows: If you are using Windows 7 or Windows Vista Install the printer driver on the client systems For installation instructions, see "... - Page 708 Start the wizard Select the start menu -> Control Panel -> Printers and Other Hardware -> Printers and Faxes -> Add a printer. When Welcome to the Add Printer Wizard screen appears, click Next. Add a printer Select A network printer, or a printer attached to another computer, then click Next. On the Specify a Printer window, click Next and then search for the print server system.
-
Page 709: Restrictions On Printer Sharing
P415 Restrictions on Printer Sharing If you are using the XPS printer driver, replace "Canon IJ Status Monitor" with "Canon IJ XPS Status Monitor" when reading this information. These are restrictions that apply when you are using a printer in a network environment. Check the restrictions for the environment you are using. - Page 710 Page top...
- Page 711 > Using Easy-PhotoPrint EX Advanced Guide A001 Using Easy-PhotoPrint EX --- Transforming Your Photos into Creative Works of Art --- Easy-PhotoPrint EX allows you to create albums, calendars and stickers easily using photos taken with digital cameras. You can also print borderless photos easily. Start Easy-PhotoPrint EX Click Here: Easy-PhotoPrint EX...
- Page 712 CHECK! Select Album to add text and frames. You cannot decorate photos with Photo Print. Create a Calendar Using Your Favorite Photos Create calendars easily with Easy-PhotoPrint EX. Create your own calendar using your favorite photos! It'll be exciting to turn the calendar pages. You can also create 2-month, 6-month and 12-month You can use all kinds of photos.
- Page 713 Page top...
- Page 714 > Using MP Navigator EX Advanced Guide S001 Using MP Navigator EX MP Navigator EX is an application that enables you to easily scan photos and documents. It is suitable even for beginners. Start MP Navigator EX Click Here: MP Navigator EX Note See "...
- Page 715 Scan with One-click In One-click Mode, MP Navigator EX completes from scanning to saving, with a click of an icon. One-click Mode also allows you to scan and save images as PDF files or attach them to e-mail automatically. Scan and Correct/Enhance Photos You can easily correct/enhance scanned photos using MP Navigator EX.
Need help?
Do you have a question about the mp280 series and is the answer not in the manual?
Questions and answers