Table of Contents
Advertisement
Advertisement
Table of Contents

Related Manuals for Geo solo


Summary of Contents for Geo solo
- Page 1 Solo | PV Display User instructions...
-
Page 2: Safety Notice
It is important to observe some simple safety precautions when using this product. Please read this important information before continuing. Safe operation of the Solo is impaired if used in a manner not specified by the manufacturer. The Solo product is designed to be For use in dry environments only. -
Page 3: What's In The Box
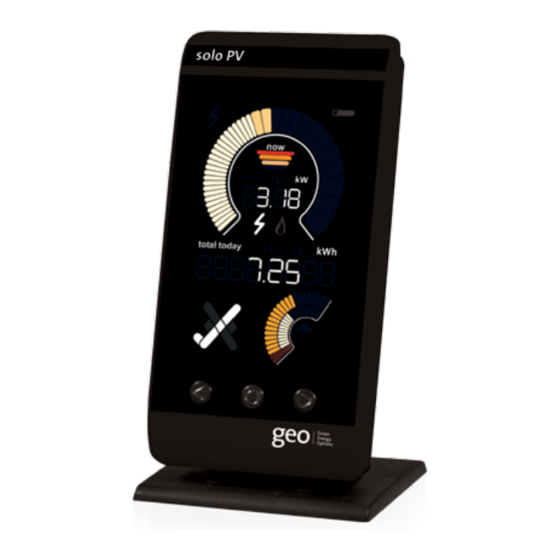
What’s in the box Transmitter Batteries Batteries Display (Transmitter) Stand LED Reader (Receiver) SD Card Power Supply (UK/EU/AU available) Display (Receiver) LED Reader (Velcro) The display shows your energy generation. It The LED reader will work with any meter with a visible LED pulse (you will be able receives a wireless signal from the transmitter to see this on the face of your meter). - Page 4 Set-up Setting-up the Solo for the first time takes only a few minutes and is described in the next few pages. Transmitter Battery life Speedometer PV array size Units of measurement: indicator Currency/c0 Communications icon Milometer Tick Outer gauge Inner gauge...
- Page 5 This ensures you are making the most of the electricity you are generating. The buttons Immediately under the display are three black buttons. You’ll use these when you set up the Solo and move between the different display modes. www.greenenergyoptions.co.uk | 5...
- Page 6 Setting the size of your PV array and feed in tariff So that the Solo can show you what you are earning by using solar panels you will also need to enter your feed in tariff rates. 1. Set the currency: ($, £, kr, €) using the left and right buttons on the display then press the set button to confirm.
- Page 7 Set the power down time This switches off the backlight to save power: • Off – The display remains on permanently. • 1 or 2 – The display goes to sleep after one or two minutes, waking up briefly every 15 minutes. • Press the set button to confirm.
- Page 8 1. into the transmitter and turn on the display. 4. Once paired, press the set button to return to the main screen. You should now see the lightning bolt (communications icon) lit up. 8 | geo helpline: 0845 519 7226...
- Page 9 Please look for a flashing coloured light on the meter. LED reader (See page 15 for Transmitter more details.) 8 5 0 2 1 0 Communications icon Meter Cables Fitting the transmitter and the LED reader • Locate the connection point on the face of •...
- Page 10 So if you turned on your per unit of electricity. It gives you a feeling Solo at monday lunch time, it would be 00:15 for the amount of CO 2 that would be on the following Monday before data would be generated if you were using electricity from added to the L7 feature.
- Page 11 PV array is performing. The Tick icon The Solo shows the best time for you to turn on appliances that use higher levels of electricity than others. • If you are generating enough electricity to use heavy load appliances (750W and above) the tick will show.
- Page 12 Recording data and uploading to MyEnergy website (optional service) Please ensure the lock button on the SD card is in the unlock position (down) so that data can be transferred. 12 | geo helpline: 0845 519 7226...
- Page 13 • To start recording data insert the SD card the myEnergy home screen will take you into the slot in the top of the Solo display. to a screen where you can see the data Push it in firmly and it will click into place.
-
Page 14: Frequently Asked Questions
The will show a ‘Pair’ screen with a Tick. Press the Solo can be run off batteries for short periods of Set button to go back to the main screen. time but is designed to run off the mains adapter provided. - Page 15 & Pulse rates The Solo PV is designed to work with any pulse output generation meter with a pulse rate of between 50 and 10,000 [max]. We have listed some of the meters and the pulse rates you should set on the Solo below.
-
Page 16: Contact Information
GEO. The contents of this document are to be used solely for the purpose for which they are provided by GEO and for no other purpose.
Need help?
Do you have a question about the solo and is the answer not in the manual?
Questions and answers