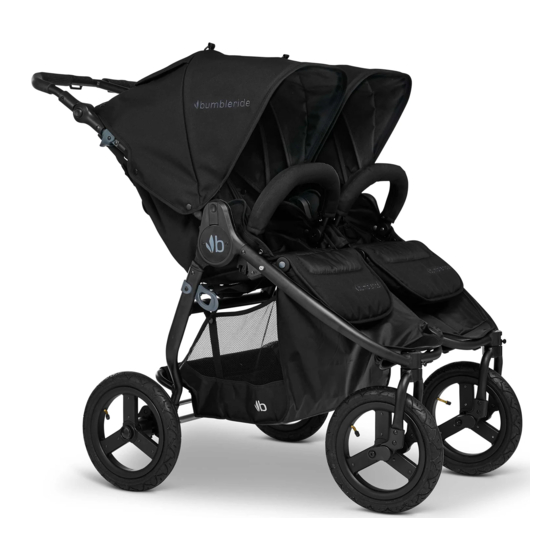
Bumbleride Indie Twin Owner's Manual
Hide thumbs
Also See for Indie Twin:
- User manual ,
- Owner's manual (44 pages) ,
- Assembly & operation manual (34 pages)
Table of Contents
Advertisement
Quick Links
Hello
Welcome to the Bumbleride family.
Get ready for the ride of your life.
At Bumbleride, our goal is to make gear for
parents to get out and do what they love,
while doing our best to preserve the planet.
With Indie Twin and all our products, we
are committed to creating the very best
product experience for our families. Our
designers seek to understand how you
interact with your children and develop
ergonomic designs for you and your baby.
Our customer care team is here to help
and put a smile on your face. We love to
make your life just a little bit easier. That's
our Bumbleride Promise.
Everything we do has an impact on this
world. From the factories we partner with to
the materials we choose, we take the time
to think critically and act responsibly. We
promise straightforward, common sense
design that doesn't try to be too clever.
We know you're busy. So you need products
and services that work seamlessly and a
partner that supports you if they don't.
For us, it's not just about providing quality
service, but caring about the service
we provide.
Our aim with Indie Twin is to give you a
versatile all terrain double stroller to make
your life a little easier to get out and do
what you love. The narrow side by side
design provides a smooth one hand push
and offers quick access to both kids. The
fully adjustable backrests, footrests and
handle create a customized fit for you
and your little ones.
Please complete the product registration
card so that we may assist you with any of
your warranty needs should they arise.
You can also register your product online
at: www.bumbleride.com/support
The Bumbleride Indie Twin complies with
ASTM F-833, SOR/85-379 and EN 1888
safety standards. All fabric complies with
Furniture and Furnishings Fire Safety
Regulations. Materials matter. Feel good
knowing our eco fabrics keep plastic
bottles out of landfills and our dye
process conserves water.
2
Advertisement
Table of Contents

Related Manuals for Bumbleride Indie Twin


Summary of Contents for Bumbleride Indie Twin
- Page 1 Get ready for the ride of your life. At Bumbleride, our goal is to make gear for Our aim with Indie Twin is to give you a parents to get out and do what they love, versatile all terrain double stroller to make while doing our best to preserve the planet.
-
Page 2: Table Of Contents
This owner’s manual is broken into 4 sections. The first, Assembly, will introduce you to the Indie Twin and guide you through the steps of assembling your new Indie Twin. The second, Operation, will show you how to use your Indie Twin properly. The third, Maintenance, will give you clear steps on how to maintain your Indie Twin. - Page 3 Bienvenido a la familia Bumbleride. Prepárate para el paseo de tu vida. En Bumbleride, nuestro objetivo es propulsar Nuestro objetivo con Indie Twin es para el cambio para que los padres salgan y hagan darle un cochecito doble todo el terreno lo que les encanta, y al mismo tiempo hacer versátil para hacer su vida un poco más...
- Page 4 Este manual está dividido en 4 secciones. La primera, Montaje, le brindará una introducción sobre el Indie Twin y lo guiará a través de los pasos de ensamblar su nuevo Indie Twin. La segunda sección, Operación, le mostrará cómo usar correctamente su Indie Twin. La tercera, Mantenimiento, le brindará...
- Page 5 Bienvenue dans la famille Bumbleride. Préparez-vous à une promenade mémorable. Chez Bumbleride, notre objectif, en plus Notre objectif avec Indie Twin est de vous de faire de notre mieux pour préserver la donner un polyvalent tout terrain poussette planète, est de fabriquer des équipements...
- Page 6 Ce livret du propriétaire est divisé en 4 sections. La première, Assemblage, vous présentera l’Indie Twin et vous guidera à travers les étapes d’assemblage de votre nouvel Indie Twin. La deuxième, Fonctionnement, vous montrera comment utiliser votre Indie Twin correctement.
-
Page 7: What's In The Box
What’s in the box Incluido en la caja / Ce que contient la boîte? Indie Twin frame SPF 45+ canopies Estructura Indie Capota SPF 45+ Cadre Indie Pare-soleil FPS 45+ 12in rear wheels 12in front wheels 30.5cm ruedas traseras 30.5cm ruedas frontales Roues de 30.5cm a l’arriere... - Page 8 Pump Rear axle Bomba Eje trasero Pompe Essieu arrière Wrist strap Bumper bars Correa para la muñe Barras de parachoques corroie de poignet Barre pare-chocs Also included but not pictured, 2 Allen wrenches, Inclus, mais non illustré : 2 clés Allen, clé ouverte, manuel d’utilisation, instruction de gonfl...
-
Page 9: Opening Frame
Opening frame Cómo abrir el marco / Ouverture du cadre WARNING / ADVERTENCIA / ATTENTION Always ensure baby is a safe distance away while opening and folding the stroller. Asegúrese siempre de que el bebé esté a una distancia prudente antes de abrir y plegar la silla de paseo. - Page 10 Begin by releasing the autolock. Lever it away from the stroller and pull up on the handlebar at the same time. Comience por liberar la autolock. Haga palanca lejos de la silla y jale hacia arriba desde el manillar a la vez. Desserrer d’abord les verrous automatiques.
-
Page 11: Attaching Rear Axle & Wheels
Attaching rear axle & wheels Fijación de las ruedas y eje trasero Fixation de l’essieu arrière et des roues... - Page 12 Position the rear axle so that the brake bar is facing outward. Slide the rear axle onto the rear tubes until you hear a ‘CLICK’ on both legs. Ponga ele trasero en posicion de modo que la barra del freno mire hacia afuera. Desslice ei eje traseros hacia los tubos traseros hasta que estuche un sinodo de ‘CLIC”...
-
Page 13: Attaching Front Wheels
Attaching front wheels Fijación de las ruedas delanteras Fixation des roues avant... - Page 14 Position front wheel between fork. Slide the axle bolt through the fork and wheel. Coloque la rueda delantera entre las horquillas. Deslice el eje trasero hacia las ruedas y la horquilla. Plasez la roue avant entere les fourches. Glissez l’essieu dans la fourche et la roue. Thread nut onto axle bolt.
-
Page 15: Attaching Sun Canopies
Attaching sun canopies Colocación de la capota / Fixation du pare-soleil... - Page 16 Slide the canopy ratchets into the inside hinge slot until you feel them notch into place. Deslice los trinquetes de la cubierta dentro de las ranuras externas en las bisagras hasta que sienta que traban en su lugar. Glissez les cliquets du pare-soleil dans les fentes externes sur les charnières jusqu’à...
-
Page 17: Attaching Canopy Extensions
Attaching canopy extensions Colocación de extensión de cubierta / Fixation extension de couvercle The rear canopy extension can be added if more coverage is needed. Begin by zipping the extension to the canopy’ . La extensión de cubierta trasera puede ser añadido si se necesita más cobertura. -
Page 18: Attaching Bumper Bar
Attaching bumper bar Colocación de la barra de parachoques / Fixation de la barre pare-chocs Locate the bumper bar holsters on each side of the seat and slide it into place. Ubique las fundas de la barra de parachoques a cada lado del asiento y deslice la barra en su lugar. -
Page 19: Attaching Wrist Strap
Attaching wrist strap Colocación de la correa de muñeca / Fixation dragonne Feed the loop end of the strap through Introduzca el extremo de la correa por la ranura en el soporte del manillar. Enfi lez le bout replié de la courroie dans la fente située contre la poignée. -
Page 20: Using The Brake
Using the brake Cómo usar el freno / Futilisation du frein Press down on the brake bar to engage. Presione hacia abajo en la barra del freno para accinarlo. Appuyez sur la barre de frain pour l’enclencher. Lift up on the brake bar to release it. Levante la barra del freno para liberarlo. -
Page 21: Part One
PART ONE Using with an infant Utilización con un bebé / Utilisation avec un poupon how the harness locks together. Abra el arnés de seguridid de cinco puntos. Observe cómo se cierra el arnés. Ouvrez le harnais de sécurité en cinq points. Notez la façon dont le harnais se verrouille. - Page 22 As your child becomes taller you can rethread the shoulder straps in a higher position on the backrest. A medida que su hijo crece puede volver a ajustar las correas de los hombros en una posición más alta en al respaldo. Au fi...
-
Page 23: Part Two
PART TWO Using with an infant Utilización con un bebé / Utilisation avec un poupon Recline the backrest to its lowest position by squeezing the backrest adjuster and pulling it down. Recline el respaldo a su posición más baja, apriete el ajustador del respaldo y jale hacia abajo. - Page 24 Unsnap the infant wall from under footrest. Desbroche la tela de la parte abajo del apoyapié. Détachez la paroi pour poupon de dessous de l’appui-pied. Wrap the infant wall around footrest and engage snaps on seat fabric. Envuelva la tela alrededor del apoyaoié y abroche en la tela del asiento.
-
Page 25: Folding Indie Twin
Folding Indie Twin Cómo plegar Indie / Plier Indie Begin by folding down the bumper bar and footrest. Comience por plegar el apoyapié y la barra del parachoques. Destrabe totalmente el seguro de la horquilla. Commencez par replier le pare-chocs et le repose-pied. - Page 26 Continuez à plier jusqu’à ce que vous entendiez le verrou automatique s’enclencher. Use the carrying handles and frame to safely carry your Indie Twin. Utilice las asas de transporte y el marco para llevar con seguridad su Indie Twin. Utilisez les poignées et le cadre pour transporter en toute sécurité...
- Page 27 Adding air to the tires Cómo agregar aire a las ruedas / Ajouter de l’air aux pneus Indie Twin’s tires have inner tubes and will occasionally need air added. Keep the pump handy by storing it in the zippered pocket of the cargo basket.
- Page 28 may hear some air escaping. Flip up the pump head lever to seal the connection. en la válvula. Es posible que escuche algún escape de aire. Levante la cabeza de la bomba para sellar la conexión. Appuyez fermement la tête de la pompe sur la valve.
-
Page 29: Part One
PART ONE Removing the fabric to wash Cómo quitar la tela para lavarla / Retirer le tissu pour le laver Begin by detaching the snaps holding the canopy to the handlebar. Comience por separar los broches de presión que sostienen el dosel en el manillar. Commencez par détacher les pression tenant la canopée au guidon. - Page 30 Unsnap the webbing strap on both sides from around the handlebar. Desabroche la correa tejida a ambos lados del manillar. Dégagez les courroies de tissu enroulées des deux côtés de la poignée. Unzip the side panels. Abra la cremallera de los paneles laterales. Dézippez les panneaux latéraux.
- Page 31 PART TWO Removing the fabric to wash Cómo quitar la tela para lavarla / Retirer le tissu pour le laver Unsnap and remove the webbing from the back leg frame buckle. Desabroche y quite la cinta desde la hebilla del marco de la pata trasera. Dégagez et retirez les courroies de tissu des boucles sur le cadre des pattes arrière.
- Page 32 shoulder harness buckles back through the buckle slots. Quite el apoyo de la espalda empujando primero las hebillas del arnés del hombro hacia atrás por las ranuras de la hebilla. Retirez le soutien du dossier en faisant d’abord repasser les boucles du harnais d’épaules à travers les fentes de boucles.
- Page 33 Cleaning instructions Las instrucciones de limpieza / Instructions de nettoyage Seat Fabric Machine wash seat fabric, canopy fabric and bumper bar fabric using cold water on a delicate cycle. Do not machine-dry. Do not iron. Only air-dry. To attach the fabric, reverse the steps above.
- Page 34 Additional accessories (not included) Accesorios adicionales (no incluido) / Accessoires supplémentaires (non inclu) Snack Pack Parent Pack Bell Mini Board Rain Cover For more information visit us at www.bumbleride.com...
- Page 35 Bumbleride dealers only. A list your Bumbleride for years to come. The frame of of authorized dealers can be found by visiting your Bumbleride is guaranteed to be free from...
- Page 36 Your child’s safety may be affected if you do not follow these instructions. Always ensure that children are a safe distance away when opening and closing the stroller. Learn more by visiting us at www.bumbleride.com. • Never leave your child unattended.
- Page 37 EN 1888. Bumbleride comprados a vendedores autorizados de Bumbleride. Puede encontrar una lista de El marco de su cochecito Bumbleride viene con los vendedores autorizados visitando nuesto una garantía limitada de 3 años e incontables Ubicador de Vendedores en línea en: años de servicio de atención al cliente para...
- Page 38 Asegúrese siempre de que los niños estén a una distancia segura al abrir y cerrar la cochecito. Obtenga más información visitándonos en www.bumbleride.com. • Nunca deje a su niño desatendido. • Utilice siempre los frenos cuando no tiene el cochecito.
- Page 39 Bumbleride autorisé. que vous aimerez votre Bumbleride pendant Une liste de détaillants autorisés est disponible des années. Le cadre de votre Bumbleride est en visitant notre localisateur de détaillants en garanti sans défauts de fabrication pendant ligne à l’adresse: www.bumbleride.com une période de 3 ans à...
- Page 40 Toujours s’assurer que les enfants sont à une distance sécuritaire lors de l’ o uverture et de la fermeture de la poussette. En savoir plus en vous rendant sur www.bumbleride.com. • Ce véhicule est destiné aux • Ne laissez jamais votre enfant sans surveillance.
Need help?
Do you have a question about the Indie Twin and is the answer not in the manual?
Questions and answers