Bumbleride IndieTWIN Owner's Manual
Hide thumbs
Also See for IndieTWIN:
- User manual ,
- Owner's manual (44 pages) ,
- Assembly & operation manual (34 pages)
Advertisement
Quick Links
Hello
Welcome to the Bumbleride family.
Get ready for the ride of your life.
At Bumbleride, our goal is to make gear for
parents to get out and do what they love,
while doing our best to preserve the planet
we all share.
With Indie Twin and all our products, we
are committed to creating the very best
product experience for our families. Our
designers seek to understand how you
interact with your children and develop
ergonomic designs for you and your baby.
Our customer care team is here to help
and put a smile on your face. We love to
make your life just a little bit easier. That's
our Bumbleride Promise.
Everything we do has an impact on this
world. From the factories we partner with to
the materials we choose, we take the time
to think critically and act responsibly. We
promise straightforward, common sense
design that doesn't try to be too clever.
We know you're busy. So you need products
and services that work seamlessly and a
partner that supports you if they don't.
For us, it's not just about providing quality
service, but caring about the service
we provide.
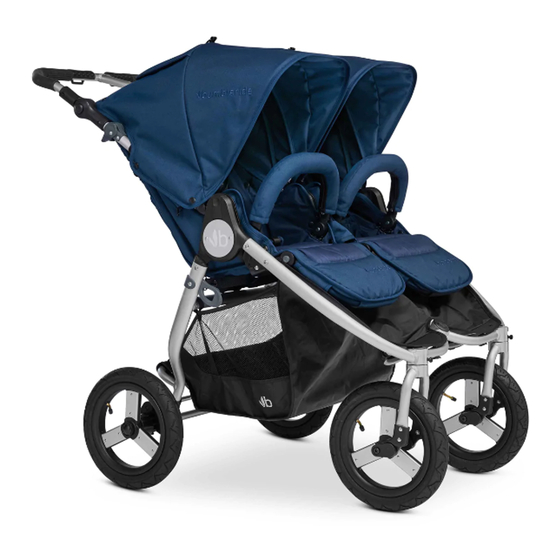
Our aim with Indie Twin is to give you a
versatile all terrain double stroller to make
your life a little easier to get out and do
what you love. The narrow side by side
design provides a smooth one hand push
and off ers quick access to both kids. The
fully adjustable backrests, footrests and
handle create a customized fi t for you
and your little ones.
Please complete the product registration
card so that we may assist you with any of
your warranty needs should they arise.
You can also register your product online
at: www.bumbleride.com/support
The Bumbleride Indie Twin complies with
ASTM F-833, SOR/85-379 and EN 1888
safety standards.
Materials matter. Feel good knowing our eco
fabrics keep plastic bottles out of landfi lls
and our dye process conserves water.
2
Table of Contents
This owner's manual is broken into 4 sections. The first, Assembly, will introduce you
to the Indie Twin and guide you through the steps of assembling your new Indie Twin.
The second, Operation, will show you how to use your Indie Twin properly. The third,
Maintenance, will give you clear steps on how to maintain your Indie Twin. The fourth,
Useful Information, contains all product information such as warranty, warnings and
additional accessories you may need.
ASSEMBLY
8
What's in the box
10
Opening frame
12
Attaching rear axle & wheels
14
Attaching front wheels
16
Attaching sun canopies
18
Attaching canopy extensions
19
Attaching bumper bar
20
Attaching wrist strap
OPERATION
20
Adjusting the handlebar
21
Using the brake
22
PART ONE
Using with an infant
24
PART TWO
Using with an infant
26
Folding Indie Twin
MAINTENANCE
28
Adding air to the tires
30
PART ONE
Removing the fabric to wash
32
PART TWO
Removing the fabric to wash
34
Cleaning instructions
USEFUL INFORMATION
35
Additional accessories
36
Stroller warranty, standards
and warnings
(English)
38
Stroller warranty, standards
and warnings
(Spanish)
40
Stroller warranty, standards
and warnings
(French)
3
Advertisement

Subscribe to Our Youtube Channel
Related Manuals for Bumbleride IndieTWIN


Summary of Contents for Bumbleride IndieTWIN
- Page 1 Maintenance, will give you clear steps on how to maintain your Indie Twin. The fourth, Useful Information, contains all product information such as warranty, warnings and additional accessories you may need. At Bumbleride, our goal is to make gear for ASSEMBLY MAINTENANCE...
- Page 2 Mantenimiento, le brindará pasos claros sobre cómo mantener su Indie Twin. La cuarta, Información útil, contiene toda la información pertinente al producto como la garantía, advertencias y accesorios adicionales que pudiera necesitar. En Bumbleride, nuestro objetivo es propulsar Nuestro objetivo con Indie Twin es para ENSAMBLAJE...
-
Page 3: Table Of Contents
Bonjour Table des matières Bienvenue dans la famille Bumbleride. Préparez-vous Ce livret du propriétaire est divisé en 4 sections. La première, Assemblage, vous présentera à une promenade mémorable. l’Indie Twin et vous guidera à travers les étapes d’assemblage de votre nouvel Indie Twin. La deuxième, Fonctionnement, vous montrera comment utiliser votre Indie Twin correctement. - Page 4 What’s in the box Incluido en la caja / Ce que contient la boîte? Pump and hinge cover Rear axle Bomba y cubierta de la bisagra Eje trasero Pompe et couvercle de charnière Essieu arrière Indie Twin frame SPF 45+ canopies Estructura Indie Capota SPF 45+ Cadre Indie...
- Page 5 Opening frame Cómo abrir el marco / Ouverture du cadre Begin by releasing the autolock. Lever it away from the stroller and pull up on the handlebar at the same time. Comience por liberar la autolock. Haga palanca lejos de la silla y jale hacia arriba desde el manillar a la vez.
- Page 6 Attaching rear axle & wheels Fijación de las ruedas y eje trasero Fixation de l’essieu arrière et des roues Position the rear axle so that the brake bar is facing outward. Slide the rear axle onto the rear tubes until you hear a ‘CLICK’ on both legs.
- Page 7 Attaching front wheels Fijación de las ruedas delanteras Fixation des roues avant Position front wheel between fork. Slide the axle bolt through the fork and wheel. Coloque la rueda delantera entre las horquillas. Deslice el eje trasero hacia las ruedas y la horquilla. Plasez la roue avant entere les fourches.
- Page 8 Attaching sun canopies Colocación de la capota / Fixation du pare-soleil Slide canopy ratchets onto the hotshoes located on the inside of the handlebars. Push the ratchets down until they notch in place. Deslice los trinquetes del protector solar sobre la placa de montaje ubicada en el interior del manillar.
-
Page 9: Fixation Extension De Couvercle
Attaching canopy extensions Attaching bumper bar Colocación de extensión de cubierta / Colocación de la barra de parachoques / Fixation extension de couvercle Fixation de la barre pare-chocs Locate the bumper bar holsters on each The rear canopy extension can be added side of the seat and slide it into place. - Page 10 Attaching wrist strap Using the brake Colocación de la correa de muñeca / Fixation dragonne Cómo usar el freno / Futilisation du frein Feed the loop end of the strap through Press down on the brake bar to engage. the slot in the handlebar standoff . Presione hacia abajo en la barra del freno Introduzca el extremo de la correa por la para accinarlo.
-
Page 11: Part One
PART ONE Using with an infant Utilización con un bebé / Utilisation avec un poupon Open the fi ve point safety harness. Notice As your child becomes taller you can how the harness locks together. rethread the shoulder straps in a higher position on the backrest. -
Page 12: Part Two
PART TWO Using with an infant Utilización con un bebé / Utilisation avec un poupon Recline the backrest to its lowest position Unsnap the infant wall from under by squeezing the backrest adjuster and footrest. pulling it down. Desbroche la tela de la parte abajo del Recline el respaldo a su posición más baja, apoyapié. - Page 13 Folding Indie Twin Cómo plegar Indie / Plier Indie Begin by folding down the bumper bar Fold the handle forward. and footrest. Pliegue la manija hacia adelante. Comience por plegar el apoyapié y la barra Rabattez la poignee vers l’avant. del parachoques.
- Page 14 Adding air to the tires Cómo agregar aire a las ruedas / Ajouter de l’air aux pneus Indie Twin’s tires have inner tubes and will Push pump head fi rmly onto valve. You occasionally need air added. Keep the may hear some air escaping. Flip up the pump handy by storing it in the zippered pump head lever to seal the connection.
-
Page 15: Part One
PART ONE Removing the fabric to wash Cómo quitar la tela para lavarla / Retirer le tissu pour le laver Begin by unsnapping all six snaps on the Unsnap the seat fabric from inside the canopy. handlebars. Comience desabrochando los seis broches Suelte la tela del asiento desde el interior a los lados y la parte de atrás del protector del manillar. -
Page 16: Part Two
PART TWO Removing the fabric to wash Cómo quitar la tela para lavarla / Retirer le tissu pour le laver Unsnap and remove the webbing from Remove back support by fi rst pushing the the back leg frame buckle. shoulder harness buckles back through the buckle slots. - Page 17 Pour replacer le tissu, reprenez les étapes ci-dessus en ordre inverse. Parent Pack Rain Cover Mini Board Indie Twin Bassinet/Carrycot Indie Twin Maxi Cosi/ Cybex/ Nuna Car Seat Indie Twin Maxi Cosi/ Cybex/ Nuna Car Seat Adapter- Single Adapter- Double For more information visit us at www.bumbleride.com...
- Page 18 Always ensure that children are a safe distance away when opening and closing the stroller. Learn more by visiting us at www.bumbleride.com. This product is tested in compliance with ASTM This warranty does not cover damage caused •...
- Page 19 Utilice siempre el de Bumbleride. Puede encontrar una lista de arnés • Utilice siempre los frenos cuando El marco de su cochecito Bumbleride viene con los vendedores autorizados visitando nuesto de seguridad de 5 puntos. no tiene el cochecito.
- Page 20 Bumbleride pendant Une liste de détaillants autorisés est disponible • Toute charge fi xée à la poignée af- des années. Le cadre de votre Bumbleride est en visitant notre localisateur de détaillants en fecte la stabilité de la poussette.
Need help?
Do you have a question about the IndieTWIN and is the answer not in the manual?
Questions and answers