Advertisement
Quick Links
Advertisement

Related Manuals for Bresser 900x


Summary of Contents for Bresser 900x
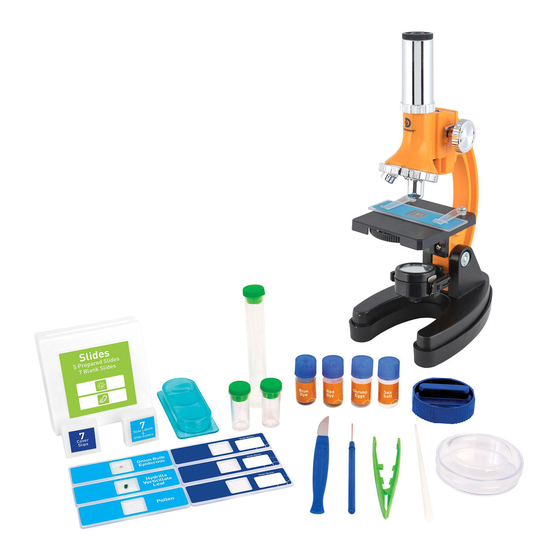
- Page 1 900x Microscope Need Help? Toll Free 866-252-3811...
-
Page 2: Cautionary Statements
900x Microscope WARNING: CHOKING HAZARD Small Parts. Not for children under 8 years. WARNING: This set contains chemicals that may be harmful if misused. Read cautions in the Instruction Manual and on individ- ual containers carefully. Not to be used by children except under adult supervision. - Page 3 Let’s Start! Lift the microscope from the box using two hands. Place the microscope on flat, sturdy surface. Always be mindful of your mirror and light source. The more light that is reflected or transmitted through the hole in the stage, the brighter and sharper the images will appear in the microscope eyepiece.
- Page 4 Microscope Features R. Focus Knob. Slowly turn the knob back and forth to focus an object in the eyepiece. Notice what happens to the power indicator TIP: Begin viewing at the (U, Fig. 1) as you turn the knob. lowest magnification or power S.
- Page 5 can adjust them, and choose one or the TIP: Always keep both eyes other. The light source turns on auto- open when looking through matically when tipped upwards toward the the eyepiece. stage. The mirror gathers and reflects light Doing so will relieve stress on into the microscope.
- Page 6 slowly turn the focus knob until the speci- CAUTION: When you are men can be seen in focus. finished observing, be sure to 5. Observe what happens when you turn the light source around, if slowly move the light source (Fig. 4) or the necessary, so that it turns off mirror.
- Page 7 salt. Brine shrimp are salt water creatures. NOTE: Use the color filter Your microscope kit comes supplied with especially when looking at sea salt (N, Fig. 1), brine shrimp eggs (O, clear or dim specimens. Fig. 1) and a shrimp hatchery (P, Fig. 1). The brine shrimp eggs included with this set are dried and will remain alive for up to five years if stored in a cool, dry place.
- Page 8 A section of almost any material can be TIP: Don’t always assume placed on a slide and observed with a that increasing magnification microscope. All you need is the proper will produce the best image equipment and a little patience, and you’ll for viewing.
- Page 9 If you carefully performed the experiment, you will see little crystal cubes. A grain of (storebought) salt is made up of many cubes. Place one or two grains of fresh salt on another blank slide and co pare it with the slide containing the crystal cubes.
- Page 10 Creating Smears Start thinking like a scientist Use your scalpel (A, Fig. 1) to gently scrape off perform your small shavings from the surface of a freshly cut experiments. potato. Smear the shavings onto a clean slide. Clean the Observe carefully, take notes scalpel by swishing it in the fresh water.
- Page 11 just above the specimen area and slowly let the water drain into the cup. With a paper towel, pat the underside of the slide dry. Be very careful and try not to touch the specimen. Allow the specimen to air dry for sev- eral minutes.
- Page 12 a handful of dry grass and a pinch or two of dirt into the jar. Put the cap on the jar and keep it in a place where it will receive light (but not direct sunlight). In about five days, you may examine the water. First make a special slide: Using the needle or stirring rod, make a ring of petroleum jelly on a clean slide.
- Page 13 Experiments work best with clean and uncontaminated equipment. Care for Your Equipment The Bresser 900x Microscope is a precision opti- cal instrument and, when treated with care, will provide you with years of use and discovery fun.
Need help?
Do you have a question about the 900x and is the answer not in the manual?
Questions and answers