
Related Manuals for Work Pro WD 2012 DMX


Summary of Contents for Work Pro WD 2012 DMX
- Page 1 Equipson, S.A. www.equipson.es WD 2012 DMX support@equipson.es User Manual / Instrucciones de Usuario...
- Page 2 User Manual / Instrucciones de Usuario English Version Page 1 Spanish Version Page 28...
-
Page 3: Table Of Contents
Contents Especificaciones Tecnicas General Instructions 1 Features 2 1. Overview 4 Alimentación..............AC 230V~50/60Hz Canales de Salida..........10A por canal, Total 120A 1.1 Front View 4 (monofasico) 1.2 Rear View 6 10A por canal, Total 40A por fase Canales de Salida........ 1.3 Preview Menu 9 (trifasico) Entrada analógica................ -
Page 4: General Instructions
General Instructions 2. Guia de Funcionamiento Thank you for your purchase. Please read the following instructions 2.4 Menu Setup before using your new unit. After being read thoroughly, this manual shall be kept with the fixture for future reference. 2.4.11 Borrar Todo DELETE ALL borra todas memorias, chases, direcciones DMX, curvas, etc. -
Page 5: Features
2. Guia de Funcionamiento Features 2.4 Menu de configuracion S ect ion 1 GE NE RA L F EA TU RE S 2.4.9 Curva The unit is a 12 channel digital module dimmer, which contains a 32-bit high power computer with a Time Processing Unit and a big graphic display. -
Page 6: Pagina 54
2. Guia de Funcionamiento Features 2.4 Menu de configuracion Sectio DETAILED FEA TURES 2.4.9 Curva The unit works with the phase angle control method with SCRs. Hay 5 tipos de curva. This method produces disturbance especially in the lower frequency range. The disturbance will be filtered by using interference suppression filters. -
Page 7: Overview
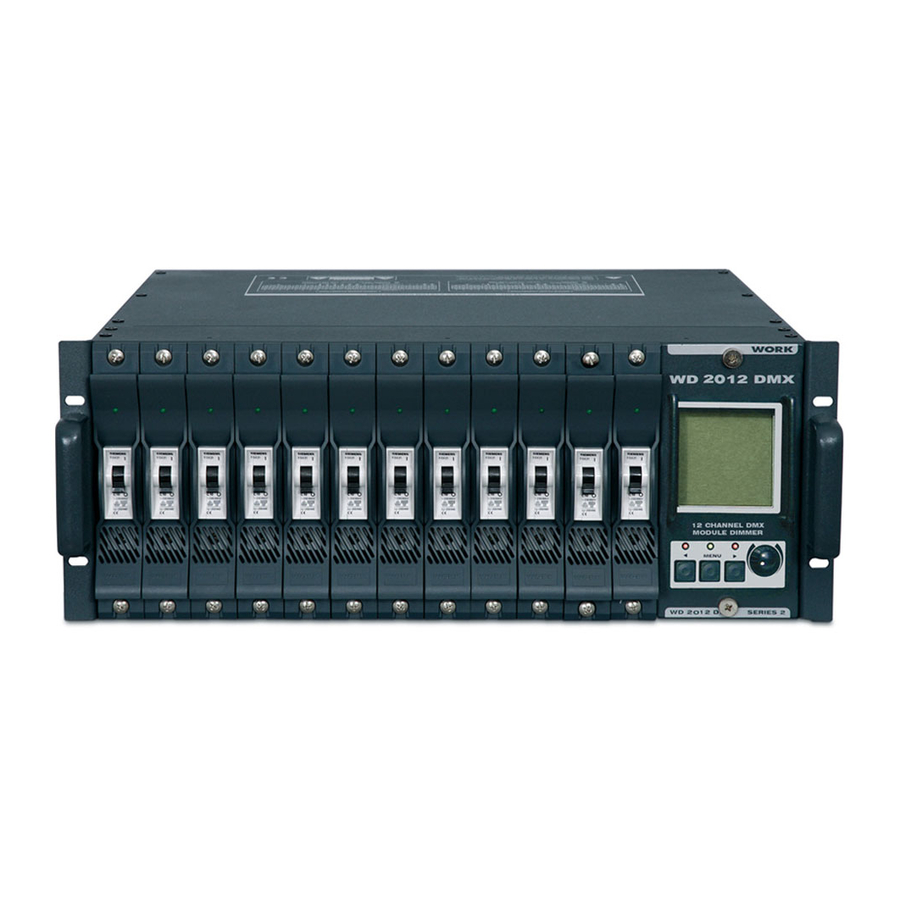
1. Overview 2. Guia de Funcionamiento 1.1 Front View 2.4 Menu de Funcionamiento 2.4.7 Modo Master/Esclavo Algunas unidades puede ser conectadas en modo Master/Esclavo. Se define al ser conectado. La unidad master solo puede enviar información de salida y la unidad esclavo solo recibe información. En la conexión de varias unidades, solo se puede seleccionar un master. - Page 8 2. Guia de Funcionamiento 1. Overview 2.4 Menu de configuracion 1.1 Front View 2.4.4 Canal MIDI Un total de canales 1-16 pueden ser seleccionados LCD DISPLAY Used to display various menus and submenus. 2.4.5 Correccion de Fase THE LEFT BUTTON Normalmente este parametro está...
-
Page 9: Rear View
2. Guia de Funcionamiento 2. Guia de Funcionamiento 1. Overview 2.4 Menu de configuracion 2.4 Menu de configuracion 1.2 Rear View 2.4.2 Modo DMX Aqui " Block", "Single" y "2 CHA" pueden ser seleccionados. 1=Ground 2=Data- - SINGLE Significa que la dirección DMX de cada canal es seleccionable 3=Data+ e incluso los 12 canales pueden tener la misma dirección DMX. - Page 10 2. Guia de Funcionamiento 1. Overview 2.4 Menu de configuracion 1.2 Rear View FUNCIONAMIENTO Receives DMX signal 1 DMX IN 3 Gire el encoder sin pulsar ninguna tecla, el cursor se desplaza arriba y abajo seleccionando el item deseado para configurar los parametros. Sends DMX signal out DMX OUT 4.
- Page 11 2. Guia de Funcionamiento 1. Overview 2.4 Menu de configuracion 1.2 Rear View For proper connection, please refer to the below wiring diagram printed Menu de configuracion on the top cover. FAIL MODE BLOCK MIDI/DMX MIDI CHANNEL --------------------------------- PHASE CORR. USER MODE SUPER...
-
Page 12: Preview Menu
1. Overview 2. Guia de Funcionamiento 1.3 Preview Menu 2.3 Menu de memoria Press Menu button for 5 seconds FAIL ATENCION! MODE BLOCK MIDI/DMX 1 2 3 4 5 6 7 8 9 10 11 12 MIDI CHANNEL Cuando se seleccionala memoria con el cursor, pulse la tecla izquierda, --------------------------------- PHASE CORR. -
Page 13: Operating Guide
2. Guia de Funcionamiento 2. Operating Guide 2.3 Menu de Memoria General FUNCIONAMIENTO The LCD display is integrated with this 12 Channel Digital Module Dimmer. Three buttons under the display and an Encoder (Data Wheel) make all 1. Preseleccione el no uso de memoria interna y apage los chaser necessary adjustments possible for example DMX address, limitation, 2. -
Page 14: Top Menu
2. Operating Guide 2. Guia de Funcionamiento 2.3 Menu de Memoria 2.1 Top Menu General Functions: 1. After "Power On", "Top Menu" is automatically shown in the display. Este menú aparece despues del menú de canal, una vez presionado el botón menú, se activa, además se activa el modo supervisor. - Page 15 2. Guia de Funcionamiento 2. Operating Guide 2.2 Menu de Canal 2.1 Top Menu FUNCIONAMIENTO Top Menu OPERATION 9 Control de curva "lineal" 10 Pulse el botón izquierdo y gire el encoder a la vez, el cursor se mueve horizontalmente. Entonces el DMX, curva, Limitador y será seleccionado. 11 Las teclas de menú...
- Page 16 2. Operating Guide 2. Guia de Funcionamiento 2.1 Top Menu 2.2 Menu de Canal Menu de canal 8 A short touch sets selected channel(1) to predefined value(e.g.20%). Tapping again will switch it off. While holding down the right button, turn the encoder(Data Wheel),this value will be stored after switchover.
-
Page 17: Channel Menu
2. Guia de Funcionamiento 2. Operating Guide 2.1 Menu Top 2.2 Channel Menu 8 Un ligero toque configura el canal seleccionado (1) al valor predefinido Channel Menu (ejem. 20%). Pulsando otra vez se apagará. Mientras mantiene pulsado el botón derecho, gire el encoder, el valor será almacenado despues de apagar. - Page 18 2. Guia de Funcionamiento 2. Operating Guide 2.1 Menu Top 2.2 Channel Menu Menu Top OPERATION FUNCIONAMIENTO 9 Control curve "linear" 10 Touch the left button and turn the encoder simultaneously, the cursor moves horizontally. Then DMX, Curve, Limit and the like will be selected.
-
Page 19: Memory Menu
2. Guia de Funcionamiento 2. Operating Guide 2.3 Memory Menu 2.1 Menu Top General Funciones: 1. Despues de encender la unidad, el menú Top se muestra en el display. This menu appears after the Channel Menu. Once the Menu button is pressed, this menu is activated, provided the supervisor mode is activated. - Page 20 2. Operating Guide 2. Guia de Funcionamiento 2.3 Memory Menu General La pantalla LCD está integrada en el módulo digital del Dimmer. OPERATION Los 3 botones bajo la pantalla y un encoder, hacen posibles todos los ajustes necesarios como dirección DMX, limitación, control de curvas, 1 Preselect no internal memory and chaser turns off.
-
Page 21: Setup Menu
2. Operating Guide 1. Vista General 1.3 Menu Previo 2.3 Memory Menu Presione el botón menú durante 3 segundos ATTENTION! FAIL MODE BLOCK MIDI/DMX When MEMORY is selected by the cursor, touch the left button, then 1 2 3 4 5 6 7 8 9 10 11 12 MIDI CHANNEL ---------------------------------... - Page 22 2. Operating Guide 1. Vista General 2.4 Setup Menu 1.2 Vista Trasera Setup Menu Para una adecuada conexión, diríjase a diagrama mostrada abajo FAIL MODE BLOCK MIDI/DMX MIDI CHANNEL --------------------------------- PHASE CORR. USER MODE SUPER MASTER/SLAVE MASTER UNIT CURVE USER1 EDIT CURVE USER2...
-
Page 23: Dmx Fail
2. Operating Guide 1. Vista General 2.4 Setup Menu 1.2 Vista Trasera OPERATION Recibe señal DMX 1 DMX IN 3 Turn the encoder without tapping any button, the cursor moves up and down, selecting the desired item to set the parameters. Envía señal DMX de salida DMX OUT 4 When USER CURVE is selected, press this button, you can enter... -
Page 24: Dmx Mode
1. Vista General 2. Operating Guide 1.2 Panel Trasero 2.4 Setup Menu 2.4.2 DMX Mode Here " Block", "Single" and "2 CHA" can be selected. 1=Ground 2=Data- 3=Data+ - SINGLE : means that the DMX address of each channel is selectable, and even that the 12 channels can select the same DMX addresses. -
Page 25: Midi Channel
2. Operating Guide 1. Vista General 2.4 Setup Menu 1.1 Vista Frontal 2.4.4 MIDI Channel A total of channels 1~16 can be selected. PANTALLA LCD Usada para mostar varios menus y submenus 2.4.5 Phase Correction BOTON LEFT (IZQ.) Usually this control parameter is set to "ON". It makes a brightness-linear BOTON MIDDLE (CENTRAL) control possible. -
Page 26: Master/Slave Mode
1. Vista General 2. Operating Guide 1.1 Vista Frontal 2.4 Setup Menu 2.4.7 Master/ Slave Mode Several units can be linked in Master/Slave mode. The master and slave unit must be defined when linking. The master unit only can send information out, and the slave unit only receives information. - Page 27 2. Operating Guide Caracteristicas 2.4 Setup Menu Seccion 2 Caract. detalladas 2.4.9 User Curve La unidad trabaja con metodo de control de angulo de fase con Triacs. Este metodo produce interferencias especialmente en el rango de bajas There are five types of curves below for reference. frecuencias.
-
Page 28: Clear Curves
2. Operating Guide Caracteristicas 2.4 Setup Menu Seccion 1 Caract. generales 2.4.9 User Curve Esta unidad es un dimmer modular de 12 canales, el cual contiene una unidad de 32 bit con una unidad procesadora de tiempo y una pantalla gráfica. -
Page 29: Delete All
2. Operating Guide Instrucciones Generales Gracias por su compra. Lea las siguientes instrucciones antes de usar 2.4 Setup Menu esta unidad. Despues de leerlo cuidadosamente, este manual debe permanecer junto al dispositivo para futuras refencias. 2.4.11 Delete All "DELETE ALL" deletes all memories, chases, DMX addresses, curves, etc., Cada unidad ha sido cuidadosamente comprobada y embalada which is carried out by turning the encoder while holding the right button. -
Page 30: Technical Specifications
Technical Specifications Contenidos Instrucciones Generales 28 Power Input..............AC 230V~50/60Hz Caracteristicas 29 Channel Output..........10A per channel, Total 120A (for single-phase connection) 1. Vista General 31 10A per channel, Total 40A per phase Channel Output........ 1.1 Vista Frontal 31 (for three-phase connection) 1.2 Vista Trasera 33 Analogue Input................
Need help?
Do you have a question about the WD 2012 DMX and is the answer not in the manual?
Questions and answers