
Related Manuals for K-FEE Grande


Summary of Contents for K-FEE Grande
- Page 1 G R A N D E Original operating manual OOH 21 Please read the manual before using this appliance.
-
Page 3: Table Of Contents
Contents Safety instructions ....................4 - 7 Machines – Overview ....................8 Overview of pictograms ....................9 Start-up of the appliance ..................10 Preparing beverages ....................11 Programming cup capacity ..................12 Temperature reduction ..................... 13 Daily cleaning ......................14 Cleaning on request ...................15 - 16 Descaling on request ..................17 - 18 Changing filter on request ...................19 - 20... -
Page 4: Safety Instructions
Symbols and warnings General safety instructions Commercial use If you fail to comply with the The warning triangle is used This appliance is intended to be in the instructions where operating instructions used by expert or trained users in safety instructions, the ma- risks can result to the user professional and similar areas, such chine may become dangerous... - Page 5 3-pin wall socket. 8 years old or older and act un- tended for this appliance that bear Your warranty rights may be der supervision. the K-fee system logo. Never ® voided if the unit is incorrectly • The appliance and its connection use a damaged or deformed cap- connected.
- Page 6 Visit tem capsules! • Protect the appliance from frost. our website for more informa- Look out for the red K-fee ® • Operate the appliance only tion about products and/or au- System logo and the charac- within the specified temperature thorised dealers.
- Page 7 The manufacturer and his dis- tribution partner cannot be held liable for any injury or damage which is the direct or indirect result of non-original capsules being used with this machine. These operating instructions are also available as a download from our website: www.k-fee-system.com...
-
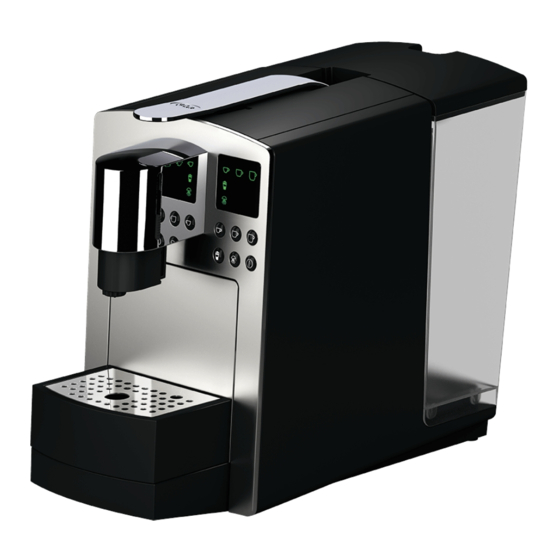
Page 8: Machines - Overview
Machines – Overview Button symbols: Small cup Large cup Extra large cup 1 Drip grating 2 Drip tray wall Temperature On/Off button Rinsing button 3 Height-adjustable spout °C reduction 4 Capsule insertion opening 5 Lever 6 Water tank CAUTION 7 Water tank cover Four pointed needles open the capsule in 8 Water filter (optional) the machine. -
Page 9: Overview Of Pictograms
Pictograms Description Overview of pictograms • The cup symbols flash green when the appliance heats up. Display of symbols: • The cup symbols and the rinsing symbol light up green when the appli- ance is ready. • The respective cup symbol or the rinsing symbol flashes green when the desired action is in process. -
Page 10: Start-Up Of The Appliance
Start-up of the appliance Please read the safety in- structions before starting up 3.5 l the appliance. Remove water tank. Fill water tank with fresh Re-insert water tank. potable water If you decide to use a water filter: Screw filter into water tank and rinse appliance with at least 200 ml of water. -
Page 11: Preparing Beverages
Preparing beverages The spout can be moved either down- 110 mm wards upwards 160 mm with the help of the sliding device (on both sides of the spout). The appliance switch- Adjust drip tray to desired With upper drip tray. With lower drip tray. -
Page 12: Programming Cup Capacity
Programming cup Matching the brewing capacity to your cup size when the appliance is ready for operation: capacity hold down the "Small cup", "Large cup" or "Extra large cup" button until the liquid reaches the level required in the cup. The new fill quantity remains stored (even if power is inter- rupted). -
Page 13: Temperature Reduction
Temperature reduction °C °C Use the temperature reduction button to optimise the brewing temperature for capsules containing milk powder. Press button for temperature reduction. Use a container. Very hot water – risk of scalding! °C °C Press rinsing button. Remove Open lever and insert milk Place a suitable cup or glass on container after rinsing. -
Page 14: Daily Cleaning
Daily cleaning For health reasons it is rec- ommended to rinse the ap- pliance – 5 x before every first bev- erage preparation, – 1 x after every drink Place a container under Open lever and close again. Push button briefly to rinse poured. -
Page 15: Cleaning On Request
( 1 ) Only use cleaning agents that are suitable for the appliance. For further information, please visit our website at: www.k-fee-system.com Danger to health! Care- fully read the user instruc- tions for the cleansing agent and follow the safety instruc- tions. - Page 16 Cleaning on request ( 2 ) The appliance rinses at in- tervals until the water tank is empty. Very hot water – risk of Press rinsing button. Wait until rinsing process is Clean water tank, re-fill water scalding! finished. Then empty con- tank (min.
- Page 17 ( I ) Only use descaling agents that are suitable for the appliance. For further information, please visit our website at: www.k-fee-system.com Danger to health: Care- fully read the user instruc- tions of the descaler and comply with the safety in- structions.
-
Page 18: Descaling On Request
Descaling on request (2) The appliance rinses at in- tervals until the water tank is empty. Very hot water – risk of Press rinsing button. Wait until rinsing process is Clean water tank, re-fill water scalding! finished. Then empty con- tank (min. - Page 19 Only use water filters that are suitable for the appliance. For further information, please visit our website at: The filter symbol will contin- www.k-fee-system.com ue to be displayed in red un- til the water filter has been replaced. If setting "Filter available" has been activated, the appliance...
-
Page 20: Changing Filter On Request
Changing filter on request (2) 3.5 l min. 0.25 l Screw in new water filter. Refill water tank completely Place a container under and re-insert. spout. The appliance rinses with 200 ml of water. Very hot water – risk of scalding! Wipe contacts on lower drip Wait until rinsing process is... -
Page 21: Cleaning, Descaling And Changing Filter If Required
Cleaning, descal- For the descaling process, ing and changing hold the rinsing button down for 3 sec. and please follow filter if required the operating steps from pictogram 3 on page 43. Press the rinsing but- ton briefly to start This function can be used to the next function. -
Page 22: Setting Parameters: - Water Hardness
Setting parame- ters: water hard- ness The water hardness set de- termines how much water is used before descaling be- comes necessary. For an Press rinsing button for at Press rinsing button briefly Press button briefly again for overview for determining the least 3 sec. -
Page 23: Power Off
Parameter setting: power-off °C °C °C °C °C °C The factory setting for the switch-off time (power-off ) is 5 min. Press button for at least Press button briefly again. Press button briefly again. 3 sec. in Eco mode. Power-off will be extended to Power-off will be extended 15 min. -
Page 24: Temperature Reduction
Parameter setting: temperature reduc- tion The factory setting for tem- perature reduction is under 70 °C. Press button for at least Press button briefly again: Press button for at least 3 sec. in Eco mode: under reduce temperature reduc- 3 sec. to store the setting. 70 °C tion to under 60 °C. -
Page 25: Evaporation Of Residual Water
Evaporation of residual water 20°C This function evaporates and thus removes residual water from inside the appli- ance. This prevents residual water from freezing inside the appliance. Allow appliance to warm Open lever and close again. Press buttons (small and up to room temperature if extra large cup) for at least necessary. -
Page 26: Frequently Asked Questions
After inserting a capsule, the lever cannot be closed completely? K-fee System logo. ® Check that there is no used capsule in the brewing chamber, that the container for used cap- The use of non-original cap- sules is not overfull and that the newly inserted capsule is in the correct position. -
Page 27: Specifications And Servicing
Specifications and 220 - 240 V, ~ 50 Hz, max. 1455 W servicing 1.45 m max. 19 bar approx. 3.5 l approx. 4.5 kg A = 200 mm B = 406 mm C = 316 mm max. 160 mm 10°C - 45°C ~ 90°C Noise emissions do not exceed 70 dB(A) If you have any queries or suggestions,... -
Page 28: Disposal Instructions
Disposal The packaging is recyclable. Ask the authori- public recycling yard in your vicinity. The ma- instructions ties responsible in your local council offices for chine bears the sign for waste electrical and further information about recycling. electronic appliances in accordance with Eu- ropean Directive 2002/96/EC (WEEE). - Page 29 Notes...
- Page 30 G R A N D E K - f e e S y s t e m G m b H , 5 1 4 6 9 B e r g i s c h G l a d b a c h , G e r m a n y w w w .
Need help?
Do you have a question about the Grande and is the answer not in the manual?
Questions and answers