
Subscribe to Our Youtube Channel
Summary of Contents for Academy Dragster ADSP 8
- Page 1 INSTRUCTIONS MANUAL ADSP 8 D I G I T A L S O U N D P R O C E S S O R C H A N N E L D S P O U T P U T...
-
Page 2: Table Of Contents
1. CONTENT 2. WELCOME TO THE ADSP 8 3. ADSP 8 PACKAGE CONTENTS 6. ADSP 8 INSTALLATION PROCEDURE 4. PRODUCT FEATURES 4.1. Audio speciality 4.2. Audio decoder 4.3. Wireless connection 4.4. Unit interface connection 4.5. DSP controller introduction 4.6. Software introduction 5. - Page 3 12.1. How to get the Application 12.2. Application Installation 12.3. Android Connection 12.4. Application Operating 12.5. Application Screenshot 12.6. Application Operation 13. TROUBLE SHOOTING GUIDE 14. ASSEMBLY DIMENSIONS 15. ASSEMBLY DIMENSIONS FOR THE REMOTE CONTROL 3 ADSP 8...
-
Page 4: Welcome To The Adsp
- Digital Sound Processor - and welcome to the Academy-Dragster family of Sound Quality for car audio. The ADSP 8 is the best combination of the highest quality analog and digital components available giving all levels of enthusiast the finest product available. -
Page 5: Unit Interface Connection
6 pcs buttons with light: switches the EQ mode and function, status display 4.6. DSP Software Introduction ADSP 8: Exe control software: the PC control software can connect to the unit by USB, WiFi, etc, which can configure the unit with flexibility and conveniently, download the configuration already set to the machine or to save the existing configuration from the device to the computer. -
Page 6: Technical Parameters
Each input channel set up separate volume, adjustment range 59.9dB~0dB, shut off. Input Equalizer Each Input Channel set up with 31-band equalizers, parameter range: Centre Frequency point:: 20Hz~20kHz, Accuracy: 1kHz. Q (quality factor): 0.404~44.852, precision is 0.001. Gain. 12.0dB~+ 12.0dB, accuracy of 0.1dB 6 ADSP 8... - Page 7 3. Gain: -12.0dB ~+12.0dB, accuracy of 0.1dB. Time Delay and Space Each output channel has separated delay to adjust sound field spatial orientation. Parameters range: 1. Milliseconds (0.000 to 20) 2. CM (0.00 to 692.00) 3. Inches (0.00 to 272.75) 7 ADSP 8...
- Page 8 Volume Output Each channel sets up with separated volume control, adjustment range -59.9dB~0dB, shut down. Configuration Load, delete, save. It can support 6 scenarios depending on the personal preferences and size of the car. 8 ADSP 8...
-
Page 9: Adsp 8 Installation Procedure
Please select a dry clean location in the trunk or passenger compartment only. Do not install the ADSP 8 to any area that may experience excessive vibrations. Position the ADSP 8 processor in a location that will allow for sufficient airflow with taking into mind an ease of service for subsequent accesses. -
Page 10: Power Supply, Rem, High-Level Pin
Provided left-front (FL+/FL-), righ-front (FR+/FR-), left-rear (RL+/RL-), right-rear (RR+/RR-), 4 groups. This high-level analog signal input cannot exceed a voltage input of 14.4 VDC. Note: switching on the built-in source, you will have automatically +12V from REM OUT. 10 ADSP 8... -
Page 11: Aux Low-Level Rca Input Interface Connection
CH1 – CH2 – CH3 – CH4 – CH5 – CH6 RCA cable connects to the low-level analog signal input. There are 3 different input modes according to the software operation setting. 7.2.1. 3 Groups Stereo Input Mode 11 ADSP 8... -
Page 12: Group Stereo, 4 Channels Input Mode
7.2.2. 1 group Stereo, 4 Channels input Mode 7.2.3. 5.1 Channels (6-channel) Input Mode ADSP 8... -
Page 13: S/Pdif Digital Interface Input
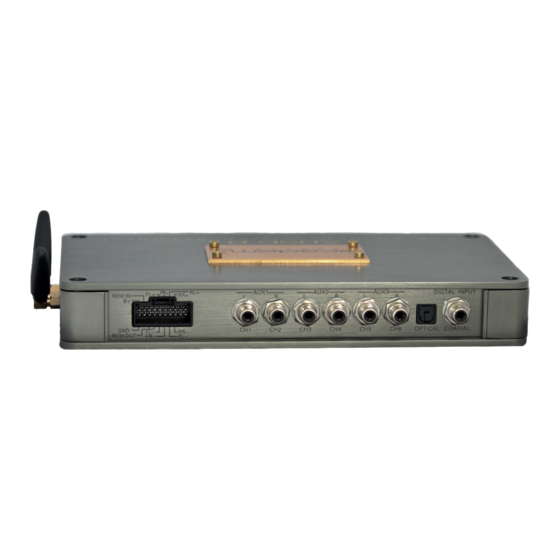
There is an optional input for optical input and coaxial input. The processor will give preference to optical input when the optical input and coaxial input are both plugged. If there is no optical input, it will be switched to coaxial input. 13 ADSP 8... -
Page 14: Output Panel Connection Features
USB3.0 Interface. Power indicating light. Microphone. 8.1 RCA Output Interface CH1 – CH2 – CH3 – CH4 – CH5 – CH6 – CH7 – CH8 Low-level analog output by RCA cable to be connected to car amplifier input. ADSP 8... -
Page 15: Input, Output, Routing Connection Rules
High-level right-rear input ---------------------------------------------------------- Bluetooth right input AUX right input (stereo input mode) Right-rear speaker sound field ---------------------------------------------------------- AUX right-rear input (4 channel or 5.1 channel Input mode) ---------------------------------------------------------- High-level right-rear input ---------------------------------------------------------- Bluetooth right input 15 ADSP 8... - Page 16 Left signal input to left-front, left-rear and left-subwoofer sound field speaker _____________________________________________ Right signal input to right-front, right-rear and right- subwoofer sound field speaker Left + right signal send to: center and subwoofer sound field speaker __________________________________________________________________ 16 ADSP 8...
-
Page 17: Usb3.0 Interface
Connect devices to PC and configures the user processor program by PC software. 8.3.2. Connecting to Controller Processors can be easily and conveniently controlled by wired DSP Controller. (1) Connect the processor to USB interface controller, wire connection as below photos. ADSP 8... -
Page 18: Phone Interface
(2) Connect computer to USB interface controller and configurate the scenario by computer software. (The wired USB interface controller must be connected to the processor), see wire connection here below: 8.4 Phone Interface Insert the receiver phone inteface and realize hand.free phone calls as seen below: ADSP 8... - Page 19 (3) USB3.0 Inteface (2 pcs)2 pcs USB3.0 Interface (one in the face-panel, one in the right side of panel 1). Compatible USB1.1/2.0 Interface, the right side panel USB interface used to connect the processor, and the face-panel USB interface used to connect to the computer. 19 ADSP 8...
-
Page 20: Software Operative Instructions
(a file named “data file” will automatically be created at the software directory once you run this file to save user program files). Open the software and the Main GUI as below: ADSP 8... -
Page 21: Software Online
A few seconds later the “offline” button color will change to “online” green on successful button, loading the preset scene data. “offline”: red color buttons “online”: green color, and successful connection buttons, and load the present scene date 21 ADSP 8... -
Page 22: Wifi Connection
D428B726” wireless network by computer, then set up wireless connection with the DSP processor. (2) Running software: (such as 10.3. Operartion Software). The software will be connected automatically by WiFi (if without direct USB connection). The connection same with the USB connection. ADSP 8... -
Page 23: Software Input Signal Interface
A. 2 channels: 3 groups stereo input mode B. 2 channel/4 channels: 1 group stereo input mode and 4 channels input mode 1. C. 6 channels: 5.1 channels input mode. Refer the 4.2, AUX level-input pin for connection method. ADSP 8... -
Page 24: Graphic Input Signal
H (HP or Low cut) or L (LP or High cut), left click and drag the mouse to adjust the frequency of High cut (LP) or Low cut (HP). 10.5.4. Equalizer Parameters Area Input 24 ADSP 8... - Page 25 Click this button, the pop-up confirmation dialog box, press “YES” button and reset all 31-b1nd equalizer. (frequency Rate, Q value and gain vakues are reset to the preset state, which is a third time frequency distribution). Note: after resetting it isn’t possible to go back! ADSP 8...
-
Page 26: Status Bar Signal Input
Colorful and bright highlights to meet with the artist’s needs. 10.5.5. Status Bar Signal Input The audio source status bar displays the current signal input source. ADSP 8... -
Page 27: Signal Output Gui
Display CH1 to CH8 output channel configuration, and set-up the speaker parameters directly in the graphic area. Click on the corresponding output channels of the speaker, and the color changes to green, then you can edit current output channel parameters. ADSP 8... -
Page 28: Output Channel Setting Area
“default” button set output channel as default setting. Press “cancel” button to exit the dialog. End of Setting Procedure: (Lock output setting button) Click the button “Lock output map” then OK to lock or unlock from CH1 to CH8 setting. 28 ADSP 8... -
Page 29: Output Volume
59.9dB ~ 0dB of all the audio system. Note: This function will be useful to have the gain of amplificator at 0. 10.6.4. Crossing Setting Area In the x-over section it is possible to fix the crossover points. 29 ADSP 8... -
Page 30: Output Phase Area
A. Time delay: 0.00 to 20.00 ms. B. Metric distance delay: 0.00 to 692.00 CM. 30 ADSP 8... -
Page 31: Master Volume Setting Area
Adjusting area: -59.9dB ~12.0dB or shut down. (2) Master Volume Mute Buttons: with this button, you can insert or switch off the mute function of the system. 31 ADSP 8... -
Page 32: Signal Input Level Setting Area
The parameters range as below: A. Millisecond: 0.000MS – 20.000MS B. CM: 0.00CM – 692.00CM C. Inch: 0.00 – 272.37 inches 32 ADSP 8... -
Page 33: Signal Output Level Setting Area
Memory Menu: to open, save, delete memory operation and etc. Options Menu: to hardware and software upgrades, advanced setting, help operation and etc. Online Button: Connection and disconnection buttons for device to PC control software. 33 ADSP 8... -
Page 34: Memory Menu
Click and pop-up dialog box as follows: This dialog box shows the 6 group presets data saved previously on this machine. The matched DSP controller has 4 recalling buttons which correspond to the first four presets. 34 ADSP 8... - Page 35 (111111). Note: to use the 6 memories in remote mode the ADSP 8 can support WiFi technology. Downloading the software from www.dragster.audio it is possible to create an application on a smartphone having in this way a remote control.
- Page 36 (e.g. the name of saves), because the adjusted preset data is already different from the one you just saved as preset data. 36 ADSP 8...
- Page 37 Select the item to be deleted, click “delete”, the file is empt again. Note: the function is only to delete the present data from this machine and restore to the default data, and this won’t change the current working preset data in the processor. 37 ADSP 8...
- Page 38 The name of your saved file will not be indicated again if the parameters are changed. 38 ADSP 8...
- Page 39 (7) Save Complete Processor Preset Data This function saves all the data from current machine to computer for further complete machine scenes copy use (same with above function opration). This operation won’t change any data of the current working machine. 39 ADSP 8...
-
Page 40: Options Menu
“bum”). By setting this delay, the impact of music will be deferred to the lowering of the signal REM. This will avoid the impact of the shutdown. Click the white area to the left of the text, the imput values vary on the cursor (adjustment range: 0.00s~1.00s). 40 ADSP 8... - Page 41 So, it’s better to adjust the response time shorter. Adjusting range: 0.3mS to 200mS. Setting advice: better bass signal response time: 60mS~80mS, better midrange and tweeter signal response time: 20mS~40mS. 41 ADSP 8...
- Page 42 Please don’t turn the power off during the update!!! (3) Help Menu: Left-click the “help” and the machine’s help files pop-up including: operation instruction, the installation dimension, etc. (4) About: Display the version of the software, copyright info, etc. 42 ADSP 8...
-
Page 43: Bluetooth Connection
But it will turn back to previous selected input signal source if it cannot find the Bluetooth music player or if there is a phone call coming in. Also you can change the input signal sourse by yoursellf in the software. 43 ADSP 8... -
Page 44: How To Get The Application
After the downloading and installation on your Android machine, go to the WiFi procedure for the connection to the processor. Click “setting” , go to wireless network , connect it, see the image here below: 44 ADSP 8... -
Page 45: Application Operating
- select the “input signal” among “High Level”, “Bluetooth”, “AUX1”, AUX2”, “AUX3”, “Digital”, Coaxial”. (3) Volume: - use the volume bar to increase or decrease it. (4) Line: - shows the connection status with the device. 45 ADSP 8... -
Page 46: Trouble Shooting Guide
WiFi network which begins with “DSP Audio” characters? USB cannot 1- Is USB cable in place or not’? connect to 2- Have you found the link called “HID-compliant computer? device” in the manager’s computer or on a device on someone? ADSP 8... - Page 47 14. ADSP 8 ASSEMBLY DIMENSIONS 15. CONTROLLER ASSEMBLY DIMENSIONS 47 ADSP 8...
- Page 48 1 0 7 , 4 0 c m 3 . 1 0 4 m s 4 2 , 2 8 I N C H ADSP 8 A u d i o c i t y s r l M i l a n o , I t a l y w w w .
Need help?
Do you have a question about the ADSP 8 and is the answer not in the manual?
Questions and answers