Table of Contents
Advertisement
Advertisement
Table of Contents

Related Manuals for Exterity avediaplayer R93 series


Summary of Contents for Exterity avediaplayer R93 series
- Page 1 Exterity AvediaPlayer Receiver r93xx Series V5.0 Getting Started Guide...
- Page 2 The information contained in this document is subject to change without notice. EXTERITY LIMITED MAKES NO WARRANTY OF ANY KIND WITH REGARD TO THIS MATERIAL, INCLUDING, BUT NOT LIMITED TO, THE IMPLIED WARRANTIES OF MERCHANTABILITY AND FITNESS FOR A PARTICULAR PURPOSE.
-
Page 3: Table Of Contents
Table of Contents Safety Notices............................................5 Important Safety Instructions ......................................................5 USA and Canada..........................................................5 EU and Others ..........................................................6 Safety Information..........................................................6 About This Guide............................................ 8 1 About the AvediaPlayer r93xx Series Receivers..............................10 Models ..............................................................10 AvediaPlayer r9300 Receiver....................................................10 AvediaPlayer r9310 Receiver....................................................11 2 Before You Begin..........................................12 Network Considerations........................................................ - Page 4 Serial TV /ADM ..........................................................20 USB ..............................................................20 4 Basic Configuration..........................................21 Using a DHCP Server to Determine the Receiver’s IP Address .......................................... 21 Using AvediaServer Director....................................................22 Using the Connected TV and Remote Handset ..............................................23 Using the Serial Admin Interface ................................................... 24 Log into the Web Interface.......................................................
-
Page 5: Safety Notices
Important Safety Instructions There are no instructions specifically for service personnel in this document. There are no user serviceable parts inside any Exterity product. To prevent electric shock or fire hazard, do not remove cover. Refer service to qualified service personnel. -
Page 6: Eu And Others
Safety Information Warning: There are no user serviceable parts inside any Exterity product. To prevent electric shock or fire hazard, do not remove cover. Refer service to qualified service personnel. For 230/240 volt operation, be sure to use a harmonized grounded 3 conductor cord, rated 6 Amp minimum. Use a suitable cord for connection to the equipment and terminating in an IEC. - Page 7 If in any doubt about the earth provision in your building consult a qualified electrician. Use only the dedicated power supply or cord supplied for your device. Exterity products use ventilation holes for cooling. None of the ventilation holes should be blocked. Keep all materials at least 5cm away from all the ventilation holes.
-
Page 8: About This Guide
About This Guide This manual shows you how to perform the first steps of configuring and connecting Exterity AvediaPlayer r93xx Receivers to your TV/display and IP network. • Refer to the AvediaPlayer r93xx Receiver Administrator’s Guide for detailed information about configuring your AvediaPlayer Receiver(s) for use. All AvediaPlayer documentation is available from the Exterity website at www.exterity.com >... - Page 9 Documentation Conventions The following conventions are used in this guide: Note: A Note calls attention or adds information that is important for the proper operation of the product. Courier Font - is used to identify scripts, code examples, or keyboard commands. SMALL CAPITALS –...
-
Page 10: About The Avediaplayer R93Xx Series Receivers
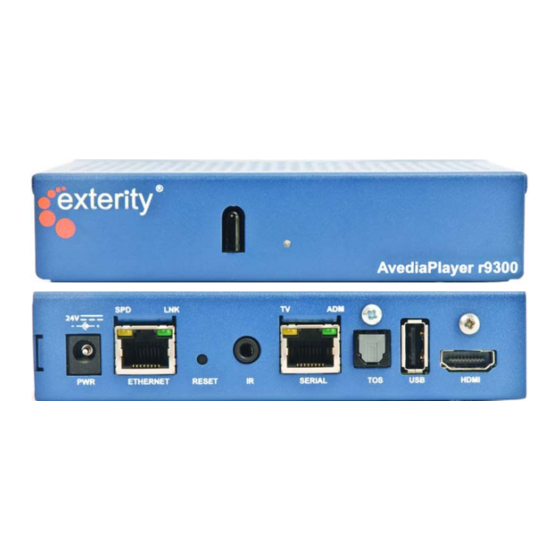
AvediaPlayer r93xx Receivers are network devices which display an IP network delivered MPEG-2 transport stream (TS) on a television or other display. Streams from Exterity TVgateway, Encoder, Transcoder and AvediaServer products are supported, as well as streams from third party products. -
Page 11: Avediaplayer R9310 Receiver
AvediaPlayer r9310 Receiver The AvediaPlayer r9310 Receiver provides the same connections as the AvediaPlayer r9300, plus additional support for analog video and audio outputs. Rear panel connections provide support for: • Video: HDMI v1.4b (with HDCP) 1080p,1080i, 720p (50Hz/59.94Hz/60Hz), 576p, 576i (50Hz), 480p, 480i (59.94Hz/60Hz) •... -
Page 12: Before You Begin
For these purposes, “Multicast-enabled” is understood to mean that all network switches carry out IGMP snooping. One switch must act as the IGMP querier. Exterity Receivers support version 2 and 3 of IGMP. The Ethernet port – a 10/100 Mbps interface used to connect the receiver to the network switch using a standard straight-through Cat 5 cable. -
Page 13: Physical Location
Refer to the Installation Solutions Guide for more information. Consult your Exterity sales representative for details of the available AvediaPlayer r93xx Receiver installation accessories. Please see the Exterity Accessories Datasheet for details of order codes. -
Page 14: User Control
Typical user functions such as channel selection and volume control are made using the available remote controls and accessories. Infra Red (IR) Receiver – The receiver is controlled using the IR Exterity Remote Control handset. If the receiver’s location means that its IR Window is not easily visible, control functions can be maintained using an IR Extender connected to the rear panel (see below). -
Page 15: Connection And Power On
Note: You must use HDMI-compliant cables to connect the receiver to the display device. Tip: For best performance Exterity recommends the addition of a ferrite on the HDMI cable. A Wurth 742 716 22 S or similar is recommended. Figure 1 HDMI cable with ferrite bead... -
Page 16: Avediaplayer R9310 Only - Component/Composite/Analog Audio
AvediaPlayer r9310 Only - Component/Composite/Analog Audio Component Video – (HD and SD) Use standard phono cables (RCA). Composite Video – (SD only) Use a standard phono cable (RCA). Analog Audio – Analog audio 1 volt peak-to-peak maximum. Use standard phono cables (RCA) (not required if using HDMI). -
Page 17: Digital Audio
Digital Audio TOS – Use a standard TOSLINK cable to connect the 2 channel PCM or Bitstream audio output to an external audio system if required. (Not required if using HDMI.) HDMI – Use HDMI cables to attach an external audio system between the receiver and the TV to achieve 6 channel PCM or Bitstream audio output. -
Page 18: Connect To A Power Source And The Network
Connect to a Power Source and the Network The receiver is an IP network device and so must be connected to the LAN for operation. It can also be powered from the LAN connection if Power over Ethernet (PoE) is available, otherwise use its DC supply. By default, the receivers are configured to obtain an IP address from the DHCP server on the network. -
Page 19: Additional Connections And Functions
During Power On During power on the front panel LED flashes according to the startup activity, listed below. The Status LED flashes during startup or to indicate the receiver is responding to remote control commands as follows: Function LED activity Startup Remains off for around 10 seconds, then on for around 20 - 30 seconds with periods of rapid... -
Page 20: Reset
The interface wiring is shown in the AvediaPlayer r93xx Receiver Administrator’s Guide. Contact your Exterity supplier for more details on supported televisions. An external storage device (FAT32 format) can be connected to the USB port. The storage device can be used to hold items such as video content and playlists to provide failover support, additional fonts, and HTML content for digital signage. -
Page 21: Basic Configuration
Basic Configuration Each AvediaPlayer Receiver must have an IP address before you can carry out any configuration. This chapter explains how to: • Determine the receiver’s IP address when using a DHCP server • Assign a static IP address • Configure the receiver’s name and location Using a DHCP Server to Determine the Receiver’s IP Address If you have a DHCP server on the network, the receiver’s IP address is allocated automatically. -
Page 22: Using Avediaserver Director
Enter the IP address to access the Web Admin of the AvediaServer Interface. Director – lists all Exterity devices in your network. Find the device using its MAC address. Click the receiver’s name to open its web interface. -
Page 23: Using The Connected Tv And Remote Handset
Using the Connected TV and Remote Handset To display the receiver’s IP address on the television screen, click the MODE button on the handset. Scroll down the displayed options and select Network. Settings DHCP: Enabled 1 Language 2 Audio IP address: 18.9.199.22 3 Subtitles Network mask:... -
Page 24: Using The Serial Admin Interface
Admin – log in using: USB/Serial username: admin password: labrador to access the Serial Admin Interface. Serial port (RJ45) Enter 3 to view the current IP address of the receiver. Start terminal program Exterity access-usb Exterity access-srl RJ-45 to USB RJ-45 to DB9... -
Page 25: Log Into The Web Interface
Log into the Web Interface Once you have determined the receiver’s IP address, enter it into a browser to carry out configuration. Admin – log in using: username: admin Enter the IP address password: labrador of the receiver to access the Web Admin Interface. -
Page 26: Assigning A Static Ip Address
Terminal Program such as PuTTY. Baud rate: 115200 Data bits: 8 Serial port (RJ45) Parity: none Stop bits: 1 Flow control: none Exterity access-srl Exterity access-usb Start terminal program RJ-45 to DB9 RJ-45 to USB Admin – log in using: username: admin password: labrador to access the Serial Admin Interface. -
Page 27: Using The Receiver's Web Interface
Using the Receiver’s Web Interface 1 Enter the receiver’s IP address into a browser, and log in using the default username and password (admin/labrador). 2 Click Network. Figure 1 Setting a static IP address using the receiver’s web interface 3 In the IP Address Configuration section, select Static. 4 Enter the required values for IP Address, Subnet Mask, Default Gateway and Preferred and alternate DNS Servers in the respective entry fields and click Apply. -
Page 28: Configuring The Device's Name And Location
AvediaPlayer r93xx Receiver Administrator’s Guide. Exterity recommends that you specify a name and location for each receiver. This allows you to easily identify the device on the network and in a management application, such as the AvediaServer Director application. - Page 29 Item Description Product Type The product variant. This can be r9300 or r9310. Software Version The version of software running on the device. Description The full unit ID, including the firmware release number, type and date. MAC Address The unit’s MAC address. This can be found on the underside of the receiver. Serial Number The receiver’s serial number.
Need help?
Do you have a question about the avediaplayer R93 series and is the answer not in the manual?
Questions and answers