
Subscribe to Our Youtube Channel
Related Manuals for Ford FD6700S


Summary of Contents for Ford FD6700S
- Page 1 MODEL#: FD6700S FD7200S FD6700S-T FD7200S-T Diesel Generator OPERATOR’S MANUAL www.fordpower.cc...
-
Page 2: Table Of Contents
TABLE OF CONTENTS Introduction ............................3 Product Specifications ........................ 3 How to contact us........................Safety Rules............................4 Safety Symbols......................... 4 Safety Instructions ........................4 Features............................. 7 Assembly............................9 Unpacking ..........................9 Packing List ........................... Open Maintenance Door.... -
Page 3: Introduction
INTRODUCTION Thank you for purchasing this superior quality portable generator from Ford Power Equipment. When operating and maintaining this product as instructed in this manual, your generator will give you many years of reliable service. Product Specifications: This generator is an engine-driven, revolving field, alternating current (AC) portable generator. It is designed to supply electrical power to operate tools, appliances, camping equipment, lighting, or serve as a back up power source during power outages. -
Page 4: Safety Rules
SAFETY RULES Safety Symbols Indicates a potentially hazardous situation which result in serious injury or death W W ARNING! if not avoided. Indicates a potentially hazardous situation which could result in damage to W C AUTION! equipment or property. Risk of explosion Toxic Fumes Risk of fire Lifting hazard... - Page 5 SAFETY RULES Never exceed generator’s wattage / amperage capacity. This could damage the generator W W W ARNING! and / or connected electrical devices. • Check operating voltage and frequency requirements of all electrical devices prior to plugging them into the generator. Never start or stop engine with electrical devices plugged in to the receptacles.
- Page 6 Never transport or make adjustments to this unit while it is running. • Never insert objects through cooling slots. Never operate this unit if there are any broken or missing parts and only use Ford Power WARNING! W W W ARNING! Equipment replacement parts specifically designed for this unit.
-
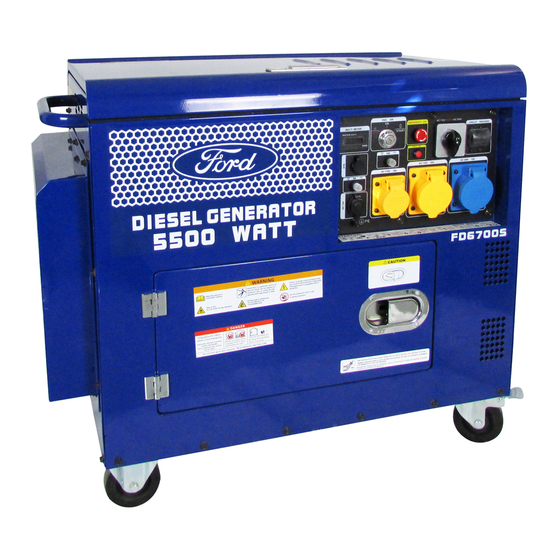
Page 7: Features
FEATURES Three Phase Single Phase G - Main Circuit Breaker A - ON/OFF/Start Switch H- Socket CEE 2P+T Three Phase Main Circuit Breaker I - Circuit Breaker C- Socket CEE 3P+N+T J - Lock D - Outlets K - Handle Bumper E - Grounding Stud F - Meter(Frequency,Current,Battery Voltage, L - Air Filter Maintenance... - Page 8 FEATURES T -Oil Drain Plug M - Fuel Tank U -Maintenance Door Lock Fuel Tank V - Maintenance Door O - Top Cover Plate W- Battery P - Pressure Support Bar X- Wheels Q- Air Filter Y- Muffler (Engine) Mechanical Switch S -Oil Plug...
-
Page 9: Assembly
ASSEMBLY Unpacking 1. Place box on a level surface. 2. Remove all items from box except the generator. Make sure all items listed on the packing list are included and not damaged. 3. Cut down the sides of the box being careful to avoid hitting the generator. 4. -
Page 10: Open Maintenance Door
ASSEMBLY Open Top Cover Plate(See Fig 2) • Play open the lock.(See Fig 2A) • Open the top cover plate upwards.(See Fig 2B) OPEN PUSH OPEN Fig 2A Fig 2B When you open the maintenance door and top cover plate , will you be able to make W C AUTION! the following operation. - Page 11 ASSEMBLY Be careful not to short across the terminals when installing. Shorting the terminals together W W C AUTION! can cause sparks, damage to the battery or generator, or even burns or explosions. When removing the battery for replacement: Remove the nut and bolt first from the negative (Black) post, then from the positive (Red) post, being careful not to short across the terminals.
-
Page 12: Adding Engine Oil
ASSEMBLY Adding / Checking Engine Oil (See Fig 4) • Place generator on a level surface. • Remove the crankcase dipstick to ensure you do not overfill the engine. • Insert a funnel into the crankcase dipstick hold and carefully add 4-Cycle engine oil (SAE10W- 40 CD) to empty reservoir until oil reaches the outer edge of the oil fill hole (crankcase dipstick hole). -
Page 13: Connecting Generator To An Electrical System
ASSEMBLY Connecting Generator to an Electrical System • If connecting generator to a building’s electrical system for standby power, you must use a qualified electrician to install a transfer switch. The power from the generator must be isolated from the circuit breaker or alternative power source. The connection must comply with all electrical codes and applicable laws. -
Page 14: How To Start Engine
OPERATION Close Maintenance Door and Top Cover Plate (See Fig 8) Close Close Fig 8A Close Fig 8B Fig 8C How to Start Engine (See Fig 9) • Place generator on a level surface. All electrical loads MUST be disconnected from generator. Turn the START/ON/OFF switch (Key) to the “START”... -
Page 15: How To Stop Engine
How to Stop Engine (See fig 10 - 12) All loads MUST be disconnected from the generator. Never start or stop the engine with electrical devices plugged in to the receptacles. Turn the engine START/ON/OFF switch to the “OFF” position. Turn the Mechanical Switch(Engine) to the “OFF”... -
Page 16: Don't Overload Generator
Moving the Generator Disconnect any electronic devices from generator then turn generator off. Turn fuel valve to the “OFF” position. Tilt generator until it balances on wheels. Roll machine to desired location. If the generator must be carried, fold handle to the down position. Never lift or carry generator by its handle. This product is heavy and requires several people to lift. -
Page 17: Wattage Reference Guide
Wattage Reference Guide (Wattages listed are just approximations. Check electronic device for actual wattage) Color TV (27") Personal Computer (17" Monitor) Circular Saw ( 7 ") Miter Saw (10") Electric Drill( HP,5.4Amps) Never exceed generator’s wattage / amperage capacity. This could damage the generator W W W ARNING! and / or connected electrical devices. -
Page 18: Cold Weather Operation
To Balance the Load To obtain the best output and performance of your Ford Generator it is best to make every effort to balance the load on the outlets. Attempt to spread the load as evenly as possible by utilizing all outlets and try to run higher wattage device onseparate outlets when possible. -
Page 19: Maintenance
Pre-Operation Steps Before starting the engine, perform the following pre-operation steps: • Check the level of the engine oil and the fuel tank level. • Make sure the air filter is clean. • Remove any debris that has collected on the generator and around the muffler and controls. Use a vacuum cleaner to pick up loose debris. - Page 20 Oil Recommendations Do not use special additives. • Outdoor temperatures determine the proper oil viscosity for the engine. Use the chart to select the best • viscosity for the outdoor temperature range expected.(see Fig 14) ° Fig 14 ℉(4℃) Below 40 Note the use of SAE 30 will result in hard starting ℉(27℃)...
-
Page 21: Air Filter
Air Filter (See Fig 15) A dirty air filter will reduce the life span of the engine, make it difficult to start the engine, and reduce the unit’s performance. • To clean, remove the air filter cover. • Carefully pull the air filter out by lifting up along the edges. •... -
Page 22: Oil Filter
Fuel filter must often clean, ensure a maximum output power for diesel engine. • Put the fuel tank of fuel. • Loosen the tubing clamp, screw, nut, diesel thoroughly clean the filter. • Serious condition, replace the fuel filter. • Bolted fixed fuel filter. -
Page 23: Storage And Transportation Of The Generator
Storage and Transportation of the Generator(See Fig 18) • Remove any debris that has collected on the generator and around the muffler and control panel. Use a brush or vacuum to remove loose dirt • Inspect air cooling slots. Remove any debris if obstructed. •... -
Page 24: Troubleshooting
TROUBLESHOOTING 2.See pg 16 “Don’t overload 1. ON/OFF switch set to “OFF” 1. Turn switch to “ON” 5.Water in fuel 5.Drain fuel tank and replace fuel 6.Fuel valve is in “OFF” position 6.Turn fuel valve to “ON” position 8.Low oil level 8.Fill crankcase to proper oil level &... -
Page 25: Diagrams
DIAGRAMS... - Page 26 Ford Power Equipment authorized service dealer, is found to be defective within the original warranty period. Ford Power Equipment will also decide upon the use of new or rebuilt parts or comparable product. Any part or product that is replaced will be retained by Ford Power Equipment. This warranty period shall not be extended and any repaired product shall be warranted for the remaining period of the original warranty.
-
Page 27: Warranty
U.A.E or +971 4 226 8227 from outside the U.A.E. You can also visit our website for more details. www.vtoolsme.com – Ford Power Equipment and Venus Tools recommend you retain all of your receipts covering the purchase and maintenance of your Portable Generator, but will not deny you warranty coverage as long as proof of purchase or service can be obtained.
Need help?
Do you have a question about the FD6700S and is the answer not in the manual?
Questions and answers