Table of Contents
Advertisement
Advertisement
Table of Contents

Related Manuals for Brinsea Ovation 28 EX


Summary of Contents for Brinsea Ovation 28 EX
-
Page 2: Af37 Us Issue
For more information on incubation and hatching please download our FREE Incubation Handbook: www.brinsea.com/brochures/BrinseaIncubationHandbook2016.pdf To register your new Brinsea product please visit www.brinsea.com and follow the link on the right hand side of the home page to qualify for your free 3 year guarantee. -
Page 3: Table Of Contents
AF37 US Issue 01 CONTENTS Setting Up Your Incubator Unpacking Part Quantities Assembly Pump Setup Location & Installation Product Introduction – Functional Features Settings – Control Menu Display Temperature Humidity and Ventilation Eggs Periodic Incubation Cooling Hatching & Cleaning up Specifications... -
Page 4: Setting Up Your Incubator
AF37 US Issue 01 1 SETTING UP YOUR INCUBATOR UNPACKING Your incubator has been supplied in protective packaging. Please remove all tape, strapping and packing from the incubator and parts. Retain the carton and packing materials to enable the unit to be repacked. -
Page 5: Part Quantities
Ensure you have the correct quantities of each part. If there are any parts damaged or missing please contact your retailer or Brinsea Products (at the address at the end of the document). Damaged appliances must not be used. -
Page 6: Assembly
AF37 US Issue 01 1 SETTING UP YOUR INCUBATOR Water Channel Water Evaporation Block ASSEMBLY : There are two water pans. Fit the water evaporation block into the correct water pan. This is the one that has the water channel flowing into it. - Page 7 AF37 US Issue 01 1 SETTING UP YOUR INCUBATOR Link slots ASSEMBLY Detail A Detail B : Fit the link into its slots ensuring the smooth side is facing inwards. : Fit the egg carriers into the supports. The pegs must fit in the sockets.
- Page 8 AF37 US Issue 01 1 SETTING UP YOUR INCUBATOR ASSEMBLY : Place the top onto the base in the correct orientation. The egg turning motor must sit over the link. Check the top fits flush all the way around the base edge. : Find a suitable water container (1pt to 2pt).
-
Page 9: Pump Setup
AF37 US Issue 01 1 SETTING UP YOUR INCUBATOR PUMP SETUP The Ovation EX incubator uses a peristaltic water metering pump to automatically control the relative humidity of the air in the egg chamber. Pumped water is fed to an expanded paper evaporation block where warm air is drawn over the large surface to effectively evaporate all the water... - Page 10 AF37 US Issue 01 1 SETTING UP YOUR INCUBATOR PUMP SETUP : Pull the short pump connector up over the capstan, wrap around and pull over into the pump connector’s slot. Follow the diagram on the incubator, 1 – 2 – 3. Pump Connectors Slot Capstan : Fit the pump cover in place and gently tighten...
-
Page 11: Location & Installation
AF37 US Issue 01 1 SETTING UP YOUR INCUBATOR LOCATION AND INSTALLATION Your incubator will give best results in a heated room free from wide temperature variations and with generous ventilation – particularly if several incubators are running at the same time. Ensure that the room temperature cannot drop on a cold night. -
Page 12: Product Introduction - Functional Features
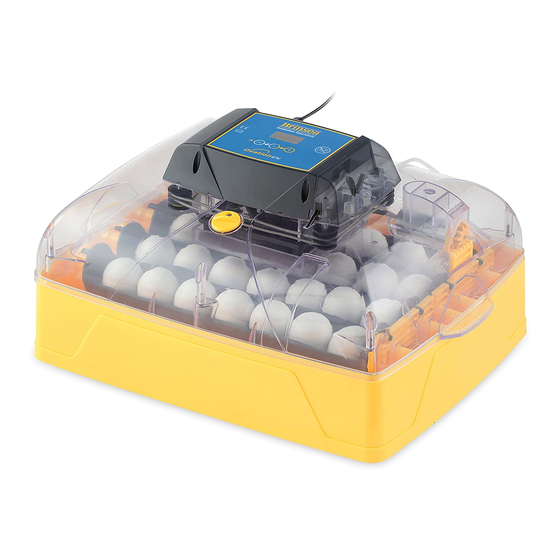
AF37 US Issue 01 2 PRODUCT INTRODUCTION FUNCTIONAL FEATURES : Digital Display : Pump Cover : Control Buttons : Adjustable air vent : Egg Carriers (4) -
Page 13: Settings - Control Menu
AF37 US Issue 01 INCUBATION TEMPERATURE 37.5C TEMP Range 20.0 – 40.0°C (68.0 – 104.0°F). 3 SETTINGS Default 37.5°C (99.5°F). See section 5. CONTROL MENU RELATIVE HUMIDITY RH 20% Range 20% – 80%. EX ONLY Default 20%. See section 6. The diagram on the right illustrates how to navigate through the control menu. -
Page 14: Display
AF37 US Issue 01 4 DISPLAY Normal Operation – Temperature, relative humidity and turn system status are continuously displayed. DIGITAL CONTROL SYSTEM The asterisk “*” adjacent to the temperature reading shows when the heater power is on. When warming the asterisk will be continuously on, once warmed up the asterisk will slowly flash as the heater is pulsed to maintain the correct temperature. - Page 15 AF37 US Issue 01 High Temperature Alarm Display (FIG 2) – If the measured temperature inside the incubator goes up by more than the 4 DISPLAY figure in the ALARM HI screen, the alarm will sound immediately and “H” will be displayed. Press OK to silence the alarm for 30 minutes.
-
Page 16: Temperature
AF37 US Issue 01 5 TEMPERATURE Please Note: Your incubator will be factory set for hen eggs, you may wish to adjust the temperature in the menu to suit the types of eggs you are incubating. SETTING THE TEMPERATURE As the incubator warms up and approaches its control setting the ‘heater on’ asterisk “*” will change from continuously on to flashing. Allow the incubator to stabilise for at least an hour before adjusting the temperature. -
Page 17: Humidity And Ventilation
13-16% depending on species. By weighing eggs periodically during incubation it is possible to monitor and, if necessary, correct humidity levels to achieve the correct weight loss. For more detailed information on all aspects of egg incubation including helpful advice on getting best results please visit our website at www.brinsea.com/brochures/BrinseaIncubationHandbook2016.pdf... - Page 18 AF37 US Issue 01 The pump will not run if the incubator is significantly below the set temperature (including during periodic incubation cooling – see section 8). This is to prevent the system adding too much water when the top has been opened for inspecting eggs etc. 6 HUMIDITY AND VENTILATION In all cases the humidity for hatching needs to be high.
-
Page 19: Eggs
Press + to scroll to the TURN 0/1 option. The Ovation 28 EX is designed to accommodate eggs of different sizes from pheasant to duck eggs or larger/ smaller eggs using the alternative egg carrier. Press OK to select the Before setting eggs ensure that the incubator has been running for several hours and has stabilised at the correct temperature. -
Page 20: Periodic Incubation Cooling
BACKGROUND INFORMATION ON PERIODIC COOLING SETTING THE COOLING PERIOD The precise details of which days and what cooling period each day should be used for best effect are not known. Brinsea have assessed The cooling function is not essential. It’s an optional... -
Page 21: Hatching & Cleaning Up
CLEAN ANY PARTS OF THE INCUBATOR. Following each hatch in the Ovation EX remove and wash the egg carriers, link and base in Brinsea Incubation Disinfectant Solution and : Put the top back on. then rinse thoroughly. Use a vacuum cleaner and soft brush to remove dust from the fan guard. Wipe all other internal surfaces with a cloth made damp with the solution and then wipe off with a cloth made damp with clean water. -
Page 22: Specifications
19 pheasant eggs in optional large egg carrier Power Consumption: The large egg carriers are available from Incubator maximum 60 Watts brinsea.com or your local stockist (product code (typical average) 30 Watts AF011). Electrical Supply: 230v 50Hz or 115V 60Hz (as ordered) Brinsea Products Inc., 704 N Dixie Ave.,...
Need help?
Do you have a question about the Ovation 28 EX and is the answer not in the manual?
Questions and answers