
Subscribe to Our Youtube Channel
Related Manuals for Timex T129


Summary of Contents for Timex T129
- Page 1 Model T129 Dual Alarm Clock with USB Charging For additional information, online registration, and exclusive special offers visit our website: Questions? Contact Customer Service at 1-800-888-4491...
-
Page 2: Table Of Contents
Troubleshooting.......................................12 Warranty Information ....................................13 What’s in the Box This product ships with the following items. Make sure all are present. 1. T129 Alarm Clock 2. AC adaptor 3. Instruction book Product Care • Place the unit on a level surface away from sources of direct sunlight or excessive heat. -
Page 3: Controls Overview
Service Number: T129-A-A accept any interference received, Toll Free: 1-800-888-4491 including interference that may cause Mfd & Serviced by SDI Technologies Inc. undesired operation. TIMEX Reg TM Timex Corporation in the U.S. & other countries CAN ICES-3 (B)/NMB-3(B) www.timexaudio.com Made in China... -
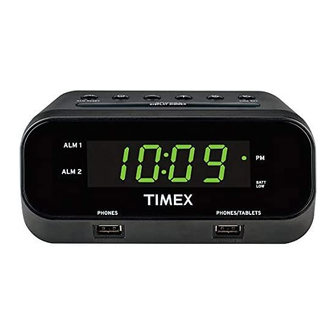
Page 4: Display
Display When lit, indicates Alarm 1 is armed. When lit, indicates time Time display If not lit, Alarm 1 is not armed. displayed is PM. When lit, indicates Alarm 2 is armed. When lit, indicates backup batteries If not lit, Alarm 2 is not armed. should be replaced. -
Page 5: Adjusting The Time Zone
Adjusting the Time Zone If you are NOT in the Eastern time zone, press the Time Zone Button located on back of the unit. “2” will appear in the display. 1 —— Atlantic Time 4 —— Mountain Time 2 —— Eastern Time (Default Setting) 5 ——... -
Page 6: Setting The Clock
Setting the Clock This unit features Redi-SET and should display the correct time when first connected to power. If the time is not correct, follow these steps to set the clock manually. For quick adjustment for Daylight Saving Time, slide the DST Switch on the back of the unit to +1 to add an hour. -
Page 7: Setting And Using Alarms
Press and release the Time Set TIME SET Button to complete time setting. Setting and Using Alarms This unit has two independent alarms, Alarm 1 and Alarm 2. Each is set and operates in the same way. Instructions below show Alarm 1. Follow the same method to set Alarm 2. 2 SECS Press and hold the Alarm 1 Button until current alarm time flashes on the display. - Page 8 SETTING THE ALARM VOLUME Move the Alarm Volume Switch on the back of the unit to Loud for sound sleepers or to Soft for lighter sleepers. RESETTING AN ALARM TO COME ON THE NEXT DAY To silence any sounding alarm and reset it come on the next day at the same time, press and release the Nap/Alarm Reset Button.
-
Page 9: Nap Mode
Press and release the Minus or Plus Button to adjust the desired snooze duration time from 1 to 29 minutes. Press and release the Snooze/Dimmer Button to confirm snooze duration setting. Nap Mode Nap mode allows you to set the alarm to sound after a selected time interval. ALM RESET Press and release the Nap/Alarm Reset Button to select the desired nap interval: 5, 10, 15, 30, 45, 60, 90 minutes or OFF. -
Page 10: Charging Devices Using The Usb Ports
Charging Devices Using the USB Ports PHONES PHONES/TABLETS Connect a USB cable (not included) to the 1 Amp Phone USB Charging Port on the left front of the unit and connect the other end to the phone you wish to charge. For faster charging or to charge tablets, connect cable to the 2.1 Amp Phone/Tablet USB Charging Port on the right front. -
Page 11: Installing And Replacing Backup Batteries
Installing and Replacing Backup Batteries Your new Timex Clock Radio includes 2 AA batteries (installed). This battery backup system will maintain the time and alarm settings during a temporary power interruption. When the Battery Low Indicator on the bottom right of the display is lit, it’s time to replace the batteries. -
Page 12: Safety Information
IMPORTANT SAFETY INSTRUCTIONS When used in the directed manner, this unit has been designed and manufactured to ensure your personal safety. However, improper use can result in potential electrical shock or fire hazards. Please read all safety and operating instructions carefully before installation and use, and keep these instructions handy for future reference. -
Page 13: Troubleshooting
Troubleshooting 1. The unit does not power ON. The unit is not connected to AC outlet, the AC outlet has no power, or is controlled by a wall switch that is “OFF”. Check AC outlet and wall switch. 2. Alarm does not come on? The alarm time AM or PM incorrectly set, Alarm was OFF, etc. -
Page 14: Warranty Information
Limited 90 Day Warranty Information Timex Audio Products, a division of SDI Technologies Inc. (hereafter referred to as SDI), warrants this product to be free from defects in workmanship and materials, under normal use and conditions, for a period of ninety (90) days from the date of original purchase.
Need help?
Do you have a question about the T129 and is the answer not in the manual?
Questions and answers
How do you turn off alarm 1
@Andy Trohanis
To turn off the alarm on the Timex T129 and have it come on the next day, press and release the Nap/Alarm Reset Button. If you press either the Alarm 1 or Alarm 2 Button instead, it will disable the current alarm setting and the alarm will not sound the next day.
This answer is automatically generated