Table of Contents
Advertisement
Advertisement
Table of Contents

Related Manuals for Atid AT911N

Summary of Contents for Atid AT911N
- Page 2 ATID Co,. Ltd Copyright ○ c 2006 ATID Co., Ltd. An Unpublished Work – All right reserved. No part of the contents of this documentation or the procedures described there in may be reproduced or transmitted in any form or by any means without prior written permission of ATID Co., Ltd..
-
Page 3: Table Of Contents
Content table Before Using the Manual for AT911N Before Using the Manual for AT911N, ....................4 1. How to use the battery correctly ...................... 5 2. Caution when using AT911N ......................5 Chapter 2. Product Composition ......................6 1. Product Composition ........................6 2. -
Page 4: Before Using The Manual For At911N
User guide inclusive of text, images, logos, product names is either the property of, or used with permission by ATID CO.LTD. The information may not be distributed, modified, displayed, reproduced (in whole or in part) without the prior written permission of ATID CO.LTD There are maybe some differences between user guide and actual function of device User guide can be adjusted by ATID CO.LTD without consent of user discretionally. -
Page 5: How To Use The Battery Correctly
Chapter 1. Caution when using AT911N Please aware of the manual contents in advance, before you handle and operate your AT911N and other ATID Products. 1. How to use the battery correctly case of that you dropped the main body or battery in water, please do not put into the stove or heater for drying. -
Page 6: Chapter 2. Product Composition
Chapter 2. Product Composition AT911N is based upon Android OS and as the state of the art product. it is equipped with barcode scanner, RFID Tag reader, MSR card reader, printer, smart card reader, MODEM, Camera and so on and it can be applied to Industry, Enterprise, Logistics and so on, can be used extensively in many fields due to this kind of various functions 1. -
Page 7: Name Of Each Part
2. Name of Each Part Receiver Charge LED WLAN/3G LED LCD Touch Screen Reset Key KEY PDA < Front > EarJack Power Key Scan Key Side Key < Side > AT911N User Guide... - Page 8 Scanner Camera Antenna Camera Flash < Forepart > DC Power Port USB Synchronization/ DC Power Port < Back > AT911N User Guide...
-
Page 9: Name And Function Of Each Part
It makes image capture and save Touch Screen You can implement and terminate the program to touch the screen Please attach hand strap and stylus pen with device for your convenience when using it Hand strap hole for a long time. AT911N User Guide... -
Page 10: Chapter3. Basic Functions
Chapter3. Basic Functions Power and Battery Main battery for AT911N supplies the power to the system and RAM which could keep the data. Main Battery: 3.7V 2,200mA Lithium - Ion 1.1 Attaching and Detaching the Main Battery Detaching the Battery Below images are shown the bottom of device. -
Page 11: Charging Battery
Device can move into the Low-Power Mode if user pushes the <Power> button in state of power-on. Cancel the Low-Power Mode (Sleep Mode): Power will be turned on when user pushes the <Power> button in state of power-off AT911N User Guide... -
Page 12: Check The Battery Level
NOTE: Using time of battery is influenced by using method, surrounding environment. In general, user can use the device for 6 or 12 hours after charging the main battery at full Check the Battery Level AT911N User Guide... -
Page 13: Battery Replacement
In that case, please turn off the device by pushing the <Power> button as soon as possible and then, charge the device. Battery Replacement Please buy a new battery, if existing battery has been damaged and its life has ended CAUTION! Discard the dead battery to assigned place AT911N User Guide... -
Page 14: System Reset (Restart)
Please push the <Power> Button and <Reset> Button with stylus pen simultaneously and then, unhand those buttons Please push the <Reset> Button in short [Hard Reset Result] System will restart. Operating System will start after loading the device. AT911N User Guide... -
Page 15: Use Of Micro Sd, Sim, Sam Card
Put the SD memory on the Do lock the slot cover by slot and then, shut the cover sliding it to left side and then, turn on the device after installing the battery AT911N User Guide... -
Page 16: Sim Card Installation
SD Memory folder will be shown as below after executing the File Manager when inserting Micro SD memory card. 3.2 SIM card Installation Below is the screenshot after installing the SIM card. Place and insert the SIM card in accordance slot shape AT911N User Guide... -
Page 17: System Configuration
Sound Volume Settings Volume is set to around 80% at the first. User can adjust the sound attributes by doing [Menu] -> [Application] -> [Settings] -> [Sound] Volume and Sound Settings [Menu] -> [Application] -> [Settings] -> [Sound] AT911N User Guide... -
Page 18: Use Of Keypad
Keypad is an input method editor that inputs numbers or alphabetic characters easily. Use of Keypad Please follow the below steps for changing the input language [Menu] -> [Application] -> [Settings] -> [Language & Input] Or it can be changed at the selection screen for input method AT911N User Guide... -
Page 19: Keypad Button Execution
User can work such as installation, copy, movement, deletion by connecting PC with Device after synchronizing the data one another. Connection settings between PC and Device Connect PC with device after downloading the below program .exe Connection by program (Android USB Driver for WIN7) PdaNetA325x64 Download link: http://download.cnet.com/PdaNet-for-Android-64-bit-Windows-Installer/3001-2155_4- 75167583.html?spi=b919c0d7061a55cea7228ccdad091cec AT911N User Guide... -
Page 20: Firmware Upgrade
7. Firmware Upgrade Please click the firmware update application by choosing as occasion when [Menu] -> [Application] user needs firmware upgrade of AT911N. Please proceed with the Firmware image update through manufacturer or supplier separately AT911N User Guide... -
Page 21: Chapter 4. Use Of Optional Module
Option Module for AT911N According to the purpose of use, AT911N device provides the options as below. User has to check below option modules before buying the device since its specifications are outside of basic AT911N. -
Page 22: D & 2D Barcode Scanner
1. 1D & 2D Barcode Scanner This Device can be equipped with barcode scanner which can read 1D & 2D barcode 1.1 Read 1D or 2D Barcode [Menu]->Execute the application Execution screen of ATID in the [Application] of ATID Barcode Scanner AT911N User Guide... -
Page 23: Barcode Keyboard Settings
1.2 Barcode Keyboard Settings User can input the barcode value on the screen which located at the cursor by using barcode emulator program of AT911N and scan button, scan sound and barcode value input method 1) Utilization Method Barcode value will be inputted on the screen which located at the cursor regardless of web program, wordpad program without development of the new program that shows the separate barcode value. -
Page 24: Barcode Scanning
2. Laser beam will be shown up as a clear red line when using it at the barcode [Incorrect way to read the barcode] 1. Laser bean have to be crossed in the barcode 2. If laser beam partly will be shown up on the barcode, it doesn`t work well. AT911N User Guide... -
Page 25: Wifi Connection
2. WiFi Connection AT911N enable to explain wireless communication including APN since it can communicate through 802.11 a/b/g/n radio. AT911N supports the TCP/IP network protocol and AT911N directly uses the TCP/IP and host computer at this protocol Device is OFF state at the first. -
Page 26: Bluetooth
3. Bluetooth This user manual includes “BCM4329 COMBO” Module which applied to AT911 Bluetooth Connection/Termination [Menu] -> [Application] -> [Settings] -> [Bluetooth] 1. Bluetooth Function Start AT911N User Guide... -
Page 27: Gps Module
4. GPS Module AT911Ncan install the GPS system as an option, and GPS Module will be installed on top of AT911N into Built-in shape GPS Demo Program Execution [Menu] -> [Application] -> [GPS Test] Execute the GPS Test program Confirm GPS reception Data: 1. -
Page 28: Use Of Camera
5. Use of Camera AT911N is installed with 5.0 mega pixel and brightness, resolution revision, screen capture and so on can be adjusted by user 5.1 Use of Camera [Menu] -> [Application] -> [Camera] Execute the camera program Screen for Camera execution... -
Page 29: Use Of Nfc13.56Mhz Rfid Reader
6. Use of NFC13.56MHz RFID Reader AT911N can internally install the NFC module as an option and it can read the tag in range of3~8.5cm in accordance with ISO standard. In case of Mifare tag, it can read in range of 1~3.5cm. -
Page 30: Uhf 900Mhz Rfid Program
UHF 900Mhz RFID Program Menu] -> [Application] -> [Settings] -> [ATUHF Demo] Screen for ATUHF Demo execution Execute ATUHF Demo program AT911N User Guide... -
Page 31: Chapter 5. Appendix
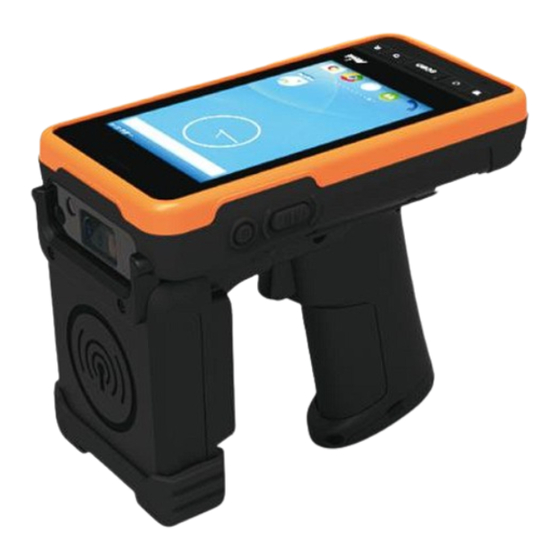
UHF 900 Mhz Reader/Writer Frequency 860MHz~960MHz 0M ~ 6M (According to Tag & Environment) Reading range Writing range 0M ~ 3M (According to Tag & Environment) RF output 1W (MAX) Protocol GEN2, ISO/IEC 18000-6C Special function Anti-Collision AT911N User Guide... - Page 32 According to Tag : 0 ~ 5Cm (Internal) Gun Handle Gun Handle Grip Body, UHF /HF Available (Pistol Grip) Gun Handle Battery Lithium-Ion 3.7V 5,200mAh (Rechargeable)* * All Features and specifications described are subject to change without notice. AT911N User Guide...
- Page 33 AT911N User Guide...
Need help?
Do you have a question about the AT911N and is the answer not in the manual?
Questions and answers