Table of Contents
Advertisement
Important Information: These instructions must be kept with
the product at all times. This product is a prescribed Medical
Device. To be used only under the guidance of a Therapist
or Prescribing Practitioner. You must read these instructions
carefully before use.
INSTRUCTION FOR USE
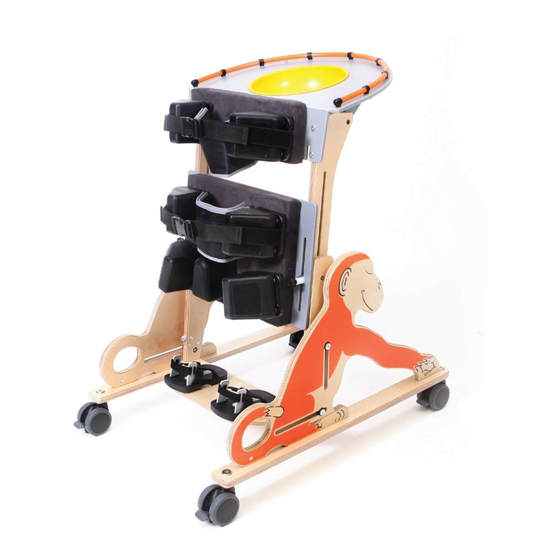
Monkey
Max user weight: 25 kg
Weight of product:17.6 kg
Version 010
Advertisement
Table of Contents

Related Manuals for Jenx Monkey


Summary of Contents for Jenx Monkey
- Page 1 Version 010 INSTRUCTION FOR USE Monkey Max user weight: 25 kg Weight of product:17.6 kg Important Information: These instructions must be kept with the product at all times. This product is a prescribed Medical Device. To be used only under the guidance of a Therapist or Prescribing Practitioner.
- Page 2 INSTRUCTION FOR USE Monkey Note: Some fabric and plastic colours may vary, adjustments are not affected.
-
Page 3: Table Of Contents
Contents General Information Clinical Adjustments Safety Labels ............7 Upper & Lower Pads ..........20 Basic Safe Configuration ........8 Thoracic Pads ............21 Care and Cleaning Instructions ......8 Hip and Lower Pads ..........22 Maintenance ............9 Angle Adjustment ........... 23 Product Induction &... - Page 4 Do not use this product if you suspect or know that it is broken or faulty. Please contact Jenx Limited immediately for advice: Jenx Limited, Tel: +44 (0)114 285 3376.
- Page 5 Monkey Key to Components Swiss clip T-Nut Wing knob Allen key bolt Wing nut Star knob Plastic spacer Plastic washer Key for Users Carers and Re-issue Professional and home users and stores technical users Scallop wheel jenx.com...
-
Page 6: General Information
CHAPTER ONE General Information Carers and Re-issue Professional and home users and stores technical users... -
Page 7: Safety Labels
Please quote this number on all cor- respondence. Product Labels Each Jenx product has a number of pictorial safety labels attached, these refer to the explanations below. Client weight Limit (chang- es per model and size) Attention/ Warning... -
Page 8: Basic Safe Configuration
Wooden Products and Parts • For deep cleaning a low pressure steam cleaner can be used • Do not use organic solvents to clean Jenx Products • Soap and water or antibacterial spray can be used • Check for breaks or splintering of the wood before re-issuing • ... -
Page 9: Maintenance
Unauthorised accessories may affect the safety of this product and invalidate your warranty • Check that gas spring levers are not bent. Do not use the product if any levers are bent. Contact Jenx Limited to arrange replacement Monthly Checks... -
Page 10: Product Induction & Hand Over
If the product is to be re delivered, ensure adequate and secure packaging is used • If in any doubt as to the safety of this product do not issue it, contact Jenx Limited for advice • Products must only be issued fully assembled, clean and in good working order. Instruction for Use must be with the product Jenx Limited offer Technical User Courses for stores personnel. -
Page 11: Specification & Warranty
Monkey Specification & Warranty Age Range 9 months to 4 years Max User Weight 25 kg Min (mm) Max (mm) Height from Sandals Chest Width Hip Width Hip Pad Height from Sandals Thoracic Pad Height Base Footprint 880 x 575 Angle Range 0 º... -
Page 12: Main Features And Benefits
General Information Main Features and Benefits The adjustment can be found on the page specified The priority order in which it is recommended to adjust the product Safety Straps Benefits: Holds the user securely in place during use Hip / Thoracic Pads Benefits: Adjusts to support or brace the... - Page 13 Monkey Tray Height Benefits: The tray Adjustment gives a surface for the Benefits: The child to play and learn stander can on. It is adjustable for accommodate users height and angle and of different heights can be removed. Angle Adjustment...
-
Page 14: Frequent Adjustments
CHAPTER TWO Frequent Adjustments Carers and Re-issue Professional and home users and stores technical users... -
Page 15: Castors & Safety Straps
Monkey Castors & Safety Straps Lock Castors Press down on the lever to lock the castor. Lock castors before using the stander. Safety Straps To attach the Thoracic and Hip straps, pass the narrow portion of the strap under the side pads and attach to the Velcro receptive material at the back of the pad. -
Page 16: Safety Straps
Frequent Adjustments Safety Straps Tri-glide To adjust the length of the safety strap, thread the strap through the buckle and tri-glide until desired length is achieved. Ensure that the safety strap end is secured by the tri-glide at all times. Always use the safety straps when the stander is in use. -
Page 17: Tray Angle
Monkey Tray Angle To alter the tray angle first loosen the Wing Knobs circled above. Alter the tray angle and re-tighten Wing Knobs to secure the angle. Only the occupant of the product should lean on the tray jenx.com... -
Page 18: Tray Infill
Frequent Adjustments Tray Infill The tray infill fits onto the top of the monkey tray, it simply slots under the tray rail. -
Page 19: Clinical Adjustments
CHAPTER THREE Clinical Adjustments Carers and Re-issue Professional and home users and stores technical users... -
Page 20: Upper & Lower Pads
Clinical Adjustments Upper & Lower Pads To alter the Upper Pad height, loosen the 4 Wing Knobs circled above and raise pad to the desired height before re-tightening. To alter the Lower Pad height, loosen the Scallop Wheels circled above and raise pad to the desired height before re-tightening. -
Page 21: Thoracic Pads
Monkey Thoracic Pads To alter the Side Pads first loosen the Wing Knobs circled above. Adjust the Side Pads to desired height, angle and width before re-tightening Wing Knobs circled in the previous step. jenx.com... -
Page 22: Hip And Lower Pads
Clinical Adjustments Hip and Lower Pads To alter the Lower Side Pads first loosen the Wing Knobs circled above. Adjust the pads to desired height, angle and width before re- tightening Wing Knobs circled in the previous step. -
Page 23: Angle Adjustment
Angle Adjustment Adjust the angle of the stander by, first, loosening the Scallop Wheel circled above. Move the Monkey to the desired angle by pulling the rear end of the tray towards you, whilst pushing downwards simultaneously. Re- righten the Scallop Wheel whilst holding Monkey at your chosen angle. -
Page 24: Sandal Adjustments
Clinical Adjustments Sandal Adjustments Plastic Washer Steel Washer Attach Sandals to the footplate as above, using the Wing Knob and washer configuration seen to the right. Loosen Wing Knobs to adjust the angle, width and depth of Sandals. Tighten Wing Knobs after altering. -
Page 25: Sandal Raising Blocks
Monkey Sandal Raising Blocks Attach Sandal Raising Blocks between the sandals and footplate using the Wing Knob and washers supplied with the sandal raising blocks. jenx.com... -
Page 26: Optional Components
CHAPTER FOUR Optional Components Carers and Re-issue Professional and home users and stores technical users... -
Page 27: Activity Frame & Grab Bar
Monkey Activity Frame & Grab Bar Attach the Activity frame or Grab Bar onto the Tray using the provided Wing Knob and Washer, as shown above, both fit into the same way. jenx.com... - Page 28 CHAPTER FIVE Maintenance & Inspection Carers and Re-issue Professional and home users and stores technical users...
-
Page 29: Maintenance & Inspection
& Inspection Each Jenx product must be checked and inspected in line with the advice given in this IFU. Failure to com- plete these regular checks poses a risk to the user. Every year, each product must be thoroughly inspected by a person competent to assess faults and able to rectify or out source rectification. - Page 30 If there is any doubt about the safety of the product, do not hesitate to contact our Customer Support Department for advice Products should be thoroughly decontaminated in line with MHRA and local guidelines prior to inspection, storage and re-issue Jenx Limited can take no responsibility for re-issue of products...
-
Page 31: Frequently Asked Questions
The purchasing authority has a duty under the MHRA guidelines DB2006 (05) to address training for Medical Devices Management. Check with your authority. Question: Does Jenx run technical competency courses? Answer: Yes. Please visit jenx.com for details of available courses. Question: Why does my tilt-in-space lever not work? Answer: If your lever does not operate properly, ensure that it is fully unlocked and try again. - Page 32 Seating Standing Sleeping Therapy Mobility Bathroom Jenx Limited, Wardsend Road, Sheffield S6 1RQ T: 0114 285 3376 E: sales@jenx.com jenx.com...
Need help?
Do you have a question about the Monkey and is the answer not in the manual?
Questions and answers