Table of Contents
Advertisement
Quick Links
Digital Thermometer
FCC DECLARATION OF CONFORMITY
This device complies with Part 15 of the FCC Rules. Operation is subject to the following two
conditions: (1) this device may not cause harmful interference, and (2) this device must accept
any interference received, including interference that may cause undesired operation.
Product:
Digital Thermometer
Weber Part Number:
32908
Responsible Party:
Weber-Stephen Products Company
200 East Daniels Road
Palatine, IL 60067-6266 USA
Phone:
1-800-446-1071
THE FCC WANTS YOU TO KNOW
This equipment has been tested and found to comply with the limits for a Class B digital
device, pursuant to Part 15 of the FCC Rules. These limits are designed to provide reasonable
protection against harmful interference in a residential installation This equipment generates,
uses and can radiate radio frequency energy and, if not installed and used in accordance with
the instructions, may cause harmful interference to radio communications.
However, there is no guarantee that interference will not occur in a particular installation. If
this equipment does cause harmful interference to radio or television reception, which can be
determined by turning the equipment off and on, the user is encouraged to try to correct the
interference by one or more of the following measures:
• Reorient or relocate the receiving antenna.
• Increase the separation between the equipment and receiver.
• Connect the equipment into an outlet on a circuit different from that to which the receiver
is connected.
• Consult an experienced radio / TV technician for help.
• If you cannot eliminate the interference, the FCC requires that you stop using
your thermometer.
Changes or modifi cations not expressly approved by Weber-Stephen Products Company may
cause interference and void the user's authority to operate the equipment.
SETUP
Remove the battery covers from both the ThermoSensor and Monitor, then remove the
plastic tabs from the battery compartments. Continue to battery installation steps.
INSTALLING BATTERIES
The thermometer requires two AA batteries and two AAA batteries for power. Follow these
steps to install the batteries.
Note: Reset both the monitor and the ThermoSensor within 60 seconds to synchronize
them to transmit a signal. Only reset after installing new batteries.
In The Monitor
1.
Slide down and lift off the belt clip on the back of the monitor.
Slide then lift up and remove the battery compartment cover.
2.
Place two AA batteries in the compartment as indicated by the
polarity symbols (+and-).
3.
Press RESET in the battery compartment using a pointed
object such as a straightened paper clip.
4.
Replace the cover and the belt clip.
In the ThermoSensor
1.
Slide off the battery compartment cover.
2.
Place two AAA batteries in the compartment as indicated
by the polarity symbols (+and-) and press RESET beside
the battery compartment using a pointed object such as a
straightened paper clip.
3.
Replace the battery compartment cover.
When
appears on the monitor, replace the batteries.
ADJUSTING FAHRENHEIT / CELSIUS
To select Fahrenheit or Celsius, slide °C / °F, located beside the
monitor's battery compartment, to °C or °F.
ADJUSTING THE VOLUME
To adjust the monitor's volume, slide HI / LO, located in the
ThermoSensor's battery compartment, to HI or LO.
LED INDICATOR
The red LED in the center of the ThermoSensor fl ashes to indicate
that it is on and transmitting.
USING THE BELT CLIP
You can wear the belt clip on your belt or use it as a stand. To use
the belt clip as a stand, remove the belt clip from the back of the
monitor. Insert the left or right side of the clip into the lower part of
the slot then snap the other side of the clip into the other lower slot.
55791_Nafta_0605.indd 1
55791_Nafta_0605.indd 1
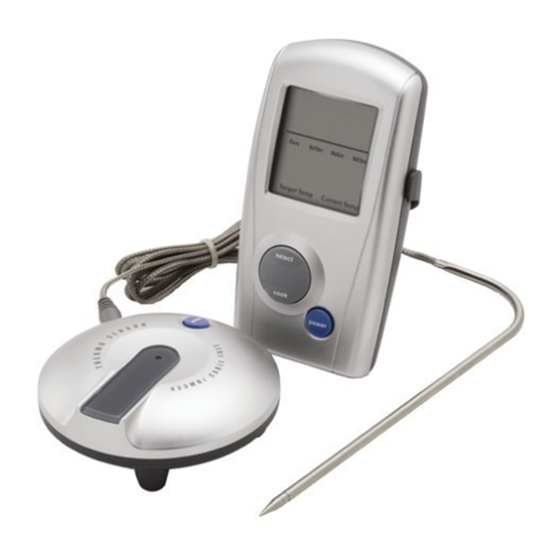
A QUICK LOOK AT THE MONITOR AND THERMOMETER
ThermoSensor LED
Power
Probe
Socket
CONNECTING THE PROBE
Locate the cover to the probe socket on the top right side of the ThermoSensor and
carefully pull it out. Plug the meat probe into the socket.
OPERATION
Note: Only reset after installing new batteries.
1. Press and hold power until the ThermoSensor's red LED fl ashes.
Then press and hold power until the monitor's green LCD lights
and all display segments appear.
2. Repeatedly press select until the desired meat appears. You can select BEEF,
LAMB, VEAL, HMBGR (Hamburger), PORK, TURKY (Turkey), CHICK (Chicken),
or FISH. Then repeatedly press cook to select doneness level.
Note: The doneness level selections, RARE, MED RARE, MEDIUM, and
WELL DONE, are only available for beef, lamb, and veal. For chicken, pork,
turkey, fi sh, and hamburger the monitor defaults to WELL DONE.
3. Place the ThermoSensor near the cooking area and insert
the tip of the probe into the center of the meat. To prevent
the lid from crimping the probe wire, feed the wire out
through the slot (1) on the side of the cookbox. Use the
monitor's stand for easy viewing or use the belt clip.
Notes:
Reset
•
Place the ThermoSensor away from direct heat or fl ame and do not rest the
probe on the cooking surface. Doing so could damage the thermistor inside
ThermoSensor
the probe.
˚C / ˚F
HI / LO
Reset
•
For a clear signal, place the monitor within 100 feet of the ThermoSensor.
•
The operation temperature range of the sensor probe is -4°F to 482°F (-20°C to
Hi /Lo
C / F
reset
250°C). The LCD display range in 0°C/F to 199°C/F. When the display tempera-
ture is out of range, the display's digits fl ash.
"AA" UM3 1.5V
4. When the meat is done, remove the probe from the meat wearing an oven mitt or
let the probe cool off. Press and hold POWER on the monitor and ThermoSensor
for about 2 seconds to turn them off.
Monitor Battery Compartment
Notes:
• The monitor's last record remains even when you turn the power off. When you
Belt Clip Position
turn the monitor on again, the last record appears on the display.
• The monitor and ThermoSensor automatically turn off if you do not press any
button for about eight hours.
5. Disconnect the probe from the ThermoSensor and replace the socket cover. After
you fi nish cooking, clean the probe with water and a mild detergent. Wipe the
monitor and ThermoSensor with a damp cloth.
Note: Do not use a dishwasher to clean the probe or immerse the monitor or
ThermoSensor in water or liquid.
Stand
Position
Indicator Monitor /
Low Battery
ThermoSensor
Type of
Indicator
Communication
Meat
Levels of
Target
Probe Socket
Doneness
Temp
Cover
Current
Temp
Probe
Select / Cook
co ok
pow er
Power
(1)
CHECKING SIGNALS AND AUDIBLE ALARM STATUS
SIGNAL
Indicates no signal.
Indicates the monitor is receiving
a signal from ThermoSensor.
ALARM
Three beeps - indicates the monitor is not receiving a signal from the ThermoSensor.
Four beeps - indicates the current temperature is within fi ve degrees of the
target temperature.
A continuous beep - indicates the thermometer has reached its target temperature.
A fast and continuous beep - indicates the meat is overcooked.
Note: Press any button to stop the alarm.
BATTERY NOTES
appears on the monitor to indicate the condition of the batteries. Please
observe the following information for an indication of when the batteries need
to be replaced.
•
main - indicates the monitor's battery is low.
•
remote - indicates the ThermoSensor's battery is low.
•
main remote - indicates the batteries are low in both the
monitor and ThermoSensor.
• Use only fresh batteries of the required size and recommended type.
• Do not mix old and new batteries, different types of batteries (standard,
alkaline or rechargeable) or rechargeable batteries of different capacities.
• If you do not plan to use the thermometer with batteries for a month or more,
remove the batteries. Batteries can leak chemicals that can destroy electronic parts.
WARRANTY
®
Weber-Stephen Products Co., (Weber
) hereby warrants to the ORIGINAL
PURCHASER of this Digital Thermometer, that it will be free from defects in
material and workmanship from the date of purchase as follows:
1 year(s) when assembled, and operated in accordance with the printed instructions
accompanying it.
Weber may require reasonable proof of your date of purchase. THEREFORE, YOU
SHOULD RETAIN YOUR SALES SLIP OR INVOICE.
This Limited Warranty shall be limited to the repair or replacement of parts that prove
defective under normal use and service and which on examination shall indicate, to
Weber's satisfaction, they are defective. If Weber confi rms the defect and approves
the claim, Weber will elect to repair or replace such parts without charge. If you are
required to return defective parts, transportation charges must be prepaid. Weber will
return parts to the purchaser, freight or postage prepaid.
This Limited Warranty does not cover any failures or operating diffi culties due
to accident, abuse, misuse, alteration, misapplication, vandalism, improper
installation or improper maintenance or service, or failure to perform normal and
routine maintenance. Deterioration or damage due to severe weather conditions
such as hail, hurricanes, earthquakes or tornadoes, discoloration due to exposure
to chemicals either directly or in the atmosphere, is not covered by this Limited
Warranty.
Weber shall not be liable under this or any implied warranty for incidental or
consequential damages. This warranty give you specifi c legal rights, and you may
also have other rights, which vary from state to state.
This warranty is applicable in the USA and Canada.
©2005 Weber-Stephen Products Co.. Weber and the Kettle confi guration are registered trademarks of
Weber-Stephen Products Co., 200 E. Daniels Road, Palatine, IL 60067-6266 USA.,
www.weber.com
®
Made and Printed in China. 55791 N 06/05
6/16/05 2:12:17 PM
6/16/05 2:12:17 PM
Advertisement
Table of Contents

Subscribe to Our Youtube Channel
Related Manuals for Weber 32908


Summary of Contents for Weber 32908
- Page 1 250°C). The LCD display range in 0°C/F to 199°C/F. When the display tempera- the battery compartment using a pointed object such as a the claim, Weber will elect to repair or replace such parts without charge. If you are ture is out of range, the display’s digits fl ash.
- Page 2 à WELL difi cultades de funcionamiento debido a accidentes, abuso, mal Weber s’engage pour sa part à retourner à ses frais les pièces résidentielle. L’équipement génère, utilise et peut émettre de Ponga el ThermoSensor cerca del area de coccion e inserte la DONE (BIEN CUIT).
Need help?
Do you have a question about the 32908 and is the answer not in the manual?
Questions and answers