Megger SVERKER 750 User Manual
Relay test unit
Hide thumbs
Also See for SVERKER 750:
- User manual (16 pages) ,
- User manual (73 pages) ,
- Quick start manual (9 pages)
Table of Contents
Advertisement
Quick Links
Advertisement
Table of Contents

Related Manuals for Megger SVERKER 750


Summary of Contents for Megger SVERKER 750
- Page 1 SVERKER 750/780 Relay Test Unit User’s Manual ZP-CD03E...
- Page 3 NOTICE OF COPYRIGHT & PROPRIETARY RIGHTS © 2009, Megger Sweden AB. All rights reserved. The contents of this manual are the property of Megger Sweden AB. No part of this work may be reproduced or transmitted in any form or by any means, except as permitted in written license agreement with Megger Sweden AB.
-
Page 4: Table Of Contents
3 Description .......... 10 5.10 Timer .............. 35 3.1 General ............. 10 5.11 Display ............35 SVERKER 750 control panel ......10 5.12 Off delay ............36 SVERKER 780 control panel ......10 5.13 0-Level filter ............ 36 3.2 Current source ..........11 5.14 Save/Recall ............ - Page 5 8.2 Displayed values ..........68 8.3 Error messages etc..........69 9 Specifications ........70 Specifications SVERKER 750 / 780 ......70 Specifications extended ........... 71 Maximum load times for different currents ..71 The voltage outputs of the current source ..71 Separate AC voltage source ......
-
Page 6: Safety
The SVERKER 750/780 should be operated only from the type of power source indi- cated on its nameplate. The SVERKER 750/780 must not be used in Important other ways than stated by the manufac- Read and comply with the following in- turer. - Page 7 1 SAFETY Important For added protection during a lightning storm, or when the SVERKER 750/780 is left unattended and unused for long periods of time, unplug it from the wall outlet. This will prevent damage due to lightning and power line surges.
-
Page 8: Introduction
2.1 Applications Current and voltage transformation ratio tests Burden measurement for relay protection equipment SVERKER 750/780 is intended primarily for testing Impedance measurement relay protection equipment, but it can also be used for many other purposes. Virtually all single-phase relay... -
Page 9: Design And Construction
Moreover, these instruments can be used for measurements in external circuits. A set of resistors and a capacitor (SVERKER 750) are provided, and they can be connected into the circuits being tested to provide phase shifts, fine adjustments and the like. -
Page 10: Description
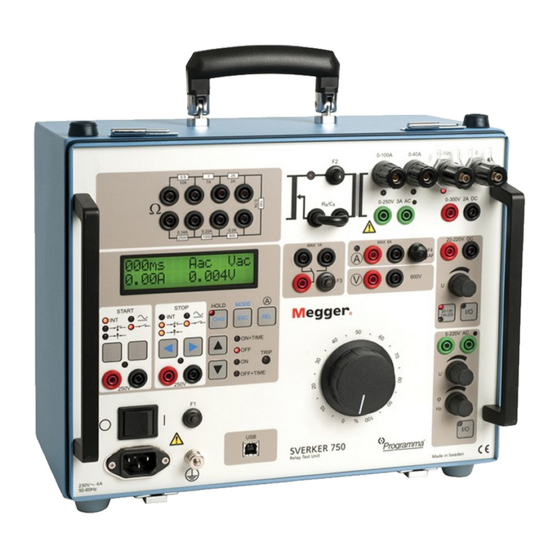
This chapter presents a general description of SVERK- Trip indicator ER and the types of functions it performs. For more detailed descriptions, please see Chapters 4 and 5. Display Ammeter & voltmeter SVERKER 750 control panel AC voltage source Auxiliary voltage source ➊ ❾ Make/Break contact... -
Page 11: Current Source
There are a number of different types of generation, and they are selected via the display window (Chapter Type of generation Explanation ZP-CD03E SVERKER 750/780... -
Page 12: Timer
When a voltage is applied to the stop input or when a contact is closed. c) When a voltage applied to the stop in- put vanishes or when a contact is opened. d) When the state of the input changes. SVERKER 750/780 ZP-CD03E... -
Page 13: Trip Indicator
When a test includes timing, this The display window is also used to make settings. To indicator lamp flashes when tripping occurs. do this, you must put SVERKER in the setting mode by pressing the button marked MODE. ZP-CD03E SVERKER 750/780... -
Page 14: Ammeter & Voltmeter
The ammeter measures one of the following: • Current at one of the current outputs 0‑100 A, 0-40 A or 0-10 A. • Current in an external circuit connected to the SVERKER 750/760 ammeter panel input (marked You select the desired measurement site (test point) using the button marked A, whereupon a indicator lamp lights at the selected measurement site. -
Page 15: Ac Voltage Source
3 DESCRIPTION 3.7 AC Voltage source 3.8 Auxiliary voltage source SVERKER 750 The auxiliary voltage source provides 20-220 V DC The AC voltage source provides 0-120 V AC (split (split into two ranges). It is equipped with overcurrent into two ranges). It has two knobs of its own, one for protection, and it is separate from the other outputs. -
Page 16: Make/Break Contact
Note There is no capacitor on the SVERKER 780. non-faulty to faulty or vice versa. The phase-angle is set with the knob at the AC voltage source. SVERKER 750/780 ZP-CD03E... -
Page 17: Power Supply
SVERKER has a serial port for communication with breaker. computers and the SVERKER Win software. To be able to use the SVERKER 750/780 with the software SVERKER Win the SVERKER 750/780 must be “unlocked” with a software key. You can check if your SVERKER is “unlocked”... -
Page 18: Control Panels
4 CONTROL PANELS Control panels 4.1 Front panels SVERKER 750 SVERKER 750/780 ZP-CD03E... -
Page 19: Sverker 780
4 CONTROL PANELS SVERKER 780 ZP-CD03E SVERKER 750/780... -
Page 20: Current Source
10. Rx/Cx. Connector for resistor or capacitor. To obtain a smoother characteristic, connect one or more resistors in series. To change the phase angle 90˚ (on SVERKER 750), connect the capacitor. A jumper must be connected to this connector when it is not being used. -
Page 21: Timer
Internal. Used when ON+TIME or OFF+TIME is selected. b) When voltage is applied or when a contact is closed. c) When applied voltage vanishes or when contact is opened. d) When the state of the input changes. ZP-CD03E SVERKER 750/780... -
Page 22: Trip Indicator
ON+TIME or OFF+TIME position). It also indicates that timing is completed. SVERKER then returns auto- matically to the OFF state. You can reset the flashing indicator lamp by pressing the button marked HOLD (item 21) twice. SVERKER 750/780 ZP-CD03E... -
Page 23: Ammeter & Voltmeter
4 CONTROL PANELS 4.6 Ammeter & voltmeter 4.7 AC Voltage source SVERKER 750 18. Input marked A. This is the external panel input to the SVERKER ammeter. It is activated by pressing the button marked A (item 19) which is located at right beneath the display 22. -
Page 24: Auxiliary Voltage Source
34. F3 1 A: Miniature circuit breaker for relay 29. 20-130 / 130-220 switch. This is used to tog- contact (31). gle between the 20-130 V and 130-220 V DC auxiliary voltage ranges. 30. I/O. ON/OFF switch used for the auxiliary volt- age source (27. SVERKER 750/780 ZP-CD03E... -
Page 25: Resistor Set And Capacitor
4 CONTROL PANELS 4.10 Resistor set and 4.11 Power supply capacitor SVERKER 750 37. Mains voltage ON/OFF. 35. Capacitor, 10 mF, 450 V 38. Connector for mains voltage. 36. Resistor set. 39. F1: Miniature circuit breaker for the power supply. 4 A (230 V), 8 A (115 V). -
Page 26: Other
HOLD, MODE and A respectively. These imprints (CHG, ESC and SEL) apply only when SVERKER is in the set- ting mode. The panel markings (HOLD, MODE and A) apply when SVERKER is in its normal mode, i.e. the measurement mode. SVERKER 750/780 ZP-CD03E... - Page 27 4 CONTROL PANELS ZP-CD03E SVERKER 750/780...
-
Page 28: Making Settings On The Display
5.1 Introduction are kept in the special memory. They are determined by Megger, and you cannot change them. There are a number of ways to make SVERKER set- How to return to the measurement tings. In addition to using the buttons and other... -
Page 29: Button Functions
◀ button. Injection ⧫ Max time:95.0 Press the ▼ button four times to step from 99.0 down to 95.0. The numerical value is now set as desired, but to invoke it you must press the SEL button. ZP-CD03E SVERKER 750/780... -
Page 30: The Menu System
Power factor. φ (°, Iref ) Phase difference, current as reference. φ (°, Uref ) Phase difference, voltage as reference. Frequency (U) Frequency Timer Unit: Seconds Time expressed in seconds. Unit: Cycles Time expressed in mains-frequency cycles. SVERKER 750/780 ZP-CD03E... - Page 31 Recalls all settings that were stored in the specified memory. Range is 0 – 3. Recall default Recalls all of the original settings made by Megger prior to delivery (they are stored in a special memory). Save mem #: 0 Saves the settings in the specified memory.
-
Page 32: Test Mode
SVERKER “master” and then be set for external start. The slaves will start at the same time as the master (±1 ms). Press the SEL button to invoke the selected option. SVERKER 750/780 ZP-CD03E... -
Page 33: Ammeter
Alt. 2. Fixed low range Press the SEL button to invoke the selected Range: Mid Alt. 3. Fixed mid range option. Range: High Alt. 4 Fixed high range Press the SEL button to invoke the selected option. ZP-CD03E SVERKER 750/780... -
Page 34: Ω , Φ , W , Va
Apparent power displayed Q (VAr) Reactive power displayed cos φ Power factor displayed φ (º, Iref) Phase difference displayed with current as reference φ (º, Uref) Phase difference displayed with voltage as reference Frequency (U) Frequency displayed SVERKER 750/780 ZP-CD03E... -
Page 35: Timer
1 period within the last 0.5 s held in memory. Hold Min Shows the min value in RMS for 1 period within the last 0.5 s held in memory. Press the SEL button to invoke the selected option. ZP-CD03E SVERKER 750/780... -
Page 36: Off Delay
SVERKER features a well-defined lower tinue after tripping occurs. The range is 0-999 cycles. limit called the 0-level. The original Megger setting is 4 cycles. If no delay is When testing ground fault protection (for example) desired, set the number of cycles to 0. -
Page 37: Save/Recall
SVERKER memory (range is 0-3) Recall default: Recall the original Programma settings from the special memory Save mem #: Save the settings in the specified SVERKER memory (range is 0-3 Press the SEL button to invoke the selected option. ZP-CD03E SVERKER 750/780... -
Page 38: Language
“software key” for SVERKER Win, this is Svenska Swedish-language menus, prompts etc shown with the text “PC-750” or “SVERK- ER Win” in the “Software version” window in Press the SEL button to invoke the selected the menu tree. option. SVERKER 750/780 ZP-CD03E... - Page 39 5 MAKING SETTINGS ON THE DISPLAY ZP-CD03E SVERKER 750/780...
-
Page 40: How To Operate Sverker
Output alarm If more than 1 V/ 0.5 A flows (in the 10 A range) when SVERKER is in the OFF state there will be a mes- sage on the display "CAUTION OUTPUT". CAUTION OUTPUT SVERKER 750/780 ZP-CD03E... -
Page 41: Selecting The Correct Current Output
The external input can be used for currents of up to 6 A. The HOLD (freeze) function makes it possible to measure currents of very short duration. Activate it by pressing the button marked HOLD. Seethe section headed ”Ammeter and voltmeter” in Chapter 3. ZP-CD03E SVERKER 750/780... -
Page 42: Setting The Desired Current
(terminal Rx/Cx) of the output transformer. More-over, if you want to limit the current without generating heat, you can connect the SVERKER ca- pacitor (only SVERKER 750), al-though this will change the phase angle of the current. SVERKER 750/780... -
Page 43: Finding Pick-Up And Drop-Out Limits For Over Current/Voltage/Other Entity Relays
OPENING, CONTACT for example). curs. Then, while keeping ON active, reduce Activate ON using the start switch. the current by turning the main knob until resetting takes place. Release the start switch Turn up the current until pick-up. ZP-CD03E SVERKER 750/780... -
Page 44: Finding Pick-Up And Drop-Out Limits For Under Current/Voltage/Other Entity Relays
TRIP indicator lamp on SVERKER is on. Read the current. Search for the lowest current where the relay operates, by repeating from point 6 above and onwards. SVERKER 750/780 ZP-CD03E... -
Page 45: Measuring Operating Times For Over Current/Voltage/Other Entity Relays
Activate ON briefly using the start switch and read the current from the ammeter. Repeat until the desired current has been set. ZP-CD03E SVERKER 750/780... -
Page 46: Measuring Operating Times For Under (Current/Voltage/Other Entity) Relays
Activate OFF+TIME using the start switch Read and note the time and current. SVERKER 750/780 ZP-CD03E... -
Page 47: Obtaining The Correct Phase Angle When Two Or More Ac Outputs Are Being Used
If these are connected to a common point, it’s impor- tant to know the polarity. The right-hand terminal in each of the outputs is thus provided with a black dot, thereby indicating that these output socket terminals have the same polarity. ZP-CD03E SVERKER 750/780... -
Page 48: Setting An Auxiliary Voltage
Connect the SVERKER voltmeter input to the output of the auxiliary voltage source. Auxil- iary voltage source Only for SVERKER 750 Set the voltmeter to measure DC (see expla- nation of settings in Chapter 5). Warning Select the range to be used for the auxiliary This connection will damage a voltage (20-130 V or 130-220 V). -
Page 49: Changing The Current And Voltage Phase Difference
(the one that performs a break function). Connect the left-hand output socket terminal SVERKER 750 on the AC voltage source to the upper right- Using the built-in capacitor and set of resistors, you hand socket terminal on the make/break con- can change the phase difference between current and tact (the one that performs a make function). -
Page 50: Measuring The Phase Angle
5 Settings. Example Phase shift at an inductive load (current lags voltage). Current selected as reference. Current generated by SVERKER (ammeter connected internally) Current generated by external source (amme- ter panel input used). SVERKER 750/780 ZP-CD03E... -
Page 51: Measuring External Cycle Time (Measurement Not Initiated By Sverker)
TACT for example). The input state indicator lamp at each input shows whether or not the desired condition is present there before the cycle starts. Activate ON+TIME using the start switch. 8. The timer is now ready to start. ZP-CD03E SVERKER 750/780... -
Page 52: Plotting A Magnetization Curve
Set start and stop conditions When the knee of the curve is reached, slowly lower the voltage and set the start Activate ON using the start switch. switch to OFF. Turn up the desired test current. SVERKER 750/780 ZP-CD03E... -
Page 53: Measuring The Trip Pulse Length
Total = The total time, T#00 + T#01. Press the ▼ button once to get here. Read and note the times at which the relay operated. Please note: Current value is not shown. After you press the button marked MODE, you can start a new test. ZP-CD03E SVERKER 750/780... -
Page 54: Injecting Current - External Start
(12). Select dry or wet contact and closing or opening contact, for the external signal. If 120º phase shift is desired between the SVERKERs, you can connect them to the different phases of a 3-phase outlet. SVERKER 750/780 ZP-CD03E... - Page 55 6 HOW TO OPERATE SVERKER ZP-CD03E SVERKER 750/780...
-
Page 56: Application Examples
Activate the desired stop condition for the age. timer by setting the stop input for a make and/or break function and for a live or dead When the protective relay equipment oper- contact. SVERKER 750/780 ZP-CD03E... -
Page 57: Testing Over-Current Relays
Move the ammeter test point to the desired current output. When measuring low cur- rents, less than 6 A, use the separate am- meter input for better accuracy. This can be done step by step with the A button located ZP-CD03E SVERKER 750/780... - Page 58 Turn on the SVERKER current source by ting the start switch to the OFF position. setting the start switch to the ON position, whereupon the ON indicator lamp will light. Activate ON + TIME by means of the start SVERKER 750/780 ZP-CD03E...
-
Page 59: Testing Directional Over-Current Relay Systems Or Directional Ground-Fault (Earth-Fault) Relay Systems
(NI) to the pro- tective relay equipment. Connect the timer stop input (STOP) to the relay trip output. Turn on power to SVERKER using the mains switch. ZP-CD03E SVERKER 750/780... -
Page 60: Sverker 750
SVERKER 750 The following functions are to be tested: Testing the pick-up and drop-out • Pick‑up functions: I > ON and U ON Select stop conditions, dry or wet contact. - Page 61 SVERKER current source by setting the start Decrease the voltage until drop-out takes switch to the OFF position. place (U> OFF), whereupon the TRIP indica- tor will be extinguished. Read the U > OFF value from the display window. ZP-CD03E SVERKER 750/780...
-
Page 62: Testing Power Relays
The following functions are to be tested: • Pick‑up function: P > ON or Q > ON • Drop‑out function : P > OFF or Q > OFF • Operating time: P > ON + TIME DELAY or Q > ON + TIME DELAY • Sensitivity (depends on phase angle) Make a note of the relay setting data (U, I and time delay as well as P or Q). If so desired, calculate the SVERKER 750/780 ZP-CD03E... - Page 63 Turn on the SVERKER current source by acti- the test report. vating ON with the start switch (press the ▼ key once), whereupon the ON indicator lamp Turn off power to SVERKER using the mains will light. switch. Increase the current until operation takes ZP-CD03E SVERKER 750/780...
-
Page 64: Testing Undervoltage Relays
If the display window is to freeze the voltage reading at trip/signal time, check to see that the HOLD function is active (it can be acti- vated by means of the HOLD button). If the 0-250 V AC output is considered not SVERKER 750/780 ZP-CD03E... - Page 65 TRIP indicator starts to flash. Read the U < ON + TIME DELAY value from the display window. Repeat the U < ON + TIME DELAY run two or three times to confirm its accuracy through repetition. ZP-CD03E SVERKER 750/780...
-
Page 66: Testing Motor Overload Releases And Overcurrent Cut-Outs That Grant/Deny Starting Permission
The normal-operation current changes to fault current and time measurement starts. This procedure provides you with the tripping times for the release/cut-out for a fault that occurs occurring during normal operation and also for a fault that prevents starting permission from being granted. SVERKER 750/780 ZP-CD03E... - Page 67 7 APPLICATION EXAMPLES ZP-CD03E SVERKER 750/780...
-
Page 68: Troubleshooting
• Overcurrent on output • Main frequency is outside limits (40 to 80 Hz) No phase-angle No current gener- "Press ""ON"" to reading (or ated. Both cur- generate the cur- jumping values) rent and voltage rent. must be gener- ated. SVERKER 750/780 ZP-CD03E... -
Page 69: Error Messages Etc
BAD START Select another start CONDITION condition. BAD STOP Select another stop CONDITION condition. CHECKSUM Internal fault in Contact your clos- ERROR SVERKER. est Programma representative. RAM ERROR Internal fault in Contact your clos- SVERKER. est Programma representative ZP-CD03E SVERKER 750/780... -
Page 70: Specifications
9 SPECIFICATIONS Specifications Specifications Measurement section Timer SVERKER 750 / 780 Time can be displayed in seconds or in mains-frequency cycles. Range Resolution Inaccuracy Specifications are valid at nominal input voltage and an ambient temperature of +25°C, (77°F). Specifications are subject to change 000-9.999 s... -
Page 71: Specifications Extended
10 minutes Capacitor 10 μF, max voltage 450 V AC 30 minutes 1) Measurement intervals longer than 100 ms Continuous – 2) SVERKER 750 1 s (3 times) Outputs 3 s (5 times) Current outputs – AC 1 minute Range... -
Page 72: Inputs
V DC Maximum values Parameter Unit Max input voltage, DC, |VIN|DC V DC Max input voltage, AC, |VIN|AC V ACrms External ammeter input Maximum values for external current measurement Parameter Unit Max current, DC Max current, AC SVERKER 750/780 ZP-CD03E... -
Page 73: Make/Break Contact
6 A miniature circuit breaker, and input resistance Rin is 0.22 Ω. The values specified below are for measurement in- tervals (times) longer than 100 ms. The measurement error is greater for shorter measurement intervals. ZP-CD03E SVERKER 750/780... -
Page 74: Voltmeter
The input is protected by a PTC resistor, and input resistance Rin is 220 kΩ. The values specified below are for measurement in- tervals (times) longer than 100 ms. The measurement error s greater for shorter measurement intervals. SVERKER 750/780 ZP-CD03E... -
Page 75: Other
10 A For DC, the following items (X above) can be meas- 1 Ω ured: 25 Ω • R (Ω) 100 Ω 0.7 A • P (W) 500 Ω 0.3 A 1 kΩ 0.22 A 2.5 kΩ 0.11 A ZP-CD03E SVERKER 750/780... -
Page 76: Index
Set of resistors and capacitor ......25 Setting mode ..........28 Setting the desired current ......42 Injecting current ..........40 Software ............38 Injection ............32 Specifications ..........70 SW ..............38 Symbols on the instrument ......6 SVERKER 750/780 ZP-CD03E... - Page 77 Timer ..........12, 21, 35 Start conditions ......... 12 Stop conditions ......... 12 Trip indicator ..........13, 22 Trip pulse length ..........53 Troubleshooting ..........68 Undervoltage relays........64 Voltage relays ........48, 56 Voltage source ........15, 23 Voltmeter ........14, 23, 33 ZP-CD03E SVERKER 750/780...
- Page 78 9 SPECIFICATIONS SVERKER 750/780 ZP-CD03E...
- Page 79 9 SPECIFICATIONS ZP-CD03E SVERKER 750/780...
- Page 80 USA, UK and Sweden, combined with sales and technical support in most countries, ▪ T1 Network Test Equipment Megger is uniquely placed to meet the needs of its ▪ customers worldwide. Tachometers & Speed Measuring Instruments For more information about Megger and its diver- ▪...
Need help?
Do you have a question about the SVERKER 750 and is the answer not in the manual?
Questions and answers