Table of Contents
Advertisement
Advertisement
Table of Contents

Related Manuals for Eclipse FITCLIP+


Summary of Contents for Eclipse FITCLIP+
-
Page 2: Table Of Contents
CONTENTS WELCOME CONTACT US NOTES SAFETY & USAGE FEATURES APPEARANCE BASIC OPERATION CONNECTING TO PC MAIN MENU MUSIC VIDEO PICTURES RADIO PEDOMETER USER TIPS SETTINGS FCC INFORMATION LIMITED MANUFACTURER’S WARRANTY... -
Page 3: Welcome
– offering extra features and quality for your money. If you’re already using Eclipse by JLab and loving your products, please share your feedback – via word of mouth, social media or even Amazon or online reviews. -
Page 4: Notes
NOTES • The playback times listed refer to the maximum playback times possible, using the best power savings. The actual playback time may differ as adjustments to screen brightness, power savings modes, volume, etc. are made. • As parameters such as formats, bitrate, codecs, framerates, and resolutions differ, the player will not be compatible with all files of the listed types. -
Page 5: Safety & Usage
SAFETY & USAGE • Do not use the player in exceptionally cold or hot, dusty, damp or dry environments. • Do not drop, strike, or throw your player. Physical damage to your player will void ALL warranties. • Please charge your battery when: >... -
Page 6: Features
FEATURES • 8GB internal memory; memory card slot (removable) • 1.8ʺ full color LCD screen (resolution: 160x128) • File transfer: (1) micro-USB • Supports the following audio formats: MP3 and WMA • Supports the following image formats: JPEG, BMP, GIF and PNG •... -
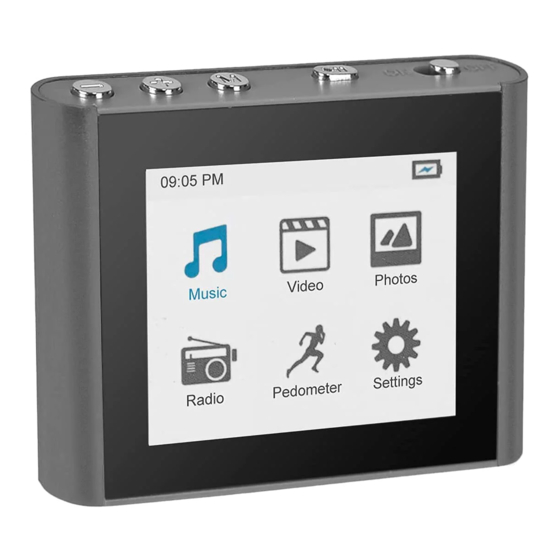
Page 7: Appearance
APPEARANCE Mode Volume On/Of Play/ Pause Switch Clip Display Headphone Memory Jack USB Port Card Port... -
Page 8: Basic Operation
BASIC OPERATION Power On/Off Slide the power switch to the On or Off position. You may also leave the power switch in the On position and use the Play / Pause button to turn the player on and off. Note: If the player is powered off by the power switch while it is still running, all saved settings such as last song played or date/time settings will be lost. -
Page 9: File Storage
File Storage Your device supports a wide variety of media types, so that you can enjoy your favorite movies, digital images, and music on the move. Your device acts as a removable disk when connected to your computer, which makes transferring files quick and easy. -
Page 10: Connecting To Pc
CONNECTING TO PC Loading Files: Copy & Paste Note: This alternate method is used to load videos, pictures, and eBook files as well as audio files. 1. Connect the MP3 player to a working USB port. 2. Go to the My Computer (or This PC if using Windows 10) section of your computer. - Page 11 4. Open the drive by either double left clicking on the drive itself, or by right clicking to open the option menu then left clicking on the desired drive. 5. Locate the music stored on your computer. Generally this is stored in the My Music folder of your computer.
- Page 12 6. Once you have located the song files, you can right click on the song itself and select Copy. Open the removable disk drive, right click on in the empty space and select Paste. This will transfer the song on to your player. 7.
-
Page 13: Main Menu
MAIN MENU Main Interface Navigation 1. On the main menu interface, press the + and – buttons at the top of the player to scroll through the player’s features. 2. Press the Play / Pause button to select an item. 3. -
Page 14: Music
MUSIC Music mode allows you to listen to your audio files loaded on the player. Connect your wired listening devices to the headphone jack. Compatible with MP3 and WAV formats. Main Interface Music Playback When you enter Music mode, the most recent track will begin playing immediately. - Page 15 Volume Control Press and hold – to decrease volume or + to increase volume. Settings Press Mode (M) to access the Music menu. Select Music: Album, Artist, or Genre 1. Press – or + to highlight a folder, and then press Play / Pause to open the folder.
-
Page 16: Video
VIDEO Video mode allows you to watch your video files loaded on the player. Compatible with AVI format. Note: If you are having a hard time viewing your video files, ensure that they are converted to the AVI file format. If you need assistance converting your videos or have questions please visit: http://support.jlabaudio.com/hc/en- us/categories/201688557-MP3... -
Page 17: Pictures
PICTURES Pictures mode allows you to view your image files. Compatible with JPEG, BMP, GIF, and PNG. Note: We recommend resizing your files to 160x128 or 128x160 dimensions before loading them onto the player for optimum quality. View Images 1. Press – or + until Local Folder is highlighted and press Play / Pause to open it. -
Page 18: Radio
RADIO Radio mode allows you to listen to FM Radio channels. Main Interface Browse Radio Stations From the Radio menu: 1. Press – or + until Normal Band is highlighted and press Play / Pause to select it. 2. Press – or + to search for local radio stations. Volume Control Press and hold –... - Page 19 Scan for Available Stations From the Radio menu: Press – or + until Auto Search is highlighted, and then press Play / Pause to select it. The radio will scan and save all available stations in your area. Save Stations From the Radio menu: Make sure you’re currently on the station you’d like saved.
-
Page 20: Pedometer
PEDOMETER Your device includes a pedometer to record the time, number of steps, distance, and calories you expend while walking. Main Interface Pedometer Settings For the most accurate data, enter this information. From the Pedometer menu: 1. Press – or + until Setting is highlighted, and then press Play / Pause to select it. - Page 21 Turn Pedometer On/Off From the Pedometer menu: Press – or + until On/Off is highlighted and press Play / Pause to select your desired option. View Pedometer From the Pedometer menu: Press – or + until Pedometer is highlighted, and then press Play / Pause to select it.
-
Page 22: User Tips
USER TIPS Your device includes handy user tips to get the most from your device. View the User Tips Press – or + to scroll through the User Tips. SETTINGS Note: If the player is powered off by the power switch while it is still running, all saved settings such as last song played or date/time settings will be lost. -
Page 23: Memory Info
Date/Time 1. Press Play / Pause to advance through the fields. 2. Press – or + to decrease or increase the values. 3. Press Mode to save changes. LCD Set Brightness Set the display brightness: Low, Medium, or High. A higher brightness setting will use more battery power. Auto Dim Set the delay (in seconds) before the screen dims automatically when left idle. -
Page 24: Fcc Information
FCC INFORMATION This equipment has been tested and found to comply with the limits for Class B Digital device, pursuant to part 15 of the FCC rules. These limits are designed to provide reasonable protection against harmful interference in a residential installation. -
Page 25: Limited Manufacturer'swarranty
LIMITED MANUFACTURER’S WARRANTY 1. Eclipse by JLab products carry a one year from date of purchase warranty. This warranty is nontransferable. 2. JLab Audio warrants to the original registered end-user purchaser that Eclipse by JLab products will be free from defects in materials and workmanship for one year from the date of new purchase. - Page 26 Return Merchandise Authorization (RMA) 1. Customers will be charged additional for testing and repackaging when returned “bad” items are found to have no problems or defects. 2. Items found to be out-of-warranty or not belonging to JLab Audio will not be replaced. Instead, they will be returned back to the customer freight-collect.
- Page 27 Discrepancy & Shipping Damage 1. For wrong items, missing items, shipping damage, or other discrepancy; customer should report to RMA department on the day in which the items were received. Any claims after one business day of receipt will not be honored. 2.
- Page 28 Consequential Damages & Limitations 1. JLab Audio shall not be liable for any failure to perform or delay in performing any of its obligations when such failure or delay is due to circumstances beyond its reasonable control, including, without limitation, any act of God, war, strike, riot, fire, flood, earthquake, lock-out, late or non-delivery by suppliers, shortage or unavailability of materials, components or transportation facilities, or any act, refusal to act, regulation,...
Need help?
Do you have a question about the FITCLIP+ and is the answer not in the manual?
Questions and answers
witch memory card does it take?