Table of Contents
Advertisement
Quick Links
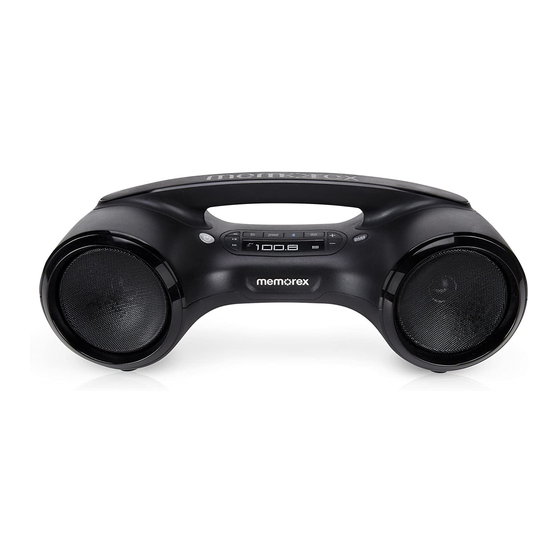
FlexBeat
Bluetooth
™
Boombox
I'll Stream Your Tunes
CAUTION
RISK OF ELECTRIC SHOCK
DO NOT OPEN
CAUTION: TO REDUCE THE RISK OF ELECTRIC SHOCK, DO NOT REMOVE COVER (OR BACK). NO USER-SERVICEABLE PARTS INSIDE. REFER SERVICING
TO QUALIFIED SERVICE PERSONNEL.
DANGEROUS VOLTAGE: The lightning flash with arrowhead symbol within an equilateral triangle is intended to alert the user to
the presence of uninsulated dangerous voltage within the product's enclosure that may be of sufficient magnitude to constitute
a risk of electric shock to persons.
ATTENTION: The exclamation point within an equilateral triangle is intended to alert the user to the presence of important
operating and maintenance (servicing) instructions in the literature accompanying the appliance.
WARNING: Users of this product are cautioned not to make modifications or changes that are not approved by Imation Corp,
doing so may void the compliance of this product and may result in the loss of the user's authority to operate the equipment.
CAUTION: TO PREVENT ELECTRIC SHOCK, MATCH WIDE BLADE OF PLUG TO WIDE SLOT AND FULLY INSERT.
This device complies with Part 15 of the FCC rules and with RSS-210 of Industry Canada. Operation is subject to the following two conditions: (1) This
device may not cause harmful interference, and (2) This device must accept any interference received, including interference that can cause undesired
operation.
NOTE: This equipment has been tested and found to comply with the limits for a Class B digital device, pursuant to part 15 of the FCC Rules. These limits
are designed to provide reasonable protection against harmful interference in a residential installation. This equipment generates, uses and can radiate radio
frequency energy and, if not installed and used in accordance with the instructions, may cause harmful interference to radio communications. However, there
is no guarantee that interference will not occur in a particular installation. If this equipment does cause harmful interference to radio or television reception,
which can be determined by turning the equipment off and on, the user is encouraged to try to correct the interference by one or more of the following
measures:
• Reorient or relocate the receiving antenna.
• Increase the separation between the equipment and receiver.
• Connect the equipment into an outlet on a circuit different from that to which the receiver is connected.
• Consult the dealer or an experienced radio/TV technician for help.
• The rating information is located at the rear of the apparatus.
SURGE PROTECTORS: It is recommended to use a surge protector for AC connection. Lightning and power surges ARE NOT covered under warranty for
this product.
WARNING: TO PREVENT FIRE OR SHOCK HAZARD, DO NOT EXPOSE THIS UNIT TO RAIN OR MOISTURE.
This Class B digital apparatus complies with Canadian ICES-003. Cet appareil numérique de la classe B est conforme à la norme NMB-003 du Canada.
IMPORTANT SAFETY INSTRUCTIONS
1. Read these Instructions.
manufacturer, or sold with the apparatus. When a
2. Keep these Instructions.
cart is used, use caution when moving the cart/
3. Heed all Warnings.
apparatus combination to avoid injury from tip-over.
4. Follow all Instructions.
13. Unplug this apparatus during lightning storms or
5. Do not use this apparatus near water.
when unused for long periods of time.
6. Clean only with a dry cloth.
14. Refer all servicing to qualified service personnel.
7. Do not block any of the ventilation openings. Install in accordance with
Servicing is required when the apparatus has
the manufacturer's instructions.
been damaged in any way, such as power-supply
8. Do not install near any heat sources such as radiators, heat registers,
cord or plug is damaged, liquid has been spilled or objects have fallen
stoves, or other apparatus (including amplifiers) that produce heat.
into the apparatus, the apparatus has been exposed to rain or moisture,
9. Do not defeat the safety purpose of the polarized or grounding-type
does not operate normally, or has been dropped.
plug. A polarized plug has two blades with one wider than the other.
15. WARNING: To reduce the risk of fire or electric shock, do not expose this
A grounding-type plug has two blades and a third grounding prong.
apparatus to rain or moisture. Do not place objects filled with water, such
The wide blade or the third prong are provided for your safety. When
as a vase, on the apparatus.
the provided plug does not fit into your outlet, consult an electrician for
16. The AC mains plug is used as the power disconnect device and it should
replacement of the obsolete outlet.
remain readily accessible and operable during intended use. In order to
10. Protect the power cord from being walked on or pinched particularly at
completely disconnect the apparatus from power, the mains plug should
plugs, convenience receptacles, and the point where they exit from the
be completely removed from the AC outlet socket.
apparatus.
17. CAUTION: To reduce the risk of fire or explosion, do not expose batteries
11. Only use attachments/accessories specified by the manufacturer.
to excessive heat such as sunshine, fire or other heat sources.
12. Use only with a cart, stand, tripod, bracket, or table specified by the
AC CONNECTION
Insert the small end of the AC adapter in the DC IN 5V Jack
located on the rear of the unit. Plug the other end into a wall outlet
ar
having 120V AC, 60Hz.
Notes:
• Remove the DC plug and the AC IN plug to disconnect the AC adapter when not in use.
• Only use the supplied DC 5V, 1.2A AC adapter. Other voltages could damage the product.
• Batteries are disconnected when using AC power.
LOCATION OF CONTROLS
1
2 3 4 5 6 7 8
9
10
11
12
13 14 15
16
1. Power Button
10. Carrying Handle
16. Right Speaker
2. Play/Pause4 ; button
11. Left Speaker
17. Headphone Jack
3. Tune/Skip/Search : button
12. Tune/Skip/Search 9 button
18. DC IN Jack
4. FM Button
13. Display
19. AUX IN Jack
5. Preset Button
14. Battery Compartment
(AC ADAPTER PART NO.:
6. Bluetooth Button
(Bottom of Unit)
17.2.007.0127*)
7. AUX Button
(BATTERY COVER PART NO.:
8. Volume + Button
27.4.017.0007 *)
*Consumer Replaceable Part
9. Bass Boost Button
15. Volume – Button
(See end of guide to order.)
®
BATTERY INSTALLATION
Four (4) "AA" size batteries can be used to operate the unit as follows:
1. Open the Battery Compartment door
on the bottom of the unit by
an
sliding the cover towards the front of the unit.
2. Insert four (4) "AA" batteries into the Battery Compartment as shown.
Be sure to observe the polarity markings which are engraved inside
the battery compartment. Alkaline batteries are recommended for the
longest playing time.
3. Slide the Battery Compartment door back on.
NOTE: The battery indicator will blink in the display when there are no
batteries, or when the batteries are weak and need replacing.
BATTERY PRECAUTIONS
Follow these precautions when using batteries in this device:
1. Warning – Danger of explosion if battery is incorrectly replaced. Replace only with the same or equivalent type.
2. Use only the size and type of batteries specified.
3. Be sure to follow the correct polarity when installing the batteries as indicated in the battery compartment. A reversed battery may cause damage to
the device.
4. Do not mix different types of batteries together (e.g. Alkaline, Rechargeable and Carbon-zinc) or old batteries with fresh ones.
5. If the device is not to be used for a long period of time, remove the batteries to prevent damage or injury from possible battery leakage.
6. Do not try to recharge a battery not intended to be recharged; it can overheat and rupture. (Follow battery manufacturer's directions.)
7. Remove batteries promptly if consumed.
8. Clean the battery contacts and also those of the device prior to battery installation.
OPERATION
Turning the Unit On and Off:
Press the Power button
to turn the unit on. The previous mode and volume level will be selected. Press the Power
u
button
again to turn the unit off.
u
Using the FM Radio:
1. With the power on, press the FM button
to select the FM band; the last tuned station will appear.
x
2. Tune a station using the Tune/Skip/Search 9
and :
buttons. For faster tuning, press and hold the Tune/Skip/
al
w
Search 9
and :
buttons.
al
w
FM Antenna: FM antenna is internal. Orient unit for best reception.
To adjust the main volume: Press the Volume + button
to increase or the Volume – button
W
To turn the unit off: Press the Power button u.
Setting/Recalling FM Presets (Total 6 presets available):
1. To Set: Tune to a desired station as shown above, then press and hold the Preset button
number blinks in the display. Release the button and the preset will be set.
2. To Recall: Press and release the Preset button
to select Preset 1. Press again to select Preset 2, etc.
y
Listen to Music Using Line-In Source:
With the unit on, insert one end of an audio cable (not included) into the LINE OUT jack on your external audio unit
and the other end into the AUX IN jack
as
on the rear of this unit. Press the AUX button
playback of the external unit and its audio output sound will be heard through the MW153's speakers.
To maximize audio quality and minimize sound distortion, set your personal digital music device volume to high and use
the volume control on the MW153 to adjust the listening level.
Pairing a Bluetooth-Enabled Device:
1. Turn on your mobile device and place it within 30 feet (without barrier) of the MW153.
2. With the MW153 on, press the Bluetooth button
to select Bluetooth mode.
U
3. Press and hold the Bluetooth button
for approximately three seconds to make this unit "discoverable";
U
in the display.
4. Refer to your mobile device for instructions on enabling Bluetooth. It is usually located in the Settings menu or similar
location. After enabling, "MW153" will appear as an option on the Device List on your mobile device. Select "MW153" to
pair. If the units are paired properly, a tone will sound and the display will show "PAIRED CONNECTED". If pairing failed,
the display will show "NOT PAIRED". If the mobile device asks for a pass key, use "0000".
IMPORTANT: After step 3, you have two minutes to pair the units.
NOTES:
• After you pair a device, the MW153 will remember it for future use.
• Bluetooth connection will not terminate when switching between Bluetooth and Line-In sources.
Listening to Music from a Bluetooth-Enabled Device:
1. Turn on your mobile device and place it within 30 feet (without barrier) of the MW153.
2. Turn the MW153 on; the previous source mode and volume will be selected. Make sure Bluetooth source is selected.
MW153 will pair and connect to a previously paired device if the device is available.
3. With a unit paired (see previous section), press the Bluetooth button
4. To play/pause: Press the Play/Pause4 ; button
to start playback on your paired and connected device. Press
v
again to pause playback; the Pause indicator will appear in the display. Press yet again to resume playback.
5. To skip forward or backward: Press the Tune/Skip/Search 9
current track/previous or next track.
17
18 19
To search forward or backward on a paired and connected device: Press and hold the Tune/Skip/Search 9
or :
button to search within the currently-playing track.
al
w
6. Adjust the volume using the Volume +
or –
buttons, or use the Volume control on the Bluetooth device.
W
ao
7. To turn this unit off, press the Power button u.
NOTE: After you have adjusted the volume setting, if you turn the unit off and then on again, the volume level and mode
will be set to the level you selected prior to turning the unit off.
Rear Panel
Auto Power Off:
If in Bluetooth or Aux mode and no signal is received for 20 minutes, the unit will turn itself off to save power.
Bass Boost:
Press the Bass Boost button
to enhance the overall bass sound; the BASS BOOST indicator will light. Press again for
X
normal bass sound.
Headphone Jack:
For private listening, connect headphones (not included) into the Headphone jack
headphones will disable the speakers.
SPECIFICATIONS AND COMPATIBILITY
Dimensions ...................... 15.5 (W) x 6.3 (D) x 5.9 (H) inches
Speaker Power Output ........................................2.5W X 2
Weight ...................................................................... 3.3 lbs
Power Supply ....... DC IN 5V, 1.2A Adapter, Center Positive
Drivers .............................................Speaker: 3"x2, PR: 3"x2
Battery ..............4 x 1.5V "AA" size batteries (not included)
Specifications are subject to change without notice.
User Guide
Please read these instructions completely
before operating this product
memorex.com
MW153
PRECAUCIÓN: PARA REDUCIR EL RIESGO DE DESCARGA ELÉCTRICA, NO QUITE LA CUBIERTA (NI LA PARTE TRASERA). NO CONTIENE PIEZAS EN EL
INTERIOR QUE PUEDAN SER REPARADAS POR EL USUARIO. EL MANTENIMIENTO DEBE SER REALIZADO POR PERSONAL DE MANTENIMIENTO CALIFICADO.
VOLTAJE PELIGROSO: El rayo con el símbolo de punta de flecha dentro de un triángulo equilátero tiene como objetivo advertir al usuario
acerca de la presencia de voltaje no aislado peligroso dentro de la caja del producto que puede ser de magnitud suficiente para generar
un riesgo de descarga eléctrica para las personas.
ATENCIÓN: El signo de exclamación dentro de un triángulo equilátero tiene como objetivo alertar al usuario acerca de la presencia de
instrucciones de funcionamiento y mantenimiento (servicio) importantes en la bibliografía que acompaña a la aplicación.
ADVERTENCIA: Los usuarios de este producto están advertidos de que no deben realizar modificaciones o cambios que no estén
aprobados por imation corp. Al hacerlo, pueden anular el cumplimiento de este producto y tener como resultado la pérdida de la autoridad
del usuario para hacer funcionar el equipo.
PRECAUCIÓN: PARA EVITAR DESCARGAS ELÉCTRICAS, UNA LA CLAVIJA ANCHA DEL ENCHUFE CON LA RANURA ANCHA E INSÉRTELA POR COMPLETO.
Este dispositivo cumple con la sección 15 de las normas de la FCC y la norma RSS-210 de Industry Canada. El funcionamiento está sujeto a las dos
condiciones siguientes: (1) Este dispositivo no puede causar interferencias perjudiciales y (2) este dispositivo debe aceptar cualquier interferencia recibida,
incluidas las interferencias que puedan ocasionar un funcionamiento no deseado.
NOTA: Este equipo ha sido probado y cumple con los límites correspondientes a un dispositivo digital Clase B, según la parte 15 de las Normas de FCC.
Estos límites están diseñados para proporcionar una protección razonable contra la interferencia dañina en una instalación residencial. Este equipo genera,
utiliza y puede irradiar energía de radiofrecuencia y, si no se instala y usa de acuerdo con las instrucciones, puede generar interferencia perjudicial en
las comunicaciones de radio. Sin embargo, no se garantiza que la interferencia no se produzca en una instalación en particular. Si este equipo genera
interferencia perjudicial en la recepción de radio o televisión, que puede determinarse encendiendo y apagando el equipo, se recomienda al usuario que
intente corregir la interferencia con una o más de las siguientes medidas:
• Vuelva a orientar o ubicar la antena receptora.
• Aumente la separación entre el equipo y el receptor.
• Conecte el equipo a un tomacorriente de un circuito distinto del que está conectado el receptor.
• Consulte con el distribuidor o con un técnico de radio o TV experimentado para obtener asistencia.
• La información de clasificación se encuentra en la parte trasera del aparato.
to decrease the volume.
PROTECTORES CONTRA SOBRETENSIÓN: Se recomienda utilizar un protector contra sobretensión para la conexión de CA. los casos de sobretensión de
ao
energía y rayos no están cubiertos por la garantía de este producto.
ADVERTENCIA: PARA EVITAR EL RIESGO DE INCENDIO O DESCARGA, NO EXPONGA ESTA UNIDAD A LA LLUVIA O LA HUMEDAD.
until the desired preset
y
Este aparato digital Clase B cumple con la norma canadiense ICES-003.
INSTRUCCIONES IMPORTANTES DE SEGURIDAD
1. Lea estas instrucciones.
2. Conserve estas instrucciones.
V
to select Aux mode. Start
3. Preste atención a todas las advertencias.
4. Siga todas las instrucciones.
5. No utilice este aparato cerca del agua.
6. Limpie solo con un paño seco.
7. No bloquee ninguna de las aberturas de ventilación. Instale el producto
de acuerdo con las instrucciones del fabricante.
8. No instale el producto cerca de fuentes de calor, como radiadores,
rejillas de calefacción, estufas u otros aparatos (incluidos los
amplificadores) que generen calor.
9. No rechace el objetivo de seguridad del enchufe polarizado o de
conexión a tierra. Un enchufe polarizado tiene dos clavijas: una más
will blink
ancha que la otra. Un enchufe de conexión a tierra posee dos clavijas
y una tercera prolongación de conexión a tierra. La clavija ancha
y la tercera clavija se proporcionan para su seguridad. Si el enchufe
proporcionado no encaja en el tomacorriente, comuníquese con un
electricista para reemplazar el tomacorriente obsoleto.
10. Proteja el cable de alimentación de pisadas o pinchaduras, en particular
en los enchufes, los tomacorrientes y el punto de donde salen del aparato.
11. Utilice solo dispositivos/accesorios especificados por el fabricante.
12. Use solo el carro, el pie, el trípode, el soporte o la mesa
especificados por el fabricante o que se vendan con el aparato.
Cuando utilice un carro, tenga cuidado al mover la combinación
Inserte el extremo pequeño del adaptador de CA en la clavija DC IN 5V (entrada CC 5V)
Conecte el otro extremo en el tomacorrientes de 120V CA, 60Hz.
Notas:
• Retire el conector de CC y el conector AC IN (entrada CA) para desconectar el adaptador de CA cuando no está en uso.
to select Bluetooth mode.
U
• Solo use el adaptador CC 5V, 1,2A CA proporcionado. Otros voltajes pueden dañar el producto.
• Las baterías se desconectan cuando se usa la alimentación por CA.
or :
button to skip to the beginning of the
UBICACIÓN DE LOS CONTROLES
al
w
1
2 3 4 5 6 7 8
on the rear of the unit. Connecting
aq
11
12
1. Botón Encendido
2. Botón Reproducir/Pausar4;
3. Botón Sintonizar/Saltar/Buscar :
4. Botón FM
5. Botón Preconfiguración
6. Botón Bluetooth
7. Botón AUX
8. Botón Volumen +
9. Botón Amplificador de graves
FlexBeat
Bluetooth
™
®
Boombox
Le permite trasmitir su música
PRECAUCIÓN
RIESGO DE DESCARGA ELÉCTRICA
Se pueden usar cuatro (4) baterías "AA" para operar la unidad, de la
NO ABRIR
siguiente forma:
1. Abra la puerta del compartimento de las baterías
de la unidad al desplazar la tapa hacia el frente de la unidad.
2. Inserte cuatro (4) baterías "AA" en el compartimento de las baterías, tal
como se muestra. Asegúrese de observar las marcas de polaridad que
están grabadas dentro del compartimento de las baterías. Para obtener
el mayor tiempo de reproducción, se recomienda usar baterías alcalinas.
3. Vuelva a colocar la puerta del compartimento de las baterías.
NOTA: El indicador de la batería parpadeará en la pantalla cuando no
haya baterías, o cuando las baterías se estén agotando y haya que
reemplazarlas.
Siga estas precauciones al usar baterías en este dispositivo:
1. Advertencia: si las baterías se reemplazan incorrectamente se corre el peligro de una explosión. Reemplace las baterías únicamente con el mismo tipo o equivalente.
2. Solo use el tamaño y tipo de baterías especificadas.
3. Asegúrese de respetar la polaridad correcta al instalar las baterías, tal como se indica en el compartimento de las baterías. Una batería invertida puede
causarle daños al dispositivo.
4. No combine tipos diferentes de baterías (por ejemplo, alcalinas, recargables y de carbono-zinc) o baterías antiguas y nuevas.
5. Si es dispositivo no se usa por largos períodos de tiempo, retire las baterías para evitar daños o lesiones debido a posibles filtraciones de las baterías.
6. No intente recargar una batería que no sea recargable; se puede recalentar y romper. (Siga las instrucciones del fabricante de las baterías).
7. Cuando se agoten, retire las baterías oportunamente.
8. Limpie los contactos de las baterías y los del dispositivo antes de la instalación de las baterías.
Encender y apagar la unidad:
Presione el botón Encendido
el botón Encendido
Usar la radio FM:
1. Una vez encendida, presione el botón FM
2. Sintonice una estación mediante el botón Sintonizar/Saltar/Buscar 9
mantenga presionado el botón Sintonizar/Saltar/Buscar 9
Antena FM: La antena FM es interna. Oriente la unidad para obtener una mejor señal.
Para ajustar el volumen principal: Presione el botón Volumen +
disminuir el volumen.
Para apagar la unidad: Presione el botón Encendido u.
Configurar/Usar preconfiguraciones FM (total de 6 preconfiguraciones disponibles):
1. Para configurar: Sintonice la estación deseada, tal como se muestra arriba y luego mantenga presionado el botón
Preconfigurar
configurado la preconfiguración.
2. Para usar la preconfiguración: Presione y suelte el botón Preconfiguración
1. Vuelva a presionarlo para seleccionar la preconfiguración 2, etc.
de carro y aparato para evitar lesiones por
ADVERTENCIA DE CARRO PORTÁTIL
caídas.
(símbolo proporcionado por RETAC)
Escuchar música mediante una fuente de conexión externa:
13. Desconecte el aparato durante tormentas
Con la unidad encendida, inserte un extremo del cable de audio (no incluido) en la clavija LINE OUT (salida) en la unidad
eléctricas o cuando no se utilice durante
de audio externa y el otro extremo en la clavija AUX IN (entrada auxiliar)
un período prolongado.
14. El mantenimiento debe ser llevado a cabo
el botón AUX
por personal de mantenimiento calificado. Se
de audio se escuchará mediante los altavoces del MW153.
requiere mantenimiento si el aparato se dañó
Para maximizar la calidad del audio y minimizar la distorsión del sonido, configure el volumen de su dispositivo de
de alguna forma; por ejemplo, si se derramó
música digital al máximo y use el control de volumen del MW153 para ajustar el nivel.
líquido o cayeron objetos dentro del aparato, si se expuso a la lluvia o
a la humedad, si se cayó, si no funciona normalmente o si se dañó el
cable de alimentación o el enchufe.
Emparejar un dispositivo Bluetooth:
15. ADVERTENCIA: Para reducir el riesgo de incendio o descarga eléctrica,
1. Encienda su dispositivo móvil y colóquelo dentro de un radio de 10 metros (sin obstáculos) del MW153.
no exponga este aparato a la lluvia o a la humedad. No coloque objetos
2. Con el MW153 encendido, presione el botón Bluetooth
con líquidos (p. ej., jarrones) sobre el aparato.
16. El cable de alimentación de CA es el dispositivo para desconectar la
3. Mantenga presionado el botón Bluetooth
corriente; por lo tanto, debe estar al alcance de la mano y se debe
pppparpadeará en la pantalla.
poder manejar durante el uso previsto. Para desconectar el aparato de
4. Consulte su dispositivo móvil para obtener instrucciones sobre cómo activar Bluetooth. Por lo general, se ubica en
la corriente, el cable de alimentación se debe quitar completamente del
tomacorriente de CA.
el menú de Configuración o en algún lugar semejante. Después de activarlo, "MW153" aparecerá como una opción
17. PRECAUCIÓN: Para reducir el riesgo de incendio o explosión, no
en la Lista de dispositivos en su dispositivo móvil. Seleccione "MW153" para emparejarlo. Si la unidad se empareja
exponga las pilas a calor excesivo, como la luz solar directa, el fuego
correctamente, se oirá un tono y la pantalla mostrará "PAIRED CONNECTED" (emparejamiento conectado). Si hay un
u otras fuentes de calor.
error con el emparejamiento, en la pantalla aparecerá "NOT PAIRED" (no emparejado). Si el dispositivo móvil solicita
una clave de acceso, use "0000".
CONEXIÓN DE CA
IMPORTANTE: Después del paso 3, tiene dos minutos para emparejar las unidades.
NOTAS:
ubicada en la parte trasera de la unidad.
• Después de emparejar el dispositivo, el MW153 lo recordará para su uso futuro.
ar
• La conexión Bluetooth no se desconectará al cambiar entre las fuentes Bluetooth y Conexión externa.
Escuchar música desde un dispositivo Bluetooth:
1. Encienda su dispositivo móvil y colóquelo dentro de un radio de 10 metros (sin obstáculos) del MW153.
2. Encienda el MW153; se seleccionará el modo de fuente y el nivel de volumen anterior. Asegúrese de que la fuente
Bluetooth esté seleccionada. MW153 se emparejará y conectará a un dispositivo emparejado anteriormente si el
dispositivo está disponible.
3. Con una unidad emparejada (vea la sección anterior), presione el botón Bluetooth
4. Para reproducir/pausar: Presione el botón Reproducir/Pausar4;
9
10
17
18 19
emparejado y conectado. Vuelva a presionar para pausar la reproducción; el indicador de pausa aparecerá en la
pantalla. Vuelva a presionar una vez más para continuar la reproducción.
5. Para avanzar o retroceder: Presione el botón Sintonizar/Saltar/Buscar 9
pista actual, anterior o siguiente.
Para buscar hacia delante o atrás en un dispositivo emparejado y conectado: Mantenga presionado el botón
Sintonizar/Saltar/Buscar 9
6. Ajuste el volumen mediante los botones Volumen +
7. Para apagar esta unidad, presione el botón Encendido u.
Panel trasero
NOTA: Después de ajustar la configuración de volumen, si apaga la unidad y la vuelve a encender, el nivel del volumen y el
modo se configurará al nivel que seleccionó antes de apagar la unidad.
Apagado automático:
Si en el modo Bluetooth o Auxiliar no se recibe ninguna señal por 20, la unidad se apagará automáticamente para ahorrar energía.
Amplificador de graves:
Presione el botón Amplificador de graves
13 14 15
16
BOOST (amplificador de graves). Vuelva a presionarlo para volver al sonido normal de graves.
Clavija para auriculares:
Para escuchar de forma privada, conecte los auriculares (no incluidos) en la clavija para auriculares
10. Manija para transportar
16. Altavoz derecho
de la unidad. Al conectar los auriculares se desactivarán los altavoces.
11. Altavoz izquierdo
17. Clavija para auriculares
12. Botón Sintonizar/Saltar/Buscar 9
18. Clavija DC IN (entrada CC)
13. Pantalla
19. Clavija AUX IN (entrada auxiliar)
14. Compartimento de las baterías
(ADAPTADOR DE CA NO.
Dimensiones ...... 39,4 (ancho) x 16 (profundidad) x 15 (alto)
.......................................................................centímetros
(Parte inferior de la unidad)
DE PIEZA: 17.2.007.0127*)
Peso ...................................................................... 1,5 kg
(TAPA DE LAS BATERÍAS NO.
Controladores .................................Altavoz: 3"x2, PR: 3"x2
DE PIEZA: 27.4.017.0007 *)
*Pieza que el usuario puede
reemplazar (Consulte el final de
15. Botón Volumen –
la guía para solicitar)
Guía de usuario
Lea estas instrucciones en su totalidad
antes de usar este producto
memorex.com
MW153
INSTALACIÓN DE LAS BATERÍAS
en la parte inferior
an
PRECAUCIONES SOBRE LAS BATERÍAS
OPERACIÓN
para encender la unidad. Se seleccionará el modo y el nivel de volumen anterior. Presione
u
nuevamente para apagar la unidad.
u
x
para seleccionar la banda FM; aparecerá la última estación sintonizada.
y : w. Para una sintonización más rápida,
al
al
y : w.
para aumentar o el botón Volumen –
W
y
hasta que el número de preconfiguración deseado parpadee en la pantalla. Suelte el botón y se habrá
y
para seleccionar la preconfiguración
as
en la parte trasera de esta unidad. Presione
para seleccionar el modo Auxiliar. Comience la reproducción de la unidad externa y su sonido de salida
V
para seleccionar el modo Bluetooth.
U
por aproximadamente tres segundos para que la unidad sea "visible";
U
para seleccionar el modo Bluetooth.
U
para iniciar la reproducción en su dispositivo
v
al
o :
w
para saltar al principio de la
al
o :
w
para buscar dentro de la pista actualmente en reproducción.
o –
o use el control de volumen del dispositivo Bluetooth.
W
ao
para mejorar el sonido general de graves; se encenderá el indicador BASS
X
en la parte trasera
aq
ESPECIFICACIONES Y COMPATIBILIDAD
Salida de alimentación del altavoz .................... 2,5W X 2
Alimentación ................. Adaptador entrada CC 5V, 1,2A,
...............................................................centro positivo
Batería ................... 4 x 1,5V baterías "AA" (no incluidas)
Las especificaciones están sujetas a cambios sin previo aviso.
para
ao
Advertisement
Table of Contents

Related Manuals for Memorex MW153


Summary of Contents for Memorex MW153
- Page 1 Press • Las baterías se desconectan cuando se usa la alimentación por CA. 2. Encienda el MW153; se seleccionará el modo de fuente y el nivel de volumen anterior. Asegúrese de que la fuente Bluetooth esté seleccionada. MW153 se emparejará y conectará a un dispositivo emparejado anteriormente si el again to pause playback;...
- Page 2 6. Nettoyez uniquement avec un chiffon sec. longue période. sélectionner le mode auxiliaire. Amorcez la lecture sur l’appareil externe. Les haut-parleurs du MW153 devraient en diffuser le son. PARA ASISTENCIA ADICIONAL SOBRE LA CONFIGURACION O EL FUNCIONAMIENTO, 7. Ne bouchez pas les orifices prévus pour la ventilation. Installez 14.
Need help?
Do you have a question about the MW153 and is the answer not in the manual?
Questions and answers