Table of Contents
Advertisement
Advertisement
Table of Contents

Related Manuals for E-Collar Einstein ET-300TS


Summary of Contents for E-Collar Einstein ET-300TS
- Page 1 ET-300TS Owner's Manual...
- Page 2 ET-300TS Owner's Manual Einstein Remote Education Collar Thank you for purchasing the Einstein Remote Education Collar from E-Collar Technologies, Inc. We have made every attempt to provide you with the most technologically advanced product using the most stringent quality and manufacturing standards.
- Page 3 CHARACTERISTICS Range : ½ Mile • Three Stimulation Modes Supported (Momentary, Continuous, • and Combo Mode) Tapping Sensation • Employs Quick Charge Li-Polymer Batteries • Convenient Intensity Dial for Quick Adjustment • Stimulation Levels Adjustable from 0 to 100 • Collar Receiver Light for Night Tracking •...
-
Page 4: Contact Points
CONTENTS • • Transmitter Collar Receiver with Strap and 5/8” Contact Points • • Battery Charger Owner’s Manual ET-300TS Owner's Manual • • Contact Points 3/4" Test Light • • Contact Point Tool Lanyard Einstein Owner's Manual ET-300TS... -
Page 5: Table Of Contents
TABLE OF CONTENTS Safety and General Information • Transmitter Parts • Collar Receiver Parts • Charging the Batteries • Turning Your Einstein On/Off • The LCD Display Features • Button Functions • Changing the Intensity Level of Stimulation • Lock/Unlock the Stimulation Intensity Level •... -
Page 6: Safety And General Information
Hospital or Health Care Facility or enter the facility without turning off both units. An FCC license is not needed to operate Einstein E-Collar transmitters. However, any change or modification made to the transmitter, including the supplied antenna, without the expressed written approval of E-Collar Technologies, Inc. -
Page 7: Transmitter Parts
TRANSMITTER PARTS See figure on page 12 for button functions Antenna Stimulation Level Dial / Set and Lock Knob Stimulation Button(Black) LCD Display Stimulation Boost Button or Continuous Button(Red) Indicator Light (LED Window) Momentary / Continuous Mode Button Tapping Sensation Light and On/Off Button Button Battery Charging Receptacle... -
Page 8: Collar Receiver Parts
COLLAR RECEIVER PARTS Collar Strap 5/8” Contact Points On/Off Magnetic Dot Indicator and Tracking Light (LED Window) THIS D-CLIP IS NOT TO BE USED AS A TIE OUT Battery Charging Receptacle and Rubber Cover Einstein Owner's Manual ET-300TS... -
Page 9: Charging The Batteries
CHARGING THE BATTERIES Indicator Light will blink “Green” under normal operation. It will flicker “Red” when stimulation is applied and will blink “Red” when recharging is required. We recommend you fully charge your Einstein every six months when not in use to maintain battery life. - Page 10 CHARGING THE BATTERIES The indicator light will turn solid red during charge cycle and • turn green if it is fully charged. • Special Note: The indicator light may not turn green after the first few charges due to the nature of the Li-Polymer batteries. Einstein Owner's Manual ET-300TS...
-
Page 11: Turning Your Einstein On/Off
TURNING YOUR Einstein ON/OFF COLLAR RECEIVER ON/OFF MAGNETIC SWITCH • To turn the Collar Receiver On or Off : Position the red dot on the Transmitter close to the small red dot hole on the receiver. After turning on the unit push the tapping sensation button to assure the collar receiver is turned on and functioning properly before putting it on your dog. -
Page 12: The Lcd Display Features
“HI” means the highest level(100 ) Indicates current stimulation mode: “M” indicates Momentary/ Momentary Boost, “C” indicates Continuous/Continuous Boost, Both “M” and “C” illuminated indicates Momentary/Continuous/ Both Button Boost. “M” and “C” mode is recommended for first time e-collar users. Einstein Owner's Manual ET-300TS... -
Page 13: Button Functions
BUTTON FUNCTIONS TRANSMITTER The ET-300TS transmitter is equipped with five control buttons, LCD display, and an adjustable dial. For long range use hold the transmitter up like the Statue of Liberty and never allow the antenna to touch anything as it will decrease the range. Power lines and foliage will also reduce the range. - Page 14 BUTTON FUNCTIONS Three Programmable Modes are provided based on the status of M/C button. Two Stimulation buttons will be working differently. Momentary/Continuous Button "M/C" - M/C Button on the backside of the transmitter allows the user to easily switch between the three stimulation modes. -->...
- Page 15 BUTTON FUNCTIONS - Boosting Stimulation in Combo Mode Momentary boosting is accomplished by first sending a momentary stimulation pulse “S(Black)” to the dog and keeping the button pressed and then applying the Continuous “S (Red)” Button Continuous boosting is accomplished by first pressing the Continuous “S (Red)”...
- Page 16 BUTTON FUNCTIONS - If the state of Momentary/Continuous Button is in Combo mode, this button will be used as Continuous Stimulation Button. Tapping Sensation Button “T” - Sends education tapping sensation to the collar receiver. Light Button(On Back) “L” - When pressed less than 0.5 seconds, it will turn On or Off the high intensity night tracking light which is good for finding your dog after dark.
- Page 17 Back to Factory Default Setting Your e-collar transmitter is a small computer, if you feel it is behaving badly, it probably needs to be reset. Please turn the stimulation to “0” and press both stimulation buttons and the tapping sensation button at the same time for 2 seconds.
-
Page 18: Changing The Intensity Level Of Stimulation
CHANGING THE INTENSITY LEVEL OF STIMULATION Rotating clockwise increases the stimulation level and conversely, rotating counter-clockwise lowers the stimulation level. It is highly recommended that the user practices changing levels and modes before putting the collar receiver on the dog. Setting the correct stimulation level for your dog is very important. - Page 19 CHANGING THE INTENSITY LEVEL OF STIMULATION USING THE E-COLLAR IN CONTINUOUS AND MOMENTARY MODES For example, if you want your dog to come to you and heel, you can hold the button down until your dog comes and heels or if jumping is an issue, you can hold the button down anytime their front paws are off the ground.
- Page 20 “e-collar training” or “remote dog training techniques”. Good Luck with your training! * CAUTION : Do not put the Einstein E-Collar receiver on a human being. * WARNING : E-Collar Technologies, Inc. is not responsible for any misuse of the Einstein E-Collar and loss and damages as a result of a dog bite.
-
Page 21: Lock/Unlock The Stimulation Intensity Level
LOCK/UNLOCK THE STIMULATION INTENSITY LEVEL How to Lock/Unlock the Stimulation Level Set the desired stimulation level and then push down on the top of the stimulation dial until you see “1D” light up on the top portion of the LCD display. If the stimulation level doesn’t change when you rotate the stimulation knob, you have successfully locked the stimulation level. -
Page 22: Indicator Light
INDICATOR LIGHT • TRANSMITTER INDICATOR LIGHT Battery Charge level is signified by the flashing light going from “green” (ready for use) to “amber” (need to charge soon) and then to “red” (charge immediately). When any of the function buttons are pressed the indicator light will turn “red”... -
Page 23: Lost Transmitter Mode
Lost Transmitter Mode Your Einstein E-Collar transmitter allows the user to turn on a 6 hour timer. After 6 hours the transmitter will begin beeping providing the ability to locate the transmitter in tall grass. Lost transmitter mode is activated by first pressing light button and then simultaneously pressing the stimulation Button(Black) when the intensity level is zero. -
Page 24: Testing Your Einstein
The collar receiver light will flicker red while the stimulation is on. Next, press the button to Tapping Sensation test the tapping sensation feature. Your Einstein E-Collar is ready to use. Einstein Owner's Manual ET-300TS... -
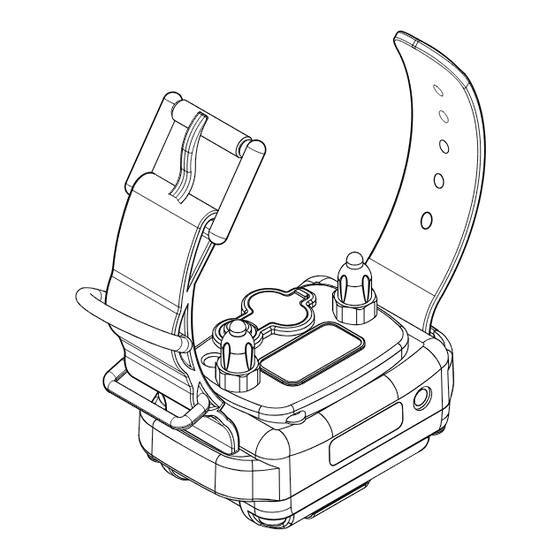
Page 25: Replacing The Contact Points
REPLACING THE CONTACT POINTS The standard 5/8” contact points are used for most dogs. Thicker fur breeds require the longer 3/4” contact points. Replace the 5/8” contact points by following the instructions below using the enclosed contact point tool. 1. Loosen both contact points by rotating the contact point counter-clockwise using the contact point tool. -
Page 26: Correctly Fitting The Collar
Antibiotic ointment will aid in the healing process. Some dog breeds have very thick fur that requires special contact points, please contact our customer service or visit www.ecollar.com for more information. -
Page 27: Warranty
The Limited Lifetime Warranty will expire 5 years from the date the model is discontinued by E-Collar Technologies, Inc. Any attempt by the user to repair or open the e-collar including battery replacement will void the warranty. Einstein Owner's Manual ET-300TS... -
Page 28: Accessories
ACCESSORIES • Micro-probes Contact Points • Thick-Hair Contact Points • Car Adapter Einstein Owner's Manual ET-300TS... -
Page 29: Contact Information
CONTACT INFORMATION E-Collar Technologies, Inc. 2120 Forrest Park Drive Garrett, IN 46738 Toll-Free 1-855-326-5527 Toll-Free Fax 1-855-226-5527 www.ecollar.com sales@ecollar.com customerservice@ecollar.com Einstein Owner's Manual ET-300TS... - Page 31 Owner’s Manual Addendum (ET-300TS & ET-400TS) 1.) Default Boosting Level is 20 not 25 as stated in the manual. 2.) The Boosting Level is changeable by doing the following: Set the mode to Momentary by pressing the M/C button on the rear of the transmitter.
Need help?
Do you have a question about the Einstein ET-300TS and is the answer not in the manual?
Questions and answers