Table of Contents
Advertisement
Quick Links
GUILD
750W Jigsaw
Instruction Manual
Important
- Please read these instructions fully before operating or maintaining your Guild jigsaw
These instructions contain important information that will help you get the best from your Guild
jigsaw, ensuring it remains safe to operate.
If you need help or have damaged or missing parts, call the Customer Helpline on 0333 3201989
After Sales Support
UK/Ireland 0333 3201989
Help@guildpowertools.co.uk
PSJ750GH
Advertisement
Table of Contents

Related Manuals for Guild PSJ750GH


Summary of Contents for Guild PSJ750GH
- Page 1 Important - Please read these instructions fully before operating or maintaining your Guild jigsaw These instructions contain important information that will help you get the best from your Guild jigsaw, ensuring it remains safe to operate. If you need help or have damaged or missing parts, call the Customer Helpline on 0333 3201989...
-
Page 2: Table Of Contents
Contents Safety Information ����������������������������������������������������������������������������������������������������3 In The Box �����������������������������������������������������������������������������������������������������������������7 Accessories ��������������������������������������������������������������������������������������������������������������7 Operating Instructions ����������������������������������������������������������������������������������������������8 Working Hints For Your Jigsaw ������������������������������������������������������������������������������� 13 Maintenance ����������������������������������������������������������������������������������������������������������� 15 Technical Data �������������������������������������������������������������������������������������������������������� 15 Environmental Protection ��������������������������������������������������������������������������������������� 16 Guarantee ��������������������������������������������������������������������������������������������������������������� 17 Declaration of Conformity ��������������������������������������������������������������������������������������� 18 Plug Replacement (Uk & Ireland Only) ������������������������������������������������������������������� 19 Customer Helpline 0333 3201989... -
Page 3: Safety Information
Safety Information Important - Please read these instructions fully before starting assembly Warning Symbols The following warning symbols appear throughout this assembly manual and indicate the appropriate safety measures you should take when assembling and operating the jigsaw. To reduce the risk of injury, Please read the instruction manual Wear eye protection Wear ear protection Wear dust mask... - Page 4 Safety Information Important - Please read these instructions fully before starting assembly General Power Tool Safety Warnings WARNING! Read all safety warnings and all instructions� Failure to follow the warnings and instructions may result in electric shock, fire and/or serious injury. Save all warnings and instructions for future reference�...
- Page 5 Safety Information Important - Please read these instructions fully before starting assembly General Power Tool Safety Warnings d) Remove any adjusting key or wrench before turning the power tool on� A wrench or a key left attached to a rotating part of the power tool may result in personal injury. e) Do not overreach�...
- Page 6 Safety Information Important - Please read these instructions fully before starting assembly Jigsaw Safety Warnings 1� Hold jigsaw by insulated gripping surfaces, when performing an operation where the cutting accessory may contact hidden wiring or its own cord� Cutting accessory contacting a “live”...
-
Page 7: In The Box
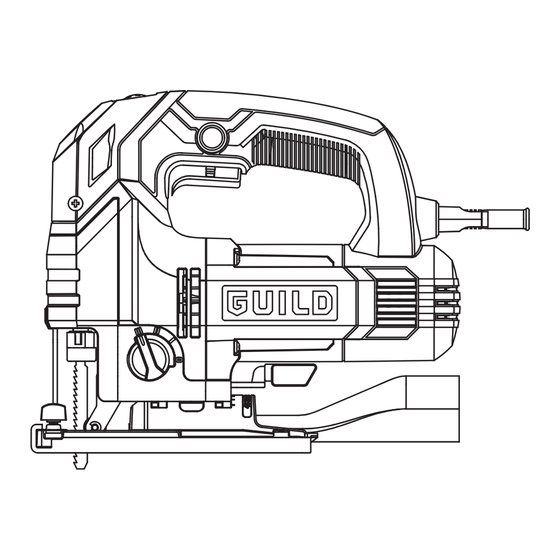
In The Box Parts Roller Guide On/Off Switch Saw blade Lock-On Button Finger protection Hand Grip Areas Tool-Free Blade Holder Vacuum adaptor SDS Plate spanner Work light Variable Speed Control Base Plate Parallel Guide Angle Plate Pendulum Action Control Accessories Parallel guide Vacuum adaptor Wood cutting blade... -
Page 8: Operating Instructions
Operating Instructions NOTE: Before using the tool, read the instruction book carefully. Intended Use This tool is intended for sawing wood, plastic, metal and building materials while resting firmly on the workpiece. It is suitable for straight and curved cuts with bevel angles to 45°. The saw blade recommendations are to be observed. - Page 9 Operating Instructions 3� VARIABLE SPEED CONTROL Adjust the thumb-wheel to increase or decrease the speed (SEE FIG C) according to the material, material thickness and blade specification to be used (also possible during no load operation). See Chart 1 for general guidance on speed selection. Avoid prolonged use at very low speed as this may damage your jigsaw’s motor.
- Page 10 Operating Instructions 5� BLADE FITTING (SEE FIG D, E, F) NOTE: Remove the plug from the socket before carrying out any adjustment, servicing or maintenance. Wear protective gloves when assembling the saw blade. You can only use the blade type shown in FIG D. Don’t use other blade types. INSERTING THE SAW BLADE To open the blade holder (12) rotate the ring anti-clockwise (Jigsaw upside down) and hold in position (SEE FIG E).
- Page 11 Operating Instructions 6� MOUNTING PARALLEL GUIDE (SEE FIG G1, G2�) Slide the parallel guide arm through both parallel guide fixtures and tighten the locking knob (a) to achieve the required cutting distance. The parallel guide can be mounted in two positions as shown in G1and G2.
- Page 12 Operating Instructions 9� BASE PLATE Adjusting the angle of the base plate (6) enables bevel cutting. The base plate must always be held firmly against the materials being cut to reduce saw vibration, blade jumping or blade breakage. 10� BASE PLATE ANGLE ADJUSTMENT Your jigsaw is equipped the SDS base plate.
-
Page 13: Working Hints For Your Jigsaw
Operating Instructions 12� PROTECTION FINGER WIRE The finger wire is located in front of the blade holder. Whilst working, it will help prevent accidental contact with moving blade. 13� DUST BLOWER AIR HOLE This is a small aperture located underneath the housing just behind the blade guide. Ensure this is kept clean to allow the air flow to continually blow dust away from the cutting area. - Page 14 Working Hints For Your Jigsaw PLUNGE SAWING Plunge cutting may be used only on soft materials such as wood, aerated concrete, gypsum plaster boards, etc.! Use only short saw blades. Place the front edge of the base plate on the workpiece and switch on. Press the tool firmly against the workpiece and plunge the saw blade slowly into the workpiece.
-
Page 15: Maintenance
Maintenance Remove the plug from the socket before carrying out any adjustment, servicing or maintenance� Your power tool requires no additional lubrication or maintenance. There are no user serviceable parts in your power tool. Never use water or chemical cleaners to clean your power tool. -
Page 16: Environmental Protection
Technical Data Vibration Information Vibration total values (triax vector sum) determined according to EN 60745: Vibration emission value a = 6,9m/s Cutting boards Uncertainty K =1,5m/s² Vibration emission value a = 6,8m/s Cutting steel metal Uncertainty K =1,5m/s² The declared vibration total value may be used for comparing one tool with another, and may also be used in a preliminary assessment of exposure. -
Page 17: Guarantee
Guarantee This product is selected for DOMESTIC USE ONLY and not for business use. This product is guaranteed against manufacturing defects for a period of 24 months. This does not cover the product where the fault is due to misuse, abuse, use in contravention of the instructions, or where the product has been the subject of unauthorised modifications or alterations, or has been the subject of commercial use. -
Page 18: Declaration Of Conformity
Declaration of Conformity This Guild 750W Jigsaw model number PSJ750GH fully complies with the Machinery Directive 2006/42/EC, Electromagnetic Compatibility Directive 2004/108/EC(before 2016/04/20) and 2014/30/EC(since 2016/04/20), RoHS Directive 2011/65/EU and the following harmonized EU standards EN 60745-2-11: 2010 EN 60745-1: 2009 + A11: 2010... -
Page 19: Plug Replacement (Uk & Ireland Only)
Plug Replacement (Uk & Ireland Only) If you need to replace the fitted plug then follow the instructions below. IMPORTANT The wires in the mains lead are colored in accordance with the following code: Blue – Neutral Brown – Live As the colors of the wires in the mains lead of this appliance may not correspond with the coloured markings identifying the terminals in your plug, proceed as follows.
Need help?
Do you have a question about the PSJ750GH and is the answer not in the manual?
Questions and answers