Table of Contents
Advertisement
Advertisement
Table of Contents

Related Manuals for Ormed ARTROMOT-K4


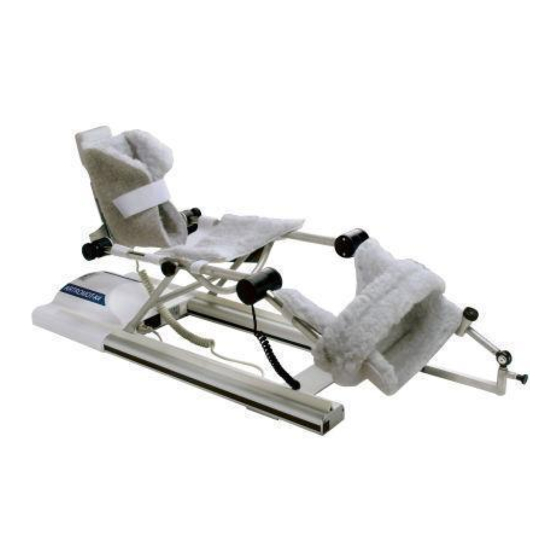
Summary of Contents for Ormed ARTROMOT-K4
- Page 1 ARTROMOT ® Operation Manual Starting with serial number higher than 10 000...
- Page 2 Fold out this page...
-
Page 3: Device Description
Device description 18 17 16... -
Page 4: Table Of Contents
Contents Device description Symbol overview ARTROMOT ® Illustrations for device setup 1. How to use the CPM device 1.1 Fields of application 1.2 Therapy objectives 1.3 Indications 1.4 Contraindications 2. Description of the ARTROMOT ® 2.1 Description of the device components 2.2 Description of the programming unit 2.3 Explanation of symbols 2.4 Explanation of symbols (connections and nameplate) -
Page 5: How To Use The Cpm Device
1. How to use the CPM device 1.1 Fields of application 1.3 Indications ARTROMOT ® -K4 is a motor-operated The CPM device is indicated in the Continuous Passive Motion (CPM) treatment of most injuries and diseases device providing motion to the shoulder of the knee and hip joints as well as in joint. -
Page 6: Description Of The Artromot
2. Description of the ARTROMOT ® The motorized CPM device permits 2.1 Description of the extension and flexion of the knee joint in the range of -10 ° - 0 ° - 125 °, device components and of the hip joint in the range of 0 °... -
Page 7: Description Of The Programming Unit
2.2 Description of the programming unit 2.2.1 Programming unit in normal mode current carriage angle selected therapy therapy timer protocol set flexion value set extension value current direction of motion parameter keys MENU key + (plus) key START key STOP key - (minus) key... - Page 8 2.2.2 Programming unit in MENU selection mode set carriage angle for selected MENU level internal / external rotation set extension value set flexion value parameters available for selection, corres- ponding selection keys 2.2.3 Programming unit in programming mode selected function status of the selected function (here: flexion angle)
-
Page 9: Explanation Of Symbols
2.3 Explanation of symbols Also refer to symbol overview on page 29. extension (stretching the knee) flexion (bending the knee) speed warm-up protocol extension pause flexion pause therapy timer reverse on load feature for patient safety transport setting new patient total therapy time service menu... -
Page 10: Explanation Of Symbols (Connections And Nameplate)
2.4 Explanation of symbols (connections and nameplate) Alternating current Protective earth connection Type B applied part Power switch OFF Power switch ON Refer to accompanying documents Do not dispose of product with unsorted household or municipal waste. -
Page 11: Safety Information
3. Safety information Definitions Warning! Read the safety statements before use Patient hazard — of the CPM device. The safety state- ments are classified as follows: – Only authorized individuals are allowed to operate the ARTROMOT ® -K4 device. Individuals are authorized after receiving Danger! training in the operation of the... - Page 12 CPM any hazard. Please contact ORMED, device. if you have questions in this matter. − Do not use multiple portable socket outlets (MPSO) to connect the device to the power line.
- Page 13 Warning! Caution! Equipment malfunction Equipment damage – Check that the voltage and fre- – Magnetic and electrical fields are quency ratings of your local power capable of interfering with the line are those indicated on the proper performance of the device. nameplate.
-
Page 14: Device Setup
4. Device setup Note: For a better understanding of − The message "ERR" and an error each step, please fold out pages 3 code (e.g. ERR 5) appear on the and 34. display. In this situation, you may attempt to restart the device by turning it briefly off and on again with the power switch. -
Page 15: Adjusting The Patient Kit
3. Adapting the carriage to the femur 4.3 Adjusting the Patient Kit length (Fig. 2) • Press on the locking pin at the femur length adjustment (9) to 1. Using the Velcro tapes, attach the release the lock. patient kits for lower leg (5) and thigh (7) to the frame of the motion ele- •... -
Page 16: Setting The Treatment Values
5. Setting the treatment values • The corresponding symbol appears Warning! on the display in a larger format. Patient hazard • The set value is displayed. • The symbol above the parameter Before therapy, a test run consisting key appears in reverse video. of several exercise cycles must be completed without the patient. -
Page 17: Programming Artromot
• If the carriage is positioned within MENU the programmed range of motion at the time therapy begins, the therapy LEVEL 3: session will start immediately. - Transport setting • If the carriage is positioned outside the programmed range of motion at - New patient the time therapy begins, it will first - Total therapy time... - Page 18 LEVEL 1: I Flexion pause I Extension (stretching) Pauses occur at the flexion limit, - Maximum knee extension: just before the stretching movement -10 degrees starts. Pauses are adjustable in steps of 1 second between 0 and - Maximum hip extension: 30 seconds 10 degrees Default: no pause...
- Page 19 I Total therapy time Caution! Patient hazard The reverse on load The total therapy time is the added sum of operating hours. feature is a safety measure to protect the patient in the event of cramps, If the device is used by only one spasms, locked joints and similar patient, this time is equivalent to the situations.
-
Page 20: Care, Maintenance
6. Care, Maintenance 6.1 Care 6.2 Maintenance (fuse replacement) Warning! Shock hazard Check before each use Visually inspect the device for signs of Remove the power cord from the wall mechanical damage before each use. outlet before cleaning. Shock hazard, equipment damage If you detect damage or malfunctions that may impair the safety of the patient Liquids must not enter the device or... -
Page 21: Conversion
Use an appropriate tool to remove the Note! fuse holder situated between the power For the correct assembly and locking switch and the power connector of the bayonet lock, please observe (Fig. 1). Replace the fuses and reinsert the sticker on the ARTROMOT ®... -
Page 22: Environmental Protection Statement
CAN / CSA unsorted household or municipal waste. C22.2 No. 601.1 It requires separate disposal. IEC 60601-1- Please contact ORMED or your local (electromagnetic 2:2001 dealer for information about the possi- compatibility) ble recycling of the product. -
Page 23: Iec 60601-1-2:2001
9. IEC 60601-1-2:2001 The ARTROMOT ® -K4 device is subject If you detect damage or malfunctions to particular precautions regarding that may impair the safety of the patient electromagnetic compatibility (EMC). or of the operator, have the device The device must be installed and put repaired before using it. -
Page 24: Electromagnetic Immunity
9.2 Electromagnetic immunity Guidance and Manufacturer’s Declaration – Electromagnetic Immunity ARTROMOT ® -K4 is intended for use in the electromagnetic environment specified below. It is the responsibility of the customer or user to ensure that the ARTROMOT ® -K4 device is used in such an environment. - Page 25 9.2 Electromagnetic immunity Guidance and Manufacturer’s Declaration – Electromagnetic Immunity ARTROMOT ® -K4 is intended for use in the electromagnetic environment specified below. It is the responsibility of the customer or user to ensure that the ARTROMOT -K4 device is used in ®...
-
Page 26: Recommended Separation Distances
2 years (mechanical parts) products and services. 2 years (electroncis) ORMED international Sales Please contact your local dealer Ormed GmbH & Co. KG or the ORMED headquarters in Merzhauser Strasse 112 Germany. D-79100 Freiburg Germany Headquarters Germany Ormed GmbH &... -
Page 27: Technical Service
To prevent damage during transport, only use the original shipping box. These boxes can be obtained from ORMED or from your local dealer. Before packing the CPM device, set it to the transport position (see chapter 5). 11.3 Spare Parts Refer to the Service Manual for the most recent list of spare parts. -
Page 28: Declaration Of Conformitiy
Declaration of conformity In compliance with the Council Directive 93/42/EEC of 14 June 1993 concerning medical devices, the company ORMED GmbH & Co. KG Merzhauser Strasse 112 D-79100 Freiburg - Germany declares that the products of the product line ARTROMOT ®... - Page 29 Symbol overview ARTROMOT ® LEVEL 1 Extensio speed warm-up protocol Flexion (stretching) (bending) LEVEL 2 pause Extension Therapy Time reverse on load pause Flexion feature for patient safety LEVEL 3 transport setting new patient total therapy time Service Menu...
- Page 30 Notes...
- Page 31 Notes...
- Page 32 Notes...
- Page 33 Notes...
-
Page 34: Illustrations For Device Setup
Illustrations for device setup Fig. 2 Fig. 6 Fig. 3 Fig. 7 Fig. 4 Fig. 8 Fig. 5... - Page 35 Fold out this page...
- Page 36 Te l + 4 9 7 6 1 4 5 6 6 - 0 1 • F a x + 4 9 7 6 1 4 5 6 6 - 5 5 0 1 • w w w. o r m e d . d e E - M a i l : i n f o @ o r m e d . d e DIN EN 46 001 ORMED Nr. 018 829-01...
Need help?
Do you have a question about the ARTROMOT-K4 and is the answer not in the manual?
Questions and answers
Where do I plug in to machine
Plug the power cord into socket (18) on the ARTROMOT-K4 device, then connect the mains plug to a properly installed wall outlet with a non-fused earthed wire.
This answer is automatically generated