Table of Contents
Advertisement
Quick Links
Advertisement
Table of Contents

Related Manuals for TaoTronics TT-BS007


Summary of Contents for TaoTronics TT-BS007
- Page 1 TaoTronics TT-BS007 Wireless Laser Barcode Scanner User’s Manual...
-
Page 2: Product Diagram
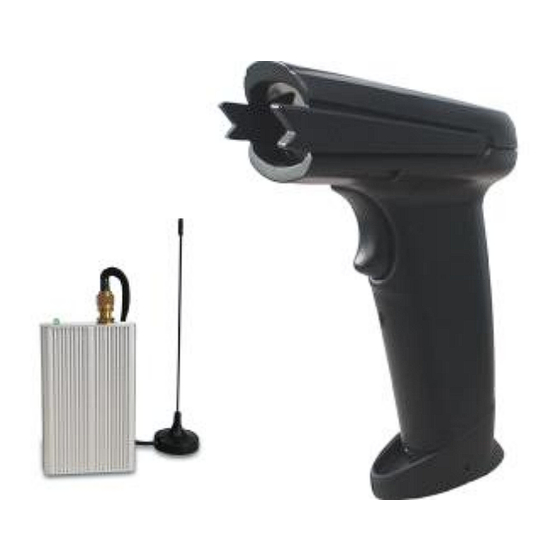
Instructions Fully integrated advantages of high-performance laser scanning, wireless transmission and ergonomic, FG 2100 Wireless Laser Barcode Scanner is a product with fashionable design and excellent performance. It has various advantages such as stable and reliable long distance speedy transmission, data-storable, independent network and so on. - Page 3 Circular charger Charge bottom Bottom view of the scanner Connect external antenna base Receiver Indicator Connect USB Interface Bottom view of Receiver Top view of Receiver Front view of Receiver...
- Page 4 Features (1)Simple installation Through the USB docking cable, the receiver plugs in the computer and play. (2)Long distance and strong wall-penetrating ability The wireless transmission distance is up to 200M in open environment, with the diffraction ability, it can penetrate walls. (3)Storage Storable, scanned bar codes can be stored when wireless transmission fails out of the wireless range;...
-
Page 5: Installation Steps
Wireless scanning gun and its receiver have loop cutting inspection for each packet to ensure the accuracy of data transmission so that data error and loss does not occur. 3. Accessory Details Parts Name Specifications Quantity Wireless laser scanner Receiver 5V/500mA 1set Charger... - Page 6 When wireless bar code scanner scans, please maintain a certain distance between the scanner and bar code, the best distance is15-20cm. Make sure all the scan lines swept strip symbols and spaces. As shown: 12345678 Wrong 错误 12345678 Wrong 12345678 (3)...
-
Page 7: Low Battery Alert
(1) Reduced to the effective scanning distance. (2) Scanning by interference, do not do other operations, the system will automatically hopping, until you can properly send data. 7. Low battery alert During the scan, the buzzer continuously issued "Didi tick" three times the voice prompt, indicating low voltage wireless scanning gun needs to be charged. - Page 8 pair; If the pairing fails, repeat steps 2,3,4. Advanced applications: network Currently supports a scanning gun on two receivers network mode (hereinafter referred to as "1 to 2 mode") or less than or equal to 4 scanners on a receiver network mode (hereinafter referred to as "4 to 1 mode").
- Page 9 (2) Implementation of the above "1 on 1 match" process; (3) Successful pairing shows that the first receiver has access to the network, called as "1 to 1 model"; (4) Match the second receiver: (a) Pull out the second receiver's USB cable from the computer and make sure that USB cable and the receiver is connected, and that the receiver’s antenna connected properly;...
- Page 10 automatically if the user doesn’t have operation 20seconds. 1minute automatically shut down if no action:Set the H Y C O C M D - S 6 0 scanner shut down automatically if the user doesn’t have any operation in 1minute. Forbid automatic shutdown:Set that the scanner won’t shut down automatically when no...
- Page 11 Close storage function:Set that when scan normally,the transmitted barcodes will lost and the stored barcodes will be cleared if the transmission fails. H Y C O C M D - D I S S T Warn: When there is data stored in the scanner, be cautious to use this function.
- Page 12 Output of EAN8 check code Output of leadcode Complement decoding Automatic(output when there is complement) Decode Output of UPCA check code Output of UPCE check code Output of leadcode CODE128 Decode Identify mini length Identify max length CODE39 Decode Identify mini length Identify max length Error check Output of check code...
- Page 13 ITF25 Decode Identify mini length Identify max length Error check Output of check code INDUS25 Decode Identify mini length Identify max length IATA25 Decode Identify mini length Identify max length Error check Output of check code MATRIX25 Decode Identify mini length Identify max length Error check Output of check code...
-
Page 14: Technical Parameters
Identify max length Error check Output of check code 12. Technical parameters Physical parameters 650nm laser(Conforms to National Laser Safety Light Source Standard Level 2) Dimensions of 164mm × 67mm × 95mm L*W*H Scanner Dimension of L*W*H 18.5mm×45mm×70mm Receiver Case materials ABS+TPU / aluminium alloy 180g (including battery)... - Page 15 Performance parameters 60mm@30mm (to articles) , 98mm@100mm (to articles) Reading Width Depth of Scan Field 10-450mm(bar code contrast 0.9, density o.25) 100scans/second Scan Rate 0.10-0.825mm Resolution 1/8,000,000 EAN8,EAN13,UPC_A,UPC_E,CODE128, CODE39,CODE93,CODE11,GS1_DATABAR, Decode Capability ITF25,INDUS25,IATA25,MATRIX25, CHINESE25,CODABAR, MSI and other 1D barcodes 3.7V/1000mAh Battery Charging time 2.5h Theoretical...
- Page 16 Communication 200m(Open area) range Interface Type USB(Serial / keyboard mode) Using Environment Operating -10℃- 45℃ temperature -20℃- 45℃ Storage temperature Operating humidity 10%-85%(non condensing) 5%-85%(non condensing) Storage humidity ±15kVDC air discharge,±8kVDCdirect/indirect Electrostatic discharge Protection 1.5m Anti-drop capability Light intensity 4.000luX max daylight Electromagnetic interference Conforms to en50081,par1 specification...
- Page 17 instruction to the power. Scan button to check whether the the scanner has system is on or not, see scanner’s no reaction. battery has been exhausted or not. Press the Scan The scanner has low power. Charge and then switch on. button will not turn on.
- Page 18 warning scanner haven’t been paired scanner have been paired untransferable successfully. successfully. Transmission distance is Make sure that the receiver and the beyond the effective range. scanner effective transmission distance. The scanner and Pairing process Please strictly follow the pairing receiver uncorrect.
- Page 19 the user guide, install, remove or incorrect use of the product, the company provides beyond-warranty-period maintenance, but service fee and parts cost will be charged. Warranty principle: The product’s warranty period is one year. In the warranty period, damage or failure of warranty parts (which determined by authorized technical staff) happened in normal use can be repaired or replaced for free.
-
Page 20: General Settings
1.General Settings Restore Factory Setting Information Output \ F N C 3 0 1 0 1 0 1 \ F N C 3 0 1 0 2 0 1 Open Buzzer Close Buzzer \ F N C 3 0 1 0 3 0 1 \ F N C 3 0 1 0 3 0 0 crlf Delete crlf... - Page 21 code types. The bar code is setted as CODE128, so all CODE128 types can not be closed. Open Identification EAN Close Identification EAN \ F N C 3 0 2 0 1 0 1 \ F N C 3 0 2 0 1 0 0 Close Identification UPC Open Identification UPC \ F N C 3 0 2 0 2 0 1...
- Page 22 \ F N C 3 0 2 0 6 0 1 \ F N C 3 0 2 0 6 0 0 Open Identification GS1 Close Identification GS1 \ F N C 3 0 2 0 7 0 1 \ F N C 3 0 2 0 7 0 0 Close Identification ITF25 Open Identification ITF25 \ F N C 3 0 2 0 8 0 1...
- Page 23 \ F N C 3 0 2 1 2 0 1 \ F N C 3 0 2 1 2 0 0 Close Identification CODEBAR Open Identification CODEBAR \ F N C 3 0 2 1 3 0 1 \ F N C 3 0 2 1 3 0 0 Close Identification MSI Open Identification MSI \ F N C 3 0 2 1 4 0 1...
- Page 24 \ F N C 3 0 3 0 3 0 0 \ F N C 3 0 3 0 3 0 1 Max length limit CODE39 Mini length limit CODE39 \ F N C 3 0 3 0 4 0 0 \ F N C 3 0 3 0 4 0 1 Mini length limit CODE93 Max length limit CODE93...
- Page 25 \ F N C 3 0 3 1 0 0 0 \ F N C 3 0 3 1 0 0 1 Mini length limit MATRIX25 Max length limit MATRIX25 \ F N C 3 0 3 1 1 0 0 \ F N C 3 0 3 1 1 0 1 Max length limit CHINESE25 Mini length limit CHINESE25...
- Page 26 Open check code EAN13 Close check code EAN13 \ F N C 3 0 4 0 1 0 1 \ F N C 3 0 4 0 1 0 0 Open check code EAN8 Close check code EAN8 \ F N C 3 0 4 0 1 1 1 \ F N C 3 0 4 0 1 1 0 Open check code UPCA Close check code UPCA...
- Page 27 \ F N C 3 0 4 0 2 1 0 Close check code CODE39 Open check code CODE39 \ F N C 3 0 4 0 4 0 1 \ F N C 3 0 4 0 4 0 0 Close check code CODE11 Open check code CODE11 \ F N C 3 0 4 0 6 0 1...
- Page 28 Close check code IATA25 Open check code IATA25 \ F N C 3 0 4 1 0 0 1 \ F N C 3 0 4 1 0 0 0 Open check code MATRIX25 Close check code MATRIX25 \ F N C 3 0 4 1 1 0 1 \ F N C 3 0 4 1 1 0 0 Open check code MSI Close check code MSI...
- Page 29 scanning "open error checking" of corresponding bar code types; switching off is to set bar codes by scanning the “close error checking” of corresponding bar code types. Warning: Because the check code of bar code may be used for verification and bar code character, so used in front of bar codes whose specific properties haven’t been identified, please use this feature with caution.
- Page 30 \ F N C 3 0 5 1 1 0 1 \ F N C 3 0 5 1 1 0 0 Open error check MSI Close error check MSI \ F N C 3 0 5 1 4 0 1 \ F N C 3 0 5 1 4 0 0 Leadcode output settings This group of setting is to set whether send out the leadcode of corresponding...
- Page 31 \ F N C 3 0 6 0 2 0 1 \ F N C 3 0 6 0 2 0 0 Switch setting of complement output This group of setting can set whether send out complement of corresponding bar codes or not, users can manually open or close the complement output of a particular bar code.
-
Page 32: Full Ascii Switch Setting
Off: No matter there is complement to scanned bar code or not, no output of complement; Automatic: When identified complement, send out bar code characters plus complement characters; when identified no complement, only send out bar code characters; Close complement output EAN13/EAN18 Open complement output EAN13/EAN18 \ F N C 3 0 7 0 1 0 1 \ F N C 3 0 7 0 1 0 0... - Page 33 \ F N C 3 0 8 0 4 0 0 Number switch of Identification Only bar codes To improve the storage of bar code number, when the user opens the number option in Identification Only bar codes, the storage space can be expanded 1 time. Identify all the letters and numbers of the bar code H Y C O C M D - A L L B A R...
-
Page 34: Numeric Codes
close the scanning head when the storage number is up to 250. The system default is all of the characters and numbers in the identified bar code,namely switch on”HYCOCMD-ALLBAR”. 10. Numeric codes: Bar codes from number 0 to 9 are auxiliary bar codes of bar code setting. \ F N C 3 1 1 0 1 0 0 \ F N C 3 1 1 0 1 0 1 \ F N C 3 1 1 0 1 0 2... -
Page 35: Power Setting
\ F N C 3 1 1 0 1 0 6 \ F N C 3 1 1 0 1 0 7 \ F N C 3 1 1 0 1 0 8 \ F N C 3 1 1 0 1 0 9 11. - Page 36 Bar code Transmit Power level distance Level 8 ( Max,default 200m ) H Y C O C M D - P W R 2 0 Level7 160 m H Y C O C M D - P W R 1 7 Level6 120 m H Y C O C M D - P W R 1 4...
-
Page 37: Advanced Setting
13. Advanced setting Warn: A serial driver should be installed when switch to serial mode. If not installed, every time when connect USB to PC, Installation Instruction pops up, the PC will not able to switch back to keyboard mode in the case of not installing the driver, and scanned data can not be transferred.
Need help?
Do you have a question about the TT-BS007 and is the answer not in the manual?
Questions and answers