
Related Manuals for Uni-Line Smart Sense SMART 1000


Summary of Contents for Uni-Line Smart Sense SMART 1000
- Page 1 Uni-Line® SMART 1000 Touchscreen Thermostat Owners Manual www.robertshaw.com ©2015 Robertshaw 12/15 – 352-00241-001...
-
Page 2: Important Safety Information
IMPORTANT SAFETY INFORMATION WARNING: ELECTRICAL SHOCK HAZARD – Turn off power at the main power source by unscrewing fuse or switching circuit breaker to the OFF position before installing, removing, or cleaning this thermostat. WARNING: FIRE AND ELECTRIC SHOCK HAZARD – This device should be installed by a qualified service technician wit ue regard for safety as improper installation could result in a fire and... -
Page 3: Table Of Contents
TABLE OF CONTENTS Introduction ............................3 Using the Touchscreen Display ......................4 Typical Display ............................5 Setting the Day, Time and Calendar ....................6 Basic Functions ..........................7, 11 Mode Configurations ......................7 Conventional Heating and Cooling Equipment (Gas/Electric) ..........7 Heat Pump and Fossil Fuel Equipment ................ - Page 4 TABLE OF CONTENTS Overrides ............................19, 20 Temporary Temperature Override ................19, 20 Permanent Hold ......................... 20 Other Options and Features ......................21, 22 Adaptive Recovery Option ....................21 Clean Screen ........................21 Low Battery Indication ......................22 Changing the Batteries ........................23...
-
Page 5: Introduction
The SMART 1000 has been designed to be an attractive, highly reliable and easy-to-use thermostat. By taking time to read and understand this Owner Manual, you can take advantage of the many features offered in this premium product. Although great care has been taken in the preparation of this manual, Uni-Line takes no ®... -
Page 6: Using The Touchscreen Display
USING THE TOUCHSCREEN DISPLAY To simplify use, the SMART 1000 only displays information relevant to the current mode of operation. When adjustments are required, the thermostat will display additional information or functional icons. Based on the thermostat configuration, some information and icons may not be displayed. The illustration below shows all the LCD segments and icons along with abbreviated definitions. -
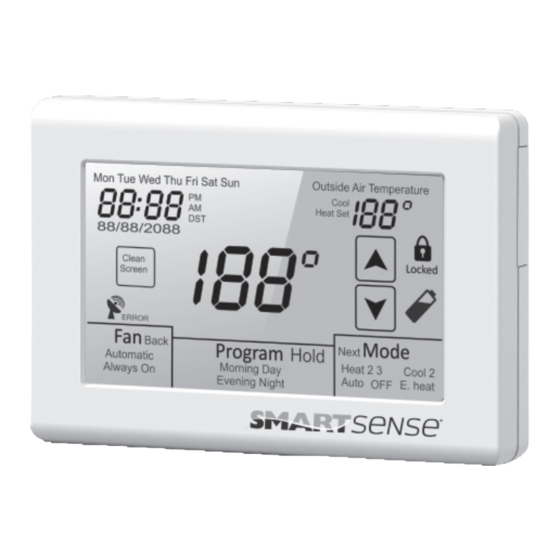
Page 7: Typical Display
TYPICAL DISPLAY During normal operation, the SMART 1000 typically displays the following: 1. Day of the week 5. Fan selection 2. Time of day 6. Program period (programmable mode only) 3. Calendar 7. Mode of operation 4. Room temperature 8. Set temperature Heat Set 01/01/2014 Automatic... -
Page 8: Setting The Day, Time And Calendar
SETTING THE DAY, TIME AND CALENDAR Touch the display to bring on the back light then touch and hold the clock with your finger. The thermostat will beep. The hour will flash. Touch the UP or DOWN arrow to change the hour making sure that AM or PM are correct. -
Page 9: Basic Functions
BASIC FUNCTIONS MODE CONFIGURATIONS Your contractor can configure the thermostat with different mode selections based on user preference and/or equipment type. Mode configurations can be as follows: CONVENTIONAL HEATING AND COOLING EQUIPMENT (GAS/ELECTRIC) Manual Changeover (Heat/Cool/Off) Auto Changeover (Heat/Cool/Auto/Off) Heat Only (Heat/Off) Cool Only (Cool/Off) HEAT PUMP AND FOSSIL FUEL EQUIPMENT Manual Changeover (Heat/Cool/*E.Heat/Off) -
Page 10: Mode Selection
BASIC FUNCTIONS MODE SELECTION To select a mode of operation, simply touch the Mode box on the screen. Based on the equipment and thermostat configuration, mode selection can be as follows: Off - Thermostat will not call for heating or cooling. Heat - Thermostat will only call for heating. -
Page 11: Fan Selection
BASIC FUNCTIONS FAN SELECTION Touch the Fan box on the screen to select Automatic or Always On fan mode. In Automatic mode, the fan operates with a heating or cooling call. If set to Always On, the fan will run continuously. If the thermostat is turned Off while the fan is set to Always On, the fan will continue to run until it is placed in the Automatic mode. -
Page 12: Changing The Heating Or Cooling Temperature Setting (Manual Heat/Cool Mode)
BASIC FUNCTIONS CHANGING THE HEATING OR COOLING TEMPERATURE SETTING Manual Heat/Cool Mode In manual changeover mode, only the heating or cooling temperature setting will be displayed. To change the setting, simply touch the temperature displayed on the screen. Depending on the mode, either Heat Set or Cool Set will flash. -
Page 13: Changing The Heating Or Cooling Temperature Setting (Auto Mode)
BASIC FUNCTIONS CHANGING THE HEATING OR COOLING TEMPERATURE SETTING Auto Mode In auto changeover mode, the heating and cooling temperature setting alternate on the screen. To change the settings, simply touch the temperature displayed on the screen. Cool Set will flash three times and then Heat Set will flash three times. -
Page 14: Programming
PROGRAMMING 7-DAY SCHEDULE (4 OR 2 DAILY EVENTS) Your installer can configure the SMART 1000 with two programming options for 7-day scheduling. You can elect to have 4 daily events (Morning, Day, Evening, Night) or 2 daily event (Day, Night) for each day of the week. -
Page 15: Daily Events
PROGRAMMING 7-DAY SCHEDULE (4 OR 2 DAILY EVENTS) Your installer can configure the SMART 1000 with two programming options for 7-day scheduling. You can elect to have 4 daily events (Morning, Day, Evening, Night) or 2 daily event (Day, Night) for each day of the week. - Page 16 PROGRAMMING Touch Program again and the Morning start time will appear. The hour and AM or PM will flash. Touch the UP or DOWN arrow to change the Morning start time hour. The factory default is 6:00 AM. Touch Program again and the minutes will flash. Touch the UP or DOWN arrow to change the minutes which can be adjusted in 10 minute increments.
- Page 17 PROGRAMMING Touch Program again and the Morning Cool Set temperature will be displayed and flash. Touch the UP or DOWN arrow to change the cooling temperature. The factory default is 77°F (25°C) for the morning schedule. Touch Program again and the Morning Heat Set temperature will be displayed and flash. Touch the UP or DOWN arrow to change the heating temperature.
- Page 18 PROGRAMMING Touch Program again and the Day start time will appear. The hour will flash along with AM or PM. Follow the same steps as in the Morning sequence. The factory defaults for the Day event are 8:00 AM, Cool Set 77°F (25°C), Heat Set 61°F (16°C). After setting the Day Heat Set temperature, touch Program again and the Evening start time will appear.
-
Page 19: Daily Events
PROGRAMMING If you elect to have a different schedule for each day of the week, simply touch Program when cpy appears. The thermostat will automatically advance to the next day. Night 2 DAILY EVENTS Seven day scheduling for 2 daily events uses the same programming steps as 4 daily events other than you only have to program Day and Night. -
Page 20: Programmable Fan
PROGRAMMING PROGRAMMABLE FAN If your installer has configured the SMART 1000 with the Programmable Fan Option, you will be able to select Automatic or Always On fan with each programmed event. When programming the thermostat, the Programmable Fan Option will appear at the end of each programming event. When the word Automatic begins to flash, touch the UP arrow to change to Always On or simply touch Program to maintain Automatic fan operation for the program period. -
Page 21: Overrides
OVERRIDES When the SMART 1000 is configured for programmable operation, there are two types of temperature overrides available. TEMPORARY TEMPERATURE OVERRIDE Temporary Temperature Override is designed to allow you to adjust the heating or cooling temperature without affecting the programmed temperatures. For example, if you want to change the heating temperature, simply touch the displayed temperature. -
Page 22: Permanent Hold
OVERRIDES The new heating temperature will remain active until the next scheduled event takes place at which time it will be deleted and only the programmed temperatures will be used. To manually cancel Temporary Override, touch Program until Hold appears and then touch Hold. The thermostat will resume normal programmed operation and the override period will stop flashing. -
Page 23: Other Options And Features
OTHER OPTIONS AND FEATURES ADAPTIVE RECOVERY OPTION If your thermostat has been configured for programmable operation, your installer can add the Adaptive Recovery Option. Adaptive Recovery compares the space temperature deviation from the set temperature for the next scheduled event and rate of recovery history to bring the equipment on and reach the next temperature setting at the scheduled event start time. -
Page 24: Low Battery Indication
OTHER OPTIONS AND FEATURES LOW BATTERY INDICATION Your thermostat uses two AA batteries to keep the time-of-day clock running in case of a power failure. In some applications, battery power is also used to control the heating and air conditioning equipment. -
Page 25: Changing The Batteries
CHANGING THE BATTERIES Press in on the battery access compartment, it will pop out a small way. Slide the drawer out. Install two AA ALKALINE batteries matching the + (Positive) and - (Negative) orientation. Push the battery compartment in until it clicks shut. When the batteries are properly installed, the touchscreen display will resume normal operation with no loss of programming. - Page 26 FIVE YEar LImItEd WarrantY Robertshaw warrants to the original contract installer, or to the original consumer user, that each new thermostat will be free of defects in materials and workmanship under normal use and service for a period of five (5) years from the date of purchase (the “Warranty Period”). If any Product fails within the applicable Warranty Period, Robertshaw shall, at its option, repair or replace the Product or credit the purchase price, provided the Product is returned to Robertshaw’s facility or designated agent with transportation charges prepaid, and the Product, upon examination by Robertshaw, is found not to conform to the Warranty.
- Page 27 REPAIR, REPLACEMENT OR CREDIT OF THE PURCHASE PRICE SHALL CONSTITUTE THE SOLE REMEDIES WITH RESPECT TO DEFECTS IN THE PRODUCTS. THE CONSUMER ASSUMES ALL RISKS AND LIABILITY FOR INCIDENTAL AND CONSEQUENTIAL DAMAGE RESULTING FROM INSTALLATION AND USE OF THE THERMOSTAT. Some states does not allow the exclusion or limitation of incidental or consequential damages, or allow limitations on how long an implied warranty lasts, so the above limitations or exclusions may not apply to you.
- Page 28 Uni-Line® Robertshaw®, Uni-Line® and SmartSense ® trademarks of Robertshaw, its subsidiaries and/or affiliated companies. All other br ands mentioned may be the trademarks of their respective owners. Customer Service Telephone 1.800.304.6563 Customer Service Facsimile 1.800.426.0804 HVACCustomerService@robertshaw.com www.uni-line.com For Technical Service www.robertshaw.com...
Need help?
Do you have a question about the Smart Sense SMART 1000 and is the answer not in the manual?
Questions and answers