Table of Contents
Advertisement
Advertisement
Table of Contents

Related Manuals for Kongsberg cPAP30


Summary of Contents for Kongsberg cPAP30
- Page 1 INSTRUCTION MANUAL cPAP 30 and cPAP 10 Portable Transceiver...
- Page 3 cPAP® Portable transceiver cPAP 30 and cPAP 10 Instruction Manual...
-
Page 4: Document History
10 in Spare parts section. Copyright © 2016 Kongsberg Maritime AS. All rights reserved. The information contained in this document remains the sole property of Kongsberg Maritime. No part of this document may be copied or reproduced in any form or by any means, and the information contained within it is not to be communicated to a third party, without the prior written consent of Kongsberg Maritime. -
Page 5: Table Of Contents
Instruction Manual Table of contents ABOUT THIS MANUAL ..................1 Registered Trademark ....................1 Manual content ......................1 Abbreviations ......................1 SYSTEM DESCRIPTION..................2 cPAP Portable transceiver units ................. 2 Dunking transducers ....................3 TDD30V Medium Frequency ................. 3 TDD303 Medium Frequency ................4 TDD180 Medium Frequency ................ -
Page 6: Cpap
cPAP® Portable transceiver Transponder test and configuration ................15 TTC Menu ....................15 TTC Menu help button ................. 16 APOS/TTC Switch button ................16 Transponder acoustic test (on-deck) ............. 16 Transponder configuration (on-deck) ............17 MAINTENANCE ....................18 cPAP unit ......................... 18 Charging the battery .................... -
Page 7: About This Manual
This is the Instruction manual for the cPAP® Portable transceiver unit. Registered Trademark cPAP® and cNODE® are registered trademarks, or trademarks of Kongsberg Maritime in Norway and/or other countries. Manual content The manual contains descriptions, specifications, procedures, spare parts, outline drawings and illustrations on how to operate and maintain the cPAP Portable transceiver unit. -
Page 8: System Description
cPAP® Portable transceiver SYSTEM DESCRIPTION This chapter gives an overall description of the cPAP Portable transceiver unit. Topics → cPAP Portable transceiver unit on page 2 → Dunking transducers on page 3 → Transponder configuration (on-deck) on page 5 → Power supply on page 5 cPAP Portable transceiver units The cPAP Portable transceiver unit is designed to fully operate... -
Page 9: Dunking Transducers
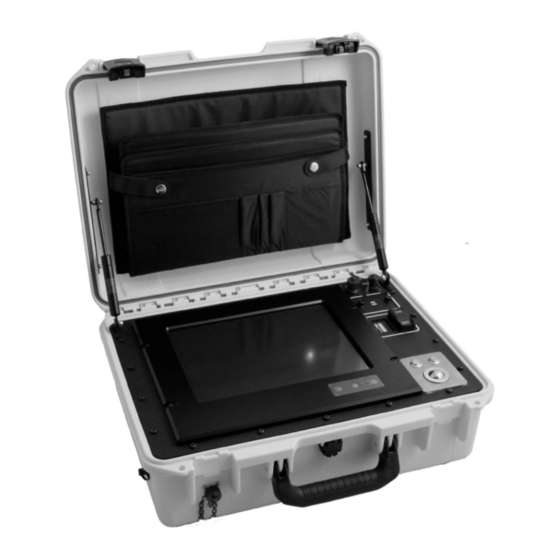
System description cPAP 30 The cPAP 30 is designed to operate, test and configure all medium frequency (MF) transponders cPAP 30 P/N: 367651 cPAP 10 cPAP 10 is designed to operate, test and configure all low frequency (LF) transponders cPAP 10 P/N: 377913 Figure 1 cPAP Portable transceiver unit →... -
Page 10: Tdd303 Medium Frequency
cPAP® Portable transceiver TDD303 Medium Frequency • For use in water depths of 1500 m and with a 50 degree beam width transducer. • It has a connector for interface with cPAP 30, ACC 401, ACU 30, TTC400 and TTC 30. •... -
Page 11: Transponder Configuration (On-Deck)
System description Transponder configuration (on-deck) The serial line cable connects a transponder to the cPAP and is used for transponder configuration such as changing acoustic mode and default channels and SW download. P/N: 355047 Power supply Mains power cable is used to connect the cPAP to a standard 115/230 Vac mains supply to recharge the internal battery. -
Page 12: Technical Specifications
cPAP® Portable transceiver TECHNICAL SPECIFICATIONS This chapter lists the main technical specification for the TTC. Topics → cPAP Portable transceiver on page 7 → Dunking Transducer on page 7 → Serial Line cable on page 8 → Mains Power cable on page 8 374876/B... -
Page 13: Cpap Portable Transceiver
Technical specifications cPAP Portable transceiver Common specifications for cPAP Portable transceiver Case information Case dimensions: 386 mm x 488 mm x 185 mm Weight: approximately 19.5 kg Degree of protection: IP54 → Outline dimensions - see drawing in the Drawing file chapter on page 23. -
Page 14: Serial Line Cable
cPAP® Portable transceiver → Outline dimensions/weight - see drawing in the Drawing file chapter on page 23 Serial Line cable Length: → Outline dimensions - see drawing in the Drawing file chapter on page 23. Mains Power cable Length: Approx. 2 m 374876/B... -
Page 15: Operation
Operation OPERATION This chapter describes how to start using the cPAP unit Topics → cPAP Front panel on page 9 → Turning unit ON and OFF on page 10 → Setting up the cable drum with the dunking transducer on page 12 →... -
Page 16: Turning Unit On And Off
cPAP® Portable transceiver Connectors for USB and LAN. For service personnel only. (Connection to network and possible APOS/PC program download via USB.) - Placed behind a waterproofed cover. Turn the pegs to lift cover. Power ON/OFF switch. Trackball - used to position the cursor on the screen. Left button: Used to click on buttons, operate menus and select displayed symbols. -
Page 17: Turning Unit Off
Operation Place the cPAP Portable unit in a suitable location and open the lid by pressing the handle knobs and pull the handles towards you. Figure 3 Opening the cPAP portable case Place the cable drum close to the cPAP. Prepare the cable drum for operation. -
Page 18: Setting Up The Cable Drum With The Dunking Transducer
cPAP® Portable transceiver Setting up the cable drum with the dunking transducer How to open the cable drum (Cd34033) Figure 4 Cable drum with transducer Pull the locking clip (A) towards you to open the unit. Fold out the handle (F). Lift up the cover (D). -
Page 19: How To Close The Cable Drum
Operation How to close the cable drum Note Wash the unit, cable and transducer before storage. Use the handle to reel in the transducer cable. Place the transducer in the basket. Push the cable locking-pin into position and lock the cable by turning the locking-knob (G) into horizontal position. -
Page 20: Apos Online Help
cPAP® Portable transceiver The main APOS menu is shown in Figure 7 with an on-the- screen keyboard make the operation easier. → See APOS Online Help on page 14 for more information about APOS operation. APOS Online help Figure 6 APOS Online help The APOS Online help button is located on the right hand side toolbar on the top of the page. -
Page 21: Transponder Test And Configuration
Operation Transponder test and configuration TTC Menu Figure 7 TTC Menu TCC Menu is used for on-deck transponder test and configuration. The main menu (see Figure 9) contains the following sub menus: • Acoustic Test • Transponder Configuration • Software Download •... -
Page 22: Ttc Menu Help Button
cPAP® Portable transceiver TTC Menu help button Figure 8 Help button This Help button is located on every page in the TTC menu. The Help menu will provide relevant information about the current operation. APOS/TTC Switch button Figure 9 APOS/TTC Switch button The APOS/TTC button is located in the top right corner of the TTC screen. -
Page 23: Transponder Configuration (On-Deck)
Operation Transponder configuration (on-deck) Establish connection with TP Select TTC Menu. Connect the Serial line cable to the upper left connector (A) on cPAP (Figure 4 cPAP Front panel on page 9) and the other connector to the bottom of the transponder (S). Select TRANSPONDER CONFIGURATION tab. -
Page 24: Maintenance
Kongsberg Maritime. Neither Kongsberg Maritime nor our dealers will accept responsibility for damage or injury to the system or personnel resulting from incorrect maintenance performed on the system. -
Page 25: Charging The Battery
Maintenance Charging the battery During operation: If the cPAP battery indicator indicates LOW power → connect the charging cable. Charging options: A Switch the unit off during charging and then switch it on again when you are going to use it. B Leave the cPAP switched on during charging. -
Page 26: Service/Repairs
cPAP® Portable transceiver Note Use the mains cable supplied with the system. Connect the other end of the cable into a 115/230 Vac mains supply. - It is important that the battery is fully charged when the cPAP is stored. It must be recharged at least every 12 months. -
Page 27: Spare Parts
Spare parts SPARE PARTS This chapter lists the parts and modules defined by Kongsberg Maritime as Line Replaceable Units (LRUs). Topics → Units on page 21 → Dunking transducers on page 21 → Cables on page 21 → Test transducer on page 21... -
Page 28: Test Transducer
cPAP® Portable transceiver Test transducer KM P/N Units Type Comments 312-219822 Test Transducer On-deck test transducer Supplied with the cPAP unit 374876/B... -
Page 29: Drawing File
Drawing file DRAWING FILE This chapter holds illustrations referred to in various sections in this manual. The illustrations are based on the original system drawings and wiring diagrams. • The original drawings are available in electronic format on request. Drawings Draw. -
Page 30: Outline Drawing - Cpap Unit
cPAP® Portable transceiver Outline drawing – cPAP unit Note: All measurements are in mm. The drawing is not in scale. 374876/B... -
Page 31: Outline Drawing - Dunking Transducer Unit
Drawing file Outline drawing – Dunking transducer unit Weight: Approx 25 kg depnding on type of TD Note: All measurements are in mm. The drawing is not in scale. 374876/B... -
Page 32: Outline Drawing - Dunking Transducers With Tdd303 Mf
cPAP® Portable transceiver Outline drawing – Dunking transducers with TDD303 MF Note: All measurements are in mm. The drawing is not in scale. 374876/B... -
Page 33: Index
Index INDEX The next pages present the index of this manual. ____________________________________________________________ Abbreviations, 1 Mains Power cable, 8 APOS Online help, 14 Maintenance, 18 APOS/TTC Switch button, 16 Manual content, 1 Batteries, 7 New configuration, 17 Cables, 21 Open the cable drum, 12 Charging options, 19 Operation, 9 Charging the battery, 19...
Need help?
Do you have a question about the cPAP30 and is the answer not in the manual?
Questions and answers